3D calf cosmetic prosthesis
Perhaps you are already familiar with our history of creating a functional mechanical prosthesis of fingers and saw the intermediate results of this venture, which grew into a separate project. Recently, my experience in creating prostheses was replenished with another case, this time our 3D scanning, 3D modeling and 3D printing skills found their application in creating a cosmetic calf prosthesis.
This story began with a letter from the girl Olga. Olga has a very extreme hobby - parachuting. As a result of one of the jumps during the landing, Olga received an injury to the calf muscles of her right leg. Now the muscle tissue of the leg is almost completely absent. Visually, this is noticeable, which causes discomfort to the girl. For this reason, a need arose for a cosmetic prosthesis. The prosthesis should be as individual as possible, taking full account of all the anatomical features of the injured leg. On the advice of her friend Olga turned to me.

We met with Olga and discussed all the details of the work. The action plan was as follows:
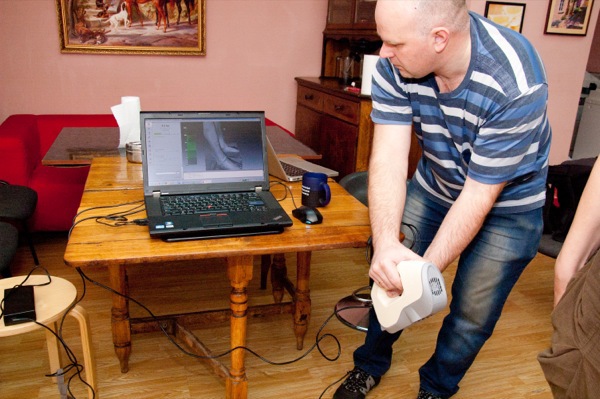
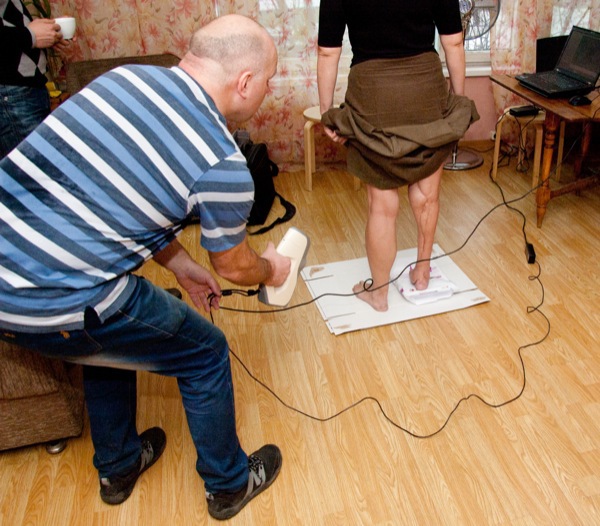
The first thing to do was to scan both legs: both damaged and healthy. For this we used an Artec Eva scanner. Scanning was done by design engineer Alexander Gorodetsky, who developed the body of this scanner. Conveniently, the scanner does not require calibration and the use of markers. It makes about 16 frames per second, which are automatically combined. We needed a scan of sufficiently high accuracy, so the work was painstaking, not without repeated passes by the scanner.
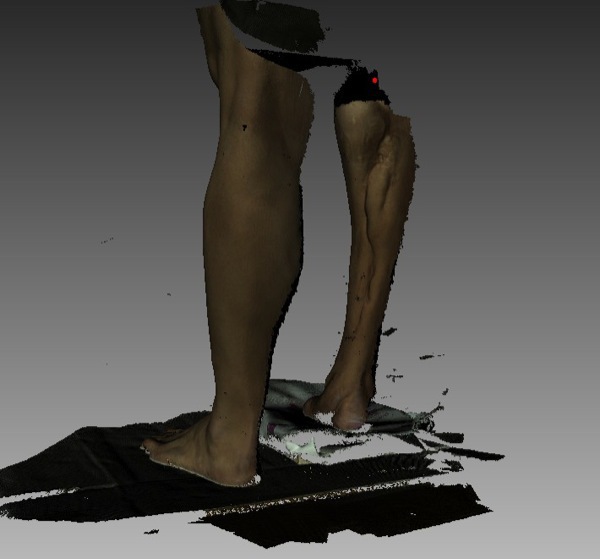
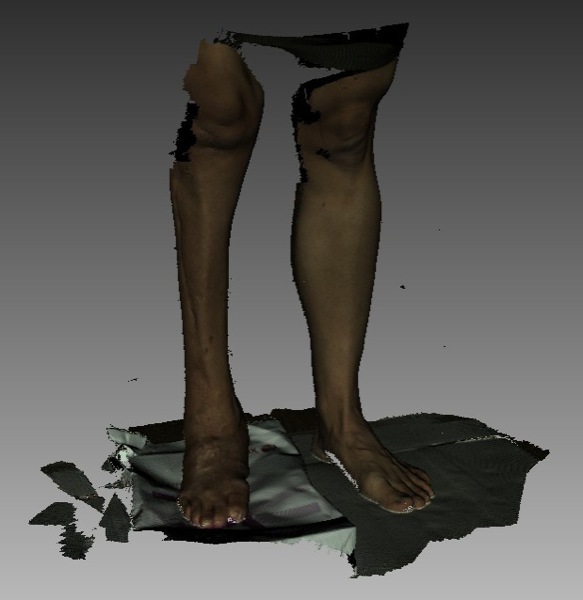
Even the most thorough scan does not mean that after completing this process you will get a perfect and absolutely ready 3D model. A scan is just a good preparation, a cloud of points, on which there is still work to do and “assemble” a solid body. Scanning along with a coffee break took about two hours.
This stage of the work was the most laborious and long. This task was taken over by my good friend and experienced 3D-modeler Valery Karaoglanyan. He faced a new task for him - to create a 3D model of a cosmetic prosthesis from the existing two point clouds (scans of a healthy leg and an injured one), taking into account all the wishes of Olga. There were no ready-made solutions to this problem.
The first step is solid-state 3D modeling in SolidWorks.
When solid-state 3D models of both legs were ready, the healthy leg model was mirrored adjusted for height, then the volume model of the damaged leg was subtracted from it and the tolerances were set so that the skin could breathe.
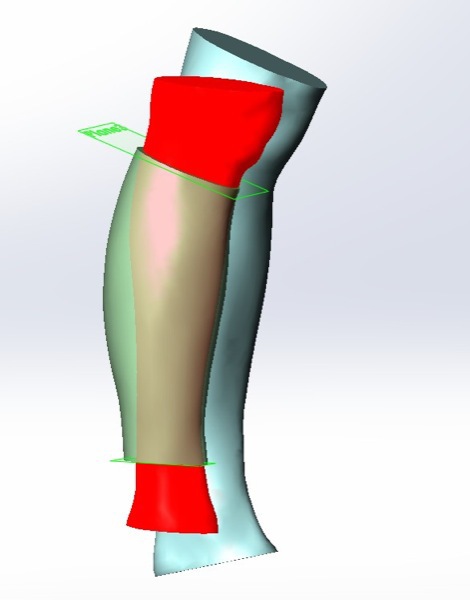
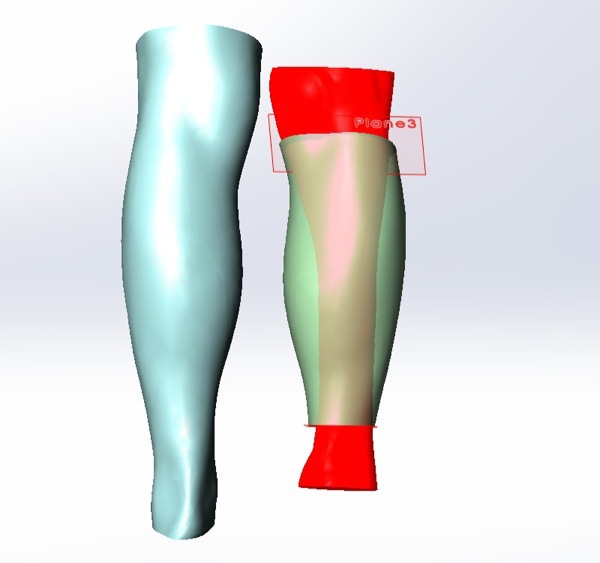
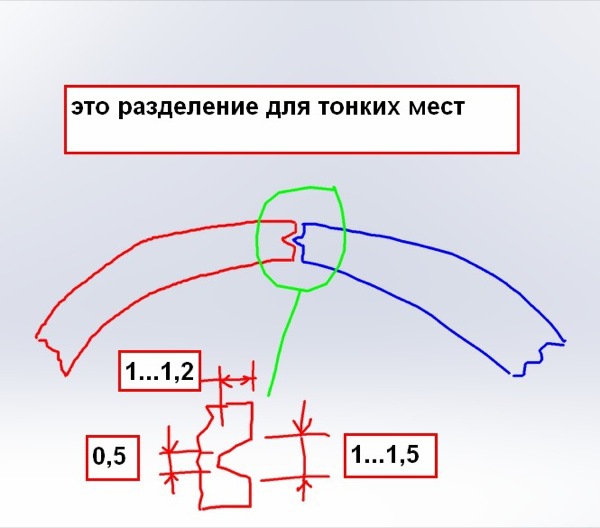
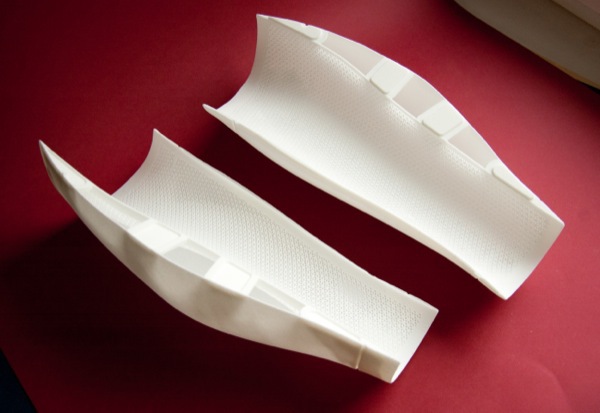
At first, the idea was that both the inner and the outer surfaces would be mesh (and at some point both surfaces were.) At the request of Olga, only the inner surface of the prosthesis was made with a mesh, and the outer surface was left solid, which led to additional changes in the outer parts of the prosthesis.
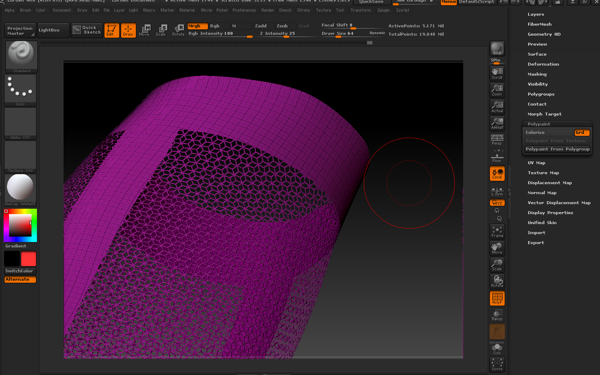
To create a surface in the form of a grid, I had to slightly juggle the 3D model from one program to another. First, it was imported into ZBrush to make a UV scan and create a grid module, after that, in Photoshop, the grid was superimposed on the scan, then the 3D model returned to ZBrush. At this stage, there was a problem with giving thickness, ZBrush does not give such an opportunity, therefore 3DS Max was also involved in the process.

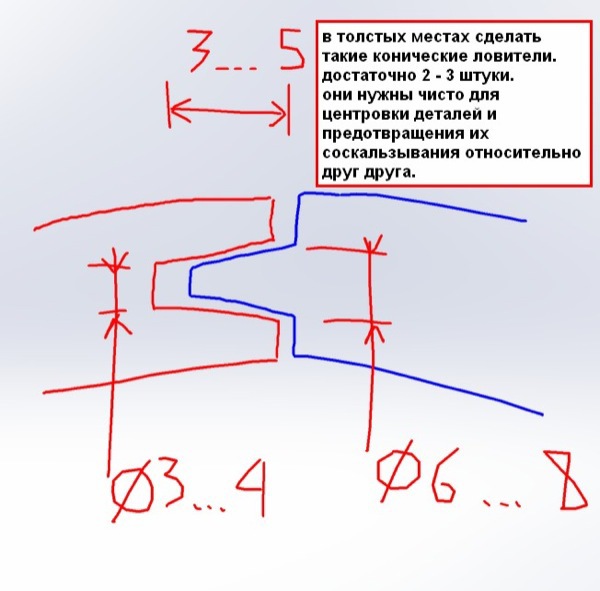
In parallel, Alexander Gorodetsky conducted the development and 3D-modeling of fastenings in the SolidWorks program. When they were ready, they were “merged” with the main 3D model of a cosmetic prosthesis:
It took time, of course, to create a 3D model. What I described in the previous two paragraphs is a short and superficial description of the process. The designer had to apply all his experience and build an algorithm for creating such a 3D model from scratch, and this is not easy. As a result, we had on our hands a full-fledged, 3D-ready model of a cosmetic calf prosthesis.
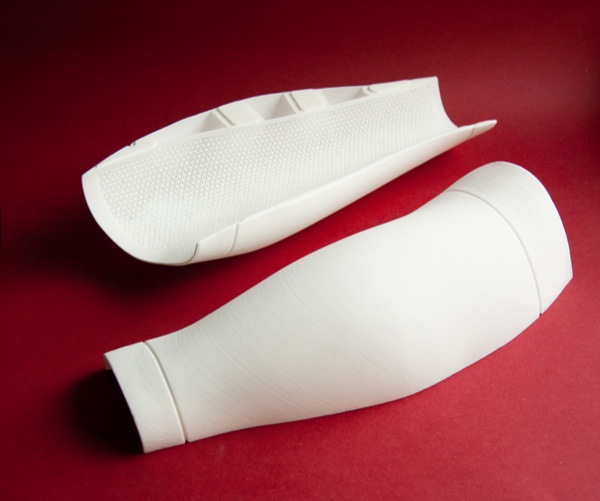
3D printing is the finish line for creating a prosthesis. As the material for 3D printing, we chose the white durable plastic PA 2200 (polyamide). Very durable and lightweight material perfectly suited for our goal - to create a cosmetic prosthesis that will be used often. For the production of objects from this material, the technology of selective laser sintering (Selective Laser Sintering) is used, when in the mass of powder the laser sinteres the material in predetermined places, "growing" a volumetric model.

The stage was exciting: the whole team was looking forward to when we could pick up the finished prosthesis and move on to the next step - fitting.
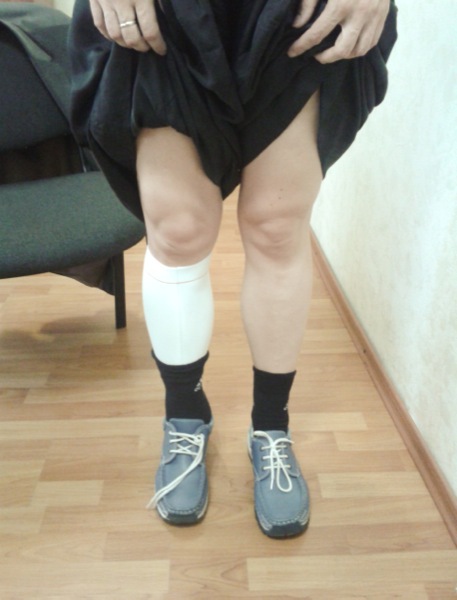
The fitting of the prosthesis, as expected, revealed both its advantages and disadvantages, which were difficult to avoid in the first iteration. When assembling the prosthesis on the leg, the fasteners worked as they should, and the body itself sat exactly on the foot.
It became clear that it was necessary to use some kind of soft material as a layer between the skin of the leg and the prosthesis itself, since the foot sweats and the texture of the material itself is slightly rough to the touch. Perhaps, if the outer surface of the prosthesis was also left mesh, this would solve the problem with ventilation, the leg would better “breathe”.
The fitting took place while Olga did not have the opportunity to actively use the prosthesis, since the summer was hot. So the main tests of a cosmetic prosthesis are yet to come.
This was our first experience in creating a cosmetic prosthesis. In the process, we made a lot of mistakes, several times went around in a circle, made unnecessary actions. But he showed us not only our shortcomings, but also our capabilities, taught a lot, now we know short ways and effective solutions.
The most important opinion in this story is the opinion of Olga. She was pleased with the result, according to her, he met her expectations. She thanked us for the work and promised to share the results of further tests of the prosthesis.
A notable moment in this story is that using industrial 3D printing technology is much easier than it might seem. Using professional equipment and knowledge, you can get the desired quality object - a prototype, prosthesis, figurine, decoration, functional part, rocket engine, and almost everything that can come to your mind.
It is not surprising that the Internet is full of articles that someone and somewhere created something using 3D printing. It is also not surprising that opinions about the possibilities of this technology vary - some are skeptical, some are an ardent supporter of home 3D printers, and others do not miss the opportunity to praise the advantages and disadvantages of additive technologies. But in my opinion, one does not have to extol or belittle the merits of 3D printing; one just needs to use it for effective problem solving like any other technology. If you have any interesting suggestions or ideas that you would like to implement, welcome to comment, maybe together we can create something interesting.
The need for a unique cosmetic prosthesis
This story began with a letter from the girl Olga. Olga has a very extreme hobby - parachuting. As a result of one of the jumps during the landing, Olga received an injury to the calf muscles of her right leg. Now the muscle tissue of the leg is almost completely absent. Visually, this is noticeable, which causes discomfort to the girl. For this reason, a need arose for a cosmetic prosthesis. The prosthesis should be as individual as possible, taking full account of all the anatomical features of the injured leg. On the advice of her friend Olga turned to me.
We begin to create a cosmetic prosthesis
We met with Olga and discussed all the details of the work. The action plan was as follows:
- 3D foot scan
- 3D modeling
- 3D printing of a cosmetic prosthesis
- Fitting
Foot scan
The first thing to do was to scan both legs: both damaged and healthy. For this we used an Artec Eva scanner. Scanning was done by design engineer Alexander Gorodetsky, who developed the body of this scanner. Conveniently, the scanner does not require calibration and the use of markers. It makes about 16 frames per second, which are automatically combined. We needed a scan of sufficiently high accuracy, so the work was painstaking, not without repeated passes by the scanner.
Even the most thorough scan does not mean that after completing this process you will get a perfect and absolutely ready 3D model. A scan is just a good preparation, a cloud of points, on which there is still work to do and “assemble” a solid body. Scanning along with a coffee break took about two hours.
Creating a 3D model of a cosmetic prosthesis
This stage of the work was the most laborious and long. This task was taken over by my good friend and experienced 3D-modeler Valery Karaoglanyan. He faced a new task for him - to create a 3D model of a cosmetic prosthesis from the existing two point clouds (scans of a healthy leg and an injured one), taking into account all the wishes of Olga. There were no ready-made solutions to this problem.
The first step is solid-state 3D modeling in SolidWorks.
When solid-state 3D models of both legs were ready, the healthy leg model was mirrored adjusted for height, then the volume model of the damaged leg was subtracted from it and the tolerances were set so that the skin could breathe.
At first, the idea was that both the inner and the outer surfaces would be mesh (and at some point both surfaces were.) At the request of Olga, only the inner surface of the prosthesis was made with a mesh, and the outer surface was left solid, which led to additional changes in the outer parts of the prosthesis.
To create a surface in the form of a grid, I had to slightly juggle the 3D model from one program to another. First, it was imported into ZBrush to make a UV scan and create a grid module, after that, in Photoshop, the grid was superimposed on the scan, then the 3D model returned to ZBrush. At this stage, there was a problem with giving thickness, ZBrush does not give such an opportunity, therefore 3DS Max was also involved in the process.
In parallel, Alexander Gorodetsky conducted the development and 3D-modeling of fastenings in the SolidWorks program. When they were ready, they were “merged” with the main 3D model of a cosmetic prosthesis:
It took time, of course, to create a 3D model. What I described in the previous two paragraphs is a short and superficial description of the process. The designer had to apply all his experience and build an algorithm for creating such a 3D model from scratch, and this is not easy. As a result, we had on our hands a full-fledged, 3D-ready model of a cosmetic calf prosthesis.
3D printing time
3D printing is the finish line for creating a prosthesis. As the material for 3D printing, we chose the white durable plastic PA 2200 (polyamide). Very durable and lightweight material perfectly suited for our goal - to create a cosmetic prosthesis that will be used often. For the production of objects from this material, the technology of selective laser sintering (Selective Laser Sintering) is used, when in the mass of powder the laser sinteres the material in predetermined places, "growing" a volumetric model.
The stage was exciting: the whole team was looking forward to when we could pick up the finished prosthesis and move on to the next step - fitting.
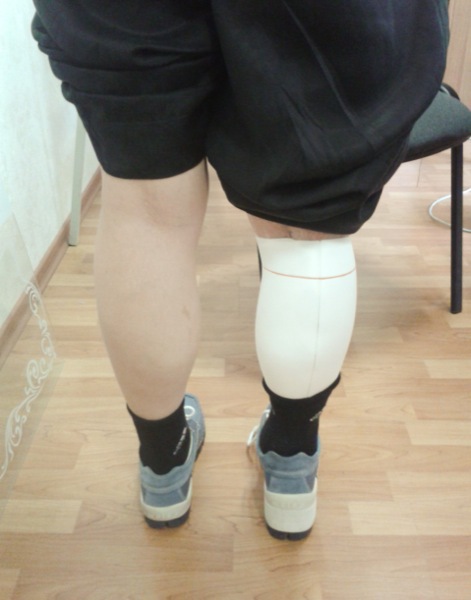
Caviar cosmetic prosthesis fitting
The fitting of the prosthesis, as expected, revealed both its advantages and disadvantages, which were difficult to avoid in the first iteration. When assembling the prosthesis on the leg, the fasteners worked as they should, and the body itself sat exactly on the foot.
It became clear that it was necessary to use some kind of soft material as a layer between the skin of the leg and the prosthesis itself, since the foot sweats and the texture of the material itself is slightly rough to the touch. Perhaps, if the outer surface of the prosthesis was also left mesh, this would solve the problem with ventilation, the leg would better “breathe”.
The fitting took place while Olga did not have the opportunity to actively use the prosthesis, since the summer was hot. So the main tests of a cosmetic prosthesis are yet to come.
Summary
This was our first experience in creating a cosmetic prosthesis. In the process, we made a lot of mistakes, several times went around in a circle, made unnecessary actions. But he showed us not only our shortcomings, but also our capabilities, taught a lot, now we know short ways and effective solutions.
The most important opinion in this story is the opinion of Olga. She was pleased with the result, according to her, he met her expectations. She thanked us for the work and promised to share the results of further tests of the prosthesis.
Available Technology Features
A notable moment in this story is that using industrial 3D printing technology is much easier than it might seem. Using professional equipment and knowledge, you can get the desired quality object - a prototype, prosthesis, figurine, decoration, functional part, rocket engine, and almost everything that can come to your mind.
It is not surprising that the Internet is full of articles that someone and somewhere created something using 3D printing. It is also not surprising that opinions about the possibilities of this technology vary - some are skeptical, some are an ardent supporter of home 3D printers, and others do not miss the opportunity to praise the advantages and disadvantages of additive technologies. But in my opinion, one does not have to extol or belittle the merits of 3D printing; one just needs to use it for effective problem solving like any other technology. If you have any interesting suggestions or ideas that you would like to implement, welcome to comment, maybe together we can create something interesting.