No need to be afraid of Core Data
I noticed for a long time that among many of my colleagues in the shop there is some suspicion and even some kind of hostility towards Core Data, and some did not even touch the framework. What is already there, and at the beginning of my development of the new platform, I was biased towards him, following the comments of such people. But you should not give in to prejudices and myths without touching the product yourself. For those of us who went “against the system”, but have not yet fully understood the tool, I dedicate this article. Based on a small example based on the real task of developing a mobile client for our My World social network, I want to talk about some of the “pitfalls” and draw the attention of a novice developer on important points in optimizing the use of Core Data. It is assumed that the reader already has an idea,
Our case: it is necessary to develop an application that allows you to store and structure a large volume of photos with various meta-information about them. To do this, we need Core Data ... and that’s it.

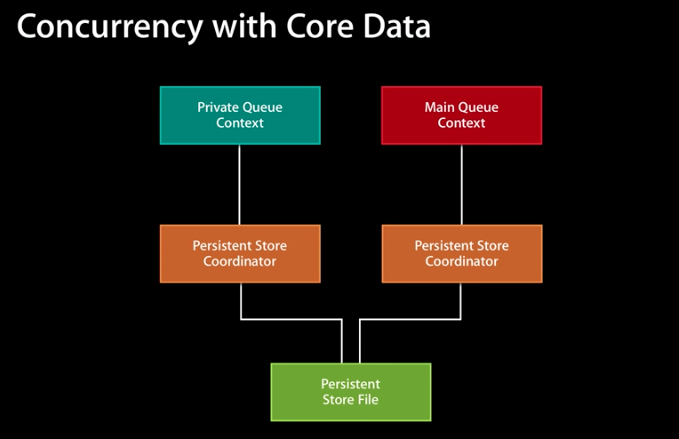
stack is divided into two contexts, the Main Context is used on the main stream to read data; Background Context - for editing, inserting and deleting large amounts of data. That is, it is recommended to initially build the architecture of your application so that all changes occur in the background context, and in the main context you perform only read-only operations.
I would like to note that a lot of articles have been written on the architecture of stacks that describe all kinds of branching contexts. In my opinion, they only raise the threshold for entering Core Data and only frighten novice developers away from using the framework. In fact, for the 90% of applications, the above model will be enough, another 9% will be enough for one Main Context in general, and only the remaininghardcore hardcore needs something more complicated.
Let's get back to our application, in it we want to achieve the following goals:
-synchronize photos with the server without affect on the UI (done! Use the Background Context for this in the stack);
- on the main screen show all photos sorted by date;
- on the secondary screen, group photos, where grouping criteria are the number of likes, photos inside the group are additionally sorted by date.
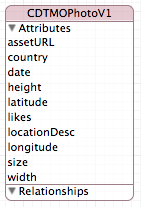
Let's start by solving the problem head-on, create a model in which there will be only one Entity - our photo with all the meta-information:
It turned out very simply, and if we were lazy developers, the work would be finished (and someone would write an article another :)).
For testing, we will assume that on the main screen we need a simple one

And on the additional screen we will use all the power

Having decided on our model, we will do a performance benchmark on the iPhone 5 for 10,000 photos. Hereinafter, we will test our model for typical operations associated with our model:
All data in the tables are given in seconds, respectively, the insertion of 10,000 of our photos on the iPhone 5 will take a little less than two seconds.
A pretty good performance boost at minimal cost. Note that the time for adding records has increased, this is due to the need to build an index. That is why it is important to use the index only where it is really needed. Putting a check
Have we squeezed all the juices out of the index? You may notice that
Next, we need the sqlite file of the storage in its full state. If you work with a simulator, then Xcode 6 stores the file system of simulators in the directory "~ / Library / Developer / CoreSimulator / Devices /". The name of the simulator directory corresponds to the Identifier value, which can be viewed in the list of devices (opens by Shitft + CMD + 2). Next, look for the directory of your application and find out the full path to the .sqlite file, which is usually placed in the application's Documents directory. If you want to access the storage on the device, then the easiest way to use the iExplorer application is to use it as a file manager to view the application directories on your device. From there, you can copy the storage files (do not forget about the .sqlite-wal and .sqlite-shm files) to any directory convenient for you. All,
Now, having launched our project and feeding SQL to the “ EXPLAIN QUERY PLAN ” directive a query from the Core Data logs, we can find out some details of the processes occurring in sqlite. Let's see what actually happens when executed
As expected, the SQL query uses the index, which led to significant acceleration. And what happens in
Here things are slightly worse, the index worked only for likes , and a temporary binary tree is created to sort by date. It is easy to optimize this behavior by creating a composite index for both fields participating in the query (CAUTION: if an additional condition appears in your query, for example WHERE, with some third field, then it also needs to be added to the composite index, otherwise it will not be used upon request). This is done very easily in the Data Model Inspector, indicating, with a comma, all the fields included in the composite index in the Indexes list of our Entity photo:

Let's see how the SQL query will now be processed:
You can make sure that a composite index is used instead of the binary tree, and this cannot but affect the performance:

We will conduct the next test and look at the operation of the indices for such a model.

The results of this test are quite interesting. Please note that the speed of this model using the index is identical, taking into account the error of the model without it. Using the already known way to look deeper, we can find that in both cases the index is not involved, since the JOIN of metadata occurs first, and only then sortings are performed in the combined table:
Bottom line: this model does not suit us.
Let's look at the test results:
The experiment was a success, we achieved acceleration of read operations, which are the main ones in the application, up to 40% in comparison with the fastest flat model and up to 80% with the original version without indexes.
As you can replace, Core Data is not only a simple means of working with data, but also a powerful tool in the right hands. Explore and experiment, and I hope that the article has opened something new for you and pushed towards the more effective use of Core Data in your projects. Good luck
NSManagedObjectContext, NSPersistentStoreCoordinatoretc.) and at least superficially familiar with the API. Our case: it is necessary to develop an application that allows you to store and structure a large volume of photos with various meta-information about them. To do this, we need Core Data ... and that’s it.
Core data stack
So, the first thing we should do is prepare the correct Core Data stack. Fortunately for us, there is a universal solution, I think the Best Practice from WWDC 2013 is well known to everyone: Thestack is divided into two contexts, the Main Context is used on the main stream to read data; Background Context - for editing, inserting and deleting large amounts of data. That is, it is recommended to initially build the architecture of your application so that all changes occur in the background context, and in the main context you perform only read-only operations.
I would like to note that a lot of articles have been written on the architecture of stacks that describe all kinds of branching contexts. In my opinion, they only raise the threshold for entering Core Data and only frighten novice developers away from using the framework. In fact, for the 90% of applications, the above model will be enough, another 9% will be enough for one Main Context in general, and only the remaining
Subtle moments
- Starting with iOS 7 sqlite, the storage, unlike previous versions, operates in the WAL (Write Ahead Log) logging mode , which allows you to perform one write operation and multiple read operations in parallel. If you suddenly support iOS 6, it’s possible to enable this mode when creating a stack coordinator in versions of iOS 4+ using
NSSQLitePragmasOption, however, this can be fraught with troubles. Also, in iOS 6, in a stack with two coordinators, when synchronizing contexts through notification , objects in them may not be updated . Therefore, for iOS 6 it is better to use a stack with two contexts that have a common coordinator and do not bother with the logging mode, the percentage of active devices is extremely low. - WAL also stores a time-lapse mine in the form of broken manual migration and possible backup errors. Since the storage on the disk is organized in the form of three files: dbname.sqlite, dbname.sqlite-wal and dbname.sqlite-shm, when organizing a manual backup, you must remember to save them all, otherwise a very “pleasant” surprise will be waiting for you later. Apple engineers apparently themselves forgot about the presence of a WAL file, so when using Migration Manager, we can also break the database. I myself have not encountered a similar problem, you can read more here .
- Typical manuals on Core Data and the project template in Xcode suggest placing the stack directly in the class
AppDelegateand initializing everything you need when the application starts. However, if working with the database in your application is episodic or optional (for example, it is needed only after registering the user in the application and is not needed with guest access), it makes sense to put the stack “sideways”. For this, a separateSingletonclass is suitable , which will be initialized immediately at the moment when it is really needed. This will save a significant amount of memory and reduce the launch time of the application.
Model design
Thinking over the data schema is the most important point when working with Core Data. Correction of a mistake made at the stage of architecture design can cost a developer a lot of time and nerves. Ideal if the model does not change after going into battle. In reality, if you do not have to resort to manual migration through the Migration Manager and all changes are swallowed by Lightweight Migration , you are done. Spend as much time as possible on this step and try to experiment with different model options.Let's get back to our application, in it we want to achieve the following goals:
-
- on the main screen show all photos sorted by date;
- on the secondary screen, group photos, where grouping criteria are the number of likes, photos inside the group are additionally sorted by date.
Let's start by solving the problem head-on, create a model in which there will be only one Entity - our photo with all the meta-information:
It turned out very simply, and if we were lazy developers, the work would be finished (and someone would write an article another :)).
For testing, we will assume that on the main screen we need a simple one
NSFetchRequest, the results of which we will then show in UICollectionView: And on the additional screen we will use all the power
NSFetchedResultsControllerto form sections and sort them:Having decided on our model, we will do a performance benchmark on the iPhone 5 for 10,000 photos. Hereinafter, we will test our model for typical operations associated with our model:
- Insert 10,000 objects and then save the context
- Requests of all 10,000 objects sorted by one field (in our case, date)
- Use
NSFetchedResultsControllerwith sorting by 2 fields and forming sections (sorting by the number of likes and dates, forming sections by the number of likes) - All the same controller using
fetchBatchSizeequal to 30 (the estimated number of photos on the gallery screen on the phone), to assess the effectiveness of block data sampling
All data in the tables are given in seconds, respectively, the insertion of 10,000 of our photos on the iPhone 5 will take a little less than two seconds.
| Operations \ Model Type | Model V1 |
|---|---|
| Insets (10000 objects) | 1.952 |
| NSFetchRequest (1 sort) | 0.500 |
| NSFetchedResultsController (2 sorts) | 0.717 |
| NSFetchedResultsController (2 sorts + batchSize) | 0.302 |
Indices
Although the execution time may seem insignificant, do not neglect the possibility of optimization. Moreover, on older devices, operations are much slower, and you should definitely not forget about it. The first optimization is the easiest and known to everyone - we’ll try to add an index for the fields that participate in the queries we form, namely date and likes :| Operations \ Model Type | Model V1 | V1 + index | Diff |
|---|---|---|---|
| Insert (10000 objects) | 1.952 | 2.193 | + 12% |
| NSFetchRequest (1 sort) | 0.500 | 0.168 | -66% |
| NSFetchedResultsController (2 sorts) | 0.717 | 0.657 | -8% |
| NSFetchedResultsController (2 sorts + batchSize) | 0.302 | 0.256 | -fifteen% |
A pretty good performance boost at minimal cost. Note that the time for adding records has increased, this is due to the need to build an index. That is why it is important to use the index only where it is really needed. Putting a check
Indexedon all possible fields, thinking that this will speed up your application, you do yourself a disservice. Have we squeezed all the juices out of the index? You may notice that
NSFetchedResultsController"accelerated" to a much lesser extent than simple NSFetchRequest. What is the matter?Compound Indexes
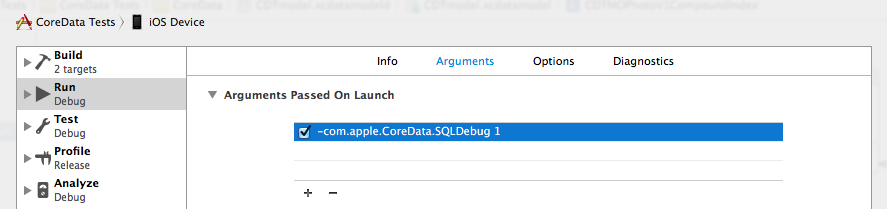
Let's take a look under the hood of CoreData. First of all, for this we need to enable the log for Core Data queries by adding the parameter "-com.apple.CoreData.SQLDebug 1" to the Run diagram of our project, as in the figure:Next, we need the sqlite file of the storage in its full state. If you work with a simulator, then Xcode 6 stores the file system of simulators in the directory "~ / Library / Developer / CoreSimulator / Devices /". The name of the simulator directory corresponds to the Identifier value, which can be viewed in the list of devices (opens by Shitft + CMD + 2). Next, look for the directory of your application and find out the full path to the .sqlite file, which is usually placed in the application's Documents directory. If you want to access the storage on the device, then the easiest way to use the iExplorer application is to use it as a file manager to view the application directories on your device. From there, you can copy the storage files (do not forget about the .sqlite-wal and .sqlite-shm files) to any directory convenient for you. All,
sqlite3 PATH/TO/SQLITE/FILENow, having launched our project and feeding SQL to the “ EXPLAIN QUERY PLAN ” directive a query from the Core Data logs, we can find out some details of the processes occurring in sqlite. Let's see what actually happens when executed
NSFetchRequest:sqlite> EXPLAIN QUERY PLAN SELECT 0, t0.Z_PK, t0.Z_OPT, t0.ZASSETURL, t0.ZCOUNTRY, t0.ZDATE, t0.ZHEIGHT, t0.ZLATITUDE, t0.ZLIKES, t0.ZLOCATIONDESC, t0.ZLONGITUDE, t0.ZSIZE, t0.ZWIDTH FROM ZCDTMOPHOTOV1INDEX t0 ORDER BY t0.ZDATE;
0|0|0|SCAN TABLE ZCDTMOPHOTOV1INDEX AS t0 USING INDEX ZCDTMOPHOTOV1INDEX_ZDATE_INDEX
As expected, the SQL query uses the index, which led to significant acceleration. And what happens in
NSFetchedResultsController:sqlite> EXPLAIN QUERY PLAN SELECT 0, t0.Z_PK, t0.Z_OPT, t0.ZASSETURL, t0.ZCOUNTRY, t0.ZDATE, t0.ZHEIGHT, t0.ZLATITUDE, t0.ZLIKES, t0.ZLOCATIONDESC, t0.ZLONGITUDE, t0.ZSIZE, t0.ZWIDTH FROM ZCDTMOPHOTOV1INDEX t0 ORDER BY t0.ZLIKES DESC, t0.ZDATE DESC;
0|0|0|SCAN TABLE ZCDTMOPHOTOV1INDEX AS t0 USING INDEX ZCDTMOPHOTOV1INDEX_ZLIKES_INDEX
0|0|0|USE TEMP B-TREE FOR RIGHT PART OF ORDER BY
Here things are slightly worse, the index worked only for likes , and a temporary binary tree is created to sort by date. It is easy to optimize this behavior by creating a composite index for both fields participating in the query (CAUTION: if an additional condition appears in your query, for example WHERE, with some third field, then it also needs to be added to the composite index, otherwise it will not be used upon request). This is done very easily in the Data Model Inspector, indicating, with a comma, all the fields included in the composite index in the Indexes list of our Entity photo:
Let's see how the SQL query will now be processed:
sqlite> EXPLAIN QUERY PLAN SELECT 0, t0.Z_PK, t0.Z_OPT, t0.ZASSETURL, t0.ZCOUNTRY, t0.ZDATE, t0.ZHEIGHT, t0.ZLATITUDE, t0.ZLIKES, t0.ZLOCATIONDESC, t0.ZLONGITUDE, t0.ZSIZE, t0.ZWIDTH FROM ZCDTMOPHOTOV1COMPOUNDINDEX t0 ORDER BY t0.ZLIKES DESC, t0.ZDATE DESC;
0|0|0|SCAN TABLE ZCDTMOPHOTOV1COMPOUNDINDEX AS t0 USING INDEX ZCDTMOPHOTOV1COMPOUNDINDEX_ZLIKES_ZDATE
You can make sure that a composite index is used instead of the binary tree, and this cannot but affect the performance:
| Operations \ Model Type | Model V1 | V1 + index | V1 + composite index | Diff (v1) |
|---|---|---|---|---|
| Insert (10000 objects) | 1.952 | 2.193 | 2.079 | + 7% |
| NSFetchRequest (1 sort) | 0.500 | 0.168 | 0.169 | -66% |
| NSFetchedResultsController (2 sorts) | 0.717 | 0.657 | 0.331 | -54% |
| NSFetchedResultsController (2 sorts + batchSize) | 0.302 | 0.256 | 0.182 | -40% |
Entity splitting
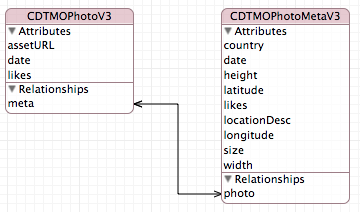
Another opportunity for optimization is the creation of entities that contain only the information we need in a particular request. We see that our structure contains many secondary fields that are not involved in the formation of the issuance of the initial result in our controllers. Moreover, when working with an object, Core Data completely pulls them into memory, that is, the larger the structure, the more memory is consumed (approx. In iOS 8, an API appeared that allows you to modify objects directly in the storage; the API is quite limited in use, since it imposes additional context synchronization requirements). In our application, the separation of our record into two suggests itself: the photo itself and the metadata for it:We will conduct the next test and look at the operation of the indices for such a model.
| Operations \ Model Type | Model v2 | V2 + index | Diff (V1 + Index) |
|---|---|---|---|
| Insert (10000 objects) | 3.218 | 3.524 | + 61% |
| NSFetchRequest (1 sort) | 0.219 | 0.215 | + 28% |
| NSFetchedResultsController (2 sorts) | 0.551 | 0.542 | -18% |
| NSFetchedResultsController (2 sorts + batchSize) | 0.387 | 0.390 | + 52% |
The results of this test are quite interesting. Please note that the speed of this model using the index is identical, taking into account the error of the model without it. Using the already known way to look deeper, we can find that in both cases the index is not involved, since the JOIN of metadata occurs first, and only then sortings are performed in the combined table:
sqlite> EXPLAIN QUERY PLAN SELECT 0, t0.Z_PK, t0.Z_OPT, t0.ZASSETURL, t0.ZMETA FROM ZCDTMOPHOTOV2INDEX t0 LEFT OUTER JOIN ZCDTMOPHOTOMETAINDEX t1 ON t0.ZMETA = t1.Z_PK ORDER BY t1.ZLIKES DESC, t1.ZDATE DESC;
0|0|0|SCAN TABLE ZCDTMOPHOTOV2INDEX AS t0
0|1|1|SEARCH TABLE ZCDTMOPHOTOMETAINDEX AS t1 USING INTEGER PRIMARY KEY (rowid=?)
0|0|0|USE TEMP B-TREE FOR ORDER BY
Bottom line: this model does not suit us.
Normalization
We continue our experiments. We made sure that strict data normalization is not always good for Core Data. The results of the previous model were far from expected. Let's try to fix it. To do this, just duplicate our date and likes fieldsin the essence of the photograph (not forgetting to add a composite index and separate for date), thereby avoiding the need for LEFT OUTER JOIN in our queries. The decision to leave or delete these fields in the metadata entity must be made depending on the situation. For example, if in addition you want to make a request with a rating of countries according to the number of likes of photos taken in them, then when you delete these fields we will again encounter the need to make JOIN, but in a different direction of communication. In our test, the properties of the entities are duplicated, and this is completely normal for Core Data:Let's look at the test results:
| Operations \ Model Type | Model v3 | Diff (V1 + composite index) | Diff (v1) |
|---|---|---|---|
| Insert (10000 objects) | 3.861 | + 86% | + 98% |
| NSFetchRequest (1 sort) | 0.115 | -32% | -77% |
| NSFetchedResultsController (2 sorts) | 0.283 | -fifteen% | -61% |
| NSFetchedResultsController (2 sorts + batchSize) | 0.181 | -1% | -40% |
The experiment was a success, we achieved acceleration of read operations, which are the main ones in the application, up to 40% in comparison with the fastest flat model and up to 80% with the original version without indexes.
Summary and subtle points
- Use indexes and use them only for fields that are relevant in your queries. Do not forget about the existence of composite indexes
- Experiment with different schemes, test their performance. It is very simple, because in Xcode 6 there is a built-in support for perfomance tests.
- Do not forget to check how the CoreData framework generates SQL queries using logs. Use EXPLAIN QUERY PLAN to learn how sqlite digests your SQL query.
- When accessing the results,
NSFetchedResultsControlleruse only the access method provided by the controller itself:NSManagedObject *object = [controller objectAtIndexPath:indexPath];
Do not use the arrayfetchedObjectsor the NSFetchedResultsSectionInfo protocol to the array of section objects:NSManagedObject *object = [[controller fetchedObjects] objectAtIndex:index]; // или NSArray *objects = [[[controller sections] objectAtIndex:sectionIndex] objects]; NSManagedObject *object = [objects objectAtIndex:index];
Why, you ask? If you usefetchBatchSizesize N, then after the controller executes the request, only the first N objects will be loaded into memory (or the first section if the block size is larger than the section size!). As soon as you request the first fault-object outside the loaded block or an object from another section, the controller will make a full pass according to the results of your request, that is, it will execute N = the number of Objects / fetchBatchSize of the storage requests. This operation is approximately 3-4 times slower than a simple request for all elements. When using access throughobjectAtIndexPaththis behavior is not observed. I would be very glad if there is someone among the readers who can shed light on such strange behavior that is not described in the documentation. - Normalization is not always the best solution for Core Data
- If you are told from the stage in Cupertino that the new iPhone is 2 times faster than the previous one ... you need to believe this, with Core Data operations these statements are confirmed almost completely. I have prepared a summary file with the results, where you will also find iPhone 5S tests. For almost all the results, it is 2 times faster than its predecessor. Accordingly, on the still current iPhone 4S, these results will be about 2 times slower, not to mention even older devices. Here you will find a summary table of results, which also contains the results of the new iPhone 6.
As you can replace, Core Data is not only a simple means of working with data, but also a powerful tool in the right hands. Explore and experiment, and I hope that the article has opened something new for you and pushed towards the more effective use of Core Data in your projects. Good luck