ATtiny13 firmware and programming with Arduino UPD 03/17/2016
- From the sandbox
- Tutorial
Hello. There has long been a way to program the small, cheap, power- saving, and affordable ATtiny13A microcontrollers .
Here is all that is below, only in video format:
Today I’ll tell you how I sew Arduino’s sketches in ATtiny13A .
So, for starters, we need to download this archive (taken and quite a bit completed from here ), put the files at the address "\ Documents \ Arduino \ hardware \". You should get something like “C: \ Users \ Administrator \ Documents \ Arduino \ hardware \ attiny13 \ avr \ cores \ core13".
We restart the Arduino IDE if it is currently running, this is necessary so that the environment adds a new microcontroller to the list of boards.
Be sure to check whether “location of the folder with the sketches” is selected correctly (you can see it in the “File / Settings” tab):

There we will need to unzip the archive with the kernel for ATtiny13.
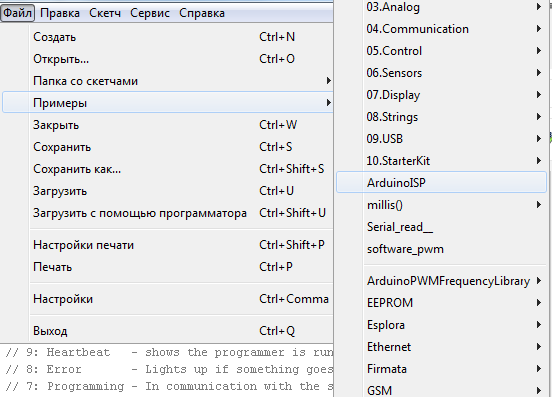
Now we’ll flash the ArduinoISP from Arduino IDE examples:
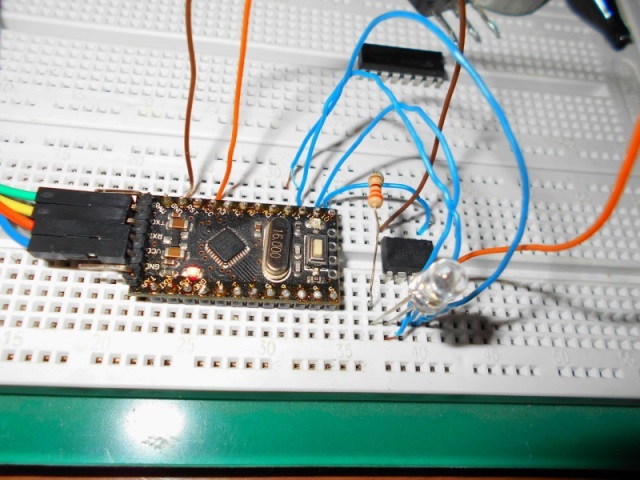
Then we connect ATtiny13 to Arduino, as shown in the picture:
Then we need to change the type of programmer to Arduino as ISP, as shown in the screenshot:

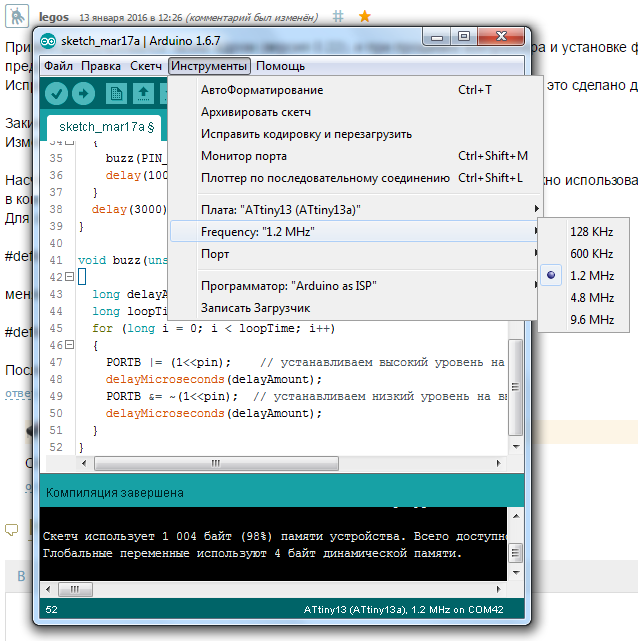
Now we can choose what frequency the ATtiny13 microcontroller can operate at.
From the factory, the ATtiny13 operates at a frequency of 1.2 MHz, that is, the microcontroller is clocked from the internal RC chain at a frequency of 9.6 MHz and the divider is 8, so I indicated a frequency of 1.2 MHz as default:

As you can see, the available frequencies are 1.2 MHz, 4.8 MHz and 9.6 MHz. To change the frequency, we need to click on the "Write bootloader" button, which is located in the "Service" tab.
What does the environment do when you click on the “Write bootloader” button?
Arduino IDE in this case simply exposes the necessary fuses of the microcontroller .
For example, I need ATtiny13 to work at a frequency of 4.8 MHz, I select the frequency I need and only once press the “Write bootloader” button - that's all. Now the microcontroller will always work at a given frequency, if it will be necessary to change the frequency again - do the procedure described above.
I must say right away that an increase in the frequency will lead to an increase in the controller’s consumption, the more often the transistors in the microcontroller switch, the more it consumes.
For some blinkers there, I believe that the implementation of 1.2 million instructions will be more than worth it, and at that frequency the microcontroller consumes about 1 milliampere, here you can see the screen from the datasheet :
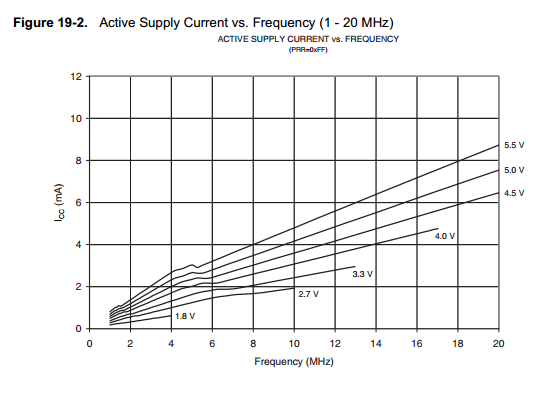
The minimum operating voltage at which the ATtiny13 remains operational is 1.8 V, and guaranteed to work, in this case, only at a frequency of 1.2 MHz.
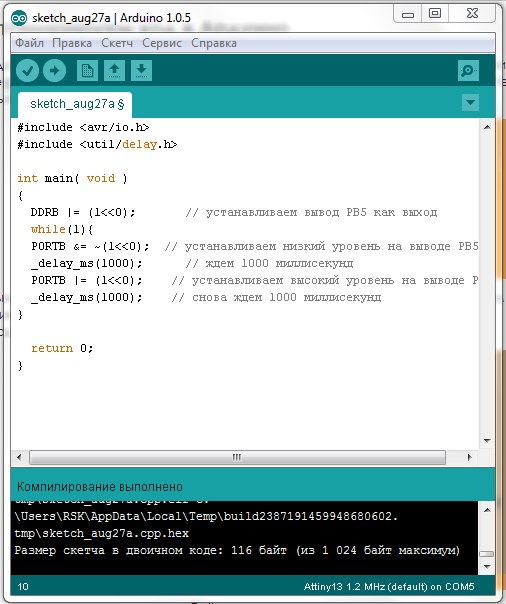
So, let's start with the blink example, almost native to beginner arduins, for starters, how could you do without it?

As you already noticed, the sketch has become noticeably easier than for the Arduino Uno. This is due to the fact that most of the Arduino's functions are cut back and they are a bit more optimized.
The following functions are supported:
pinMode ()
digitalWrite ()
digitalRead ()
analogRead ()
analogReference (INTERNAL) / (EXTERNAL)
shiftOut ()
pulseIn ()
analogWrite ()
millis ()
micros ()
delay ()
delayMicroseconds ()
So, as we just saw, only 1024 bytes are available to us. Is it not enough? Well, depending on what tasks. If, for example, for some kind of flashing lights, tweeters or indicators, I think it will be quite enough, although you can even harder something more seriously, especially if you get acquainted with AVR-C.
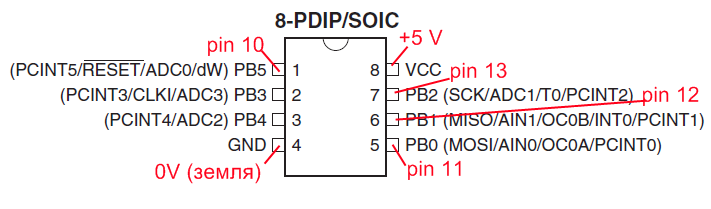
The pinout of the microcontroller from the datasheet :

For example, PB4 is the same as pin 4, or just 4.
Analog inputs are all that ADC * writes on, for example PB4 is ADC2, that is, in order to read the voltage, write analogRead (A2); or just analogRead (2) ;, hardware PWM only supports ports 0 and 1.
UPD0: added a link how to save space on the microcontroller and how to simulate Arduino in Proteus:
How to save space on the microcontroller?;
A thread on the Arduino forum ;
Arduino modeling in Proteus program (using ATtiny13 as an example) ;
Here is an application example - Musical doorbell on ATtiny13 ;
All my publications.
UPD1 03/17/2016 Now look for kernel files here:
Addition of an article from a friend legos .