Extend IP Surveillance Functionality for Home Use
Hello!
In this article I want to talk about how you can get the most out of an IP camera by organizing on its basis not just video surveillance, but already something close to the fire and security complex by connecting various sensors (PIR, heat, water, etc.) .d.). It will be about connecting, setting up ip-cameras and sensors, about how this can be useful in ensuring household safety.

Let's start with a description of each of the devices.
The basis is Zavio F3115 - a wireless IP camera of Taiwanese origin, in my stock 3 pcs.


Features of Zavio are Plug & Play and free software:
Detailed information about the camera can be viewed by clicking on this link .
Next, we will go sensors. Sensors are divided into 2 main types: Normally Closed (NC) and Normally Open (NO) - it is very important to know this for the correct connection of sensors.
This is a Pir-sensor, in common people they call it “Motion Sensor”. Combined sensor (passive IR + microwave) KX15DT manufacturer Pyronix:

Equipped with the so-called Tampering Detection, aka “tamper sensor”, “tamper sensor”, i.e. when the sensor is opened, it sends a Tampering signal to the host device (in my case it is Zavio F3115).
A wide range of applications - from conventional signaling alerts, to the control of turning on the lamps.
You can get acquainted with it in more detail by clicking on this link .
As you might guess from the name, this is a water leak sensor.

The method of application and the principle of operation are very simple, I installed it in the bathroom. It is intended for warning in the event of a water leak. The "piece" is simple and elementary, the main electronic part of the sensor is insulated, the anode and cathode remain open, which close when interacting with water.

A fairly simple sensor, when heated to the operating temperature, it signals a “fire”.
It is connected together with IP 103-5 / 1-A3, but as an output, there is a small “siren”:

When a thermal sensor is triggered, Bekas starts signaling until the “problem” is fixed, he considered it necessary to connect such an output in order to notify home in case of fire. A very loud siren that can wake the "dead". Thousands of years have passed, and the most dangerous elemental enemy of mankind is Fire, I believe that everyone in the house should have this bunch. I already had such an incident and therefore decided to secure my home in this way.
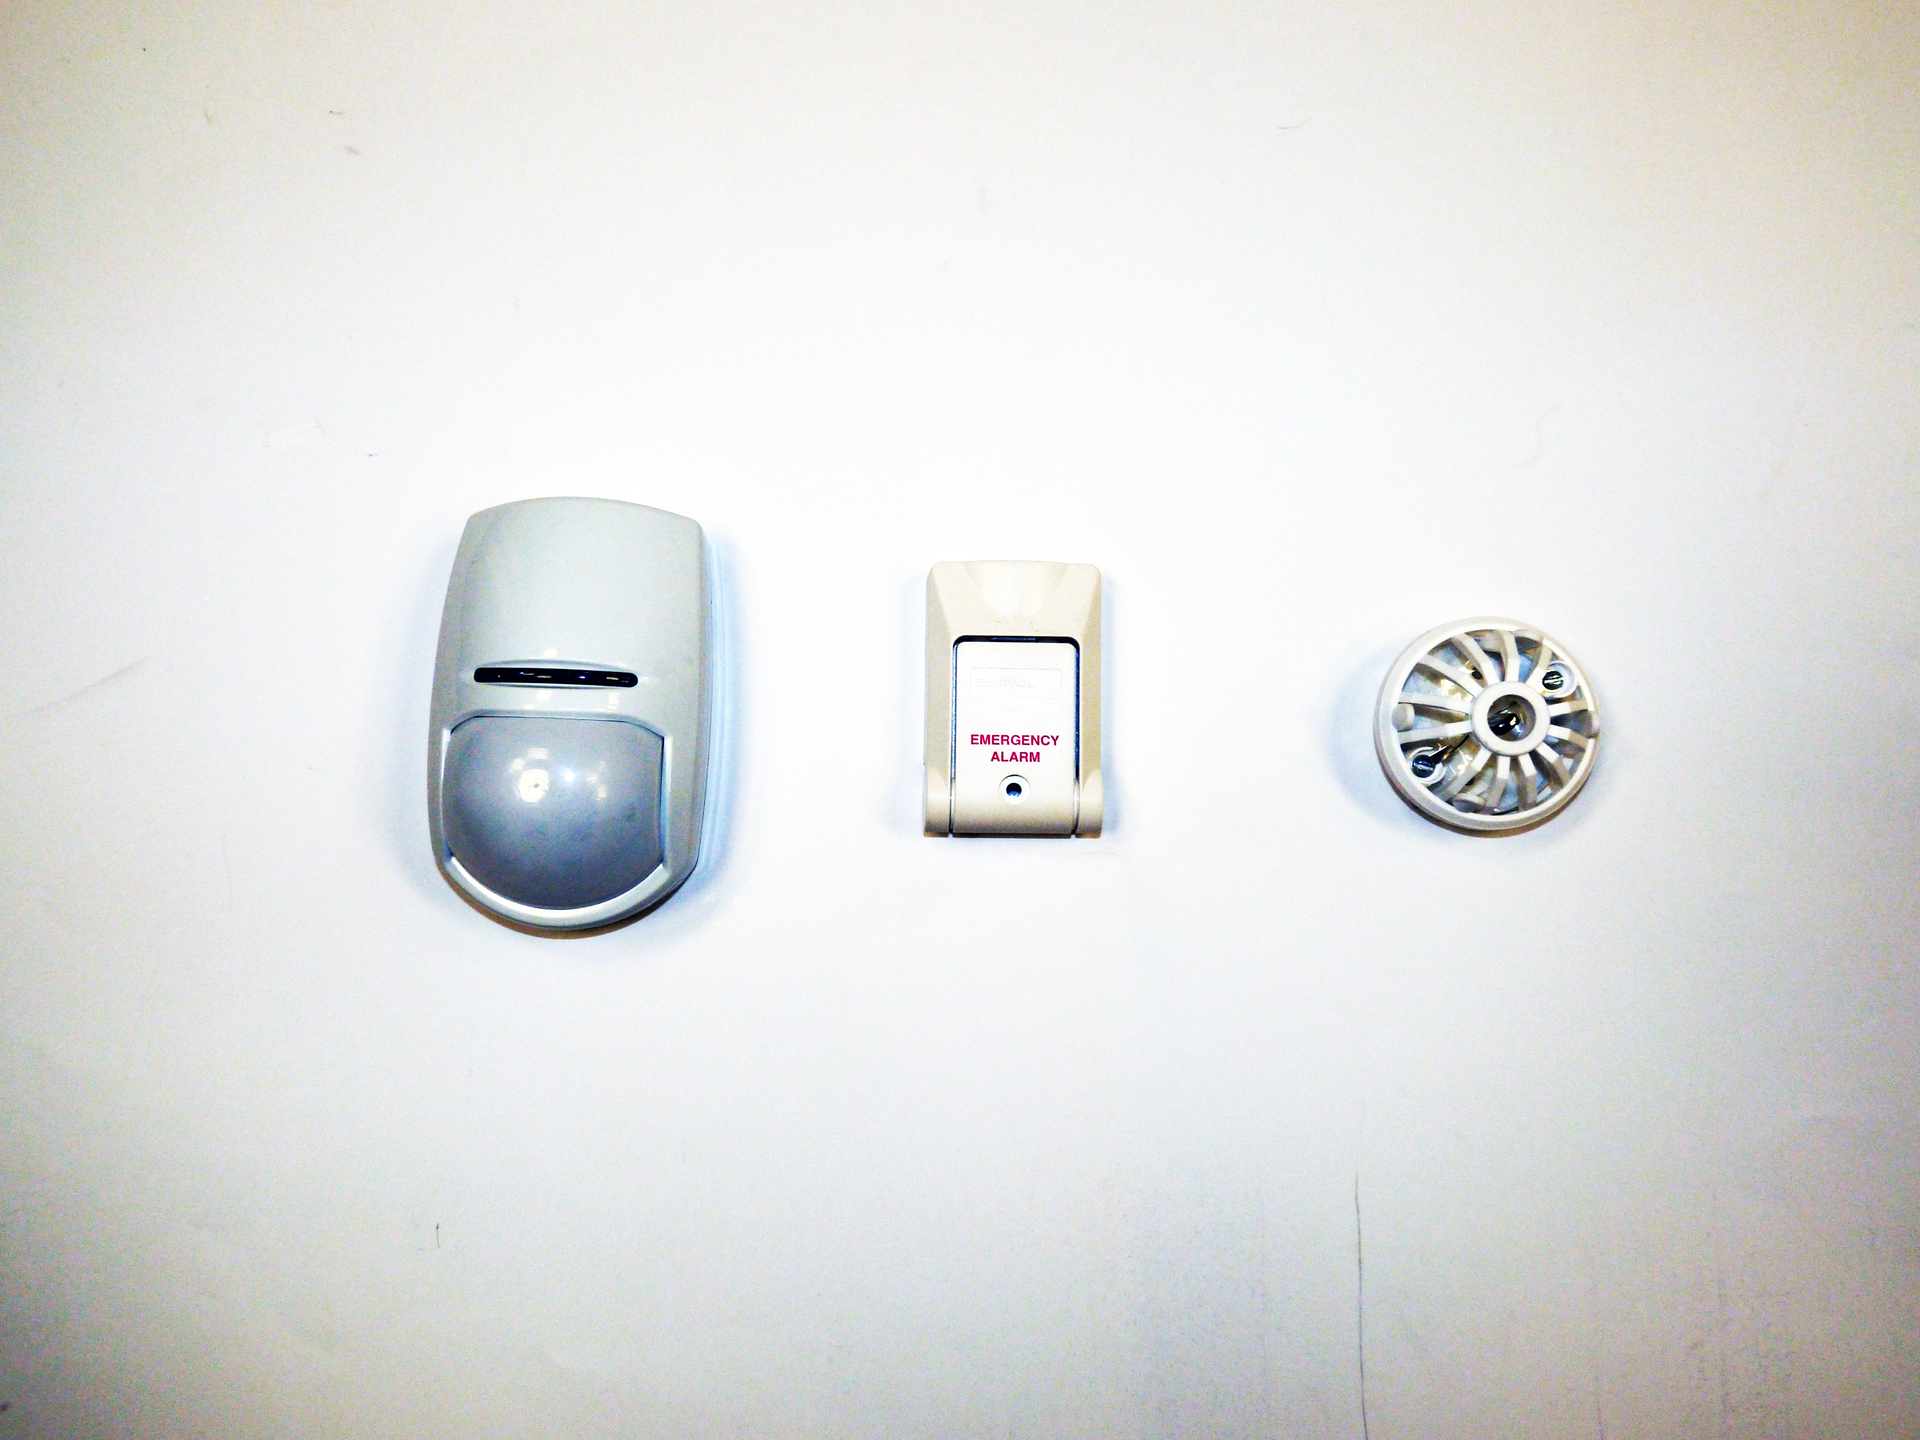
Also in the "system" is used Emergency Alarm ("Panic Button").
It is a “key” that is triggered by an open circuit. Unfortunately, there is no information on the Internet about him. This “panic button” is needed to transmit an alarm to the camera, a very useful button for installing older people in an apartment, for example.
There are plans to repair the apartment, but I want to be fully equipped, let's move on to the Kitchen.
Strongly with the installation did not bother, because There is a connection instruction for each sensor. To connect the sensors to the camera, it was enough to “open” the twisted pair and remove one pair of wires from there and connect it to the camera terminal, the connection diagram of the sensors is also attached to the User Manual. 1-pin - 5V power, 2-pin - GND, 3-pin Digital Input (Input), 4-pin - Digital Output.


In the kitchen I installed a Heat sensor and a Bekas siren, the goal: when the heat sensor is triggered, you need to be a Bekas siren. To do this, I connected an IP 103-5 / 1-A3 to the camera input, and a siren to the output. I connected the power as you probably guessed - to the 1st pin, in order to close the circuit - I connected the siren and sensor to GND.
Here is a test video (Make it quiet, very loud siren!) :
Location: The
diodes on the camera can be turned off so as not to attract attention. "Smile and wave".

It is better to place the heat sensor in the center of the room on the ceiling, but for now let it hang over the sink.

In my room I installed Pyronix KX15DT and connected the Zavio F3115 to the same camera.


Connecting to the camera:

Unfortunately, due to my carelessness, Pyronix requires 12V, and the camera only gives out 5V and I had to connect a separate PSU (Mean Well) to it, since there were several of them in my supplies.


Everything works, let's watch the video.
Sensor Trigger:
Push Notification:
Hall </5h>
Let's start by setting up DI / DO, you need to create an Event in the web interface, this is done very easily and simply, there were no difficulties, there is also localization for RU users in the camera web interface. It is possible to set up schedules for "Events", for example, the Pyronix sensor works only when there is nobody at home, except for the cat (the sensor has a peculiarity in sensitivity that it doesn’t work for pets, but at the same time the sensor will work for the child’s movement).
Window for adding Events:

Configuring Event:

Everything is very simple here, I installed the application on my iPad (there is also a client for Android, but for PC users it’s enough to go and login to sat.qlync.com).
Personally, I didn’t have any difficulties setting up, but there is an instruction in the Zavio knowledge base for users who may have problems.
The cloud service itself can browse the Archive from an SD-carrier, as well as send Event clips to Google Drive, i.e. after filling out a 16GB card, I will have an archive (free of charge up to 15GB) on my Google disk.
Qlync can send push events, in my case, events are triggered sensors. Here's what they look like:

When swapping Push, it redirects to LiveView:

You can view the list of events on the Camera, the names of the clips contain the date, i.e. It’s very convenient to find the event at the right time:

That's how I managed to get the most out of home video surveillance, providing the ability to control what is happening in the apartment, by connecting additional “sensory organs”. The sensors themselves can be different, whether this “body” is a house bell, or a specialized gas sensor or a sound siren.
Original movies on GoogleDrive .
Thanks for attention! If you have any questions, I will be happy to answer them in the comments.
In this article I want to talk about how you can get the most out of an IP camera by organizing on its basis not just video surveillance, but already something close to the fire and security complex by connecting various sensors (PIR, heat, water, etc.) .d.). It will be about connecting, setting up ip-cameras and sensors, about how this can be useful in ensuring household safety.
Appearance, characteristics, purpose
Let's start with a description of each of the devices.
Zavio F3115
The basis is Zavio F3115 - a wireless IP camera of Taiwanese origin, in my stock 3 pcs.
Specifications
Camera with a 720p 1/4 ”matrix, with a fixed lens F1.8, 4.0mm, the viewing angle of this camera is 53 ° horizontally. There is also a 10x digital zoom. The maximum resolution and fps is 1024x720 30fps, both in Motion-JPEG and H.264 with progressive scan. Those. the camera is quite suitable for our living conditions, the presence of infrared illumination can not but rejoice (up to 10m). Also, the camera has a built-in microphone and speaker, supports full duplex, which can help not only see the picture, but also “listen to the situation” in the apartment.
Features of Zavio are Plug & Play and free software:
- Qlync Sat Viewer cloud service
- SNVR CamGraba for PC.
Detailed information about the camera can be viewed by clicking on this link .
Next, we will go sensors. Sensors are divided into 2 main types: Normally Closed (NC) and Normally Open (NO) - it is very important to know this for the correct connection of sensors.
Pironyx KX15DT
This is a Pir-sensor, in common people they call it “Motion Sensor”. Combined sensor (passive IR + microwave) KX15DT manufacturer Pyronix:
Equipped with the so-called Tampering Detection, aka “tamper sensor”, “tamper sensor”, i.e. when the sensor is opened, it sends a Tampering signal to the host device (in my case it is Zavio F3115).
A wide range of applications - from conventional signaling alerts, to the control of turning on the lamps.
ATTENTION, MEASURES OF AVOIDING FALSE WORKS:
- Do not install the detector in a place that may be exposed to direct sunlight.
- Не оставлять домашних животных в зоне обнаружения извещателя на время режима охраны
- Не устанавливать извещатель рядом с отопительными приборами
- Не устанавливать извещатель вблизи открытых окон и скозняков
- Монтировать извещатель только на неподвижную поверхность
- Не прокладывать кабель параллельно с электропроводкой
- Так же в комплекте есть подробная схема-инструкция по подключению данного датчика.
You can get acquainted with it in more detail by clicking on this link .
Aquarius-R
As you might guess from the name, this is a water leak sensor.
The method of application and the principle of operation are very simple, I installed it in the bathroom. It is intended for warning in the event of a water leak. The "piece" is simple and elementary, the main electronic part of the sensor is insulated, the anode and cathode remain open, which close when interacting with water.
Thermal fire detector IP 103-5 / 1-A3
A fairly simple sensor, when heated to the operating temperature, it signals a “fire”.
Annunciator security and fire sound Bekas (PKI-MB)
It is connected together with IP 103-5 / 1-A3, but as an output, there is a small “siren”:
When a thermal sensor is triggered, Bekas starts signaling until the “problem” is fixed, he considered it necessary to connect such an output in order to notify home in case of fire. A very loud siren that can wake the "dead". Thousands of years have passed, and the most dangerous elemental enemy of mankind is Fire, I believe that everyone in the house should have this bunch. I already had such an incident and therefore decided to secure my home in this way.
Also in the "system" is used Emergency Alarm ("Panic Button").
It is a “key” that is triggered by an open circuit. Unfortunately, there is no information on the Internet about him. This “panic button” is needed to transmit an alarm to the camera, a very useful button for installing older people in an apartment, for example.
Test installation
There are plans to repair the apartment, but I want to be fully equipped, let's move on to the Kitchen.
Kitchen
Strongly with the installation did not bother, because There is a connection instruction for each sensor. To connect the sensors to the camera, it was enough to “open” the twisted pair and remove one pair of wires from there and connect it to the camera terminal, the connection diagram of the sensors is also attached to the User Manual. 1-pin - 5V power, 2-pin - GND, 3-pin Digital Input (Input), 4-pin - Digital Output.
In the kitchen I installed a Heat sensor and a Bekas siren, the goal: when the heat sensor is triggered, you need to be a Bekas siren. To do this, I connected an IP 103-5 / 1-A3 to the camera input, and a siren to the output. I connected the power as you probably guessed - to the 1st pin, in order to close the circuit - I connected the siren and sensor to GND.
Here is a test video (Make it quiet, very loud siren!) :
Location: The
diodes on the camera can be turned off so as not to attract attention. "Smile and wave".
It is better to place the heat sensor in the center of the room on the ceiling, but for now let it hang over the sink.
Room
In my room I installed Pyronix KX15DT and connected the Zavio F3115 to the same camera.
Connecting to the camera:
Unfortunately, due to my carelessness, Pyronix requires 12V, and the camera only gives out 5V and I had to connect a separate PSU (Mean Well) to it, since there were several of them in my supplies.
Everything works, let's watch the video.
Sensor Trigger:
Push Notification:
Hall </5h>
Here I installed the “Panic” button and the “flooding” sensor located in the bathroom. The connection is also very simple, but in this case I have 2 sensors for INPUT, I connect both sensors to the 3-pin camera.


Sensor
trigger rollers: By pressing a button.
"Fill" the water leakage sensor.
Customization
Let's start by setting up DI / DO, you need to create an Event in the web interface, this is done very easily and simply, there were no difficulties, there is also localization for RU users in the camera web interface. It is possible to set up schedules for "Events", for example, the Pyronix sensor works only when there is nobody at home, except for the cat (the sensor has a peculiarity in sensitivity that it doesn’t work for pets, but at the same time the sensor will work for the child’s movement).
Window for adding Events:
Configuring Event:
Connecting a cloud service and setting up push notifications
Everything is very simple here, I installed the application on my iPad (there is also a client for Android, but for PC users it’s enough to go and login to sat.qlync.com).
Personally, I didn’t have any difficulties setting up, but there is an instruction in the Zavio knowledge base for users who may have problems.
The cloud service itself can browse the Archive from an SD-carrier, as well as send Event clips to Google Drive, i.e. after filling out a 16GB card, I will have an archive (free of charge up to 15GB) on my Google disk.
Qlync can send push events, in my case, events are triggered sensors. Here's what they look like:
When swapping Push, it redirects to LiveView:
You can view the list of events on the Camera, the names of the clips contain the date, i.e. It’s very convenient to find the event at the right time:
Conclusion
That's how I managed to get the most out of home video surveillance, providing the ability to control what is happening in the apartment, by connecting additional “sensory organs”. The sensors themselves can be different, whether this “body” is a house bell, or a specialized gas sensor or a sound siren.
Original movies on GoogleDrive .
Thanks for attention! If you have any questions, I will be happy to answer them in the comments.