Creating Audio Plugins, Part 16
- Tutorial
All posts in the series:
Part 1. Introduction and configuration
Part 2. Learning the code
Part 3. VST and AU
Part 4. Digital distortion
Part 5. Presets and GUI
Part 6. Signal synthesis
Part 7. Receiving MIDI messages
Part 8. Virtual keyboard
Part 9 Envelopes
Part 10. Refinement of the GUI
Part 11. Filter
Part 12. Low-frequency oscillator
Part 13. Redesign
Part 14. Polyphony 1
Part 15. Polyphony 2
Part 16. Antialiasing
To make our SpaceBass sound even better, you need to create an oscillator in which there would be less aliasing. This is an optional improvement. Without it, the synthesizer will work as before, but with it the sound in the upper octaves will be much better.
I would like to show you a very nice free plugin: Voxengo SPAN . It can be hung on a track, and it will show the spectrum of the signal passing through it. At this stage, it’s too early to write your own test procedures with FFT , so SPAN will be an indispensable tool for comparing the results of various algorithms for oscillators. Download and install. Run SpaceBass in REAPER and do the following:
With these settings, the raw waveform of the first oscillator is heard. Now hang the SPAN on the same track after the synthesizer. Hold a high note (I used the sixth octave) and look at the spectrogram in SPAN, it should look something like this:
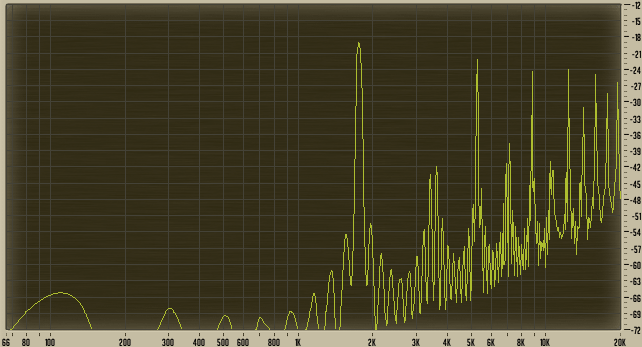
Reading it is very simple: the x-axis is the frequency in hertz, in this plugin, frequencies from 66 Hz to 20 kHz are displayed. The scale is logarithmic , i.e. the distance between the octaves is always the same - between the first octave and the second to the second as much as between the seventh and eighth. The ratio of the frequencies of neighboring octaves is two to one. While the harmonics of a signal are the fundamental frequency multiplied (or divided) by different integers. This means that harmonics are distributed unevenly along the x axis.
The y axis is the amplitude in decibels. Thus, it is very easy to determine which frequency has what amplitude at a given moment.
Depending on the settings, some points may differ on your and my spectrograms, but one thing is for sure: something is wrong. We expected to see the spectrogram of the meander — a series of peaks whose amplitude decreases with increasing frequency, and nothing between the peaks . And certainly we did not expect to see any spectral components below the fundamental frequency (on the left side of the graph). As you remember, such nonsense is aliasing .
What to do with him? There are different approaches to the solution. The most accurate solution is to synthesize the members of the Fourier seriesto approximate the meander. In fact, this is an overlapping of sines with correctly selected amplitudes, starting from the fundamental frequency and higher, one sine per harmonic. But the synthesis of harmonics will need to be stopped when the Nyquist frequency is reached . This approach will give an ideal band-limited waveform, all spectral components of which are strictly within the fundamental frequency and the Nyquist frequency.
Naturally, there is one problem. This method could be suitable for the highest octaves, where the fundamental (fundamental) frequency is so high that few harmonics remain before the Nyquist frequency. But for the lower octaves, there are a lot of harmonics, to put it mildly: at a frequency of 44.1 kHz, the meander with a fundamental frequency of 100 Hz will have 219 harmonics up to Nyquist, which means that in total it will be necessary to calculate
There are other approaches to the synthesis. The most noteworthy:
The last two approaches are based on the fact that aliasing occurs only due to sudden changes in the waveform. With the waveforms that we synthesize, the only problem is these sudden changes. Can we grind them like a piece of wood with sandpaper? Simple rounding is equivalent to light low-pass filtering, which is not what we need. We need not filter anything to the Nyquist frequency, and have nothing above it, as if it were just superimposed sines.
The synthesis of the meander from the sines looks like this:
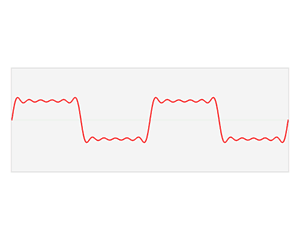
Blue indicates the sinuses superimposed on each other, red - the resulting band-limited meander. As you can see, these are not just rounded corners. This waveform has characteristic vibrations, “ripples”.
To simplify, BLEP methods first generate a waveform,as we did before , and then imposes this ripple. This eliminates (or greatly inhibits) aliasing.
If you followed the links above, you already realize that the PolyBLEP method is the simplest. We use it!
Create a new PolyBLEPOscillator class in our project. If you have not read the previous articles, download the finished project and start from that moment.
This is how the class definition looks:
We inherit publicity from
Add implementation
This may look a little tricked out, but, in fact, the function almost always returns
Before we implement
This means that we can change the behavior of a function
Change
As I said before, we use our waveforms with aliasing from the class
Add the following
This function will calculate waveforms with aliasing. Naive here means that the waveform is generated in a simple and incorrect way. Let's write it in Oscillator.cpp (you can just copy it, because it is almost identical
Differences from
Because this function contains all the code from
It is simply called here
Let's go back to PolyBLEPOscillator.cpp and write
A variable is
Create a triangle like this: first we take a meander, and then integratehis. Since we work with discrete values, integration simply means adding up values. If you estimate, the meander begins with solid units, so that their summation will give a linear increment. After the half-cycle there are continuous minus one, their integration will give a linear decline. The triangle is precisely this: linear growth and linear decline.
Keeping this in mind, we will write the code immediately for the meander and the triangle:
And again, we start with a simple wave with aliasing. But this time we are imposing two PolyBLEPs. One for the beginning of the period, the other is shifted by the
The only thing missing is a triangle. Add to the end of the block
Earlier, I wrote that we will integrate the meander. This is not entirely accurate. If you simply integrate, it will lead to huge output values, that is, we will get just a monstrous overload. Instead, use a leaky (leaky integrator). It sums up the new value with the old one, but multiplied by a value slightly less than unity. Thus, the values are not off scale.
Let's add a phase increment (everything is as before):
It was so easy to create
To use our new brilliant one
In the section,
That's all! Launch our plugin and let's look at the spectrum. As you can see, the effect of aliasing is very noticeably eliminated. Screenshots before / after for comparison:
Saw:


Meander:


Triangle:


We are still using the old one
We generated the meander and saw without aliasing using the aliased waveforms on which PolyBLEP was applied. The triangle was generated using a quasi-integrator and meander without aliasing. Now you can happily play our synth on the highest octaves and not be afraid that there will be harmonious frequencies!
The code can be downloaded from here .
Thanks for reading! :)
Original post .
Part 1. Introduction and configuration
Part 2. Learning the code
Part 3. VST and AU
Part 4. Digital distortion
Part 5. Presets and GUI
Part 6. Signal synthesis
Part 7. Receiving MIDI messages
Part 8. Virtual keyboard
Part 9 Envelopes
Part 10. Refinement of the GUI
Part 11. Filter
Part 12. Low-frequency oscillator
Part 13. Redesign
Part 14. Polyphony 1
Part 15. Polyphony 2
Part 16. Antialiasing
To make our SpaceBass sound even better, you need to create an oscillator in which there would be less aliasing. This is an optional improvement. Without it, the synthesizer will work as before, but with it the sound in the upper octaves will be much better.
Spectrum analysis
I would like to show you a very nice free plugin: Voxengo SPAN . It can be hung on a track, and it will show the spectrum of the signal passing through it. At this stage, it’s too early to write your own test procedures with FFT , so SPAN will be an indispensable tool for comparing the results of various algorithms for oscillators. Download and install. Run SpaceBass in REAPER and do the following:
- Turn the Mix knob all the way to the left so that only the first oscillator is heard
- Select for him meander (square wave)
- Set the cutoff frequency to maximum, resonance to minimum
- LFO filter at minimum, envelope knob about the middle
With these settings, the raw waveform of the first oscillator is heard. Now hang the SPAN on the same track after the synthesizer. Hold a high note (I used the sixth octave) and look at the spectrogram in SPAN, it should look something like this:
Reading it is very simple: the x-axis is the frequency in hertz, in this plugin, frequencies from 66 Hz to 20 kHz are displayed. The scale is logarithmic , i.e. the distance between the octaves is always the same - between the first octave and the second to the second as much as between the seventh and eighth. The ratio of the frequencies of neighboring octaves is two to one. While the harmonics of a signal are the fundamental frequency multiplied (or divided) by different integers. This means that harmonics are distributed unevenly along the x axis.
The y axis is the amplitude in decibels. Thus, it is very easy to determine which frequency has what amplitude at a given moment.
Depending on the settings, some points may differ on your and my spectrograms, but one thing is for sure: something is wrong. We expected to see the spectrogram of the meander — a series of peaks whose amplitude decreases with increasing frequency, and nothing between the peaks . And certainly we did not expect to see any spectral components below the fundamental frequency (on the left side of the graph). As you remember, such nonsense is aliasing .
What to do with him? There are different approaches to the solution. The most accurate solution is to synthesize the members of the Fourier seriesto approximate the meander. In fact, this is an overlapping of sines with correctly selected amplitudes, starting from the fundamental frequency and higher, one sine per harmonic. But the synthesis of harmonics will need to be stopped when the Nyquist frequency is reached . This approach will give an ideal band-limited waveform, all spectral components of which are strictly within the fundamental frequency and the Nyquist frequency.
Naturally, there is one problem. This method could be suitable for the highest octaves, where the fundamental (fundamental) frequency is so high that few harmonics remain before the Nyquist frequency. But for the lower octaves, there are a lot of harmonics, to put it mildly: at a frequency of 44.1 kHz, the meander with a fundamental frequency of 100 Hz will have 219 harmonics up to Nyquist, which means that in total it will be necessary to calculate
sin()220 times each sample. In the polyphonic model, this number is still multiplied by the number of notes played. On the one hand, you need to add the sines for each note only once for each note. But this is so if we do not have any modulation of the tone. Once it is there, the frequency can change every sample, so a lot of work needs to be done.BLIPs and BLEPs
There are other approaches to the synthesis. The most noteworthy:
- Band Limited Impulse Train (BLIT)
- Minimum-phase band-limited step function (Minimum-Phase Bandlimited Step, MinBLEP )
- Polynomial Band Limited Step Function (PolyBLEP)
The last two approaches are based on the fact that aliasing occurs only due to sudden changes in the waveform. With the waveforms that we synthesize, the only problem is these sudden changes. Can we grind them like a piece of wood with sandpaper? Simple rounding is equivalent to light low-pass filtering, which is not what we need. We need not filter anything to the Nyquist frequency, and have nothing above it, as if it were just superimposed sines.
The synthesis of the meander from the sines looks like this:
Blue indicates the sinuses superimposed on each other, red - the resulting band-limited meander. As you can see, these are not just rounded corners. This waveform has characteristic vibrations, “ripples”.
To simplify, BLEP methods first generate a waveform,as we did before , and then imposes this ripple. This eliminates (or greatly inhibits) aliasing.
If you followed the links above, you already realize that the PolyBLEP method is the simplest. We use it!
PolyBLEPOscillator Class
PolyBLEPOscillatorthisOscillator , so that we will publicly inherit from the latter. Create a new PolyBLEPOscillator class in our project. If you have not read the previous articles, download the finished project and start from that moment.
This is how the class definition looks:
#include "Oscillator.h"
class PolyBLEPOscillator: public Oscillator {
public:
    PolyBLEPOscillator() : lastOutput(0.0) { updateIncrement(); };
    double nextSample();
private:
    double poly_blep(double t);
    double lastOutput;
};
We inherit publicity from
Oscillator. To change the synthesis method, we define a new member function nextSample. We also add a new privatefunction poly_blepthat will generate oscillations on the meander swings. lastOutputstores the last generated value (this is only needed for a triangular waveform). Add implementation
poly_blepto PolyBLEPOscillator.cpp :// PolyBLEP by Tale
// (slightly modified)
// http://www.kvraudio.com/forum/viewtopic.php?t=375517
double PolyBLEPOscillator::poly_blep(double t)
{
double dt = mPhaseIncrement / twoPI;
// 0 <= t < 1
if (t < dt) {
t /= dt;
return t+t - t*t - 1.0;
}
// -1 < t < 0
else if (t > 1.0 - dt) {
t = (t - 1.0) / dt;
return t*t + t+t + 1.0;
}
// 0 otherwise
else return 0.0;
}
This may look a little tricked out, but, in fact, the function almost always returns
0.0, unless we are close to a difference. The first is iffor the case when we are at the beginning of the period, and else iffor the one when we are almost at the very end. This is the behavior of the saw, because it has only one difference, between two periods. Before we implement
nextSample, we need to change something in the oscillator class. Make a function nextSamplein Oscillator.h virtual:virtual double nextSample();
This means that we can change the behavior of a function
nextSamplein our subclass. Using virtualin code with critical runtimes is not the best solution. You can use templates (and avoid code duplication), but I want to leave the explanation at a simple level and not be distracted from the topic of synthesis. Change
private:to protected:. So we can get access to such parameters as mPhasefrom member functions PolyBLEPOscillator. As I said before, we use our waveforms with aliasing from the class
Oscillatorand apply it to them poly_blep. At the moment, nextSamplecalculates the waveform and implements the phase increment. We need to separate these unrelated things. Add the following
protectedmember function:double naiveWaveformForMode(OscillatorMode mode);
This function will calculate waveforms with aliasing. Naive here means that the waveform is generated in a simple and incorrect way. Let's write it in Oscillator.cpp (you can just copy it, because it is almost identical
Oscillator::nextSample)double Oscillator::naiveWaveformForMode(OscillatorMode mode) {
double value;
switch (mode) {
case OSCILLATOR_MODE_SINE:
value = sin(mPhase);
break;
case OSCILLATOR_MODE_SAW:
value = (2.0 * mPhase / twoPI) - 1.0;
break;
case OSCILLATOR_MODE_SQUARE:
if (mPhase < mPI) {
value = 1.0;
} else {
value = -1.0;
}
break;
case OSCILLATOR_MODE_TRIANGLE:
value = -1.0 + (2.0 * mPhase / twoPI);
value = 2.0 * (fabs(value) - 0.5);
break;
default:
break;
}
return value;
}
Differences from
Oscillator::nextSamplethe following:- The waveform is selected depending on the parameter
modetransmitted from the outside (insteadmOscillatorMode) - The saw is now ascending, not descending
Because this function contains all the code from
Oscillator::nextSample, replace the body nextSamplewith this:double Oscillator::nextSample() {
double value = naiveWaveformForMode(mOscillatorMode);
mPhase += mPhaseIncrement;
while (mPhase >= twoPI) {
mPhase -= twoPI;
}
return value;
}
It is simply called here
naiveWaveformForModeto calculate the waveform and incremented mPhase.PolyBLEP Generation
Let's go back to PolyBLEPOscillator.cpp and write
nextSample. Let's start like this:double PolyBLEPOscillator::nextSample() {
double value = 0.0;
double t = mPhase / twoPI;
if (mOscillatorMode == OSCILLATOR_MODE_SINE) {
value = naiveWaveformForMode(OSCILLATOR_MODE_SINE);
} else if (mOscillatorMode == OSCILLATOR_MODE_SAW) {
value = naiveWaveformForMode(OSCILLATOR_MODE_SAW);
value -= poly_blep(t);
}
A variable is
tnecessary for the function to work poly_blep. This is the current phase value divided by twoPI, so that it is always between 0and 1. The first ifdivides the waveform. Anti-aliasing is not necessary for the sine, since it has only one, the first harmonic - its main frequency itself. For a saw, we first get a simple waveform from the oscillator, and then apply it to it pily_blep- that's all! Create a triangle like this: first we take a meander, and then integratehis. Since we work with discrete values, integration simply means adding up values. If you estimate, the meander begins with solid units, so that their summation will give a linear increment. After the half-cycle there are continuous minus one, their integration will give a linear decline. The triangle is precisely this: linear growth and linear decline.
Keeping this in mind, we will write the code immediately for the meander and the triangle:
    else {
        value = naiveWaveformForMode(OSCILLATOR_MODE_SQUARE);
        value += poly_blep(t);
        value -= poly_blep(fmod(t + 0.5, 1.0));
And again, we start with a simple wave with aliasing. But this time we are imposing two PolyBLEPs. One for the beginning of the period, the other is shifted by the
0.5period, because meander has two drops. The saw has only one difference. The only thing missing is a triangle. Add to the end of the block
else: if (mOscillatorMode == OSCILLATOR_MODE_TRIANGLE) {
// Leaky integrator: y[n] = A * x[n] + (1 - A) * y[n-1]
value = mPhaseIncrement * value + (1 - mPhaseIncrement) * lastOutput;
lastOutput = value;
}
Earlier, I wrote that we will integrate the meander. This is not entirely accurate. If you simply integrate, it will lead to huge output values, that is, we will get just a monstrous overload. Instead, use a leaky (leaky integrator). It sums up the new value with the old one, but multiplied by a value slightly less than unity. Thus, the values are not off scale.
Let's add a phase increment (everything is as before):
    }
    mPhase += mPhaseIncrement;
    while (mPhase >= twoPI) {
        mPhase -= twoPI;
    }
    return value;
}
It was so easy to create
PolyBLEPOscillator!Using a new oscillator
To use our new brilliant one
PolyBLEPOscillatorjust needs to change a couple of lines in Voice.h . Replace #include "Oscillator.h"with #include "PolyBLEPOscillator.h". In the section,
privateturn mOscillatorOneit mOscillatorTwointo objects of the class PolyBLEPOscillator:PolyBLEPOscillator mOscillatorOne;
PolyBLEPOscillator mOscillatorTwo;
That's all! Launch our plugin and let's look at the spectrum. As you can see, the effect of aliasing is very noticeably eliminated. Screenshots before / after for comparison:
Saw:
Meander:
Triangle:
But what about the LFO?
We are still using the old one
Oscillatorfor the LFO. Should I switch to PolyBLEPOscillator? In fact, sharp boundaries are very desirable in the LFO, with them you can get interesting effects. And aliasing does not really concern us, because the fundamental frequency is usually low, less than 30 Hz. Each next harmonic has an amplitude lower than the previous one, so that frequencies above Nyquist have a very small amplitude.Total
We generated the meander and saw without aliasing using the aliased waveforms on which PolyBLEP was applied. The triangle was generated using a quasi-integrator and meander without aliasing. Now you can happily play our synth on the highest octaves and not be afraid that there will be harmonious frequencies!
The code can be downloaded from here .
Thanks for reading! :)
Original post .