XWT Introduction
- Tutorial
- Recovery mode
Greetings to all readers of this resource! At the moment, many solutions have been developed to ensure cross-platform GUI applications Microsoft .NET / Mono. In this article, I will introduce readers to one of them, the official project from the Mono developers - the XWT Widget Toolkit (Xwt). You can download it at the moment only in the form of sources from the github.com/mono/xwt repository . Unfortunately, I could not find competent and complete articles about this toolkit on the Internet, so I had to sniff out everything myself. Because this article is neither advertising nor reviewing, I will not explain why XWT is better or worse than the same Eto Forms or System.Windows.Forms (the latter works quite well on Mono). This article will talk about how XWT works and the basics of working with it.
The XWT Widget Toolkit (it seems like the name is decrypted, and not the Xamarin Widget Toolkit, as many people think) is designed according to a scheme where there is an abstract loader named Xwt.dll, which loads backends built using the standard Xwt interfaces from the Xwt.Gtk.dll libraries , Xwt.Wpf.dll, Xwt.Mac.dll, etc. You can read more about the XWT device in the Habra topic of November 11, 2013 . In terms of API structure, Xwt is very similar to GTK #, which is not surprising - Xwt was created to port MonoDevelop to platforms other than Linux (primarily MacOS X).
Xwt can be initialized as a host (for ordinary applications), or as a guest when Xwt widgets are embedded in a native application. Both methods are generally similar, therefore they will be considered simultaneously.
First, the XWT itself and the backend are initialized:
Using the argument, you can load various backends. In order for the backend to load, you need to put the Xwt. *. Dll file in the directory in your application (if you use the Cocoa backend, you also need to put the MonoMac.dll file). You can set as an argument just a line with the .net signature of the backend dll, but this is not recommended, because "DLL hell" may happen . An attentive reader will immediately notice that the backend is set manually. Although the XWT API does present a call to Xwt.Application.Initialize () with no arguments, it does not work as expected. Therefore, you have to make bicycles with the definition of the OS and the choice of ToolkitType yourself. Keep in mind that MacOSX is simply not defined .
After initialization, you need to create a window (Xwt.Window) and display it on the screen
So, we downloaded XWT, brought up a window, it blinked, and the process was completed. And all because they forgot to start the UI event stream. This is done in one line:
At this point, the code of the Main () function hangs, so everything else must be done in the UI thread, that is, in the form created by the line above.
User controls in this toolkit are called widgets. Widgets are embedded in other widgets (the only way), and widgets in windows. Windows are classes that inherit from Xwt.WindowFrame. True, as a rule, they still represent instances or inherit from the Window or Dialog classes. Dialogs differ from forms by the possibility of output in modal mode (function
Both forms and dialogs have a basic set of events and properties, generally similar to other GUI toolkits, perhaps a little shortened. Scolding the developers of Xamarin LLC, do not forget that behind each point of the Xwt interfaces there is a long refinement of four backends at once.
Widgets are classes that inherit from Xwt.Widget. There are widgets - containers and widgets - controls. Windows themselves can contain as many as one widget to overcome this restriction and container widgets were created. Containers, as the name suggests, can contain an unlimited number of other widgets (including container ones), and are responsible for their placement on their own host (parent), for example, a window or another container. Simple widgets, I think, do not need a description, although the documentation for them is clearly weak. Be prepared for known properties and events to be named differently. For example, a mouse click, incl. double, raises the ButtonPressed event.
To consolidate, let's analyze an example from the previous article:
This toolkit contains many container widgets,brazenly spionerenny from GTK . For those unfamiliar with GTK #, I’ll give an overview of these container tanks .

The easiest of containers. It allows you to either lay out widgets in a random order on themselves (AddChild (Xwt.Widget w)), and supports any kind of drawing (OnDraw (Xwt.Drawing.Context ctx, Xwt.Rectangle dirtyRect)). However, it is not recommended for “everyday” use, because the rendering tools in Xwt are far from perfect, and the hard positioning of the elements can lead to a complete disruption of widgets when changing their internal content (and, therefore, size).

VBox

HBox
HBox and VBox widgets are designed to place widgets in a line, with automatic control of the size and position of other widgets. Add widgets by calling the functions PackStart and PackEnd. By manipulating the arguments, you can specify the mode of placement and stretching of widgets. The margin * arguments are set in an incomprehensible value, with a standard display resolution of 96dpi equal to strictly 1px, but which continues to work adequately with increased DPI (with scale).
For those familiar with the classic construction of web-pages, this will probably be the most convenient container of the existing ones. Yes, this is the most common table. Each cell can be assigned a widget. For large fixed-markup applications, this is probably the best of containers. However, it does not allow marking up “rubber”, i.e. when resizing a widget in a cell, the column / row dimensions also change automatically, but you can’t just grab it and drag the border (for now?).

To create interfaces from two panels with support for changing the proportions between them, there are VPaned and HPaned containers. At the moment, in Xwt, you can not programmatically change the proportions, although there are even two inactive properties for this, however, I did not understand how they differ - Position and PositionFraction.
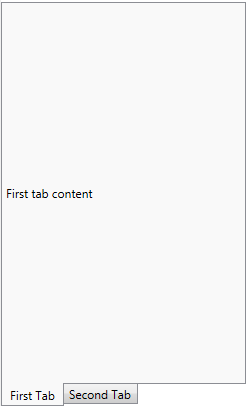
“Notebook” is intended to create a tabbed interface, as in antediluvian settings windows. Keep in mind that you need to specify containers, for example, VBox, as the child’s tabs, otherwise you can put only one widget.

This widget is designed to display various secondary, additional information or application controls. Also, like Notebook, it treats containers conditionally, because supports only one widget as a content (Content).
Examples of using XWT widgets can be found in the examples and tests included with the toolkit sources. It is unlikely to find more information, because This toolkit is poorly documented, if not to say that it is not documented at all. So far, there are few known applications on XWT, which is not surprising, but a search on Github ( tyts ) and other public repositories yields a lot of interesting startups.
In the next article I will try to talk about XWT "goodies", such as embedding in native .NET applications, Markdown built-in parser, features of setting focus on home-made widgets, as well as rendering graphics in XWT, working with TreeView and ListView, XWT thread-hazard and methods of dealing with this, as well as some significant imperfections (this language does not dare to call minor bugs) of this toolkit. If you know other important details of the XWT, please mention in the comments - there will be something to mention in Article No. 2.
PS If you cannot open the XWT sln file under Visual Studio 2010, install SP1 or VS 2012+.
Attention! This toolkit is extremely raw, and contains a lot of bugs. Using it in your applications, be prepared to detect non-working properties, non-triggering events, etc. unpleasant phenomena
Introduction
The XWT Widget Toolkit (it seems like the name is decrypted, and not the Xamarin Widget Toolkit, as many people think) is designed according to a scheme where there is an abstract loader named Xwt.dll, which loads backends built using the standard Xwt interfaces from the Xwt.Gtk.dll libraries , Xwt.Wpf.dll, Xwt.Mac.dll, etc. You can read more about the XWT device in the Habra topic of November 11, 2013 . In terms of API structure, Xwt is very similar to GTK #, which is not surprising - Xwt was created to port MonoDevelop to platforms other than Linux (primarily MacOS X).
Initialization
Xwt can be initialized as a host (for ordinary applications), or as a guest when Xwt widgets are embedded in a native application. Both methods are generally similar, therefore they will be considered simultaneously.
First, the XWT itself and the backend are initialized:
Xwt.Application.Initialize(Xwt.ToolkitType.Wpf);
//или Xwt.Application.InitializeAsGuest(Xwt.ToolkitType.Wpf);
Using the argument, you can load various backends. In order for the backend to load, you need to put the Xwt. *. Dll file in the directory in your application (if you use the Cocoa backend, you also need to put the MonoMac.dll file). You can set as an argument just a line with the .net signature of the backend dll, but this is not recommended, because "DLL hell" may happen . An attentive reader will immediately notice that the backend is set manually. Although the XWT API does present a call to Xwt.Application.Initialize () with no arguments, it does not work as expected. Therefore, you have to make bicycles with the definition of the OS and the choice of ToolkitType yourself. Keep in mind that MacOSX is simply not defined .
After initialization, you need to create a window (Xwt.Window) and display it on the screen
//MainWindow - наследник Xwt.Window, являющийся главным окном приложения
new MainWindow().Show();
So, we downloaded XWT, brought up a window, it blinked, and the process was completed. And all because they forgot to start the UI event stream. This is done in one line:
Xwt.Application.Run();
At this point, the code of the Main () function hangs, so everything else must be done in the UI thread, that is, in the form created by the line above.
Forms, dialogs and widgets
User controls in this toolkit are called widgets. Widgets are embedded in other widgets (the only way), and widgets in windows. Windows are classes that inherit from Xwt.WindowFrame. True, as a rule, they still represent instances or inherit from the Window or Dialog classes. Dialogs differ from forms by the possibility of output in modal mode (function
Run(WindowFrame parent)), as well as by dividing the workspace into a department for an embedded widget (Content) and control buttons (Buttons). Forms have only a title, a department for a nested widget (Content), and a menu bar (MainMenu). The last one is not in the dialogs.Both forms and dialogs have a basic set of events and properties, generally similar to other GUI toolkits, perhaps a little shortened. Scolding the developers of Xamarin LLC, do not forget that behind each point of the Xwt interfaces there is a long refinement of four backends at once.
Widgets are classes that inherit from Xwt.Widget. There are widgets - containers and widgets - controls. Windows themselves can contain as many as one widget to overcome this restriction and container widgets were created. Containers, as the name suggests, can contain an unlimited number of other widgets (including container ones), and are responsible for their placement on their own host (parent), for example, a window or another container. Simple widgets, I think, do not need a description, although the documentation for them is clearly weak. Be prepared for known properties and events to be named differently. For example, a mouse click, incl. double, raises the ButtonPressed event.
To consolidate, let's analyze an example from the previous article:
class Program
    {
        [STAThread] //для избежания глюков под WPF
        static void Main(string[] args)
        {
            //иницализация XWT и создание главного окна
            Xwt.Application.Initialize(Xwt.ToolkitType.Wpf);
            Xwt.Window MainWindow = new Xwt.Window()
            {
                Title = "Xwt Test"
            };
            MainWindow.CloseRequested += (o, e) =>
            {
                Xwt.Application.Exit(); //без этого exe'шник сам не закроется
            };
            //создание виджетов и меню
            Xwt.Menu MainMenu = new Xwt.Menu();
            Xwt.RichTextView TextView = new Xwt.RichTextView();
            Xwt.MenuItem FileOpenMenuItem = new Xwt.MenuItem("Открыть");
            Xwt.Menu FileMenu = new Xwt.Menu();
            FileOpenMenuItem.Clicked += (o,e) => {
                Xwt.OpenFileDialog Dialog = new Xwt.OpenFileDialog("Открыть файл");
                if (Dialog.Run(MainWindow)) {
                    TextView.LoadFile(Dialog.FileName, Xwt.Formats.TextFormat.Markdown);
                }
            };
            Xwt.MenuItem FileMenuItem = new Xwt.MenuItem("Файл") { SubMenu = FileMenu };
            FileMenu.Items.Add(FileOpenMenuItem);
            MainMenu.Items.Add(FileMenuItem);
            //формировка окна
            MainWindow.MainMenu = MainMenu;
            MainWindow.Content = TextView;
            //запуск приложения
            MainWindow.Show();
            Xwt.Application.Run();
        }
    }
Container widgets
This toolkit contains many container widgets,
Canvas - Canvas
The easiest of containers. It allows you to either lay out widgets in a random order on themselves (AddChild (Xwt.Widget w)), and supports any kind of drawing (OnDraw (Xwt.Drawing.Context ctx, Xwt.Rectangle dirtyRect)). However, it is not recommended for “everyday” use, because the rendering tools in Xwt are far from perfect, and the hard positioning of the elements can lead to a complete disruption of widgets when changing their internal content (and, therefore, size).
Boxes - bookshelf (rack)
VBox
HBox
HBox and VBox widgets are designed to place widgets in a line, with automatic control of the size and position of other widgets. Add widgets by calling the functions PackStart and PackEnd. By manipulating the arguments, you can specify the mode of placement and stretching of widgets. The margin * arguments are set in an incomprehensible value, with a standard display resolution of 96dpi equal to strictly 1px, but which continues to work adequately with increased DPI (with scale).
Table - table
For those familiar with the classic construction of web-pages, this will probably be the most convenient container of the existing ones. Yes, this is the most common table. Each cell can be assigned a widget. For large fixed-markup applications, this is probably the best of containers. However, it does not allow marking up “rubber”, i.e. when resizing a widget in a cell, the column / row dimensions also change automatically, but you can’t just grab it and drag the border (for now?).
Paned - Panels
To create interfaces from two panels with support for changing the proportions between them, there are VPaned and HPaned containers. At the moment, in Xwt, you can not programmatically change the proportions, although there are even two inactive properties for this, however, I did not understand how they differ - Position and PositionFraction.
Notebook - Tabs
“Notebook” is intended to create a tabbed interface, as in antediluvian settings windows. Keep in mind that you need to specify containers, for example, VBox, as the child’s tabs, otherwise you can put only one widget.
Expander - roll-up panel
This widget is designed to display various secondary, additional information or application controls. Also, like Notebook, it treats containers conditionally, because supports only one widget as a content (Content).
Examples of using XWT widgets can be found in the examples and tests included with the toolkit sources. It is unlikely to find more information, because This toolkit is poorly documented, if not to say that it is not documented at all. So far, there are few known applications on XWT, which is not surprising, but a search on Github ( tyts ) and other public repositories yields a lot of interesting startups.
In the next article I will try to talk about XWT "goodies", such as embedding in native .NET applications, Markdown built-in parser, features of setting focus on home-made widgets, as well as rendering graphics in XWT, working with TreeView and ListView, XWT thread-hazard and methods of dealing with this, as well as some significant imperfections (this language does not dare to call minor bugs) of this toolkit. If you know other important details of the XWT, please mention in the comments - there will be something to mention in Article No. 2.
PS If you cannot open the XWT sln file under Visual Studio 2010, install SP1 or VS 2012+.