Home cctv system
Good day, dear Khabrovchani! I decided to share with you my little weakness, since childhood I love to know everything and watch everyone! It was this idea that led me to the desire to build my own video surveillance system within the apartment. My path turned out to be a bit thorny, but first things first.
The first thing I started building my system with was studying the basics of building video surveillance systems. In fact, any video surveillance system is a video camera connected to some kind of digital device, which is responsible for processing the video signal from the camera, recording images and issuing alarm messages. Recording can be carried out in a constant mode or only in case of any event (motion detection, camera cover, camera shutdown or operation of any sensor). Modern video surveillance systems are closely connected to the Internet, which allows you to see live pictures from cameras, view recorded videos and control the video surveillance system from across the globe.
To simplify my task, I decided to stay on the most modern platform - IP cameras. This is perhaps not only the most modern, but also the most expensive option. In fact, each IP camera is a separate video surveillance system that implements all the necessary functionality.
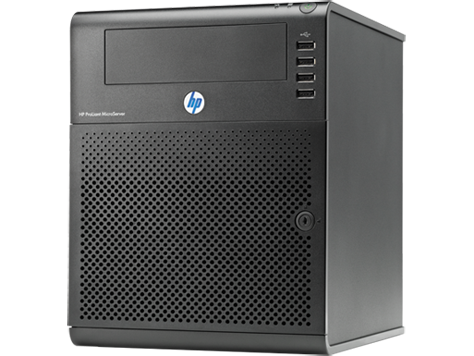
Next, I needed to find a way to store video information, because I have long abandoned a stationary PC in favor of a laptop, I decided to implement another of my old Wishlist: a home server. No sooner said than done, the HP ProLiant MicroServer G7 N54L was standing on my shelf, since its price is now 8,870 rubles, which is very interesting for a piece of hardware of this class; I purchased a HDD WD Red WD20EFRX , 2TB for 3 920rub. Windows Home Server 2011 was installed on it . On this preparation for the appearance of the IP camera was ready.
Frankly, this whole idea is rather spontaneous, and I didn’t really calculated the budget or resources in advance, I did everything in the direction of the outbursts.
The second is the choice of an IP camera. The main criterion for choosing was the availability of Wi-Fi, so as not to pull wires throughout the apartment. Properly, without studying the issue, I chose the most affordable and simple IP D-LINK DCS-931L camera for 2 080 rubles. and here I realized that you need to carefully study the characteristics of what you are buying.
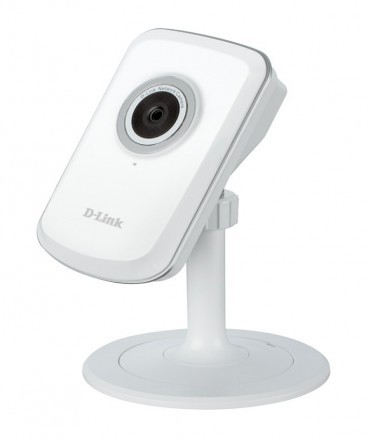
In fact, all that she can do is display a picture in real time, and everything related to the issue of storing images from the camera is present only in more expensive versions. I will not post all the TX of this camera, I will limit myself to a description of its main functionality:


Based on the available capabilities, I raised the FTP server on MicroServer using regular Windows tools and configured the camera accordingly, organized streaming recording to the server. As a result, I got a huge bunch of 3MB files with a few second videos. From a practical point of view, I received a video archive that is not suitable for viewing and analysis, and the video stream is poorly compressed (but what should I expect from MJPEG). In the future, I made a decision to transfer this camera to the entrance and configure the recording for the event, i.e. writes only when there is movement in the frame. If suddenly someone wants to unscrew it, then I will know what it looked like. The second significant drawback of this camera was of course the image quality, not that a small resolution of 640x480 , but most importantly a small viewing angle of 45 °, which is extremely small for grasping the area of the room from the corner, through the camera we will see only a third of the area. And the sensitivity of the sensor is bad, it can only be seen in good light, there is no night shooting mode, oh and the sound is terrible.
The third stage of my Wishlist was the choice of a new IP camera with the ability to record streaming video to a remote server, a good viewing angle and night shooting mode. Here I have already approached responsibly to the choice, but what was my surprise that there is not a single camera within $ 200 that would meet my criteria, but in fact this is the minimum that turns an ordinary webcam into a video surveillance tool.
After a week of studying specialized forums my choice stopped on the camera HIKVISION the DS-2CD2432F-IW , the cost of which amounted to 7590 rubles.
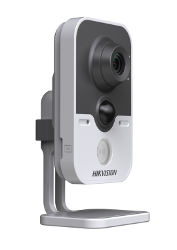
Here is her review:
Matrix type: CMOS
Focal length: 4 mm
Camera resolution: 3 MP
Wi-Fi: 802.11n
Network protocols: TCP / IP, HTTP, DHCP, DNS, DDNS, RTP, RTSP, PPPoE, SMTP, NTP, SNMP, HTTPS, FTP , 802.1x, Qos (SIP, SRTP, IPv6 option)
Support for memory cards: Micro SD up to 32 GB.
Shooting specifications
Resolution: 2048 x 1536
Video compression formats: H.264 / MJPEG
IR illumination: yes
Night shot distance: 10 m
Viewing angle: 75.8 °
Alarm triggering: PIR sensor / Motion detector / Video loss / IP address conflict Network disconnection / Video Replacement / Storage Monitoring
A few more points that I would like to note:
Instructions for the camera .
A few words about the brand: Hikvision Digital Technology is a leading provider of digital video surveillance systems with its own office and production in Hangzhou (China). Here is even their presentation clip, they inspired me confidence:
As you can see, the Chinese brand, but cameras with similar technical specifications made in Europe cost far beyond $ 500. Naturally, I experienced some fears when choosing this camera, but as it turned out in the future, this is in vain. I want to make a reservation right away that the camera is supplied without a power supply, and we need a 12V 1A power supply in the load.
Who wants to get acquainted with the devices from this manufacturer, I immediately want to recommend a Russian representative of this company with an adequate forum of those. support .
After connecting the camera to the home network, I immediately updated the firmware to V5.1.2 build 140116 and proceeded to configure it.
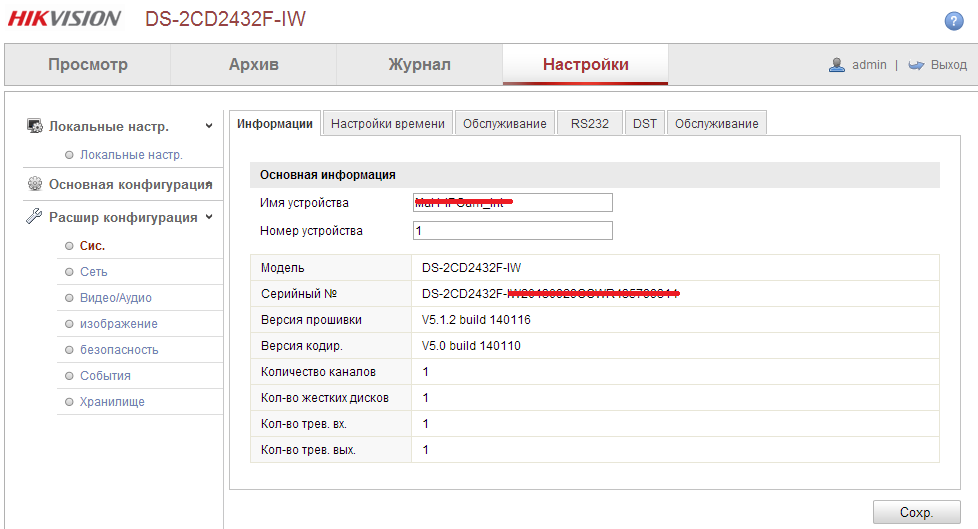
Having made a number of basic settings, or rather a few dozen, the camera began to stream back as I needed it. Further, my task was to force the camera to record to a remote server. As which we use the same server with Windows Home Server 2011 installed on board, which essentially acts as a NAS. And then began dancing with a tambourine. Next, I will describe my tuning experience, which I had to feel on my own skin, because I could not find any information on the network.
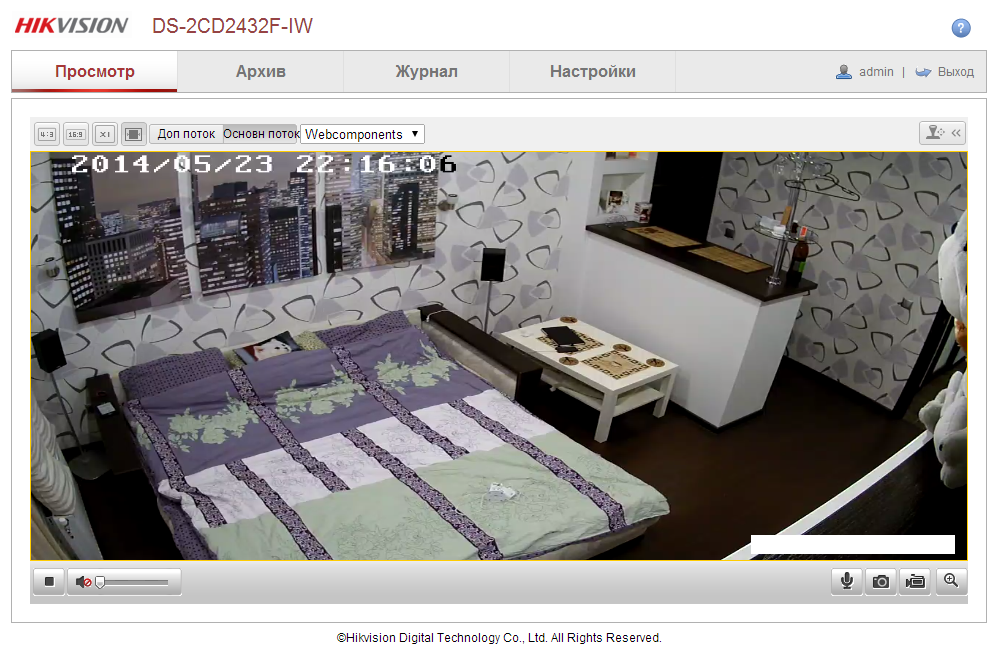
And of course the most interesting thing is the comparison of the image from both cameras, as they say, here without comment:

Next, I had to get this camera to write a video stream to the archive. As it turned out, the camera can record a video stream using several protocols: go to Settings - Advanced configuration - Storage - NAS .
To start, I tried to configure the NAS using the NFS protocol. Everything is simple here, it rises under Windows in 5 minutes. After specifying the path to the NFS storage in the settings, the camera turns on the siren and does not shut up (yes, there is a built-in siren in the camera), after which I press the format button on the "Storage Management" tab, after which the camera goes silent, the long formatting process starts, on the server containers are created. After formatting is completed, the status is set to “Norm”, but after a couple of seconds it is reset and the camera starts turning on the siren again. After trying 5 times, I got the same thing all the time.
Then I tried to connect using the SMB protocol, it’s still easier here, the usual shared folder on the server with configured access rights.
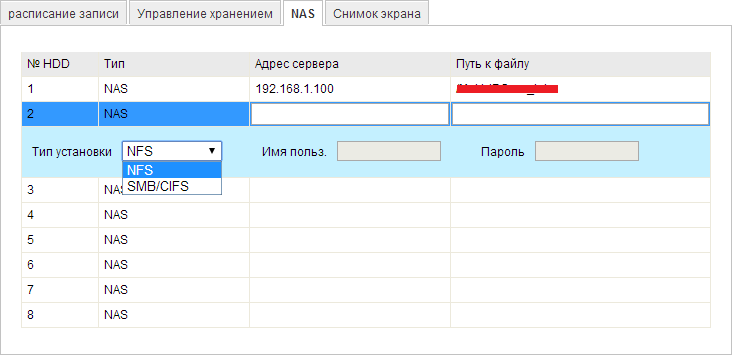
We also format on the “Storage Management” tab, and lo and behold, everything works!
But there were a couple of unresolved issues:
1. HOW TO DISABLE THE SIREN? (It always works if the camera loses connection with the server).
2. HOW TO MAKE RESTORATION OF COMMUNICATION AT THE CONNECTION WITH THE NAS? (If you reboot the router or server, the camera loses connection and does not restore it until the camera is rebooted and all this is accompanied by a vile siren).
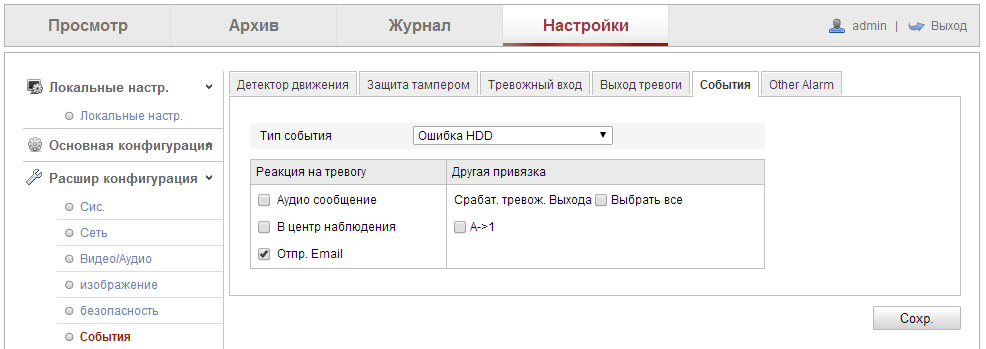
The first question I managed to solve, for this we go Settings - Advanced configuration - Events - Events . Next, select the type of event, in our case it is “HDD Error” and uncheck the Audio message box.
The second question has disappeared by itself, now everything is being restored by itself, China in a word! Although now everything is connected to the PSU source, accordingly, when external power is supplied, the UPS feeds both the camera and the server with the router. If the lights are turned off, then I receive SMS on my mobile and I can connect to the server via RDP and put out everything correctly. When power is restored, I also receive SMS, you can turn on the server through WakeOnLan, and all from a mobile phone.
Another nice bonus was the iVMS-4500 lite mobile application .
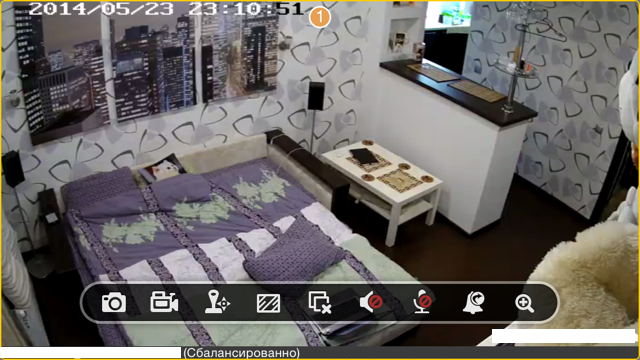
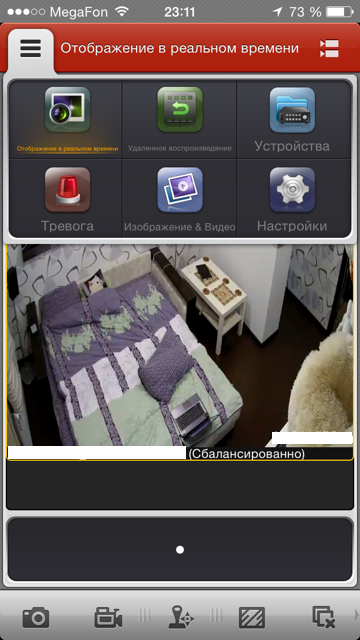
What can:
We make all this work together. Here is what I ended up with:

Two cameras, internal and external. The outer D-Link writes on the motion sensor in the frame on the stairwell, the inner one records the situation in the apartment on an ongoing basis. Both store records on the server. The server distributes via DLNA to any device, plus we have access from both the cameras from a mobile phone via the Internet, D-Link only in real time, and Hikvision in both real and archive records. In the future, it remains only to come up with why I need all this. I will not give access to broadcasts for ethical reasons.
HP MicroServer G7 server with hard drive: 12,790 rubles.
IP Camera D-LINK DCS-931L 2 080 rub.
HIKVISION DS-2CD2432F-IW Camera 7 590 rub.
The power supply for the HIKVISION camera was, you can buy ~ 500 rubles.
ZyXEL Keenetic Giga router - was, now costs 3,200 rubles.
APC 500 uninterruptible power supply unit - was, now costs 3,500 rubles.
DLNA server Serviio Pro 900 rub. (Pro version for web access to the entire library of the server)
Windows Home Server 2011 - unfortunately not for sale, but can only be preinstalled by the manufacturer of the equipment, so it’s free.
Total: 30 560 rub.
PS When studying this issue, you must not forget about the bandwidth of the Wi-Fi channel, according to my calculations, no more than 3 HD cameras will work normally. At the same time, while recording 2 cameras (HD and SD), I quietly watch DLNA HD movies without brakes and skipping streaming recording to the server.
First stage
The first thing I started building my system with was studying the basics of building video surveillance systems. In fact, any video surveillance system is a video camera connected to some kind of digital device, which is responsible for processing the video signal from the camera, recording images and issuing alarm messages. Recording can be carried out in a constant mode or only in case of any event (motion detection, camera cover, camera shutdown or operation of any sensor). Modern video surveillance systems are closely connected to the Internet, which allows you to see live pictures from cameras, view recorded videos and control the video surveillance system from across the globe.
To simplify my task, I decided to stay on the most modern platform - IP cameras. This is perhaps not only the most modern, but also the most expensive option. In fact, each IP camera is a separate video surveillance system that implements all the necessary functionality.
Next, I needed to find a way to store video information, because I have long abandoned a stationary PC in favor of a laptop, I decided to implement another of my old Wishlist: a home server. No sooner said than done, the HP ProLiant MicroServer G7 N54L was standing on my shelf, since its price is now 8,870 rubles, which is very interesting for a piece of hardware of this class; I purchased a HDD WD Red WD20EFRX , 2TB for 3 920rub. Windows Home Server 2011 was installed on it . On this preparation for the appearance of the IP camera was ready.

Frankly, this whole idea is rather spontaneous, and I didn’t really calculated the budget or resources in advance, I did everything in the direction of the outbursts.
Second phase
The second is the choice of an IP camera. The main criterion for choosing was the availability of Wi-Fi, so as not to pull wires throughout the apartment. Properly, without studying the issue, I chose the most affordable and simple IP D-LINK DCS-931L camera for 2 080 rubles. and here I realized that you need to carefully study the characteristics of what you are buying.

In fact, all that she can do is display a picture in real time, and everything related to the issue of storing images from the camera is present only in more expensive versions. I will not post all the TX of this camera, I will limit myself to a description of its main functionality:

- Real-time video streaming through the D-Link cloud server . There is also a mobile application for this service, which allows you to view the picture from the camera in real time on any mobile device (you can’t record, only a photo).
- View the video stream via the web interface.
- Sending photos and videos to FTP, and the main file is that the video cannot exceed 3mb.

Based on the available capabilities, I raised the FTP server on MicroServer using regular Windows tools and configured the camera accordingly, organized streaming recording to the server. As a result, I got a huge bunch of 3MB files with a few second videos. From a practical point of view, I received a video archive that is not suitable for viewing and analysis, and the video stream is poorly compressed (but what should I expect from MJPEG). In the future, I made a decision to transfer this camera to the entrance and configure the recording for the event, i.e. writes only when there is movement in the frame. If suddenly someone wants to unscrew it, then I will know what it looked like. The second significant drawback of this camera was of course the image quality, not that a small resolution of 640x480 , but most importantly a small viewing angle of 45 °, which is extremely small for grasping the area of the room from the corner, through the camera we will see only a third of the area. And the sensitivity of the sensor is bad, it can only be seen in good light, there is no night shooting mode, oh and the sound is terrible.
Third stage
The third stage of my Wishlist was the choice of a new IP camera with the ability to record streaming video to a remote server, a good viewing angle and night shooting mode. Here I have already approached responsibly to the choice, but what was my surprise that there is not a single camera within $ 200 that would meet my criteria, but in fact this is the minimum that turns an ordinary webcam into a video surveillance tool.
After a week of studying specialized forums my choice stopped on the camera HIKVISION the DS-2CD2432F-IW , the cost of which amounted to 7590 rubles.

Here is her review:
A little about her:
Matrix type: CMOS
Focal length: 4 mm
Camera resolution: 3 MP
Wi-Fi: 802.11n
Network protocols: TCP / IP, HTTP, DHCP, DNS, DDNS, RTP, RTSP, PPPoE, SMTP, NTP, SNMP, HTTPS, FTP , 802.1x, Qos (SIP, SRTP, IPv6 option)
Support for memory cards: Micro SD up to 32 GB.
Shooting specifications
Resolution: 2048 x 1536
Video compression formats: H.264 / MJPEG
IR illumination: yes
Night shot distance: 10 m
Viewing angle: 75.8 °
Alarm triggering: PIR sensor / Motion detector / Video loss / IP address conflict Network disconnection / Video Replacement / Storage Monitoring
A few more points that I would like to note:
- Built-in microphone and speaker, supports two-way audio transmission
- Simultaneous broadcasting of TWO streams of video, HD and SD quality
- A separate analog input for connecting external devices (for example, when a motion sensor is triggered, you can activate a machine gun or vice versa, when a machine gun fires, start recording).
Instructions for the camera .
Who is it?
A few words about the brand: Hikvision Digital Technology is a leading provider of digital video surveillance systems with its own office and production in Hangzhou (China). Here is even their presentation clip, they inspired me confidence:
As you can see, the Chinese brand, but cameras with similar technical specifications made in Europe cost far beyond $ 500. Naturally, I experienced some fears when choosing this camera, but as it turned out in the future, this is in vain. I want to make a reservation right away that the camera is supplied without a power supply, and we need a 12V 1A power supply in the load.
Who wants to get acquainted with the devices from this manufacturer, I immediately want to recommend a Russian representative of this company with an adequate forum of those. support .
Customization
After connecting the camera to the home network, I immediately updated the firmware to V5.1.2 build 140116 and proceeded to configure it.

Having made a number of basic settings, or rather a few dozen, the camera began to stream back as I needed it. Further, my task was to force the camera to record to a remote server. As which we use the same server with Windows Home Server 2011 installed on board, which essentially acts as a NAS. And then began dancing with a tambourine. Next, I will describe my tuning experience, which I had to feel on my own skin, because I could not find any information on the network.

And of course the most interesting thing is the comparison of the image from both cameras, as they say, here without comment:

Next, I had to get this camera to write a video stream to the archive. As it turned out, the camera can record a video stream using several protocols: go to Settings - Advanced configuration - Storage - NAS .
To start, I tried to configure the NAS using the NFS protocol. Everything is simple here, it rises under Windows in 5 minutes. After specifying the path to the NFS storage in the settings, the camera turns on the siren and does not shut up (yes, there is a built-in siren in the camera), after which I press the format button on the "Storage Management" tab, after which the camera goes silent, the long formatting process starts, on the server containers are created. After formatting is completed, the status is set to “Norm”, but after a couple of seconds it is reset and the camera starts turning on the siren again. After trying 5 times, I got the same thing all the time.
Then I tried to connect using the SMB protocol, it’s still easier here, the usual shared folder on the server with configured access rights.

We also format on the “Storage Management” tab, and lo and behold, everything works!
But there were a couple of unresolved issues:
1. HOW TO DISABLE THE SIREN? (It always works if the camera loses connection with the server).
2. HOW TO MAKE RESTORATION OF COMMUNICATION AT THE CONNECTION WITH THE NAS? (If you reboot the router or server, the camera loses connection and does not restore it until the camera is rebooted and all this is accompanied by a vile siren).
The first question I managed to solve, for this we go Settings - Advanced configuration - Events - Events . Next, select the type of event, in our case it is “HDD Error” and uncheck the Audio message box.

The second question has disappeared by itself, now everything is being restored by itself, China in a word! Although now everything is connected to the PSU source, accordingly, when external power is supplied, the UPS feeds both the camera and the server with the router. If the lights are turned off, then I receive SMS on my mobile and I can connect to the server via RDP and put out everything correctly. When power is restored, I also receive SMS, you can turn on the server through WakeOnLan, and all from a mobile phone.
Another nice bonus was the iVMS-4500 lite mobile application .


What can:
- Show picture in real time
- Record stream and take pictures
- View archived videos from a remote server
- Transfer sound to the built-in speaker in the camera (i.e., we have feedback)
- Activate Alarm Mode
Fourth stage
We make all this work together. Here is what I ended up with:

Two cameras, internal and external. The outer D-Link writes on the motion sensor in the frame on the stairwell, the inner one records the situation in the apartment on an ongoing basis. Both store records on the server. The server distributes via DLNA to any device, plus we have access from both the cameras from a mobile phone via the Internet, D-Link only in real time, and Hikvision in both real and archive records. In the future, it remains only to come up with why I need all this. I will not give access to broadcasts for ethical reasons.
Total budget
HP MicroServer G7 server with hard drive: 12,790 rubles.
IP Camera D-LINK DCS-931L 2 080 rub.
HIKVISION DS-2CD2432F-IW Camera 7 590 rub.
The power supply for the HIKVISION camera was, you can buy ~ 500 rubles.
ZyXEL Keenetic Giga router - was, now costs 3,200 rubles.
APC 500 uninterruptible power supply unit - was, now costs 3,500 rubles.
DLNA server Serviio Pro 900 rub. (Pro version for web access to the entire library of the server)
Windows Home Server 2011 - unfortunately not for sale, but can only be preinstalled by the manufacturer of the equipment, so it’s free.
Total: 30 560 rub.
PS When studying this issue, you must not forget about the bandwidth of the Wi-Fi channel, according to my calculations, no more than 3 HD cameras will work normally. At the same time, while recording 2 cameras (HD and SD), I quietly watch DLNA HD movies without brakes and skipping streaming recording to the server.
