How to add a help desk to your YouTrack tracker
On Habré several months ago it was discussed that there is no ideal tracker - such that it would suit both the developer and the customer. In particular, it was mentioned that the tracker needs a help desk . Starting with version 5.1, you have it in YouTrack, and today we will tell you how to configure it.
Before answering the question “how” it is useful to understand why. A typical YouTrack selection scenario is that you decide which bug tracker to take for a new project, or whether it is easy to include the required functionality in an existing one. Then the opportunity to add a help desk to the tracker in just five minutes will tip the balance in favor of YouTrack if the project involves users communicating with a support service.
First of all, the help desk should have a familiar interface. No, we (fornow) did not teach YouTrack to answer phone calls in a beautiful voice. However, your users do not need to get used to the web interface: you can simply write letters in YouTrack. Is it written on your site that you need to write in support at support@your-brilliant-app.com ? Great, YouTrack can take out letters from this mailbox and make requests from them visible to your developers.
Although YouTrack is not a free solution, you can save. The fact is that a license for YouTrack is bought for a certain number of developers (up to 10 - for free). Developers work with YouTrack using a web interface.
Registered users have access through the web interface, and to write letters to the help desk and receive answers, it is not necessary to register. Therefore, your developers will be registered in YouTrack, and users of your application will be able to report problems without registration, completely free for you.
The answers of the developers, which they will write in the comments to the application on YouTrack, will automatically come to users, including those that are put in a copy of the letter.
For the test, I made a copy of YouTrack in the cloud. If the project does not require registration of more than 10 developers, then you can take the free option.
You can start creating your cozy YouTrack from here: account.jetbrains.com/youtrackincloud/signup
If you select Russian after registration, YouTrack will speak Russian. The language setting is per server, not per project, so if you have both Russian-language projects and international ones, you will have to create several copies of YouTrack for multilingual projects.
All examples in this post will be in Russian, and anyone who wants to look at the screenshots in English can read an article on the same topic in English .
We are waiting for just five simple steps.
In the upper right corner of the screen there is a characteristic gear hinting that YouTrack settings are hiding behind it.

We go there, in the section "El. mail ”we write the settings of our SMTP server. Since I ordered YouTrack in the cloud, I don’t need to change anything here except a return address. The address will naturally be my own. Please note: if you will send letters to users on behalf of your gmail account, the "from" address must match the one to which users write. This setting can be per project, but only if your SMTP server does not mind. If you want users of each project to receive mail from their project-bound address, either do not use gmail or create your YouTrack for each project.
First you need to plan what you want to see in the description of each task (issue). You can modify the project later, but it’s convenient to make any settings related to time tracking right away. Therefore, before creating a project in YouTrack, you should agree with your colleagues what fields will be needed in the tasks, and by what rules you will work with them.
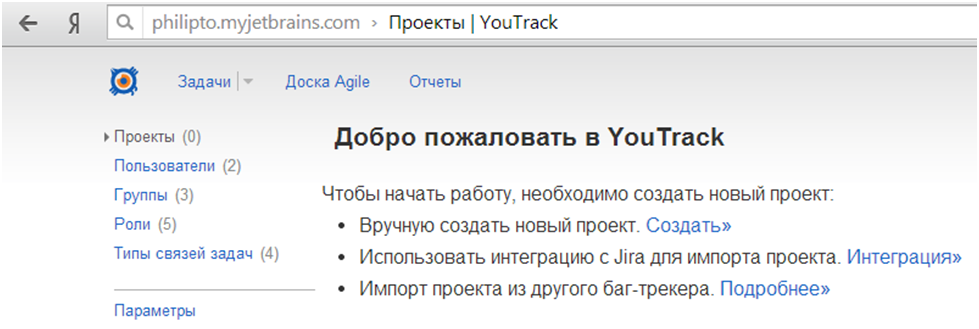
Click “Create Project” (see the first screenshot), and then do not forget to only indicate who will be involved in the tasks in this project. If your developers are not registered yet, register them, and then add them to the list of executors. You can register them manually in the "Users" section, or you can ask everyone to register on their own.
The term workflow in YouTrack, as you probably know, means not only the movement of the application along the state graph (from submitted to fixed, for example), but also sets of scripts that trigger when certain conditions appear. In the Russian-language interface, workflow is called a "workflow." The simplest workflows are the execution of short timer actions (“at 9:00 a day before deadlin'a send an e-mail with a reminder to the project manager”) or by changing the application (“if the status has changed to„ in progress “, put an observer for process of the lead developer Ivanov ").
To change or create new workflow, you need to use a separate program - Workflow Editor, it is written in Java, and will work in any operating system. The program is free, downloads fromwww.jetbrains.com/youtrack/download/get_youtrack.html (Download Workflow Editor button).
However, to set up the help desk it’s not necessary to change the workflow, it’s enough to connect an already finished project that comes with YouTrack to our project. Please note: this workflow is available starting from version 5.2, not earlier! By default, it does not associate with each project, since not every project in YouTrack should have the help desk functionality.
The desired workflow is notifyMultipleUnregisteredUsers. It is needed in order to notify the user who sent the letter that the request generated by the letter has changed (for example, the support engineer added a clarifying question or comment).
You can attach a workflow to a project in the project settings by selecting the “Workflow” tab.
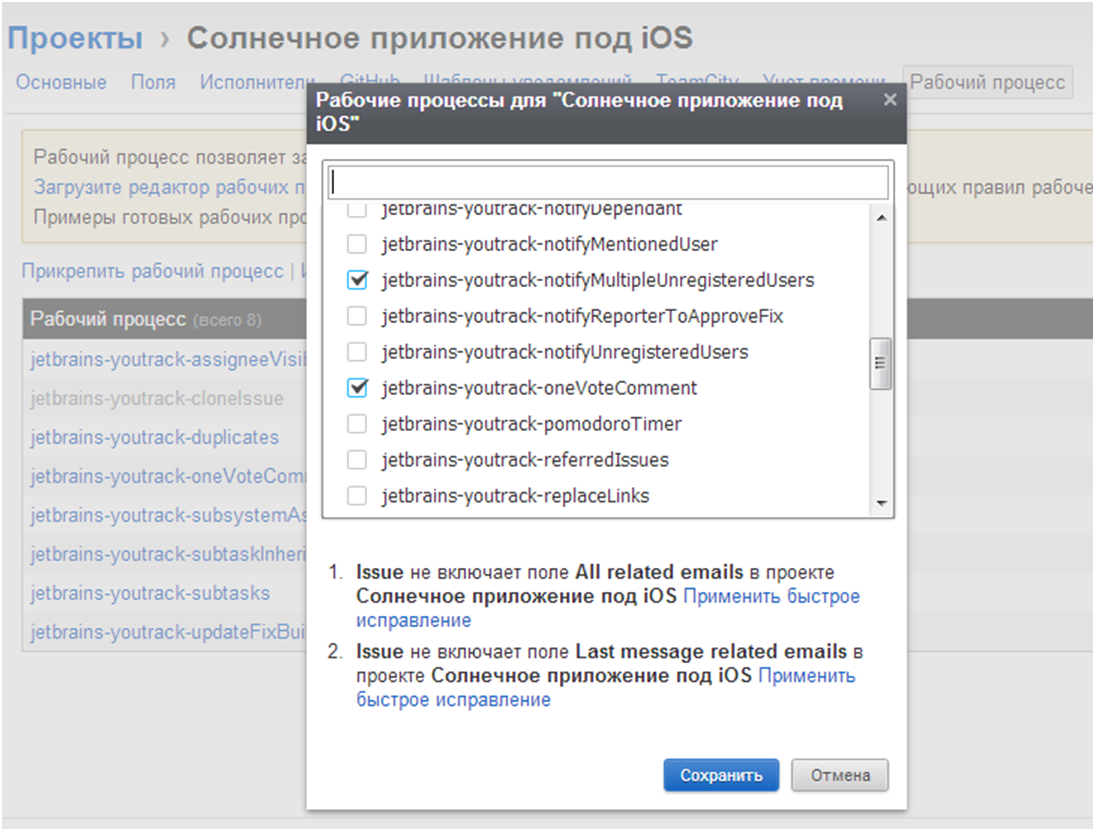
The dialog box reminds us that the All related emails and Last message related emails fields do not exist in our project, YouTrack suggests adding them for us. To do this, click "Apply quick fix."
There is another way to attach a workflow to a project, it will be needed if we need to attach the same workflow to several projects at the same time: go to Settings | Projects and in the lower left corner select "Workflow".

Figure 1 shows the set of rules we need in the general list of workflow, and figure 2 shows what to click to attach this set to our projects. Click “Attach” - and then mark the names of projects from the list. It is done.

If YouTrack underlines the rules and the bookmark in red, this may mean that you have not yet applied quick fix (“quick fix”) or it has not yet been applied (sometimes it takes time, especially if you make changes to the project with a large number of created tasks).
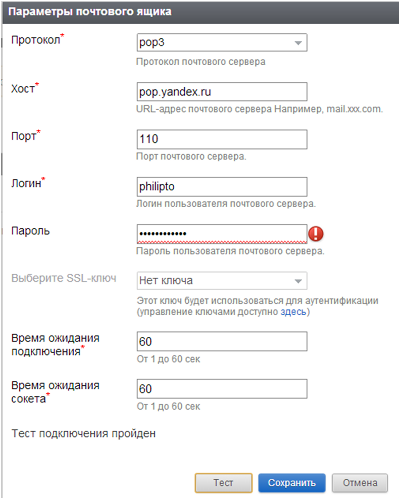
You can add a mailbox in the settings "Integration with email. by mail. " Click "add mailbox", specify the parameters of the incoming mail server, from where you will pick up mail.
Now click on “Add Rule” - this is the rule by which YouTrack will turn incoming messages into issues.
It is IMPORTANT to ALWAYS go to the tab "Task Author" and set the user on behalf of whom all tasks will be created from the received letters. If this is not done, YouTrack will register the authors of all letters as users, and this, as we recall, requires a license for a large number of them.

On the “Post-processing” tab, write what exactly to do when creating the task:
This command is needed to temporarily save information from the letter and is used by the processnotifyMultipleUnregisteredUsers . You need to specify it in two places: for use when creating a task and when adding a comment.

The setup is completed, it remains to polish the settings, if the project requires it.
There are times when the created rules for processing letters need to be supplemented. For example, if you collect letters sent to different aliases into one mailbox, you need to tweak something to correctly send notifications.
See: suppose you collect letters in the general technical support box of your company in support of different applications: app1-support@company.com and app2-support@company.com . Letters arriving on both aliases are collected in a mailbox with the address support@company.com . Then, in order not to produce circular mailings, you need to remove the addresses app1-support@company.com and app2-support@company.com from the headers of letters collected by YouTrack from this mailbox .
To do this, you need to create a new workflow and attach it to the project. To do this, you will need to download and install Workflow Editor (if you have not done this before) and create a new rule:
By default, the notification that the help desk received an email from the user is turned off. We believe that users do not like spam. However, if such messages do not seem to be spam to your users, you can modify the 'Collect related emails on issue creation' rule inside workflow notifyMultipleUnregisteredUsers.
Before the line,
insert the notification sending:
Now your YouTrack is completely ready to be not just a tracker, but also a help desk.
If you have not tried YouTrack, try it in the cloud . You can start with the version that is installed locally .
At JetBrains help desk, one project has already been done on YouTrack. It will be great if in the comments you share your experience: is it convenient to combine a bug tracker with a help desk, which help desk is prettier to you, which you screw to trackers.
Before answering the question “how” it is useful to understand why. A typical YouTrack selection scenario is that you decide which bug tracker to take for a new project, or whether it is easy to include the required functionality in an existing one. Then the opportunity to add a help desk to the tracker in just five minutes will tip the balance in favor of YouTrack if the project involves users communicating with a support service.
First of all, the help desk should have a familiar interface. No, we (for
Although YouTrack is not a free solution, you can save. The fact is that a license for YouTrack is bought for a certain number of developers (up to 10 - for free). Developers work with YouTrack using a web interface.
Registered users have access through the web interface, and to write letters to the help desk and receive answers, it is not necessary to register. Therefore, your developers will be registered in YouTrack, and users of your application will be able to report problems without registration, completely free for you.
The answers of the developers, which they will write in the comments to the application on YouTrack, will automatically come to users, including those that are put in a copy of the letter.
Making Your YouTrack Yourself
For the test, I made a copy of YouTrack in the cloud. If the project does not require registration of more than 10 developers, then you can take the free option.
You can start creating your cozy YouTrack from here: account.jetbrains.com/youtrackincloud/signup
If you select Russian after registration, YouTrack will speak Russian. The language setting is per server, not per project, so if you have both Russian-language projects and international ones, you will have to create several copies of YouTrack for multilingual projects.
All examples in this post will be in Russian, and anyone who wants to look at the screenshots in English can read an article on the same topic in English .
How to set up help desk
We are waiting for just five simple steps.
- Specify SMTP Server
- Create project
- Attach a proper workflow to the project
- Teach YouTrack how to get letters out of the mailbox
- To polish the settings (if necessary).
Specify SMTP Server
In the upper right corner of the screen there is a characteristic gear hinting that YouTrack settings are hiding behind it.
We go there, in the section "El. mail ”we write the settings of our SMTP server. Since I ordered YouTrack in the cloud, I don’t need to change anything here except a return address. The address will naturally be my own. Please note: if you will send letters to users on behalf of your gmail account, the "from" address must match the one to which users write. This setting can be per project, but only if your SMTP server does not mind. If you want users of each project to receive mail from their project-bound address, either do not use gmail or create your YouTrack for each project.
Create project
First you need to plan what you want to see in the description of each task (issue). You can modify the project later, but it’s convenient to make any settings related to time tracking right away. Therefore, before creating a project in YouTrack, you should agree with your colleagues what fields will be needed in the tasks, and by what rules you will work with them.
Click “Create Project” (see the first screenshot), and then do not forget to only indicate who will be involved in the tasks in this project. If your developers are not registered yet, register them, and then add them to the list of executors. You can register them manually in the "Users" section, or you can ask everyone to register on their own.
Attach a proper workflow to the project
The term workflow in YouTrack, as you probably know, means not only the movement of the application along the state graph (from submitted to fixed, for example), but also sets of scripts that trigger when certain conditions appear. In the Russian-language interface, workflow is called a "workflow." The simplest workflows are the execution of short timer actions (“at 9:00 a day before deadlin'a send an e-mail with a reminder to the project manager”) or by changing the application (“if the status has changed to„ in progress “, put an observer for process of the lead developer Ivanov ").
To change or create new workflow, you need to use a separate program - Workflow Editor, it is written in Java, and will work in any operating system. The program is free, downloads fromwww.jetbrains.com/youtrack/download/get_youtrack.html (Download Workflow Editor button).
However, to set up the help desk it’s not necessary to change the workflow, it’s enough to connect an already finished project that comes with YouTrack to our project. Please note: this workflow is available starting from version 5.2, not earlier! By default, it does not associate with each project, since not every project in YouTrack should have the help desk functionality.
The desired workflow is notifyMultipleUnregisteredUsers. It is needed in order to notify the user who sent the letter that the request generated by the letter has changed (for example, the support engineer added a clarifying question or comment).
You can attach a workflow to a project in the project settings by selecting the “Workflow” tab.
The dialog box reminds us that the All related emails and Last message related emails fields do not exist in our project, YouTrack suggests adding them for us. To do this, click "Apply quick fix."
There is another way to attach a workflow to a project, it will be needed if we need to attach the same workflow to several projects at the same time: go to Settings | Projects and in the lower left corner select "Workflow".
Figure 1 shows the set of rules we need in the general list of workflow, and figure 2 shows what to click to attach this set to our projects. Click “Attach” - and then mark the names of projects from the list. It is done.
If YouTrack underlines the rules and the bookmark in red, this may mean that you have not yet applied quick fix (“quick fix”) or it has not yet been applied (sometimes it takes time, especially if you make changes to the project with a large number of created tasks).
Teach YouTrack how to get letters out of the mailbox
You can add a mailbox in the settings "Integration with email. by mail. " Click "add mailbox", specify the parameters of the incoming mail server, from where you will pick up mail.
Now click on “Add Rule” - this is the rule by which YouTrack will turn incoming messages into issues.
It is IMPORTANT to ALWAYS go to the tab "Task Author" and set the user on behalf of whom all tasks will be created from the received letters. If this is not done, YouTrack will register the authors of all letters as users, and this, as we recall, requires a license for a large number of them.
On the “Post-processing” tab, write what exactly to do when creating the task:
Last message related emails ${from} ${to} ${cc}This command is needed to temporarily save information from the letter and is used by the processnotifyMultipleUnregisteredUsers . You need to specify it in two places: for use when creating a task and when adding a comment.
The setup is completed, it remains to polish the settings, if the project requires it.
Polish settings
Change the email list for notifications
There are times when the created rules for processing letters need to be supplemented. For example, if you collect letters sent to different aliases into one mailbox, you need to tweak something to correctly send notifications.
See: suppose you collect letters in the general technical support box of your company in support of different applications: app1-support@company.com and app2-support@company.com . Letters arriving on both aliases are collected in a mailbox with the address support@company.com . Then, in order not to produce circular mailings, you need to remove the addresses app1-support@company.com and app2-support@company.com from the headers of letters collected by YouTrack from this mailbox .
To do this, you need to create a new workflow and attach it to the project. To do this, you will need to download and install Workflow Editor (if you have not done this before) and create a new rule:
rule Remove additional feedback emails from All related emails
when All related emails.changed {
All related emails = All related emails.replace (
"app1-support@company.com", "");
All related emails = All related emails.replace (
"app2-support@company.com", "");
}
Notification of users on receipt of a request
By default, the notification that the help desk received an email from the user is turned off. We believe that users do not like spam. However, if such messages do not seem to be spam to your users, you can modify the 'Collect related emails on issue creation' rule inside workflow notifyMultipleUnregisteredUsers.
Before the line,
Last message related emails=nullinsert the notification sending:
var reporterEmail = Last message related emails.split (
"", preserveAllTokens) .first
sendMail (reporterEmail, “Your subject”, “Your email body”)
Now your YouTrack is completely ready to be not just a tracker, but also a help desk.
If you have not tried YouTrack, try it in the cloud . You can start with the version that is installed locally .
At JetBrains help desk, one project has already been done on YouTrack. It will be great if in the comments you share your experience: is it convenient to combine a bug tracker with a help desk, which help desk is prettier to you, which you screw to trackers.