Spring inside. Context Initialization Steps

Good day dear Khabravchians. For 3 years I have been working on a project in which we use Spring. I was always interested to understand how it is arranged inside. I searched for articles about the internal structure of Spring, but unfortunately I did not find anything.
Anyone who is interested in the internal structure of Spring, I ask for cat.
The diagram shows the main stages of raising ApplicationContext. In this post, we will focus on each of these stages. Some stage will be considered in detail, and some will be described in general terms.
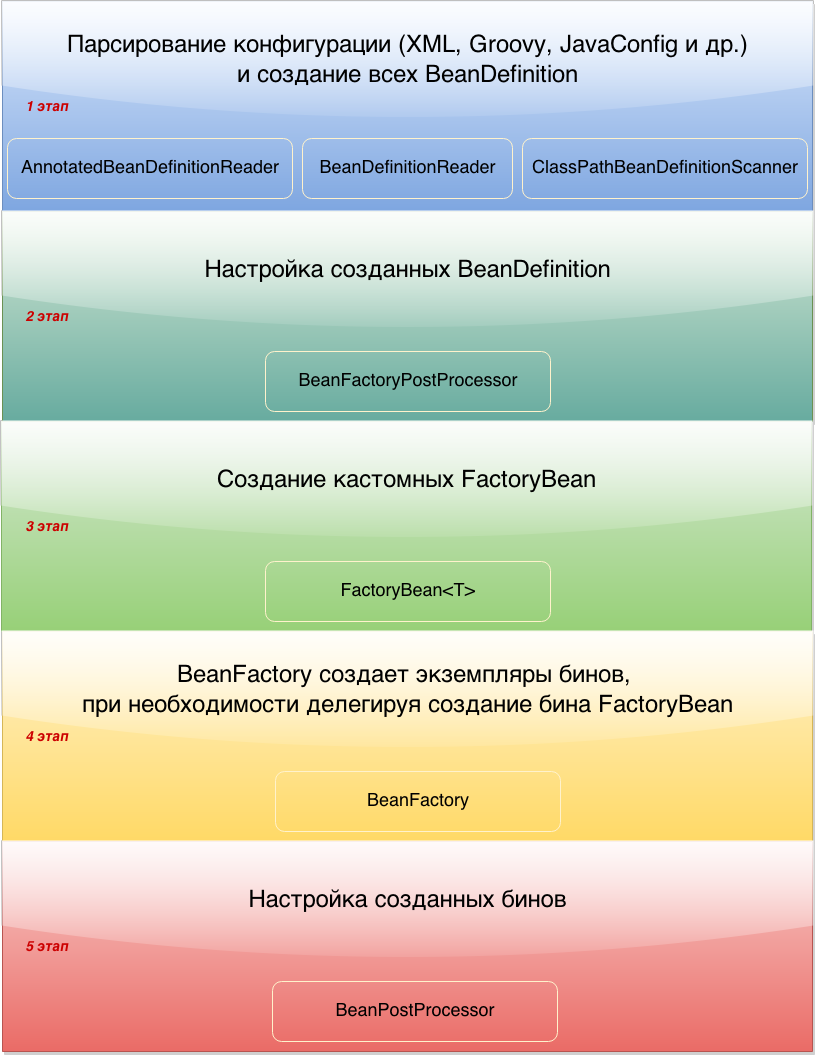
1. Parsing configuration and creating BeanDefinition
After the release of the fourth version of the spring, we have four ways to configure the context:
- Xml configuration - ClassPathXmlApplicationContext (“context.xml”)
- Configuration via annotations indicating the package for scanning - AnnotationConfigApplicationContext (“package.name”)
- Configuration via annotations indicating the class (or class array) marked with the annotation @Configuration -AnnotationConfigApplicationContext (JavaConfig.class). This configuration method is called JavaConfig.
- Groovy configuration - GenericGroovyApplicationContext (“context.groovy”)
All four methods are very well written here .
The goal of the first stage is to create all BeanDefinition . BeanDefinition is a special interface through which you can access the metadata of the future bean. Depending on what configuration you have, one or another configuration parsing mechanism will be used.
Xml configuration
For the Xml configuration, a class is used - XmlBeanDefinitionReader , which implements the BeanDefinitionReader interface . Everything is quite transparent here. XmlBeanDefinitionReader receives an InputStream and loads a Document through the DefaultDocumentLoader . Next, each element of the document is processed and if it is a bin, a BeanDefinition is created based on the filled data (id, name, class, alias, init-method, destroy-method, etc.). Each BeanDefinition is placed in a Map. Map is stored in the DefaultListableBeanFactory class . In the code, Map looks like this.
/** Map of bean definition objects, keyed by bean name */privatefinal Map<String, BeanDefinition> beanDefinitionMap = new ConcurrentHashMap<String, BeanDefinition>(64);
Configuration via annotations indicating package for scan or JavaConfig
The configuration through annotations indicating the package for scanning or JavaConfig is fundamentally different from the configuration through xml. In both cases, the AnnotationConfigApplicationContext class is used .
new AnnotationConfigApplicationContext(JavaConfig.class);or
new AnnotationConfigApplicationContext(“package.name”);If you look inside the AnnotationConfigApplicationContext, you can see two fields.
privatefinal AnnotatedBeanDefinitionReader reader;
privatefinal ClassPathBeanDefinitionScanner scanner;
ClassPathBeanDefinitionScanner scans the specified package for classes marked with the @Component annotation (or any other annotation that includes @Component ). Point of classes and parses them are BeanDefinition .
For scanning to run, the package for scanning must be specified in the configuration.
@ComponentScan({"package.name"})or
<context:component-scanbase-package="package.name"/>AnnotatedBeanDefinitionReader works in several steps.
- The first step is to register all @Configuration for further parsing. If Conditional is used in the configuration , only those configurations for which Condition will return true will be registered . Conditional annotation appeared in the fourth version of the spring. It is used when, at the time of raising the context, you need to decide whether to create a bin / configuration or not. And the decision is made by a special class, which must implement the Condition interface .
- The second step is to register a special BeanFactoryPostProcessor , namely BeanDefinitionRegistryPostProcessor , which, using the ConfigurationClassParser class, parses JavaConfig and creates a BeanDefinition .
Groovy configuration
This configuration is very similar to the configuration via Xml, except that the file is not XML, but Groovy. The GroovyBeanDefinitionReader class handles reading and parsing the groovy configuration .
2. Configure Created BeanDefinition
After the first stage, we have a Map, which stores BeanDefinition . The spring architecture is built in such a way that we have the opportunity to influence what our beans will be before they are actually created, in other words, we have access to the class metadata. To do this, there is a special interface BeanFactoryPostProcessor , implementing which, we get access to the created BeanDefinition and can change them. There is only one method in this interface.
publicinterfaceBeanFactoryPostProcessor{
	voidpostProcessBeanFactory(ConfigurableListableBeanFactory beanFactory)throws BeansException;
}
The postProcessBeanFactory method accepts the ConfigurableListableBeanFactory parameter . This factory contains many useful methods, including getBeanDefinitionNames , through which we can get all BeanDefinitionNames, and only then get BeanDefinition for a specific metadata for a specific name .
Let's take a look at one of the native implementations of the BeanFactoryPostProcessor interface . Usually, the settings for connecting to the database are transferred to a separate property file, then using PropertySourcesPlaceholderConfigurerthey are loaded and inject these values into the desired field. Since inject is done by key, before creating an instance of the bean, you need to replace this key with the value itself from the property file. This replacement occurs in a class that implements the BeanFactoryPostProcessor interface . The name of this class is PropertySourcesPlaceholderConfigurer . The whole process can be seen in the figure below.
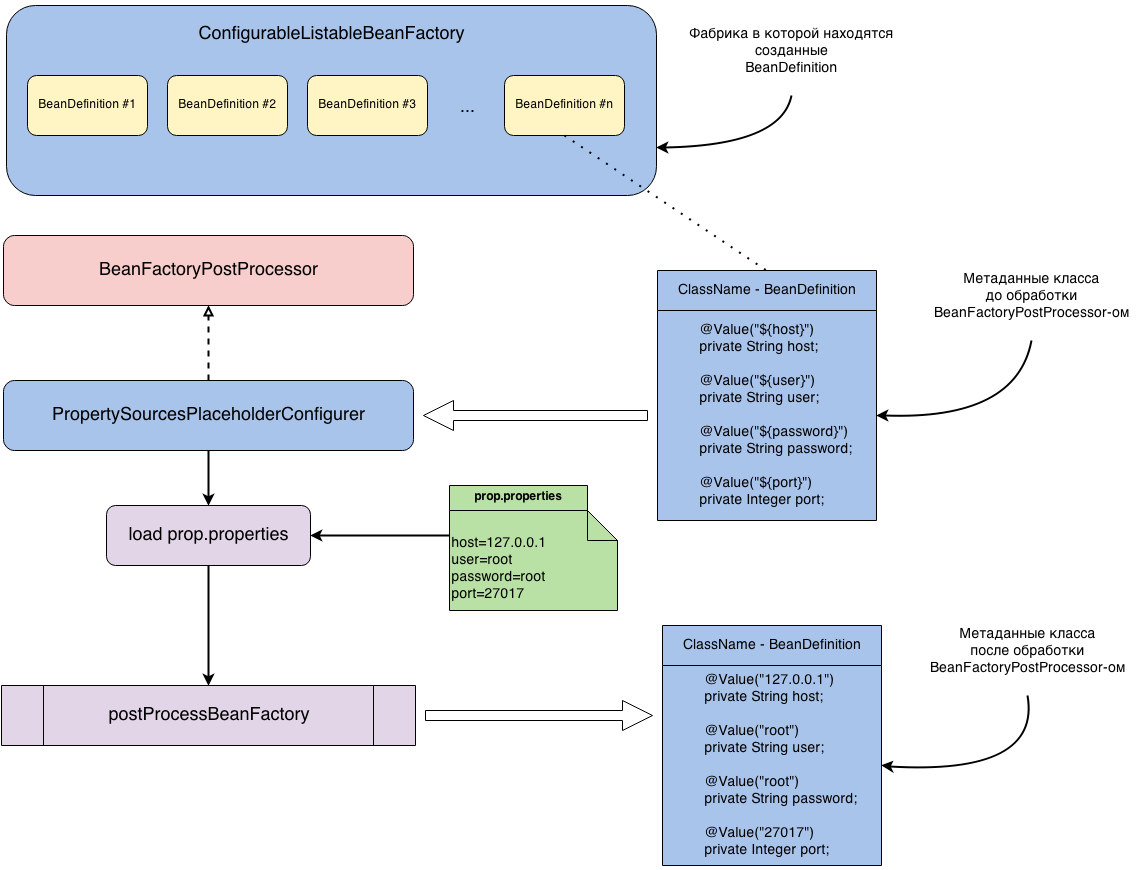
Let's look again at what is happening here. We have a BeanDefinition for the ClassName class. The class code is given below.
@ComponentpublicclassClassName{
    @Value("${host}")
    private String host;
    @Value("${user}")
    private String user;
    @Value("${password}")
    private String password;
    @Value("${port}")
    private Integer port;
}
If PropertySourcesPlaceholderConfigurer does not process this BeanDefinition , then after creating an instance of ClassName, the value "$ {host}" will be injected into the host field (the corresponding values will be injected into the remaining fields). If PropertySourcesPlaceholderConfigurer still processes this BeanDefinition , then after processing, the metadata of this class will look like this.
@ComponentpublicclassClassName{
    @Value("127.0.0.1")
    private String host;
    @Value("root")
    private String user;
    @Value("root")
    private String password;
    @Value("27017")
    private Integer port;
}
Accordingly, the correct values will be injected into these fields.
In order for the PropertySourcesPlaceholderConfigurer to be added to the settings loop of the created BeanDefinition , you need to do one of the following:
For XML configuration.
<context:property-placeholderlocation="property.properties" />For JavaConfig.
@Configuration@PropertySource("classpath:property.properties")
publicclassDevConfig{
	@Beanpublicstatic PropertySourcesPlaceholderConfigurer configurer(){
	    returnnew PropertySourcesPlaceholderConfigurer();
	}
}
PropertySourcesPlaceholderConfigurer must be declared as static. Without static, everything will work for you until you try to use @ Value inside the @Configuration class .
3. Creating Custom FactoryBean
FactoryBean is a generic interface to which you can delegate the process of creating type beans. In those days when the configuration was exclusively in xml, developers needed a mechanism by which they could control the process of creating beans. This is precisely what this interface was made for. In order to better understand the problem, I will give an example xml configuration.
<?xml version="1.0" encoding="UTF-8"?><beansxmlns="http://www.springframework.org/schema/beans"xmlns:xsi="http://www.w3.org/2001/XMLSchema-instance"xmlns:context="http://www.springframework.org/schema/context"xsi:schemaLocation="http://www.springframework.org/schema/beans http://www.springframework.org/schema/beans/spring-beans.xsd http://www.springframework.org/schema/context http://www.springframework.org/schema/context/spring-context.xsd"><beanid="redColor"scope="prototype"class="java.awt.Color"><constructor-argname="r"value="255" /><constructor-argname="g"value="0" /><constructor-argname="b"value="0" /></bean></beans>At first glance, everything is fine and there are no problems. But what if you need a different color? Create another bean? No problem.
<?xml version="1.0" encoding="UTF-8"?><beansxmlns="http://www.springframework.org/schema/beans"xmlns:xsi="http://www.w3.org/2001/XMLSchema-instance"xmlns:context="http://www.springframework.org/schema/context"xsi:schemaLocation="http://www.springframework.org/schema/beans http://www.springframework.org/schema/beans/spring-beans.xsd http://www.springframework.org/schema/context http://www.springframework.org/schema/context/spring-context.xsd"><beanid="redColor"scope="prototype"class="java.awt.Color"><constructor-argname="r"value="255" /><constructor-argname="g"value="0" /><constructor-argname="b"value="0" /></bean><beanid="green"scope="prototype"class="java.awt.Color"><constructor-argname="r"value="0" /><constructor-argname="g"value="255" /><constructor-argname="b"value="0" /></bean></beans>But what if I want a random color every time? This is where the FactoryBean interface comes to the rescue .
Let's create a factory that will be responsible for creating all type beans - Color .
package com.malahov.factorybean;
import org.springframework.beans.factory.FactoryBean;
import org.springframework.stereotype.Component;
import java.awt.*;
import java.util.Random;
/**
 * User: malahov
 * Date: 18.04.14
 * Time: 15:59
 */publicclassColorFactoryimplementsFactoryBean<Color> {
    @Overridepublic Color getObject()throws Exception {
        Random random = new Random();
        Color color = new Color(random.nextInt(255), random.nextInt(255), random.nextInt(255));
        return color;
    }
    @Overridepublic Class<?> getObjectType() {
        return Color.class;
    }
    @OverridepublicbooleanisSingleton(){
        returnfalse;
    }
}
Add it to xml and delete the previously declared type beans - Color .
<?xml version="1.0" encoding="UTF-8"?><beansxmlns="http://www.springframework.org/schema/beans"xmlns:xsi="http://www.w3.org/2001/XMLSchema-instance"xmlns:context="http://www.springframework.org/schema/context"xsi:schemaLocation="http://www.springframework.org/schema/beans http://www.springframework.org/schema/beans/spring-beans.xsd http://www.springframework.org/schema/context http://www.springframework.org/schema/context/spring-context.xsd"><beanid="colorFactory"class="com.malahov.temp.ColorFactory"></bean></beans>Now creating a bean of type Color.class will be delegated by ColorFactory, which will use the getObject method each time a new bean is created .
For those who use JavaConfig, this interface will be absolutely useless.
4. Creating Bean Instances
BeanFactory is responsible for creating the instance of the beans , and if necessary, delegates this to the custom FactoryBean . Bean instances are created based on previously created BeanDefinition .

5. Setting up the created beans
The BeanPostProcessor interface allows you to wedge into the process of setting your beans before they get into the container. The interface carries several methods.
publicinterfaceBeanPostProcessor{
	Object postProcessBeforeInitialization(Object bean, String beanName)throws BeansException;
	Object postProcessAfterInitialization(Object bean, String beanName)throws BeansException;
}
Both methods are called for each bin. Both methods have exactly the same parameters. The only difference is the order in which they are called. The first is called before the init method, the second after. It is important to understand that at this stage the bean instance has already been created and is being reconfigured. There are two important points:
- Both methods should eventually return the bean. If you return null in the method, then when you receive this bin from the context, you will get null, and since all the bins pass through the binpostprocessor, after raising the context, when you request any bin, you will receive figs, in the sense of null.
- If you want to make a proxy on your object, then keep in mind that it is customary to do this after calling the init method, in other words, you need to do this in the postProcessAfterInitialization method .
The tuning process is shown in the figure below. The order in which BeanPostProcessor will be called is not known, but we know for sure that they will be executed sequentially.

In order to better understand what this is for, let's look at an example.
When developing large projects, as a rule, a team is divided into several groups. For example, the first group of developers is writing the infrastructure of the project, and the second group, using the achievements of the first group, is writing business logic. Suppose the second group needed a functional that would allow some values to be injected into their bins, for example random numbers.
At the first stage, an annotation will be created, which will mark the fields of the class into which the value needs to be injected.
@Retention(RetentionPolicy.RUNTIME)
@Target(ElementType.FIELD)
public@interface InjectRandomInt {
    intmin()default 0;
    intmax()default 10;
}
By default, the range of random numbers will be from 0 to 10.
Then, you need to create a handler for this annotation, namely the BeanPostProcessor implementation for processing the InjectRandomInt annotation .
@ComponentpublicclassInjectRandomIntBeanPostProcessorimplementsBeanPostProcessor{
    privatestaticfinal Logger LOGGER = LoggerFactory.getLogger(InjectRandomIntBeanPostProcessor.class);
    @Overridepublic Object postProcessBeforeInitialization(Object bean, String beanName)throws BeansException {
        LOGGER.info("postProcessBeforeInitialization::beanName = {}, beanClass = {}", beanName, bean.getClass().getSimpleName());
        Field[] fields = bean.getClass().getDeclaredFields();
        for (Field field : fields) {
            if (field.isAnnotationPresent(InjectRandomInt.class)) {
                field.setAccessible(true);
                InjectRandomInt annotation = field.getAnnotation(InjectRandomInt.class);
                ReflectionUtils.setField(field, bean, getRandomIntInRange(annotation.min(), annotation.max()));
            }
        }
        return bean;
    }
    @Overridepublic Object postProcessAfterInitialization(Object bean, String beanName)throws BeansException {
        return bean;
    }
    privateintgetRandomIntInRange(int min, int max){
        return min + (int)(Math.random() * ((max - min) + 1));
    }
}
The code of this BeanPostProcessor is quite transparent, so we will not dwell on it, but there is one important point.
BeanPostProcessor must be a bean, so we either mark it with the @Component annotation , or register it in the xml configuration as a regular bean.
The first group of developers completed its task. Now the second group can use these developments.
@Component@Scope(ConfigurableBeanFactory.SCOPE_PROTOTYPE)
publicclassMyBean{
    @InjectRandomIntprivateint value1;
    @InjectRandomInt(min = 100, max = 200)
    privateint value2;
    privateint value3;
    @Overridepublic String toString(){
        return"MyBean{" +
                "value1=" + value1 +
                ", value2=" + value2 +
                ", value3=" + value3 +
                '}';
    }
}
As a result, all bins of type MyBean obtained from the context will be created with the already initialized fields value1 and value2. It’s also worth noting that the stage at which the injection of values into these fields will depend on what kind of @ Scope your bin has. SCOPE_SINGLETON - initialization will occur once at the stage of raising the context. SCOPE_PROTOTYPE - initialization will be performed each time upon request. And in the second case, your bean will go through all BeanPostProcessors, which can significantly affect performance.
The full program code can be found here .
I want to say special thanks to EvgenyBorisov . Thanks to himcourse , I decided to write this post.
I also advise you to see his report from JPoint 2014.