May 5, 2014 at 15:19
USB hardware module in ATXMega. HID Implementation Guide
The USB hardware module in Atmel's eight-bit microcontrollers has been around for a long time. But I did not find a clear guide "step by step" in Russian for the XMega family of controllers. Therefore, I share my experience. The experience is quite superficial, but allows developers who do not have the opportunity to delve into the intricacies of the USB stack, in a short time to ensure the interaction of the controller with the computer via USB. The Atmel YouTube channel has videos on how to do this. However, it’s more convenient for many to read than watch a video - this post is for these people. Also, I will describe the implementation on the PC side.
IRON. I used the ATXMega256A3BU controller. This is the same ATXMega256A3, but with a hardware-implemented USB module. By the way, I thought they were pin-to-pin compatible, but this is not completely true, be careful! I connected the terminals of the controller D + and D- directly to the corresponding pins on the computer connector without any resistors. In my case, however, it was not a computer, but a USB hub microcircuit, and then a computer, but I do not think that this changes things significantly.
SOFTWARE MICROCONTROLLER. To create the backbone of the firmware, with the Atmel USB stack already implemented by the programmers, we will use the ASF Wizard, which is built into Atmel Studio version 6. Starting day you need to create a new project (File-> New Project). Next, in the window that opens, you must select the items shown in the picture.

After creating a new project, you need to run ASF Wizard (menu ASF-> ASF Wizard). In the Availble modules tab, you need to find the USB Device (service), and click Add. After that, the USB Device (service) will appear in the Selected Modules tab, and in front of it a drop-down list. In it we select hid_generic. Then we click on the Summary button, and this is the end of the project creation. Now he is ready to fill it with meaning. In the main.c project file, we will see the following contents:
The board_init () function initializes the debug board, XMEGA-A3BU Xplained. Since I didn’t have this board, but my own, I threw this function away. Next, we need a function to initialize USB. This is udc_start (). It is announced somewhere in the bowels of asf.h, so we quietly prescribe it. It initializes USB according to the settings described in the conf_usb.h file. This file is located in the project folder. Here are the lines of this file that are especially important for configuring USB HID:
Define names speak for themselves. There is enough information about vendor id and product id on the network. UDI_HID_REPORT_IN_SIZE and UDI_HID_REPORT_OUT_SIZE are the sizes of the input and output buffers, respectively. The my_callback_generic_report_out () function is called when the data packet is received from the computer. In it, you can process the received data.
After the USB is initialized, it can be used. The program code in general looks like this:
I will say a few words about the sysclk_enable_module line (SYSCLK_PORT_C, SYSCLK_TC0). The fact is that the sysclk_init () function turns off the clocking of most peripherals by default. I couldn’t figure out what principle it does, but figured out how to turn the peripherals back on :) You can use sysclk_enable_module (), and add what you need to include as arguments. What exactly can be added can be understood if you use the search throughout the project and specify sysclk_disable_module as the search parameter.
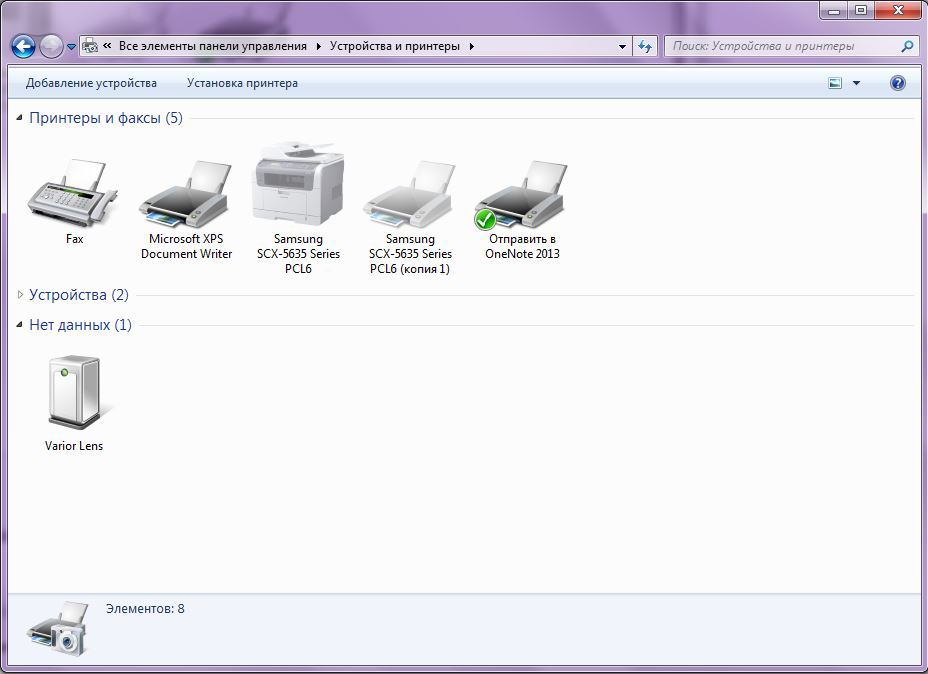
If you fill this code into the controller and connect it to the computer, a HID-compatible device will appear in the device manager. And in devices and printers, the device with the name that was indicated in the line #define USB_DEVICE_PRODUCT_NAME. In my case, it looks like this:
SOFTWARE FOR COMPUTER.
All the same Atmel kindly provides us with examples of how to do this on the side of the computer. They are made in Visual Studio, in which I am not strong, so I had to rewrite it under C ++ Builder. On this occasion, my colleagues told me: "get out." But what they are so rich in and happy. In general, I give an example on a builder.
The first step is to connect the AtUsbHid.dll library. You need to take it in a folder with an Atmelovsk example and drop it into your project folder. To start, in the .h project file in the appropriate places, write the following lines:
Further in the body of the program, for example, when creating a form, you need to write the following.
Now we have functions for working with HID devices. findHidDevice (VID, PID) searches the system for the device with the corresponding VID and PID. After that, you can work with them. writeData () sends an array to the device. You can use all this for example like this:
This is how I implemented the HID device on ATXMega. Of course, the subtleties and nuances of USB settings are not disclosed in the article. However, now those who are just starting their acquaintance with this topic have instructions for action, and then, picking and sorting it out, you need to hand the cards!
And of course, at the end there’s always a video how it works for me. Camcorder with adjustable zoom, focus and iris.
IRON. I used the ATXMega256A3BU controller. This is the same ATXMega256A3, but with a hardware-implemented USB module. By the way, I thought they were pin-to-pin compatible, but this is not completely true, be careful! I connected the terminals of the controller D + and D- directly to the corresponding pins on the computer connector without any resistors. In my case, however, it was not a computer, but a USB hub microcircuit, and then a computer, but I do not think that this changes things significantly.
SOFTWARE MICROCONTROLLER. To create the backbone of the firmware, with the Atmel USB stack already implemented by the programmers, we will use the ASF Wizard, which is built into Atmel Studio version 6. Starting day you need to create a new project (File-> New Project). Next, in the window that opens, you must select the items shown in the picture.
After creating a new project, you need to run ASF Wizard (menu ASF-> ASF Wizard). In the Availble modules tab, you need to find the USB Device (service), and click Add. After that, the USB Device (service) will appear in the Selected Modules tab, and in front of it a drop-down list. In it we select hid_generic. Then we click on the Summary button, and this is the end of the project creation. Now he is ready to fill it with meaning. In the main.c project file, we will see the following contents:
#include
int main (void)
{
	board_init();
	// Insert application code here, after the board has been initialized.
}
The board_init () function initializes the debug board, XMEGA-A3BU Xplained. Since I didn’t have this board, but my own, I threw this function away. Next, we need a function to initialize USB. This is udc_start (). It is announced somewhere in the bowels of asf.h, so we quietly prescribe it. It initializes USB according to the settings described in the conf_usb.h file. This file is located in the project folder. Here are the lines of this file that are especially important for configuring USB HID:
#define  USB_DEVICE_VENDOR_ID             0x03EB
#define  USB_DEVICE_PRODUCT_ID            0x2013
#define  USB_DEVICE_POWER                 500 // Consumption on Vbus line (mA)
#define  USB_DEVICE_ATTR                    USB_CONFIG_ATTR_SELF_POWERED
#define  USB_DEVICE_MANUFACTURE_NAME      "Company Name"
#define  USB_DEVICE_PRODUCT_NAME          "Varior Lens"
#define  USB_DEVICE_SERIAL_NAME           "00001"
#define  UDI_HID_GENERIC_REPORT_OUT(ptr) my_callback_generic_report_out(ptr)
 extern void my_callback_generic_report_out(uint8_t *report);
#define  UDI_HID_REPORT_IN_SIZE             64
#define  UDI_HID_REPORT_OUT_SIZE            64
#define  UDI_HID_REPORT_FEATURE_SIZE        4
Define names speak for themselves. There is enough information about vendor id and product id on the network. UDI_HID_REPORT_IN_SIZE and UDI_HID_REPORT_OUT_SIZE are the sizes of the input and output buffers, respectively. The my_callback_generic_report_out () function is called when the data packet is received from the computer. In it, you can process the received data.
After the USB is initialized, it can be used. The program code in general looks like this:
#define	F_CPU 		32000000UL
#include
int8_t ui_hid_report [64];
uint8_t report [64];
void my_callback_generic_report_out(uint8_t *data){
		for (uint8_t i = 0; i < 64 i++){
			report [i] = data[i];
		}
	// теперь в массиве report находятся данные полученные в сообщении
}
void main(){
	irq_initialize_vectors();
	cpu_irq_enable();
	sysclk_init();
	udc_start();
    sysclk_enable_module(SYSCLK_PORT_C, SYSCLK_TC0); // включение тактирования таймера ТС0
	while(1){
	// отправка данных находящихся в массиве ui_hid_report на компьютер
	udi_hid_generic_send_report_in(ui_hid_report);
	}
}
I will say a few words about the sysclk_enable_module line (SYSCLK_PORT_C, SYSCLK_TC0). The fact is that the sysclk_init () function turns off the clocking of most peripherals by default. I couldn’t figure out what principle it does, but figured out how to turn the peripherals back on :) You can use sysclk_enable_module (), and add what you need to include as arguments. What exactly can be added can be understood if you use the search throughout the project and specify sysclk_disable_module as the search parameter.
If you fill this code into the controller and connect it to the computer, a HID-compatible device will appear in the device manager. And in devices and printers, the device with the name that was indicated in the line #define USB_DEVICE_PRODUCT_NAME. In my case, it looks like this:
SOFTWARE FOR COMPUTER.
All the same Atmel kindly provides us with examples of how to do this on the side of the computer. They are made in Visual Studio, in which I am not strong, so I had to rewrite it under C ++ Builder. On this occasion, my colleagues told me: "get out." But what they are so rich in and happy. In general, I give an example on a builder.
The first step is to connect the AtUsbHid.dll library. You need to take it in a folder with an Atmelovsk example and drop it into your project folder. To start, in the .h project file in the appropriate places, write the following lines:
typedef ULONG HIDStatus;
typedef HIDStatus WINAPI __import tcloseDevice(void);
typedef HIDStatus WINAPI __import tfindHidDevice(const UINT VendorID, const UINT ProductID);
typedef HIDStatus WINAPI __import twriteData(UCHAR* buf);
protected:
 tcloseDevice *closeDevice;
 tfindHidDevice *findHidDevice;
 twriteData *writeData;
Further in the body of the program, for example, when creating a form, you need to write the following.
HINSTANCE AtUsbHidhandle;
 AtUsbHidhandle = LoadLibrary("AtUsbHid.dll");
 if (AtUsbHidhandle == 0) ShowMessage("Не найдена AtUsbHid.dll");
 else{
    closeDevice = (tcloseDevice*)GetProcAddress(AtUsbHidhandle,"closeDevice");
    findHidDevice = (tfindHidDevice*)GetProcAddress(AtUsbHidhandle,"findHidDevice");
    writeData   = (twriteData*)GetProcAddress(AtUsbHidhandle,"writeData");
 }
Now we have functions for working with HID devices. findHidDevice (VID, PID) searches the system for the device with the corresponding VID and PID. After that, you can work with them. writeData () sends an array to the device. You can use all this for example like this:
#define VID 0x03EB
#define PID 0x2013
char a = 0;
a = findHidDevice(VID, PID_1);
if (a != 0){
  Label1->Caption = "Подключено";
}
UCHAR leds[64];
leds[0] = 255;
leds[1] = 10;
leds[2] = 20;
leds[3] = 30;
writeData(leds);
closeDevice();
This is how I implemented the HID device on ATXMega. Of course, the subtleties and nuances of USB settings are not disclosed in the article. However, now those who are just starting their acquaintance with this topic have instructions for action, and then, picking and sorting it out, you need to hand the cards!
And of course, at the end there’s always a video how it works for me. Camcorder with adjustable zoom, focus and iris.