Dynamic mesh drawing in Unreal Engine 4
- Transfer
In this tutorial on Unreal Engine 4, you will learn how to draw flowers on a mesh of any type.
Mesh drawing allows players to color in-game objects. Examples of drawing on the mesh: graffiti (goop) in Super Mario Sunshine , gels in Portal 2 and ink in Splatoon . Drawing can be used as a gameplay element or just a graphic design. Anyway, drawing on the mesh opens up new opportunities for gameplay designers and artists.
Although this effect is used almost equally in the examples above, you can apply mesh drawing to many other effects. For example, you can paint on objects with paint cans, draw wounds on characters, or even let the players draw the character's face themselves!
In this tutorial, you will learn how to draw on skeleton meshes. For this we will do the following:
- Turn the mesh into its UV form
- Use the intersection point of the line trace to create a spherical mesh mask
- Render the expanded mesh and spherical mask to the render target using scene capture
- Use a mask to mix textures in the character's material.
Note that this tutorial is not about drawing vertices. Drawing vertices depends on the resolution of the mesh and cannot be changed during the game. The method used in this tutorial, on the contrary, works regardless of the mesh resolution and can be used during the game.
Note: it is assumed that you already know the basics of working with the Unreal Engine. If you are new to the Unreal Engine, then learn our series of tutorials from 10 parts of the Unreal Engine for beginners .
Note: this tutorial is the fourth part of the tutorial series on the use of render targets in the Unreal Engine:
- Part 1: Drawing with Render Targets
- Part 2: Warped Snow
- Part 3: interactive grass
- Part 4: Mesh Painting
Getting Started
Start by downloading materials for this tutorial. Unzip them, go to MeshPainterStarter and open MeshPainter.uproject . Click Play to see the character we are going to color.
As in the tutorials on snow and grass, this method also needs scene capture. To save time, I have already created a scene capture blueprint. If you want to learn more about capture options, then read our tutorial on creating tracks in the snow .
To begin, let's learn how to draw on a mesh.
Mesh drawing
In most cases, the meshes with which you have to work already have a UV scan. Therefore, it will be logical to create a mask using the render target and then apply it to the mesh. However, generating a mask directly on the render target (using Draw Material to Render Target) usually results in breaks in UV shells.
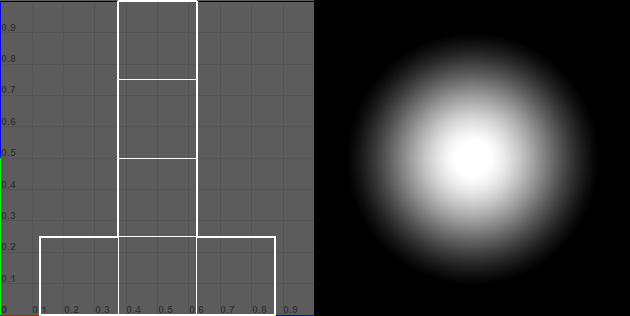
Here is an example of a UV scan of a cube and a spherical mask texture:
But the mask applied to the cube:
As you can see the 2D-dimensional spherical mask does not go around corners and does not take into account the geometry. To generate a correct mask, a spherical mask must sample positions in the world . How to get access to positions in the world when using the Draw Material to Render Target node?
If you studied the methods of drawing by meshes, you might have found a video of Ryan Brooke about drawing damage to a character using render targets (the method used in my tutorial is based on his method). In the video, he successfully generates three-dimensional spherical masks and accumulates them in the render target. He managed to do this because he creates a render target to store the positions of the mesh in the world, which can then be sampled using a spherical mask. Let's look at this method in more detail.
Ryan's method
This method consists of four stages. The first stage is to unwrap the desired mesh. You just need to move all the vertices so that you get the mesh in its UV form. For example, here are the UV coordinates of the character:

But the character after unfolding in Unreal:
You can expand the mesh by applying simple calculations for the displacements of the positions of the world (which we will discuss below).
The second stage is to encode positions in the world in the render target. This can be done by setting the color of the sweep material to Absolute World Position and using scene capture to capture the sweep. Here's what the render target will look like:
Note: The render target changes color because the character is animated. This leads to a constant change of position in the world.
The third stage is to create spherical masks. Having access to the mesh positions in the world, we can sample them onto a spherical mask, and then draw a spherical mask directly on the second render target.
The last step is to apply the mask to the character’s material to mix colors, textures, or materials. Here is a visualization of the third and fourth stages:
Now let's look at the method I suggest.
Proposed method
Although Ryan's method works, it needs the following:
- Two render target render. The first captures the undeveloped mesh, and the second accumulates spherical masks.
- One render target for storing positions in the world
- Render target for the accumulation of spherical masks. For each actor on which to draw, you will need a separate render target.
The method considered in this tutorial refuses the second rendering and render target position in the world. This is possible by combining the sweep and spherical masks into one material (the sweep material). After that, a sweep is captured using an additive composite mode to accumulate spherical masks.
It is worth noting that both methods work best when the mesh has no intersecting UV. If UV overlap, the pixels have a common UV-space, and therefore the same information about the masks. For example, both hands of a character can be UV-deployed in the same space. If a mask is applied to one hand, it will be applied to the other.
Now that we’ve become familiar with the method, let's start by creating a sweep material.
Creating a sweep material
Go to the Materials folder and create a new material. Call it M_Unwrap , and then open it.
Change the following parameters:
- Shading Model: Unlit. Because of this, capturing a scene will not capture information about the lighting.
- Two Sided: Enabled. Sometimes, the unfolded faces can look the other way (it depends on how the mesh's UV scan was performed). The Two Sided parameter ensures that we see all the inverted edges.
- Usage \ Used with Skeletal Mesh: Enabled. Enabling this option will compile the shaders needed for the material to work on the skeletal meshes.

Next we will turn the mesh. To do this, create the schema shown below. Note that I have already created the CaptureSize and UnwrapLocation parameters in MPC_Global .
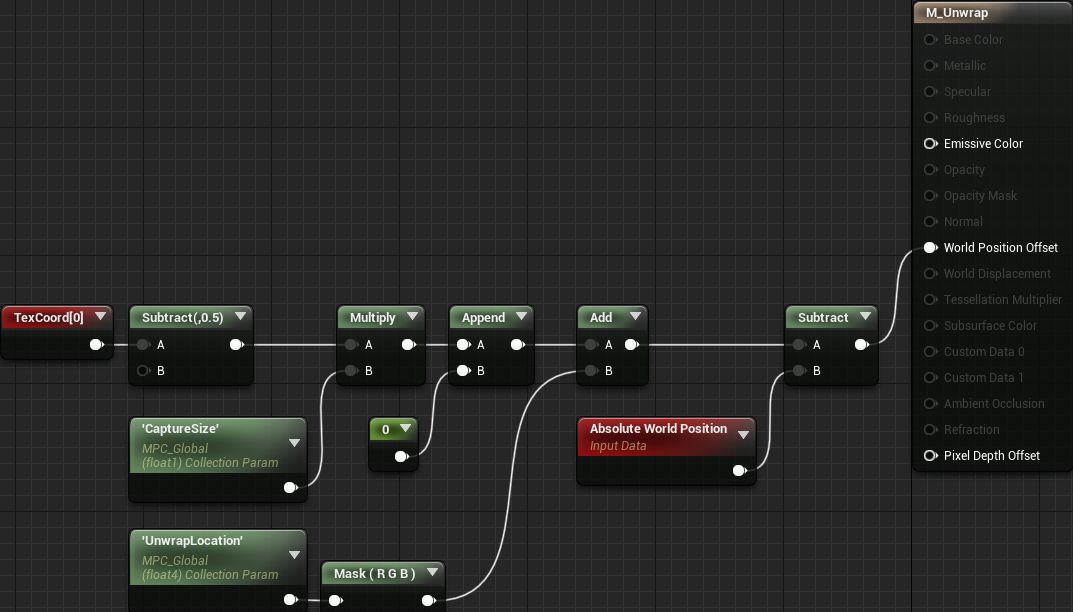
So we will perform a UV scan of the mesh to the specified location and with the specified size. Note that if the unique UV sweep of your mesh is in a separate channel, then the Coordinate Index of the TextureCoordinate node will need to be changed . For example, if the unique UV coordinates are in channel 1, then the Coordinate Index must be set to 1 .
The next stage is the creation of a spherical mask. For this we need two parameters: the intersection point and the radius of the sphere. Create selected nodes:
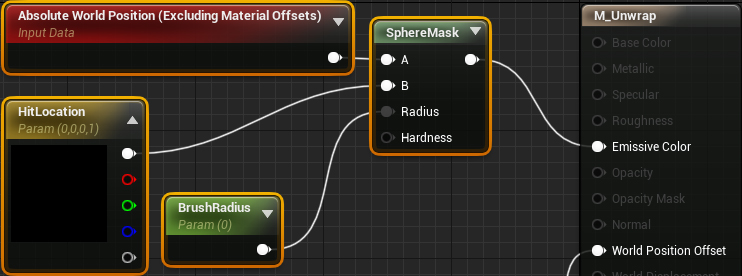
This scheme will return the white color for the pixels inside the spherical mask and the black color for the pixels outside. Do not worry about setting the value for the parameters, because we will deal with this in blueprints.
It is important to set the Absolute World Position node to Absolute World Position (Excluding Material Shader Offsets) . This is necessary because the position of the pixel in the world will change due to the unfolding. Excluding Material Shader Offsets provides us with a starting position in the world before unfolding.
And this is all that is needed for the scanning material. Click on Apply and close the material. Next we need to apply the material to the character to deploy it.
Character unfolding
In this tutorial, the capture and capture blueprint will be engaged in the deployment and capture. To begin, we need a dynamic copy of the sweep material. Go to the Blueprints folder and open BP_Capture . Then add selected nodes to Event BeginPlay . Ensure that Parent is set to M_Unwrap .

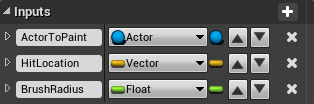
Next, we need a function to perform the sweep and capture. Create a new function called PaintActor . Then create the following inputs:
- ActorToPaint: the type must be Actor . This is the actor for which we will be scanning and capturing.
- HitLocation: type Vector . This will be the center point of the spherical mask.
- BrushRadius: Float type . The radius of the spherical mask in world units.
Although this drawing method can work with any actor, we will only check if the resulting actor is inherited from the Character class . And to simplify the code, we will store the component of the skeleton mesh in a variable, because we have to refer to it several times. To do this, we add the selected nodes:

Now it is time to do the unfolding and overlaying of a spherical mask. To do this, add the selected nodes to the end of the node chain:
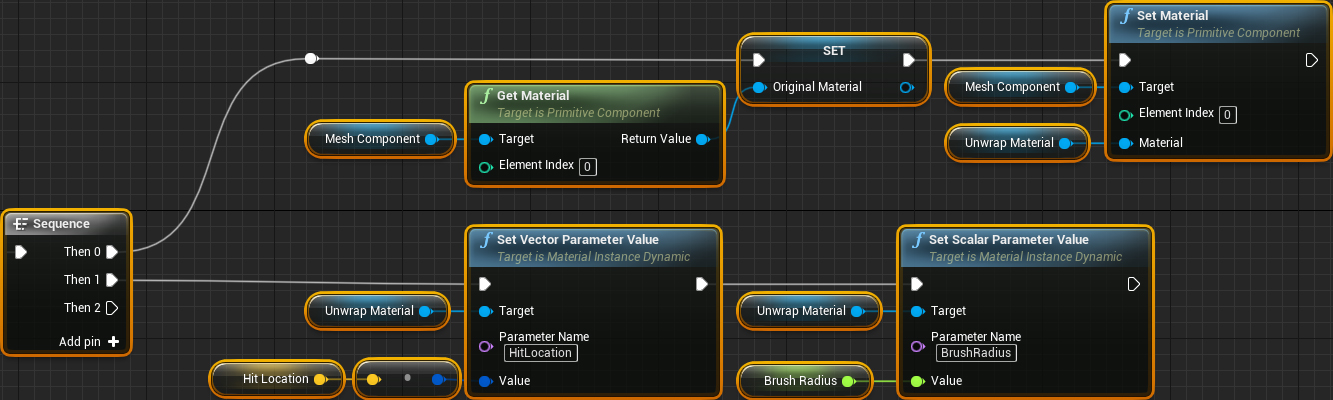
Here is what each of the lines does:
- First, we save the original mesh material to reapply it later. Then we apply the scanning material.
- This line gives the sweep material the intersection point and the radius of the brush for applying a spherical mask.
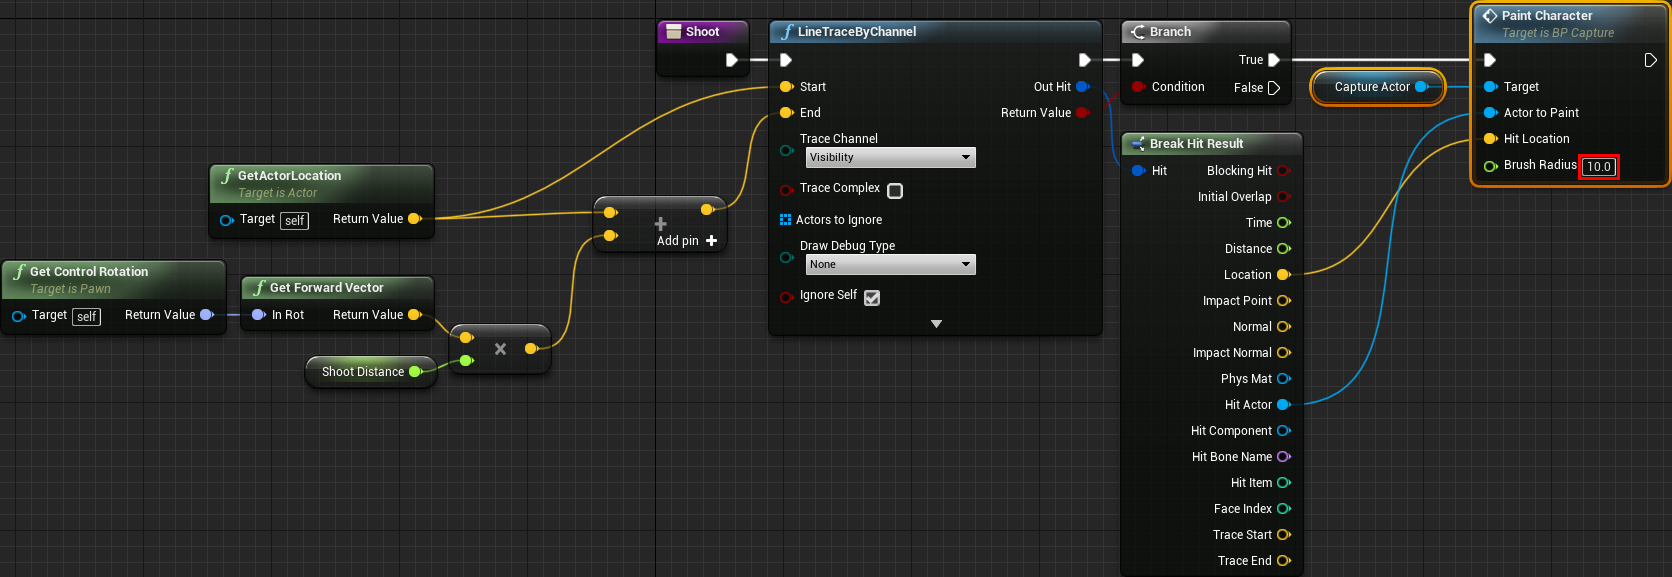
To test the sweep, we first need to trace the line from the player to get the intersection point.
Getting the intersection
Click Compile and return to the main editor. Then close BP_Player . Open the Shoot function and add highlighted nodes. For this tutorial, set the Brush Radius to 10 .
Click on Compile and close the BP_Player . Click Play , and then left-click on the character to unfold and apply a spherical mask.
If you do not understand why the mask continues to move, this is because the parts move relative to the spherical mask. However, this is not a problem, because we only capture the reamers at the moment of intersection.
Now that we have unfolded the mesh, we need to capture the reamer.
Capture Sweep
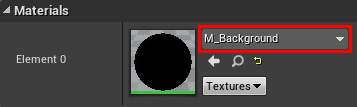
For starters, it would be nice to add an unlit black plane behind the unwrapped mesh. This will avoid seams on the edge of UV shells. Open BP_Capture , and then add a Plane component called BackgroundPlane . To save time, I have already created black material. For material choose M_Background .
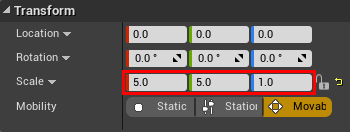
In this tutorial, we use a size of 500 × 500 units for scanning and capturing , so the background plane should be no less than these sizes. Set the Scale values (5.0, 5.0, 1.0) .
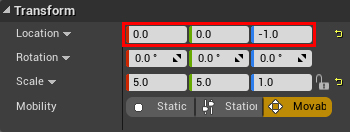
Since the position of the plane and the position of the sweep coincide, it will be nice to move the plane down to avoid z-conflicts. To do this, set the values for the Location (0.0, 0.0, -1.0) .
Next we need to capture. Return to the PaintActor function and add the selected nodes:
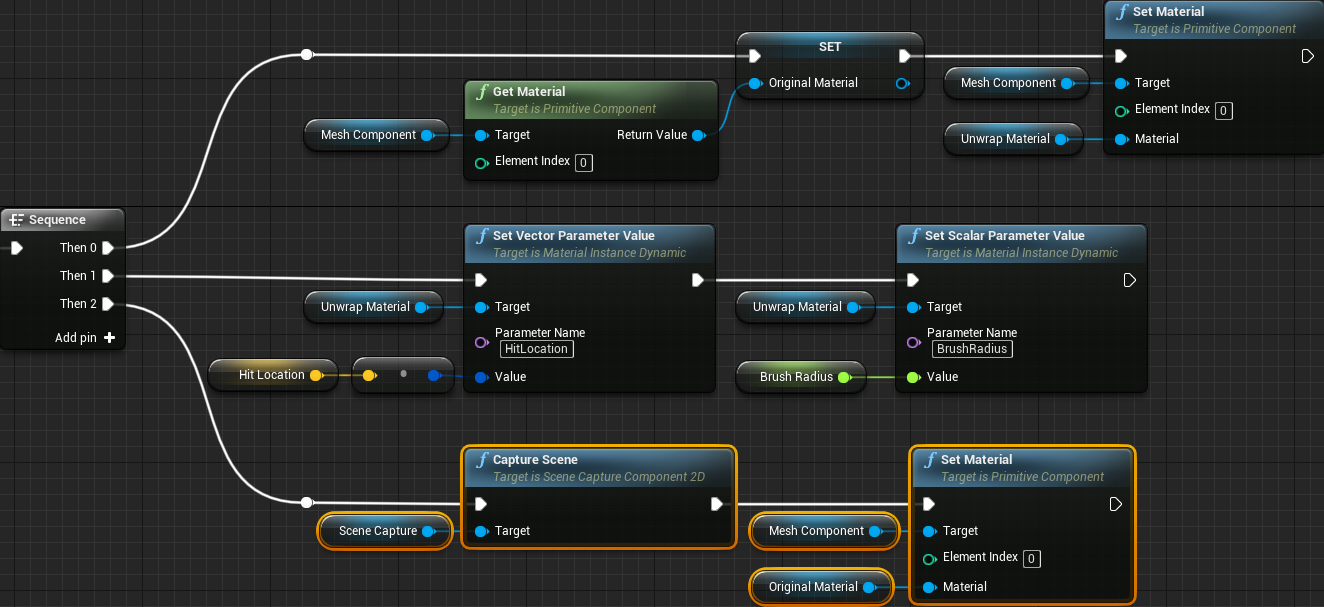
So we will capture the unwrapped mesh, after which the source material of the mesh will be applied again.
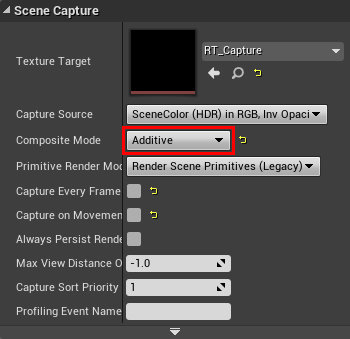
In the resulting scheme, capturing the scene rewrites the contents of the render target. In order for spherical masks to accumulate, we need to ensure that the capture of the scene adds to the previous content. To do this, select the SceneCapture component and set the Scene Capture \ Composite Mode to Additive .
Click on Compile , and then close the blueprint. Now we need to use the render target in the character material.
Use mask
Go to Characters \ Mannequin \ Materials and open M_Mannequin . Then add the selected nodes. Set Texture Sample to RT_Capture .
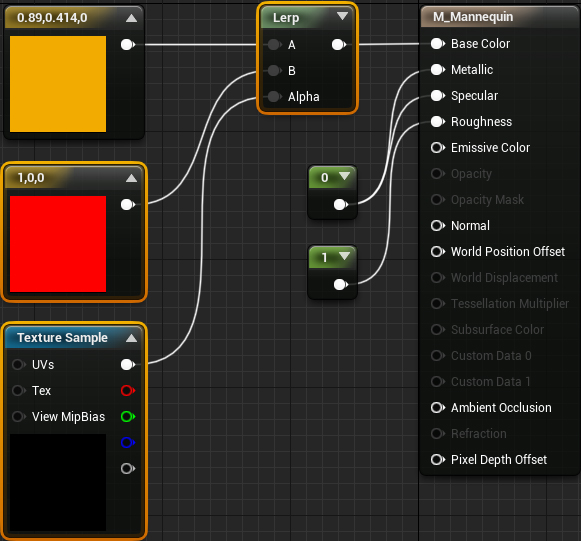
This diagram will display red where the mask is white and orange where the mask is black. However, we can make the textures or layers of materials blend together.
Click on Apply and close the material. Click Play and left-click on the character to start drawing.
Where to go next?
The finished project can be downloaded from here .
Although we used spherical masks in this tutorial, this is not the only figure that can be used. After all, there are cubes, cylinders, cones and much more! To learn more about these shapes and how to use them, you can read the following two posts:
- Modeling with Distance Functions Inigo Kilesa
- Volumetric Rendering: Alan Zukconi's Signed Distance Functions
If you want to learn another way to draw on the mesh, then read the article by Tom Luhmann Rendering Wounds on Characters . Instead of accumulating spherical masks, it uses a fixed number of spherical masks. The advantage of this method lies in its cheapness (which depends on the number of spherical masks) and in the relative simplicity of animating the masks. The disadvantage of the method is a hard limit on the number of spherical masks.