Writing Penguin Daycare Simulator on Go (Google App Engine) and Lua (Corona SDK)
- Tutorial
1. Introduction
This project is a simple example of using Google App Engine in a mobile application.
The server part provides a list of penguins in JSON format. The mobile client requests this list via HTTP or HTTPS.
Also, the server side records certain events in the database, namely the number of visits to a particular penguin and the number of button presses: feed the fish and scratch the tummy.
Each penguin has description fields
Name, Bioand counters fields.2. Subtleties of translation
I thought about how to translate Penguin Daycare Simulator into Russian, but “kindergarten” as a “daycare” is not suitable, “day care” too. Therefore, it remained without translation.
3. Preparation
If you don’t have the Google App Engine Go SDK installed, then click on the Google App Engine link , click “Try it now” and follow all points. Give your project a name, select Go, download and install the SDK. Make sure that you have properly set environment variables (
PATH, GOROOT, GOPATH, APPENGINE_DEV_APPSERVER), for this purpose in the terminal, you should have seen the team goapp. Looking ahead, I’ll say that to upload a simple project to the GAE server and run it, you need to run the command goapp deployin the project directory. She will ask you the email of the Google account on which the project should be located. It is important that the project name matches in app.yaml and on the site. But in this project, modules are used and the loading process is somewhat different. As an IDE for Go, I recommendLiteIDE , and for Lua and Corona SDK - ZeroBrane Studio . You can download the Corona SDK on their website .
4. Clint server
The picture below shows a very complex communication scheme between the client (left) and the server (right).

As you can see, the client requests only the list of penguins and sends only three events. Communication is over HTTP, but you can use HTTPS for free. This can be attributed to one of the advantages of using GAE - there is no need to pay for an SSL certificate and configure work with it.
Since everything works over HTTP, you can directly execute requests in the browser without using a special client.
penguin-daycare-simulator.appspot.com
A simple greeting, not used by the mobile client, but allows you to tell if the service is working. You can replace http with https and make sure that this also works.
penguin-daycare-simulator.appspot.com/penguins
This is the most important request. With its help, the mobile client receives a list of all penguins that are currently under supervision.
For more convenient viewing of this data, I recommend the JSONview extension for Chrome.
penguin-daycare-simulator.appspot.com/stat/visit
penguin-daycare-simulator.appspot.com/stat/fish
penguin-daycare-simulator.appspot.com/stat/bellyrub
These three queries increase the corresponding counts for a penguin .
Idpenguin is passed as a POST parameter. The server does not return anything in response, but you can, if you want, add the string “OK” or another signal of successful operation to the response.5. More screenshots, more screenshots!

Already before the publication of the article, I remembered about this penguin:
Watch the positive
6. Server - Google App Engine
Now we can go directly to the code. Consider the file structure of a Go project.
PenguinDaycareSimulatorServer/
├── default/
│   ├── app.go
│   ├── default.yaml
│   └── penguins.json
├── static/
│   ├── favicon.ico
│   └── static.yaml
└── dispatch.yaml
defaultand static- these are modules. A project for GAE can be broken down into modules, or it can work without them. In this case, only need three files: app.yaml, app/app.goand penguins.json. Initially, it was in my project (you can see the first commit on GitHub), but I wanted to add a settingmax_concurrent_requests, which is responsible for how many simultaneous requests one instance of your application can handle. The default value is only 10. Go is clearly capable of more. The maximum value is 500. When the load increases and exceeds this value, additional copies of your application are launched and the load is distributed between them. If you want to fit only in free quotas for GAE, then using this setting is highly desirable. If the application does not cope with such a load, then reduce this value and switch to paid billing. So this setting is available only for modules. And your application must have at least 2 modules for GAE to consider it modular.
static- A very simple module, which could be dispensed with (if it were not for the GAE restriction above), its task is only to give a file statically favicon.ico. default- The main module, which does all the work. Files
*.yamlare settings and descriptions. One for each module and one file dispatch.yamlthat describes which URLs which module processes.dispatch.yaml
application: penguin-daycare-simulator
dispatch:
- url: "*/favicon.ico"
  module: static
- url: "*/"
  module: default
static.yaml
application: penguin-daycare-simulator
module: static
version: 1
runtime: python27
api_version: 1
threadsafe: true
handlers:
- url: /favicon.ico
  static_files: favicon.ico
  upload: favicon.ico
default.yaml
application: penguin-daycare-simulator
module: default
version: 1
runtime: go
api_version: go1
automatic_scaling:
  max_concurrent_requests: 500
handlers:
- url: /.*
  script: _go_app
Note that in
static.yamlruntime, Python is specified, not Go. This is because GAE swears if you try to load a module on Go without actually Go files. However, he does not swear in Python and PHP in this situation.off topic
An attentive reader here may argue that "what makes PHP worse than Python to render static files" and try to untie holywar, but Python is closer to me personally, that's why I chose it. Anyone else can use PHP for these purposes. Of course, this is all pointless, since neither Python nor PHP are involved in this process.
handlersin default.yamlindicates which executables handle certain URL. In our case, app.go processes all incoming requests (taking into account dispatch.yaml). URL description is very flexible, it uses regular expressions. However, if for Python and PHP you can use different files to process different URLs within the same module, then for Go it should be one single file, which is designated as "_go_app". Further, already inside the Go program, you can select handlers for different URLs and split the entire application into several files, if necessary. More about configuration and yaml files can be read here .
penguins.json- a JSON file containing the names and descriptions of all used penguins.penguins.json
[
	{"id": "1",
	"name": "Tux",
	"bio": "Beloved Linux mascot"
	},
	{"id": "2",
	"name": "Skipper",
	"bio": "Small combat squad leader"
	},
	{"id": "3",
	"name": "Lolo",
	"bio": "Russian adventurer"
	},
	{"id": "4",
	"name": "Gunter",
	"bio": "The darkest character in Adventure Time"
	},
	{"id": "5",
	"name": "The Penguin",
	"bio": "Na, na, na, na, na, na, na, na, na, na... The Penguin! "
	}
]
Adding, editing penguins occurs through this file.
Now we come to
app.go- the heart of the entire application. A full listing is convenient to watch directly on GitHub - app.go . The simplified structure of this file:
package app
Перечисление всех используемых библиотек.
import (...)
Структура каждого пингвина: Id, имя, описание, счётчики.
type penguin struct {...}
Слайс (массив) всех пингвинов.
var penguins []penguin
Структура записи в базу данных.
type penguinEntity struct {...}
Инициализация.
func init() {...}
Чтение penguins.json в слайс penguins.
func loadPenguinsJson() {...}
Обработчик / - вывод простого сообщения.
func rootHandler(w http.ResponseWriter, r *http.Request) {...}
Обработчик /penguins - вывод всех пингвинов со статистикой в формате JSON.
func penguinsHandler(w http.ResponseWriter, r *http.Request) {...}
Обработчик события /stat/visit - посещение пингвина.
func visitHandler(w http.ResponseWriter, r *http.Request) {...}
Обработчик события /stat/fish - кормление пингвина рыбкой.
func fishHandler(w http.ResponseWriter, r *http.Request) {...}
Обработчик события /stat/bellyrub - почёсывание пингвина по животику.
func bellyrubHandler(w http.ResponseWriter, r *http.Request) {...}
When launching the application, the init () function is launched first, which reads from the penguins.json file and sets which function is responsible for various requests from the client. You could already use them at the links at the beginning of the article.
penguinsHandler()serializes slice penguins to JSON format by function json.Marshal()and gives it to clients through fmt.Fprint(). visitHandler(), fishHandler(), bellyrubHandler()Acting on one logic - penguin take from the database is incremented by one corresponding parameter and written back to the database. The database - Datastore - is not SQL compatible, that is, it is a NoSQL solution. The description of her work is worthy of a separate article.Since many operations on GAE are charged separately, including access to Datastore, excessive use of resources should be avoided. So, for example, when requesting statistics for all penguins, it is completely optional to provide relevant data. You can cache this request with a cache lifetime of say 10 minutes. To do this, I introduced an additional variable
lastUpdateTime- the timestamp of the last update of the slice penguins. And with each request, /penguinsI call a function updatePenguinsStatistics()that checks whether the cache has expired and in the cycle updates the counter for each penguin in the slice penguins. To force the update manually, I introduced an additional request / update and the corresponding handler
updateHandler().Each request is processed in its own goroutine, so you need to protect the slice
penguinsfrom possible simultaneous writing or reading during recording. For this, RWMutexa mutex for reading or writing is used. Its use is more effective than simple Mutex. To avoid the paid consumption of resources, you can also enter a delayed record in the database, accumulating the values of all received events.
To upload a project to the GAE server, you need to execute three commands in the terminal in the project directory:
goapp deploy default/default.yaml
goapp deploy static/static.yaml
appcfg.py update_dispatch .
In the future, when changing app.go, it will only need to be launched
goapp deploy default/default.yaml. In conclusion, I’ll say about the server side that to increase free limits I recommend connecting paid billing, but at the same time set the maximum cost per day equal to $ 1. At the same time, some free quotas are increasing, but you are still not spending anything.
7. Client side - Corona SDK
Corona SDK is a cross-platform framework for developing mobile applications for Android, iOS, Windows Phone (coming soon) and HTML5 (in development). I have been using this product for quite some time now, I write games both for clients as a freelancer and for myself. I note the decent speed and speed of creating applications.
Let's start with the file structure of the project. There are more files here, mainly due to icons and pictures, so I clean them under the spoiler.
file structure
PenguinDaycareSimulator/
├── images/
│   ├── penguins/
│   │   ├── 1.png
│   │   ├── 1@2x.png
│   │   ├── 2.png
│   │   ├── 2@2x.png
│   │   ├── 3.png
│   │   ├── 3@2x.png
│   │   ├── 4.png
│   │   ├── 4@2x.png
│   │   ├── 5.png
│   │   └── 5@2x.png
│   ├── background.jpg
│   ├── background@2x.jpg
│   ├── button-over.png
│   ├── button-over@2x.png
│   ├── button.png
│   ├── button@2x.png
│   ├── dot-off.png
│   ├── dot-off@2x.png
│   ├── dot.png
│   ├── dot@2x.png
│   ├── fish.png
│   ├── fish@2x.png
│   ├── hand.png
│   ├── hand@2x.png
│   ├── popup.png
│   └── popup@2x.png
├── lib/
│   ├── api.lua
│   ├── app.lua
│   └── utils.lua
├── scenes/
│   ├── choose.lua
│   ├── menu.lua
│   └── penguin.lua
├── Default-568h@2x.png
├── Icon-60.png
├── Icon-60@2x.png
├── Icon-72.png
├── Icon-72@2x.png
├── Icon-76.png
├── Icon-76@2x.png
├── Icon-Small-40.png
├── Icon-Small-40@2x.png
├── Icon-Small-50.png
├── Icon-Small-50@2x.png
├── Icon-Small.png
├── Icon-Small@2x.png
├── Icon-hdpi.png
├── Icon-ldpi.png
├── Icon-mdpi.png
├── Icon-ouya.png
├── Icon-xhdpi.png
├── Icon-xxhdpi.png
├── Icon.png
├── Icon@2x.png
├── build.settings
├── config.lua
└── main.lua
You can pay attention only to Lua files for now.
config.lua, build.settings- project setup files for the Corona SDK. Indicate a portrait or landscape view has the application, the reference screen resolution, zoom method and other different settings. If the Corona SDK is new to you, then you can not pay attention to these files for now. Also in the root you will find a bunch of icons for iOS and Android, plus
Default-568h@2x.pngfor correct operation on iPhone 5. Inside the images / directory there are regular files and their doubled HD versions @2x. Now, in principle, you can no longer support devices with screens like the iPhone 3GS, their percentage is very small, but nonetheless non-zero. For full iPad Retina support, you will already need @4xfiles and a line in config.lua, but most games work fine anyway.The Corona SDK launches the application starting from the file
main.lua, the necessary libraries are connected to it, some variables are declared and the scene is switched to with the “Enter the Daycare” button. All scenes (screens) of the application are stored in different files and collected in a directory scenes/, and I placed all user libraries in lib/. The developer is free to arrange these files as he wants, I prefer so. The
lib/are app.lua, and utils.lua- together this is my collection of useful functions for working with Corona SDK. The app.luaimplemented convenient wrapper over standard Corona SDK functions to display images, text, buttons, and others. The transition from
main.luain scenes/menu.luathrough linestoryboard.gotoScene('scenes.menu')Where, in turn, the penguin request is already running on the server. Here is the main piece of code from
menu.lua.function scene:createScene (event)
local group = self.view
app.newText{g = group, text = 'Penguin Daycare', size = 32, x = _CX, y = _CY - 150}
app.newText{g = group, text = 'Simulator', size = 32, x = _CX, y = _CY - 110}
local pleaseWait = app.newText{g = group, text = 'Please Wait', size = 16, x = _CX, y = _CY}
local button = app.newButton{g = group, x = _CX, y = _CY,
text = 'Enter the Daycare',
onRelease = function()
storyboard.gotoScene('scenes.choose', {effect = 'slideLeft', time = app.duration})
end}
button.isVisible = false
app.api:getPenguins(function()
pleaseWait.isVisible = false
button.isVisible = true
end)
endThree lines of text and one button are created. The button is hidden until we get a response from the server. The request itself is executed by a function
app.api:getPenguins(); as an argument, it has a callback function. After clicking on the button, we get to the penguin selection scene, I will also give only the main part of the code from the file
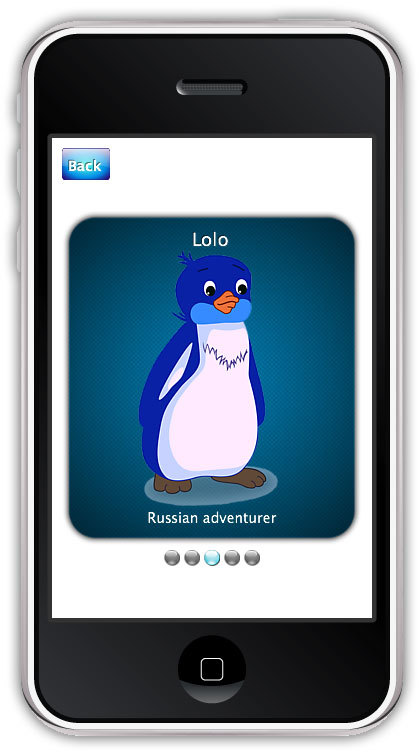
choose.lua.function scene:createScene(event)
local group = self.view
self.backButton = app.newButton{g = group, x = _L + 10, y = _T + 10, w = 48, h = 32, rp = 'TopLeft',
text = 'Back',
fontSize = 14,
onRelease = function()
storyboard.gotoScene('scenes.menu', {effect = 'slideRight', time = app.duration})
end}
local function gotoPenguin(ind)
storyboard.gotoScene('scenes.penguin', {effect = 'slideLeft', time = app.duration, params = ind})
end
local slideView = newSlideView{g = group, x = 0, y = _CY, dots_y = 180, onRelease = gotoPenguin}
for i = 1, #app.api.penguins do
local p = app.api.penguins[i]
local slide = display.newGroup()
app.newImage('images/popup.png', {g = slide, w = 300, h = 335})
app.newImage('images/penguins/' .. p.id .. '.png', {g = slide, w = 200, h = 256})
app.newText{g = slide, x = 0, y = -140, text = p.name, size = 18, color = 'white'}
app.newText{g = slide, x = 0, y = 140, text = p.bio, size = 14, color = 'white', w = 220, align = 'center'}
slideView:addSlide(slide)
end
slideView:makeDots()
slideView:gotoSlide(1)
endHere
newSlideView()it is a function that creates a simple widget with which you can scroll through the slides with penguins. The code for this widget is located right choose.luaat the beginning of the file. A slide is created for each penguin. Images of penguins are stored inside the application and correspond to Id of penguins. This can be fixed by storing images on a GAE server or any other. To download images from the network, the Corona SDK has a function
display.loadRemoteImage()or a lower level network.download(). By clicking on the slide, a function is called
gotoPenguin()that receives the number of the (non Id) penguin in the array (table) of all received penguins. This function jumps to the final scene penguin.lua, passing the same argument to this scene.penguin.lua
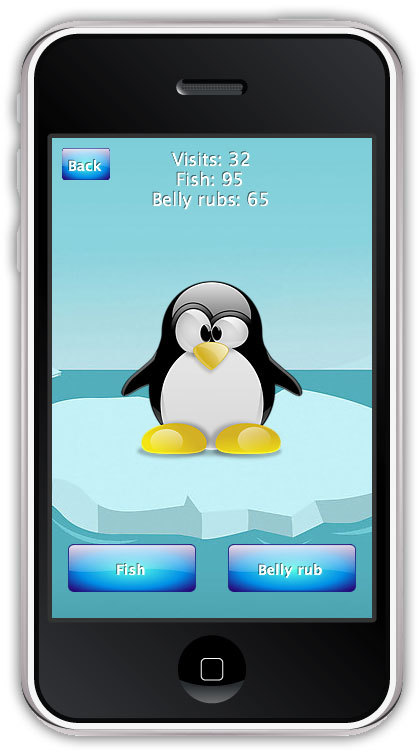
function scene:createScene(event)
    local group = self.view
    local background = app.newImage('images/background.jpg', {g = group, w = 384, h = 640, x = _CX, y = _CY})
    self.backButton = app.newButton{g = group, x = _L + 10, y = _T + 10, w = 48, h = 32, rp = 'TopLeft',
        text = 'Back',
        fontSize = 14,
        onRelease = function()
            storyboard.gotoScene('scenes.choose', {effect = 'slideRight', time = app.duration})
        end}
    local ind = event.params
    local p = app.api.penguins[ind]
    local visitsLabel = app.newText{g = group, x = _CX, y = _T + 20, text = 'Visits: ' .. p.visit_count, size = 18, color = 'white'}
    local fishLabel = app.newText{g = group, x = _CX, y = _T + 40, text = 'Fish: ' .. p.fish_count, size = 18, color = 'white'}
    local bellyrubsLabel = app.newText{g = group, x = _CX, y = _T + 60, text = 'Belly rubs: ' .. p.bellyrub_count, size = 18, color = 'white'}
    local penguin = app.newImage('images/penguins/' .. p.id .. '.png', {g = group, w = 200, h = 256, x = _CX, y = _CY - 25})
    app.newButton{g = group, x = _CX - 80, y = _B - 50, w = 128, h = 48,
        text = 'Fish',
        fontSize = 14,
        onRelease = function()
            local fish = app.newImage('images/fish.png', {g = group, x = penguin.x, y = penguin.y + 200, w = 512, h = 188})
            fish.alpha = 0.8
            transition.to(fish, {time = 400, alpha = 1, y = penguin.y, xScale = 0.1, yScale = 0.1, transition = easing.outExpo, onComplete = function(obj)
                    transition.to(fish, {time = 400, alpha = 0, onComplete = function(obj)
                            display.remove(obj)
                        end})
                end})
            app.api:sendFish(p.id)
            p.fish_count = p.fish_count + 1
            fishLabel:setText('Fish: ' .. p.fish_count)
        end}
    app.newButton{g = group, x = _CX + 80, y = _B - 50, w = 128, h = 48,
        text = 'Belly rub',
        fontSize = 14,
        onRelease = function()
            local hand = app.newImage('images/hand.png', {g = group, x = penguin.x - 40, y = penguin.y + 30, w = 80, h = 80, rp = 'TopLeft'})
            transition.to(hand, {time = 1200, x = penguin.x + 40, transition = easing.swing3(easing.outQuad), onComplete = function(obj)
                    display.remove(obj)
                end})
            app.api:sendBellyrub(p.id)
            p.bellyrub_count = p.bellyrub_count + 1
            bellyrubsLabel:setText('Belly rubs: ' .. p.bellyrub_count)
        end}
    app.api:sendVisit(p.id)
    p.visit_count = p.visit_count + 1
    visitsLabel:setText('Visits: ' .. p.visit_count)
end
In
penguin.luathe loading of the background image, the image of the selected penguin, the display of several text labels and two action buttons. When you click on them, the action is animated and the request is sent to the server through the app.api:sendFish()and functions app.api:sendBellyrub(). And it app.api:sendVisit()is called right after the scene is created. After calling each of these functions, the corresponding text labels are updated, even if there is no Internet. This can be fixed by checking for a response from the server for each request and providing callback functions. Finally, all work with the server is carried out in a file
lib/api.lua.api.lua
local _M = {}
local app = require('lib.app')
_M.hostname = 'http://penguin-daycare-simulator.appspot.com'
function _M:getPenguins(callback)
    local url = '/penguins#' .. math.random(1000, 9999)
    network.request(self.hostname .. url , 'GET', function (event)
        if not event.isError then
            local response = json.decode(event.response)
            if response then
                self.penguins = response
                callback()
            end
        end
    end)
end
function _M:sendVisit(id)
    local url = '/stat/visit'
    local request = {body = 'id=' .. id}
    network.request(self.hostname .. url , 'POST', function (event)
        if event.isError then
            app.alert('Network error')
        end
    end, request)
end
function _M:sendFish(id)
    local url = '/stat/fish'
    local request = {body = 'id=' .. id}
    network.request(self.hostname .. url , 'POST', function (event)
        if event.isError then
            app.alert('Network error')
        end
    end, request)
end
function _M:sendBellyrub(id)
    local url = '/stat/bellyrub'
    local request = {body = 'id=' .. id}
    network.request(self.hostname .. url , 'POST', function (event)
        if event.isError then
            app.alert('Network error')
        end
    end, request)
end
return _M
As you might have guessed, working with the server is done with simple POST requests. In the case
getPenguins(), the response from the server is converted from JSON format to an array (table) by a function json.decode()and placed in the (property) field of the module. As you can see, sending POST requests and responding to their responses in the Corona SDK is very simple. Accordingly, integration with the Google App Engine itself came out very simple. I do not paint what each line does, I hope the syntax is intuitive.
8. References
The sources are on my GitHub:
- Google App Engine - github.com/Lerg/PenguinDaycareSimulatorServer
- Corona SDK - github.com/Lerg/PenguinDaycareSimulator
You can install the client part on Android 2.3.3+, here is the APK ( mirror ).
Or download the Corona SDK, download the sources from GitHub and run in Corona Simulator.
Thanks to M0sTH8 for helping me write this article.
Subscribe to my twitter @SergeyLerg
That's all. Thanks for attention!