Eron-dong-dong or what else your Windows Phone might do
Hello to all habrazhitel!
Surely, many in childhood liked radio-controlled cars. And not only in childhood: I am sure that in the age category 30+ there are many lovers of dashing driving on a miniature scale. So, since childhood, I dreamed of such a machine, but girls are usually presented not with cars, but with dolls, and my dream remained unfulfilled until recently. But now I’ve grown up, and a simple radio-controlled machine seemed to me rather boring. And one fine day the idea came to my mind how to entertain myself and at the same time upgrade the machine: I decided to organize its control from my smartphone via WiFi.
I got excited about this idea, especially since the target smartphone was Nokia Lumia 620, and I was fond of programming in C # before. Work on the software part promised to be cloudless and exciting, but everything was a little more complicated with the hardware part, and I began to google and study the hardware.
Since I am not an electrician, in order to organize the work of the hardware of my machine, I had to rummage around the Internet for a long time looking for guides on the basics of robotics for blondes. As always, the beloved Habr helped, namely this post , written in a language that is understandable even to a person very far from electronics. Everything is painted there very well, so I won’t dwell on the hardware, I’ll only tell you about the differences between my machine and the WiFi bot described there:
• Since the machine is intended for entertainment, and not for monitoring rooms, it does not need a webcam (although, perhaps, this topic should be further developed ...). The same goes for the autonomous charging system. A full battery charge (I used Sanyo Eneloop AA with a capacity of 2500 mAh) is quite enough in time to play enough.
• To get the whole filling into the machine’s body, and also not to be especially tormented with soldering (I'm blonde, after all ...) I used a slightly smaller Arduino Nano v3.0 microcontroller with a USB interface. The presence of a USB interface, in addition to connecting the MK to the router without soldering, also greatly facilitates the process of programming the arduins: connected to a computer -> uploaded the sketch directly from the Arduino IDE -> enjoy. I also took another router, TP-LINK WR703N, it is slightly smaller than TL-MR3020, but otherwise they are almost identical.
• Since we do not solder the MK to the router, but connect it via USB, the UART is forwarded virtually using the ser2net daemon, which is by default present in the OR-WRT firmware of our router. All you need to do is add the following line to the ser2net.conf file on the router (or replace it if something is already written to port 2000):

In principle, it is not necessary to use the 2000 port, you can take any free port.
So, to generalize. The hardware of the machine in my version of kitchen robotics is “prepared” according to this recipe:
Ingredients:
Radio-controlled jeepik, TP-LINK TL-MR3020 or WR703N router, Arduino Nano microcontroller, L293D motor driver, 2 short microUSB cables, 4 batteries.
Cooking:
1. Reflash the router with OR-WRT firmware and perform initial configuration.
2. Set up communication with arduino using ser2net.
3. To tear out the radio control board from the machine.
4. Connect power to the router. Alternatively, this can be done in the simplest and most obvious way: since the router is powered through its microUSB interface, we cut a piece of the right size from one cable with the end on which there is a small connector. The severed end is soldered to the wires coming from the battery compartment of the machine (pinout of wires: pin1 - V + (5V), pin5 - V- (GND)), we plug the connector into the corresponding socket.
5. Connect the MK to the router using the second microUSB cable and solder the necessary (see further) MK outputs to the corresponding inputs of the engine driver microcircuit, and its outputs directly to the machine’s engines.
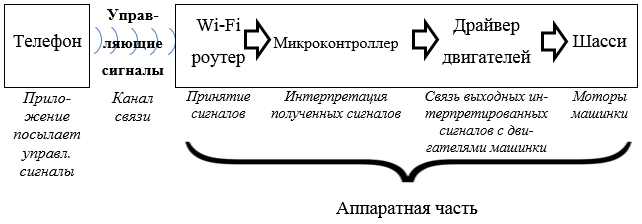
Structural diagram of
Voila, the machine itself is ready! I repeat, this is a very schematic and simplified description of the procedure, more detailed instructions are in this source .
And now the most interesting and creative (at least for me) part of the work is creating a program that will manage all this happiness. Its essence is that when you press the control buttons, send the appropriate signals to the router, which, in turn, will transmit them to the arduine, and it controls the engines of the machine through the engine driver. That is, the software part consists of two components: programs for a smartphone and programs for MK.
I thought for a long time about how it is better to send signals to the typewriter, tried a bunch of options and stopped at this: when you click on a certain control button, the typewriter will be sent a signal about the start of movement (activation of the corresponding engine), and when released, it will stop moving (deactivate the engine) . I encoded the control signals as follows:
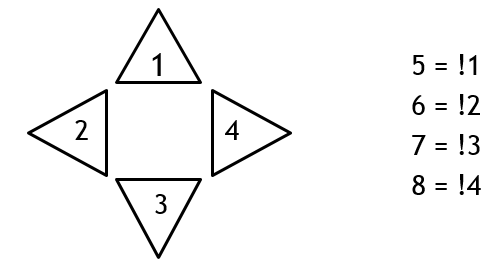
1 - start moving forward, 2 - start moving left, 3 - start moving backward, 4 - start moving right. And, accordingly, 5 - end the forward movement, 6 - end the left movement, 7 - end the backward movement, 8 - end the right direction. The “forward” and “back” buttons work with the marching engine of the machine, and the “left” and “right” - with the rotary.
After that, you can safely begin programming arduins, which consists in the fact that while it is turned on, in a cycle check the presence of incoming data and, when a certain digit is accepted, set the HIGH or LOW level on the corresponding leg. The sketch code is elementary, switch / case to help us.
But the mobile application will be more complicated. First of all, we need to contact the machine, it is with our machine, if there are several available WiFi networks around. First, configure the router to work as an access point using its new web interface.
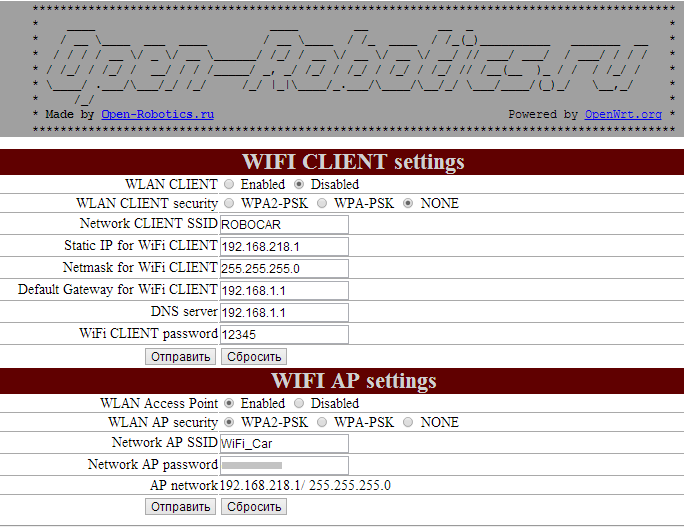
As you can see, after flashing the IP address of the router in the access point mode - 192.168.218.1 - does not change. It is at this address that we will send data to the router. We will come up with the network of our typewriter SSID and password to avoid connecting devices other than ours to the typewriter. Of course, it is impossible to exclude the possibility of hacking our network, but it is extremely unlikely that someone will suffer such nonsense, for obvious reasons.
Now our network is unique and only our smartphone can connect to it. Therefore, the first thing our application should do is to check the phone’s connection to the typewriter. And if the test is successful, you can start (the start button, inactive by default, is activated), and if not, you need to send the user to check the connection.
foreach (var network in new NetworkInterfaceList())//Для каждой доступной сети
            {
                if ((network.InterfaceType == NetworkInterfaceType.Wireless80211) && (network.InterfaceState == ConnectState.Connected) && (network.InterfaceName == "WiFi_Car"))//если тип сети – беспроводная стандарта ІЕЕЕ 80211 (WiFi), а SSID совпадает с SSID машинки
                {
                    CarName.Text = network.InterfaceName; //записать SSID сети в текстовое поле
                    StartButton.IsEnabled = true; //и сделать кнопку «СТАРТУЕМ» активной
                    break;
                }
                else
                {
                    CarName.Text = "Нет доступных машин. Проверьте WiFi-подключение.";
                    StartButton.IsEnabled = false;
                }
            }
Here is the layout of the application start page:

When we have successfully connected to the typewriter, by pressing the “START!” Button, we go to the main page of the application, from which we will control the typewriter:
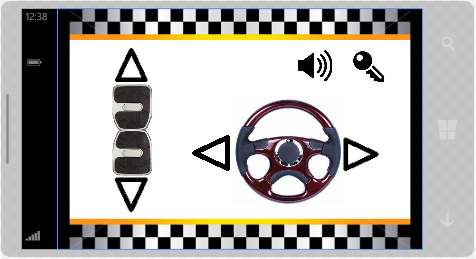
And here it is - the moment of truth: transmitting control signals to the typewriter. We organize this process using a socket. When you open this page, a socket connection is established with the router. To do this, we need to create several components:
IPEndPoint routerPort = new IPEndPoint(IPAddress.Parse("192.168.218.1"), 2000); //создание удалённого узла для сокета, с указанием IP-адреса роутера и его порта, который связан с МК через ser2net
        Socket S = new Socket(AddressFamily.InterNetwork, SocketType.Stream, ProtocolType.Tcp); //создание и инициализация сокета
        SocketAsyncEventArgs socketEventArgs = new SocketAsyncEventArgs();//создание объекта-аргумента методов соединения и передачи данных сокета
        byte[] buf = new byte[1]; //буфер – массив байтов для передачи (в нашем случае имеет размер 1 байт)
After that, connect:
socketEventArgs.RemoteEndPoint = routerPort; //инициализация созданного удалённого узла как конечной точки сокета
            S.ConnectAsync(socketEventArgs); //подключение к удалённому узлу
            socketEventArgs.SetBuffer(buf, 0, 1); //инициализация буфера данных для передачи
The functions of capturing the pressing and releasing control buttons are implemented, respectively, by the MouseEnter and MouseLeave methods . To eliminate emergency situations associated, for example, with the simultaneous pressing of buttons in opposite directions, we introduce a flag for each button that will be an indicator of the machine’s movement in the corresponding direction. The functions of pressing and releasing all the arrow buttons have the same structure.
Press:
private void [название кнопки]_MouseEnter (object sender, System.Windows.Input.MouseEventArgs e)
        {
            if (![флаг выбранного направления] && ![флаг противоположного направления])
            {
                buf[0] = [цифра-команда начала движения для выбранного направления];
                Socket.SendToAsync(socketEventArgs);
                [флаг выбранного направления] = true;
            }
        }
Release:
private void [название кнопки]_MouseLeave(object sender, System.Windows.Input.MouseEventArgs e)
        {
            if ([флаг активного направления])
            {
                buf[0] = [команда завершения движения для выбранного направления];
                Socket.SendToAsync(socketEventArgs);
                [флаг активного направления] = false;
            }
        }
It is worth noting here that data should be sent to a remote host using the SendToAsync method and not be confused with a similar method, SendAsync . The difference is that SendAsync sends data from our socket to another socket, and SendToAsync just to the remote host, which is what we need, so if you confuse the methods, the data will not be sent.
I also note that during the test drive of the machine from the laptop, I found that with the simultaneous operation of both engines, marching and turning, from time to time there are emergencies like loss of connection with the router. I suspect that this is due to the subsidence of voltage on the insides of the machine, because such bugs were also noticed with a low battery charge. After all, so many consumers are fed by the unfortunate 4 batteries. Therefore, I removed the spring from the rotary wheels, which returned them to their original position so that the motors could be started in series, and in the mobile application, the possibility of simultaneous operation of both engines was intentionally not provided. So far so, and when there is a way to improve the power supply system of the machine - then it will be possible to think about expanding its functional capabilities.
Now the thing remains for small: to implement the closure of the socket connection and return to the start page when we roll. I have these functions performed by a button in the form of an ignition key:
private void key_MouseEnter(object sender, System.Windows.Input.MouseEventArgs e)
        {
            S.Close(); //отключение и закрытие сокетного подключения
            NavigationService.Navigate(new Uri("/MainPage.xaml", UriKind.Relative));
        }
Here, in general, that's all, now you can safely play! For a complete immersion, you can also add a music on / off button, and put on a play any suitable song. For example, I could not resist, and my car drives under Lil Jon & the Eastside Boyz - Get Low .
I bring to your attention a short video about the results of my inspired work:
PS: I would be very glad of constructive criticism and optimization proposals. But do not judge strictly, please, this is my first project of this magnitude.
PPS: Thank you so much svavan for helping with the hardware! Since I was very vaguely familiar with the electronics and the process of flashing routers, I could not have done without this help.
