Reporting Using SAP Query
- From the sandbox
- Tutorial
The SAP ERP system contains many reports with a huge number of fields. To customize the display of the required fields, there is a mechanism that allows you to hide extra fields, reorder, sort, summarize intermediate and total results. In addition, the system allows you to store several settings and quickly select the one you want.
Over time, the end user needs reports that contain both standard and additional fields. Examples include reports such as general ledger account history, open invoices from suppliers, and a list of customers.
If the reports are quite specific or have some non-standard functionality, you have to contact programmers to implement them. In other cases, just use SAP Query.
The SAP Query tool allows you to create reports without significant labor costs.
Below we will consider an example of creating a report using SAP Query.
The main steps to create a report:
From time to time, situations arise in which the user cannot figure out the causes of the error “Exceeded contract value” in purchase orders. In most cases, the cause of this error is easy to find.
But if there are 1000 positions in the contract, and for some of them the value in receipt is greater than the value in the contract position (the value in the contract is equal to the value in the orders), then it becomes problematic to identify this position.
There are reports in the system showing the value of order items to a contract item or receipt documents with links to a purchase order. There is no single report.
You must create a report that displays the specified contracts by position. Each item should display its value, the value of the items of purchase orders, the value of receipts, the value of invoices. All prices must be displayed in local currency.
It is also necessary to add a feature that allows you to display only problematic positions.
The info set should contain a list of fields that you want to display in the report. In our set, such fields as the contract number, contract position, position value in the contract, value in purchase orders, value of receipts, value of invoices will be created.
Run transaction SQ02.

SAP offers several sources for creating an info set, these are:
Each of the data sources has its own characteristics, which are not discussed in this article. We chose a table, since the entire report will be built on this table, and we will get the rest of the data through the configuration of additional fields.
Next, check the box “Include key fields” and confirm the creation.
Now we are on the first screen for maintaining the info set.

The screen is divided into 3 parts:
If the same item with key fields is selected on the previous screen, then the purchase document number and position should be displayed in the group of fields. If not, then enable these fields (right-click on a field from the table and select "include field in a group of fields"), or exclude unnecessary ones.
Then you should add the remaining fields required for our report. To do this, click on the button on the "Additional Information" toolbar (F5). To switch to the starting position, press the "Field Groups" button (F6).
The right side is completely transformed. The first screen contains additional fields, tables, structures, and code links.
Create the required fields for us. To do this, click on the "Create" button (button in the form of a white sheet). In the window that opens, indicate the name of the new field and select the "Additional field" item.
Next, fill in the name, the title text in the report and a link to the sample field "EKPO-BRTWR". The format of our field will be copied from the sample.
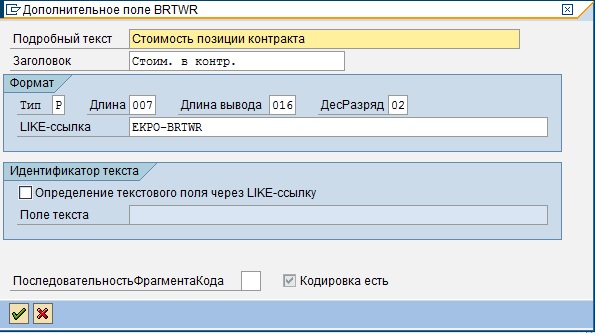
The following field is created in the same way, with the exception of the field serial number.
We will take the cost of receipts and the value of invoices from the history of the purchase order from the EKBE table.
Added fields are displayed in the left block in the "additional fields" branch.
These fields should be added to the field group. To do this, switch to the field group mode (the "Field Group" button) and right-click to select the "Add to Field Group" item.
Then we return back to the additional information mode.
Define the rules for the formation of the value of the contract position.
To do this, you must position the mouse cursor at the desired position and click the "Encoding for Add-ons" button.

We set the following code for the “BRTWR” field:
We define a variable for the exchange rate in which the contract is maintained. Then we get its value.
If the contract item is not deleted, then the cost is equal to the product of the quantity and price, taking into account the quantity of the unit price and the exchange rate. If the contract is in the accounting currency, then the system is automatically 1.
If the position is deleted, then the price is 0.
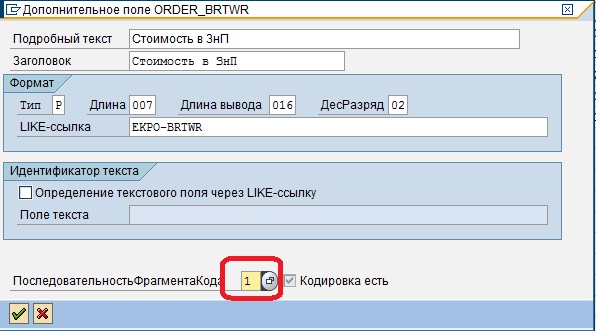
The code for the field "ORDER_BRTWR":
Everything is similar, given that there can be several order items for one contract item.
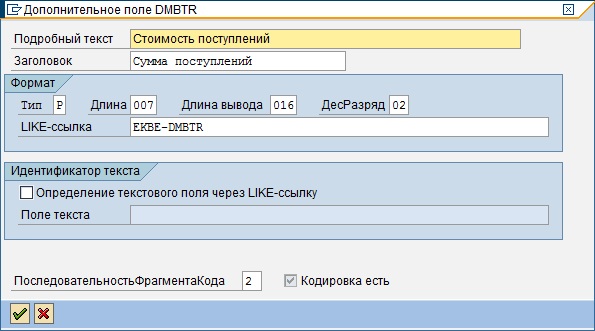
Code for the DMBTR field:
For documents of receipt, we immediately take into account the cost in local currency. For this reason, there is no need to convert the currency. In receipt documents, there is no sign of deletion, since only reversal is possible for accounting entries. In this regard, by the field "EKBE-SHKZG" we define a direct document or reversal.
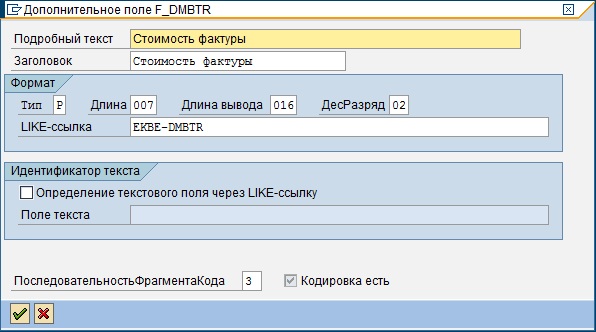
Code for the F_DMBTR field:
The amount for invoices is calculated similarly to receipt. In this case, for invoices, transactions such as add. debit and add. lending.
Next, go to the "Selection Criteria" tab. There we will create the field “Contract number” and the sign “only positions with excess”.
When creating, it should be borne in mind that the “Selection Criterion” is the field by which the restriction is fulfilled, and the “Parameter” is a certain attribute that should be set to some functionality.
Create a selection criterion "Contract Number".
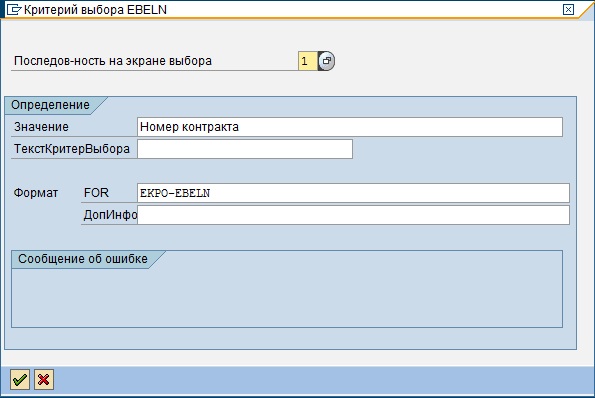
and the parameter “Only positions with excess”

Please note that the parameter in the “Additional Info” field contains the text “AS CHECKBOX” in order to be displayed as a checkbox.
For the selection criteria "Contract Number" some additional settings are not required. The report will be limited by the field specified in the settings. For the parameter, we will introduce restrictions in the generated report. To do this, go to the “Encodings” tab and select the encoding fragment “5 Processing records”.

and adding the code:
With this code, we restrict the output of only those records for which BRTWR <DMBTR, i.e. the value of the contract item is less than the value of the proceeds. We also restrict records by type “Contract”.
Please note that at the time of checks, these fields must be calculated. For this reason, for this check, the serial number was specified equal to 10 (any number exceeding the numbers of the previous fields).
Now save the info set and generate it .
.
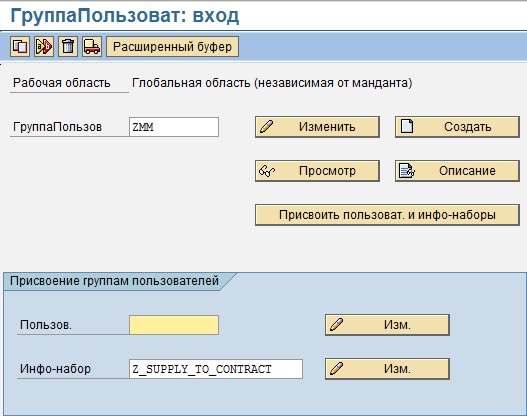
User groups provide access control to info sets and queries.
Go to the menu “Environment” -> “User Groups” from the first screen of maintaining the info set.


A request is the next step in generating a report after creating an infoset and user group. At this step, the final composition of the fields that will be included in the report, the order of the fields, the appearance of the report, sorting, totals, and so on is determined.
We start transaction SQ01.
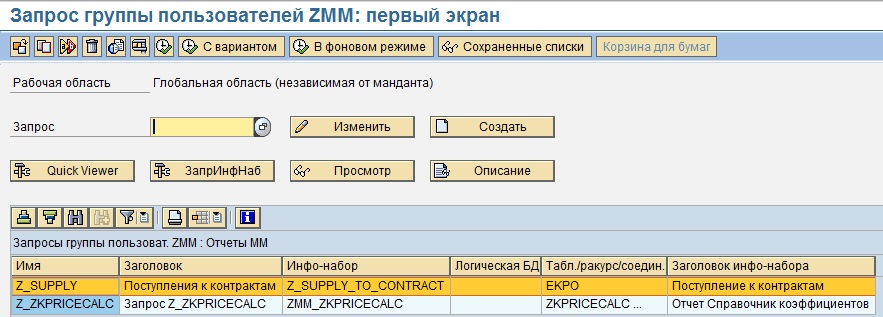
We verify that we are working with the user group created earlier. (see the name of the group at the top of the screen). If not, press the “Another user group” button (Shift + F7) and select the desired group.
Enter the name "Z_SUPPLY" and press the "Create" button. The system displays a list of info sets associated with this user group. Choose our info set and confirm the entry.
It is desirable to compare the format of the list with the existing print format, otherwise the report cannot be printed. Common formats: 65x132 and 65x80. Leave the default format: 0 rows (no limit) and 83 columns.
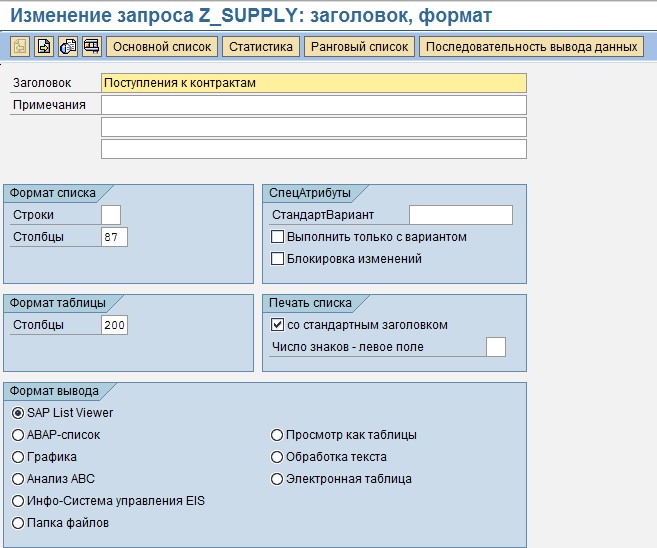
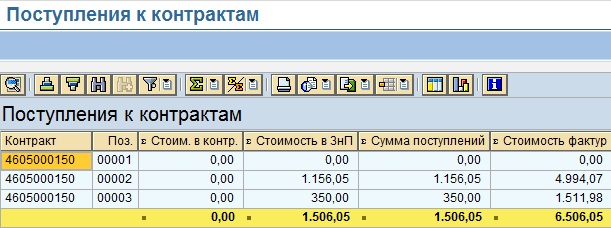
We will call the report “Receipt to Contracts” and go directly to the “drawing” of the report by clicking the “Main List” button.
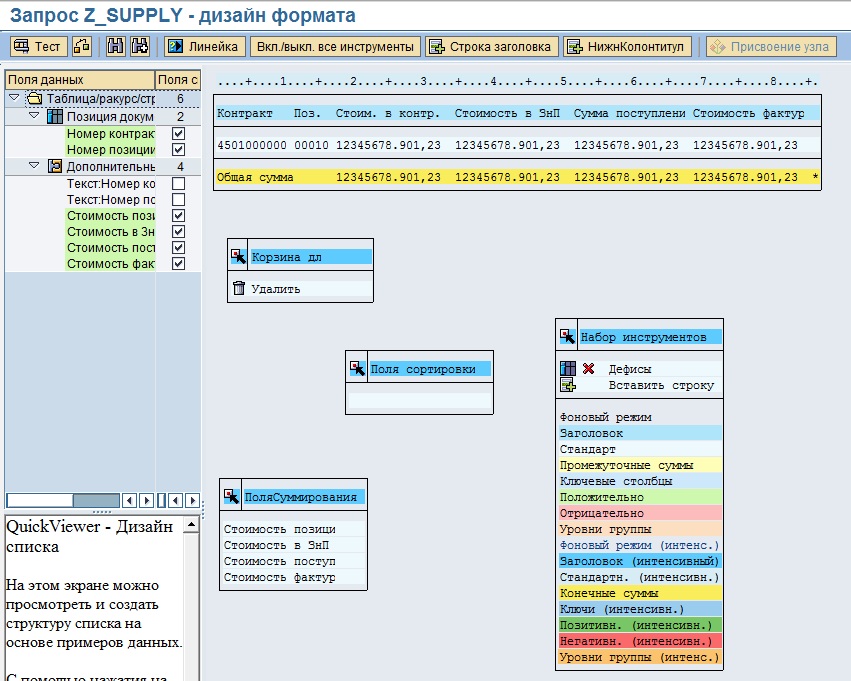
On the main list screen on the left side are fields that can be added to the report. The properties of the selected element are displayed in the lower left part, and the main part is a graphical representation of the future report.
We will open the list of fields on the left and mark the fields that should be included in the report. Fields are added in the order in which we mark them. In the future, the order can be changed by dragging the field to the desired place in the graphic block.
We’ll make small adjustments. Value fields are displayed with add. field "Currency" whose value we do not need. To remove the display of the currency, select the value field and select the item “Without currency field” in the lower left part of the screen. Then click “Apply.”

On this, our report can be considered formed. Save the report.
You can immediately test it by clicking the "Test" button.
After making sure that the report fully meets our needs, you should create a transaction to run it.
Now you can generate a report using a transaction.
Over time, the end user needs reports that contain both standard and additional fields. Examples include reports such as general ledger account history, open invoices from suppliers, and a list of customers.
If the reports are quite specific or have some non-standard functionality, you have to contact programmers to implement them. In other cases, just use SAP Query.
The SAP Query tool allows you to create reports without significant labor costs.
Below we will consider an example of creating a report using SAP Query.
The main steps to create a report:
- Creating an Info Set
- Creating a user group, assigning an info set to it
- Creating a query based on an infoset.
Formulation of the problem
From time to time, situations arise in which the user cannot figure out the causes of the error “Exceeded contract value” in purchase orders. In most cases, the cause of this error is easy to find.
But if there are 1000 positions in the contract, and for some of them the value in receipt is greater than the value in the contract position (the value in the contract is equal to the value in the orders), then it becomes problematic to identify this position.
There are reports in the system showing the value of order items to a contract item or receipt documents with links to a purchase order. There is no single report.
You must create a report that displays the specified contracts by position. Each item should display its value, the value of the items of purchase orders, the value of receipts, the value of invoices. All prices must be displayed in local currency.
It is also necessary to add a feature that allows you to display only problematic positions.
Creating an Info Set
The info set should contain a list of fields that you want to display in the report. In our set, such fields as the contract number, contract position, position value in the contract, value in purchase orders, value of receipts, value of invoices will be created.
Run transaction SQ02.
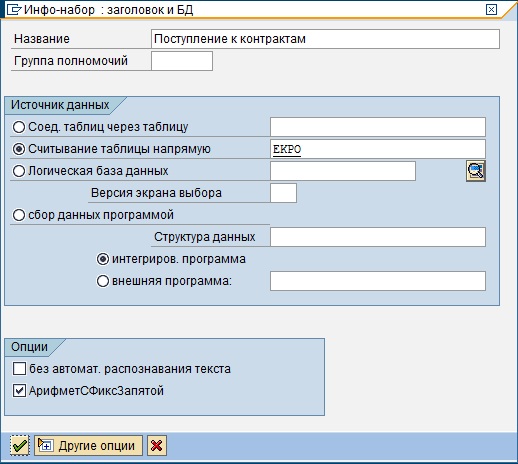
- Enter the name of the InfoSet “Z_SUPPLY_TO_CONTRACT” and click the “Create” button
- Define a description of the “Receipt of contracts” info set
- Enter the name of the EKPO table (see Figure 2). This is a standard table with the positions of purchasing documents, including contracts.
SAP offers several sources for creating an info set, these are:
- join tables
- reading the table directly
- logical database
- program data collection
Each of the data sources has its own characteristics, which are not discussed in this article. We chose a table, since the entire report will be built on this table, and we will get the rest of the data through the configuration of additional fields.
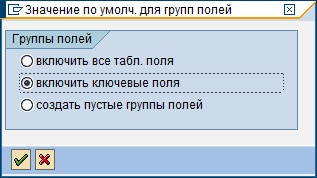
Next, check the box “Include key fields” and confirm the creation.
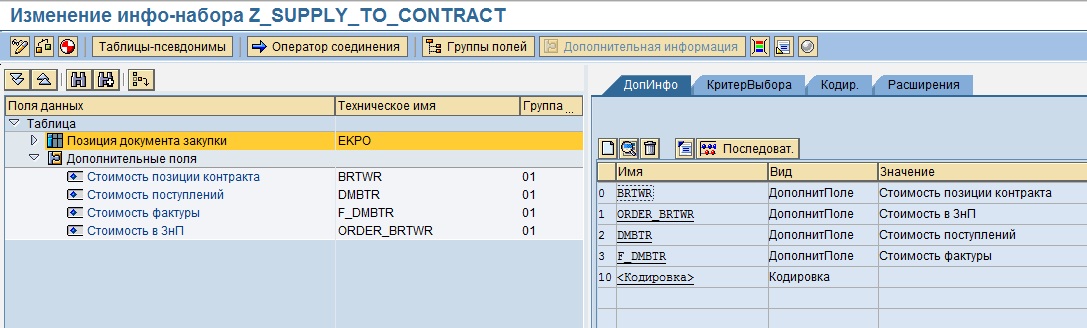
Now we are on the first screen for maintaining the info set.
The screen is divided into 3 parts:
- Left - tables and additional fields
- Top right - groups of fields that should be included in the request and, subsequently, in the report
- Bottom right - detailed information on fields from a group of fields. To display, double-click on the required field from the group of fields
If the same item with key fields is selected on the previous screen, then the purchase document number and position should be displayed in the group of fields. If not, then enable these fields (right-click on a field from the table and select "include field in a group of fields"), or exclude unnecessary ones.
Then you should add the remaining fields required for our report. To do this, click on the button on the "Additional Information" toolbar (F5). To switch to the starting position, press the "Field Groups" button (F6).
The right side is completely transformed. The first screen contains additional fields, tables, structures, and code links.
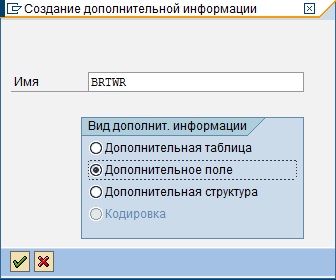
Create the required fields for us. To do this, click on the "Create" button (button in the form of a white sheet). In the window that opens, indicate the name of the new field and select the "Additional field" item.
Next, fill in the name, the title text in the report and a link to the sample field "EKPO-BRTWR". The format of our field will be copied from the sample.
The following field is created in the same way, with the exception of the field serial number.
We will take the cost of receipts and the value of invoices from the history of the purchase order from the EKBE table.
Added fields are displayed in the left block in the "additional fields" branch.
These fields should be added to the field group. To do this, switch to the field group mode (the "Field Group" button) and right-click to select the "Add to Field Group" item.
Then we return back to the additional information mode.
Define the rules for the formation of the value of the contract position.
To do this, you must position the mouse cursor at the desired position and click the "Encoding for Add-ons" button.
We set the following code for the “BRTWR” field:
data:
  ii_WKURS like EKKO-WKURS.
SELECT SINGLE WKURS INTO ii_WKURS FROM EKKO
  WHERE EBELN = EKPO-EBELN.
CLEAR BRTWR.
IF EKPO-LOEKZ IS INITIAL.
  BRTWR = EKPO-NETPR / EKPO-PEINH * EKPO-KTMNG * ii_WKURS.
ELSE.
  BRTWR = '0'.
ENDIF.
We define a variable for the exchange rate in which the contract is maintained. Then we get its value.
If the contract item is not deleted, then the cost is equal to the product of the quantity and price, taking into account the quantity of the unit price and the exchange rate. If the contract is in the accounting currency, then the system is automatically 1.
If the position is deleted, then the price is 0.
The code for the field "ORDER_BRTWR":
data:
  s_NETPR like EKPO-NETPR,
  s_PEINH like EKPO-PEINH,
  s_MENGE like EKPO-MENGE,
  c_BRTWR like ORDER_BRTWR,
  i_ebeln like EKKO-EBELN,
  i_WKURS like EKKO-WKURS.
ORDER_BRTWR = '0'.
select NETPR PEINH MENGE EBELN
  INTO (s_NETPR, s_PEINH, s_MENGE, i_ebeln)
  from EKPO as e
  where
    e~KONNR = EKPO-EBELN AND
    e~KTPNR = EKPO-EBELP AND
    e~LOEKZ = ''.
  SELECT SINGLE WKURS INTO i_WKURS FROM EKKO
    WHERE EBELN = i_ebeln.
    CLEAR c_BRTWR.
    c_BRTWR = s_NETPR / s_PEINH * s_MENGE * i_WKURS.
    ORDER_BRTWR = ORDER_BRTWR + c_BRTWR.
endselect.
Everything is similar, given that there can be several order items for one contract item.
Code for the DMBTR field:
data:
  s_SHKZG like ekbe-SHKZG,
  s_DMBTR like ekbe-DMBTR.
DMBTR = '0'.
select DMBTR SHKZG INTO (s_DMBTR, s_SHKZG) from EKBE as e
  INNER JOIN EKPO as z
    ON e~EBELN EQ z~EBELN AND
      e~EBELP EQ z~EBELP
  where
    z~KONNR = EKPO-EBELN AND
    z~KTPNR = EKPO-EBELP AND
    e~VGABE = '1'.
  if s_SHKZG = 'S'.
    DMBTR = DMBTR + s_DMBTR.
  else.
    DMBTR = DMBTR - s_DMBTR.
  endif.
endselect.
For documents of receipt, we immediately take into account the cost in local currency. For this reason, there is no need to convert the currency. In receipt documents, there is no sign of deletion, since only reversal is possible for accounting entries. In this regard, by the field "EKBE-SHKZG" we define a direct document or reversal.
Code for the F_DMBTR field:
data:
  s_SHKZG_f like ekbe-SHKZG,
  s_DMBTR_f like ekbe-DMBTR.
F_DMBTR = '0'.
select DMBTR SHKZG INTO (s_DMBTR_f, s_SHKZG_f) from EKBE as e
  INNER JOIN EKPO as z
    ON e~EBELN EQ z~EBELN AND
      e~EBELP EQ z~EBELP
  where
    z~KONNR = EKPO-EBELN AND
    z~KTPNR = EKPO-EBELP AND
    ( e~VGABE = '2' OR e~VGABE = '3' ).
  if s_SHKZG_f = 'S'.
    F_DMBTR = F_DMBTR + s_DMBTR_f.
  else.
    F_DMBTR = F_DMBTR - s_DMBTR_f.
  endif.
endselect.
The amount for invoices is calculated similarly to receipt. In this case, for invoices, transactions such as add. debit and add. lending.
Next, go to the "Selection Criteria" tab. There we will create the field “Contract number” and the sign “only positions with excess”.
When creating, it should be borne in mind that the “Selection Criterion” is the field by which the restriction is fulfilled, and the “Parameter” is a certain attribute that should be set to some functionality.
Create a selection criterion "Contract Number".
and the parameter “Only positions with excess”
Please note that the parameter in the “Additional Info” field contains the text “AS CHECKBOX” in order to be displayed as a checkbox.
For the selection criteria "Contract Number" some additional settings are not required. The report will be limited by the field specified in the settings. For the parameter, we will introduce restrictions in the generated report. To do this, go to the “Encodings” tab and select the encoding fragment “5 Processing records”.
and adding the code:
CHECK EKPO-BSTYP = 'K'.
IF Z_ONLY = 'X'.
  CHECK BRTWR < DMBTR.
ENDIF.
With this code, we restrict the output of only those records for which BRTWR <DMBTR, i.e. the value of the contract item is less than the value of the proceeds. We also restrict records by type “Contract”.
Please note that at the time of checks, these fields must be calculated. For this reason, for this check, the serial number was specified equal to 10 (any number exceeding the numbers of the previous fields).
Now save the info set and generate it
.Create user group
User groups provide access control to info sets and queries.
Go to the menu “Environment” -> “User Groups” from the first screen of maintaining the info set.
- Enter the name of the user group "ZMM"
- Click the Create button
- Define the name "MM Reports"
- Click the “Save” button. At this point, the system may request a developer key or transfer request
- Click the "Assign Users and InfoSets" button
- In the window that opens, enter the users for whom this report is intended
- Save changes
- Press the button “Assign info sets”
- Scroll down the list to find custom info sets and mark the previously created info set “Z_SUPPLY_TO_CONTRACT”
- Save
Request creation
A request is the next step in generating a report after creating an infoset and user group. At this step, the final composition of the fields that will be included in the report, the order of the fields, the appearance of the report, sorting, totals, and so on is determined.
We start transaction SQ01.
We verify that we are working with the user group created earlier. (see the name of the group at the top of the screen). If not, press the “Another user group” button (Shift + F7) and select the desired group.
Enter the name "Z_SUPPLY" and press the "Create" button. The system displays a list of info sets associated with this user group. Choose our info set and confirm the entry.
It is desirable to compare the format of the list with the existing print format, otherwise the report cannot be printed. Common formats: 65x132 and 65x80. Leave the default format: 0 rows (no limit) and 83 columns.
We will call the report “Receipt to Contracts” and go directly to the “drawing” of the report by clicking the “Main List” button.
On the main list screen on the left side are fields that can be added to the report. The properties of the selected element are displayed in the lower left part, and the main part is a graphical representation of the future report.
We will open the list of fields on the left and mark the fields that should be included in the report. Fields are added in the order in which we mark them. In the future, the order can be changed by dragging the field to the desired place in the graphic block.
We’ll make small adjustments. Value fields are displayed with add. field "Currency" whose value we do not need. To remove the display of the currency, select the value field and select the item “Without currency field” in the lower left part of the screen. Then click “Apply.”
On this, our report can be considered formed. Save the report.
You can immediately test it by clicking the "Test" button.
Creating a transaction for a report
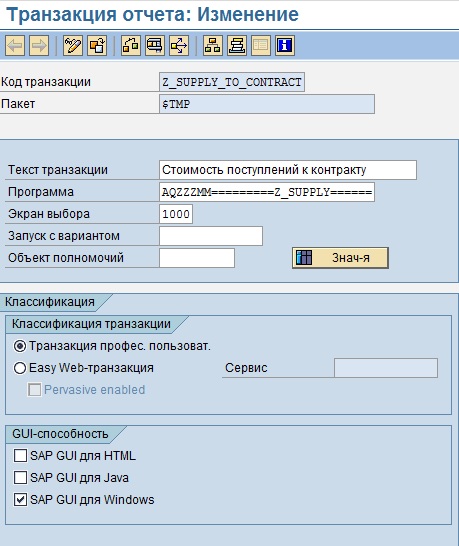
After making sure that the report fully meets our needs, you should create a transaction to run it.
- Initially, we generate the program. To do this, go to the first screen of transaction SQ01. In this transaction, select the request we created and select in the menu “Request” -> “Other Functions” -> “Generate Program”.
- After generating the program, we get the program name in the menu "Request" -> "Other functions" -> "View report name."
- We form the transaction through SE93.
- Specify the name of the transaction
- Click the Create button
- Specify the name of the transaction
- We mark the item "Program and selection screen"
- Confirm entry
- In the screen that opens, in the "Program" field, enter the previously received report name
- Note the GUI ability
- Save
Now you can generate a report using a transaction.
PS
- On some screens it may appear in the heading “Change” instead of “Create”. This is due to the fact that the report was created earlier.
- The given code is hardly the most optimal. If you think your option is better, you are ready to consider and replace it.
- There are several options for generating this report in SAP Query. The above option is not optimal. But it reveals the capabilities of SAP Query
- I am always happy for constructive criticism