Starry Sky on Canvas. Constellations
Continuation of the topic that began in the previous article . The idea for its development was the reading of an article on the Habr “ LibCanvas: On the Way to the Stars ”, which describes the implementation of a planetarium on Canvas with the derivation of constellations and planets in a geodetic coordinate system (with the coordinates of the observation point, azimuth and height above the horizon). In a post, the author gives a link to a database of stars and constellations, which I kindly used. The file contains the coordinates of the right ascension (Right Ascension, in hours) and declination (Declination, in degrees) of stars, constellation points and their names. I converted them to radians and saved them in the constellations.js file for my star project Starry Sky .
Comparing the results, I noticed that in the original planetarium, everything looks the other way around. That is, the stars are drawn to the outer side of the sphere, and for me - to the inner. I decided to use another planetarium as a reference. For this purpose, I chose the "Stars" project on Maps@Mail.ru. It turned out that the correct display option is on the inside of the stellar sphere. This can be seen in the figure (time 2/3/2014 17: 2: 0, observation point - d 37, w 55 Moscow).

In addition to the constellations in my Starry Sky planetarium, I added the output of information on stars, planets, points of spacecraft when you hover over them (active areas).
For stars, the number from the Henry Draper'a catalog (HD) is displayed.
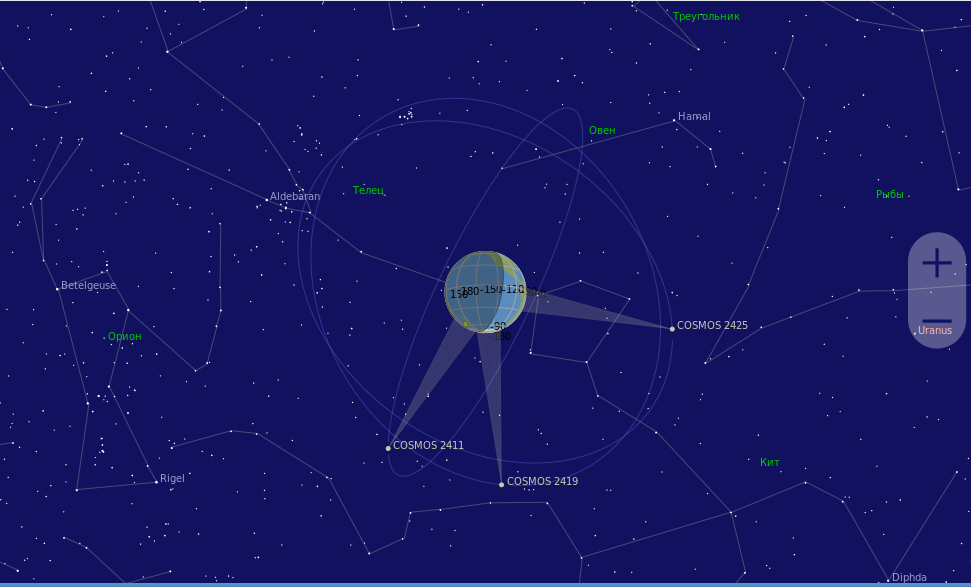
In addition to stars and planets, ephemeris and orbits of spacecraft from the GLONASS group are added to the map. Data was taken from celestrak.com and saved in the tledata.js file . In total, there are 28 devices in the grouping, the choice of devices is controlled by the satellites list ... The satellite-js module is used to calculate the orbits and positions of the spacecraft .
A change in the scale of the map is tied to a change in height above the surface of the Earth. The size of the stellar sphere is fixed because otherwise the realism of the image is lost, the code of the edge of the celestial sphere becomes smaller than the edges of the map. Ideally, I would like to create the effect of an infinite Universe as in Celestia with the removal and approach of stars and planets.
You can now enable or disable layers (groups of objects) through a separate list of layers ...
The main problem of the planetarium with astrokot.ru , as the author writes, is the slowness of the program. I measured the times in the Firefox 19 profiler. In Planetarium - 1168 ms, in Starry - 525 ms. Really slow, there are more objects in Starry, and time is 2 times less. Apparently the cycles use extra calculations that slow down the output.
Exploring stellar algorithms for my project, I try to simplify the calculations and code as much as possible so that they are clear and visual. Studying codes of other projects (Celestia, Stellarium, libastro), especially on WebGL, it is very difficult to figure out which formulas are used and how they work. For myself, I have so far identified two projects - libnova and Marble - whose code is clear and most suitable for porting to other environments, for example, in JS.
Difference
Comparing the results, I noticed that in the original planetarium, everything looks the other way around. That is, the stars are drawn to the outer side of the sphere, and for me - to the inner. I decided to use another planetarium as a reference. For this purpose, I chose the "Stars" project on Maps@Mail.ru. It turned out that the correct display option is on the inside of the stellar sphere. This can be seen in the figure (time 2/3/2014 17: 2: 0, observation point - d 37, w 55 Moscow).
What's new
In addition to the constellations in my Starry Sky planetarium, I added the output of information on stars, planets, points of spacecraft when you hover over them (active areas).
For stars, the number from the Henry Draper'a catalog (HD) is displayed.
In addition to stars and planets, ephemeris and orbits of spacecraft from the GLONASS group are added to the map. Data was taken from celestrak.com and saved in the tledata.js file . In total, there are 28 devices in the grouping, the choice of devices is controlled by the satellites list ... The satellite-js module is used to calculate the orbits and positions of the spacecraft .
A change in the scale of the map is tied to a change in height above the surface of the Earth. The size of the stellar sphere is fixed because otherwise the realism of the image is lost, the code of the edge of the celestial sphere becomes smaller than the edges of the map. Ideally, I would like to create the effect of an infinite Universe as in Celestia with the removal and approach of stars and planets.
You can now enable or disable layers (groups of objects) through a separate list of layers ...
- cntlines - constellation lines,
- cntpos - names of constellations,
- star - stars
- sun sun
- moon - moon
- planet - planets
- earth - Earth
- sattrac - spacecraft orbits,
- satsurface - satellite sub-satellite points,
- sattrace - projections of the spacecraft ephemeris on Earth,
- satsector - field of vision of the spacecraft (18 degrees),
- satpos - spacecraft in orbit,
- terminator - night zone.
results
The main problem of the planetarium with astrokot.ru , as the author writes, is the slowness of the program. I measured the times in the Firefox 19 profiler. In Planetarium - 1168 ms, in Starry - 525 ms. Really slow, there are more objects in Starry, and time is 2 times less. Apparently the cycles use extra calculations that slow down the output.
Exploring stellar algorithms for my project, I try to simplify the calculations and code as much as possible so that they are clear and visual. Studying codes of other projects (Celestia, Stellarium, libastro), especially on WebGL, it is very difficult to figure out which formulas are used and how they work. For myself, I have so far identified two projects - libnova and Marble - whose code is clear and most suitable for porting to other environments, for example, in JS.