February 20, 2014 at 13:57
Creating a game before your eyes - part 4: Shader for fade in the palette (a la NES)
- Tutorial
Today I’ll talk about the implementation of a shader that allows you to make fade in / out on the palette, as was done in old NES games, etc.
The bottom line is that if there was a limited palette of colors, it was impossible to gradually darken (or vice versa, remove from the dark) the picture, because it just simply didn’t have the right colors in the palette. And this was solved by using different colors, which are perceived as darker. That is, you need to make fade in a yellow object, and there are no dark yellow shades in the palette - so you have to first make the object blue (looks dark), then red, etc.
Below I will show what the final version of the written shader looks like:
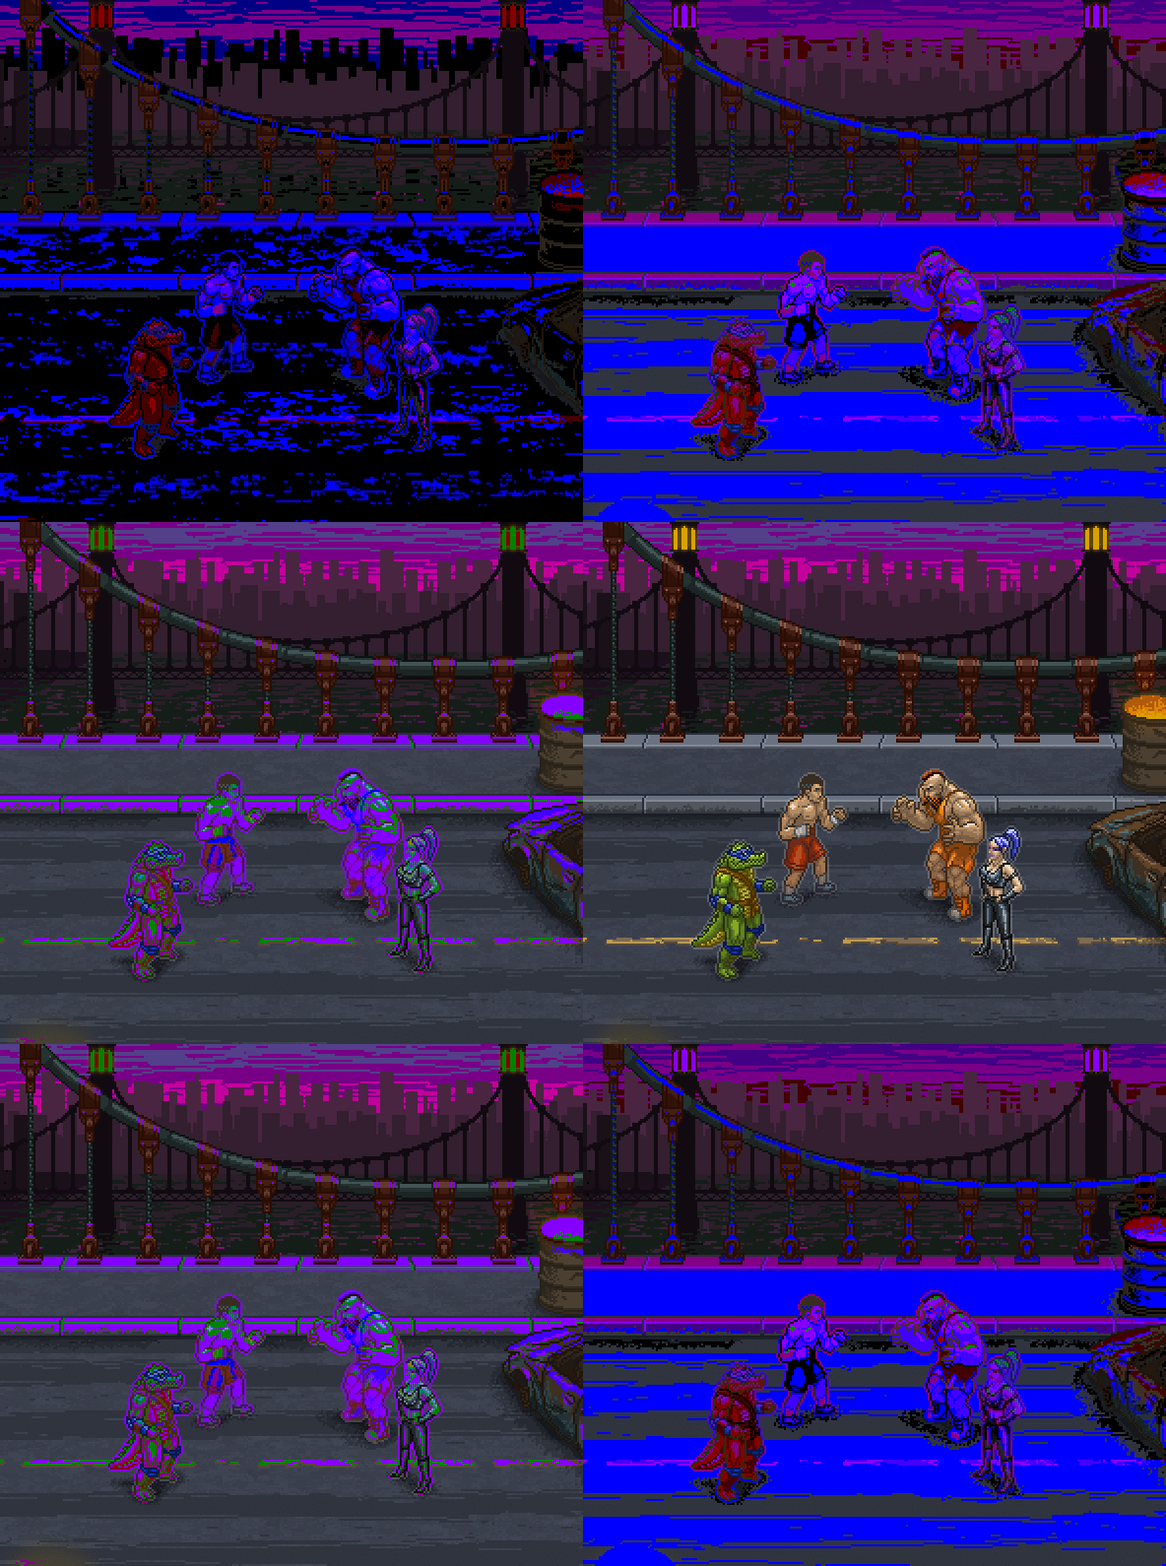
Just make a reservation - whether or not to use such a shader in our game, we have not decided yet. Since it looks like on modern pixel art with a lot of colors, it's a little debatable.
So, to begin with, write a shader disc:
Now let's think ...
For a start - a little theory. As I said above, colors are perceived differently. Blue is perceived as the darkest, etc. In general, if you take the TV table settings and see it on the B / W TV - then it will be ordered by Cvetlaya to dark:
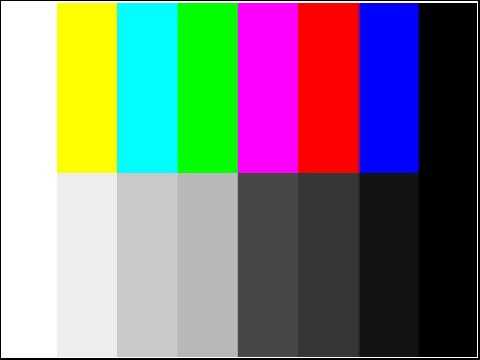
We describe such a color conversion to B / W magic formula
The shader will work as follows: it will take the original image, change its brightness (lower), and then try to find a color from the available palette that would be closest in brightness. That is, in fact, the shader is divided into two parts: 1) lower the brightness and 2) select a color from the palette.
With lowering the brightness, everything is simple - we will primitively multiply the color by a factor. But finding the nearest color in the palette is more difficult.
Those who are familiar with shaders understand that any cycle in a shader is tantamount to suicide. So sorting through the palette in search of a suitable color for each pixel is a bad idea. How to be?
The solution is simple and elegant - to create a texture that serves as a color converter. And it is very fortunate that there is such a thing as three-dimensional textures. That is, we take and pre-compute a table for converting the source color to the color index in the palette. And even better - immediately in the final color. In such a texture, the R / G / B components will be located along three axes, and the pixel color at this point will be our resulting color. Everything is simple! It remains only to create such a texture.
Of course, for accurate color conversion, you would have to create a monster-like texture, where the dimension along each axis would correspond to the number of gradations of each component. That is 256x256x256. But in our case, accuracy is not at all important to us, because we make sure that we lower the color depth and reduce all the colors to several colors in the palette.
So, for starters, let's create a palette and immediately remember for each color its brightness:
It is worth paying attention to the fact that I eventually divided the R component by 2, because I didn’t like that in the resulting palette the red color was very “sticking out”.
And now - the most interesting. You need to create a 3D texture for conversion.
Well, actually, it remains to write the shader itself, but everything is simple:
Here it is worth paying attention to line c
Actually, that's all.
Final version:
It is also worth noting that in the code above I introduced such a parameter as “random”. This was done in order to have a simple opportunity to rebuild the color table on the fly and it was more convenient to select the parameters of the palette. That is, I changed the code generating the palette and moving the slider “random” forced the game to regenerate the palette.
All articles in the series:
The bottom line is that if there was a limited palette of colors, it was impossible to gradually darken (or vice versa, remove from the dark) the picture, because it just simply didn’t have the right colors in the palette. And this was solved by using different colors, which are perceived as darker. That is, you need to make fade in a yellow object, and there are no dark yellow shades in the palette - so you have to first make the object blue (looks dark), then red, etc.
Below I will show what the final version of the written shader looks like:
Just make a reservation - whether or not to use such a shader in our game, we have not decided yet. Since it looks like on modern pixel art with a lot of colors, it's a little debatable.
So, to begin with, write a shader disc:
shader
Shader "Custom/Palette Shader"
{
	Properties {
		_MainTex ("Base (RGB)", 2D) = "white" {}
	}
	SubShader {
		Pass {
			ZTest Always Cull Off ZWrite Off Fog { Mode off }
			CGPROGRAM
			#pragma vertex vert
			#pragma fragment frag
			#pragma fragmentoption ARB_precision_hint_fastest
			#include "UnityCG.cginc"
			#pragma target 3.0
			struct v2f
			{
				float4 pos      : POSITION;
				float2 uv       : TEXCOORD0;
			};
			uniform sampler2D _MainTex;
			v2f vert(appdata_img v)
			{
				v2f o;
				o.pos = mul(UNITY_MATRIX_MVP, v.vertex);
				o.uv = MultiplyUV(UNITY_MATRIX_TEXTURE0, v.texcoord);
				return o;
			}
			half4 frag(v2f i): COLOR
			{
				half4 color = tex2D(_MainTex, i.uv);
				// здесь будет код, преобразующий цвет
				half4 rc = color;
				return rc;
			}
			ENDCG
		}
	}
	FallBack "Diffuse"
}
c #
using UnityEngine;
[ExecuteInEditMode]
[RequireComponent(typeof(Camera))]
public class PaletteShader : MonoBehaviour
{
	public Shader shader;
	private Material _material;
	////////////////////////////////////////////////////////////////////////////////////////////////////////////////////
	protected Material material
	{
		get
		{
			if (_material == null)
			{
				_material = new Material(shader);
				_material.hideFlags = HideFlags.HideAndDontSave;
			}
			return _material;
		}
	}
	////////////////////////////////////////////////////////////////////////////////////////////////////////////////////
	private void OnRenderImage(RenderTexture source, RenderTexture destination)
	{
		if (shader == null) return;
		Material mat = material;
		Graphics.Blit(source, destination, mat);
	}
	////////////////////////////////////////////////////////////////////////////////////////////////////////////////////
	void OnDisable()
	{
		if (_material)	DestroyImmediate(_material);
	}
	////////////////////////////////////////////////////////////////////////////////////////////////////////////////////
}
Now let's think ...
For a start - a little theory. As I said above, colors are perceived differently. Blue is perceived as the darkest, etc. In general, if you take the TV table settings and see it on the B / W TV - then it will be ordered by Cvetlaya to dark:
We describe such a color conversion to B / W magic formula
R*0.21 + G*0.72 + B*0.07. Will call this parameter "brightness". The shader will work as follows: it will take the original image, change its brightness (lower), and then try to find a color from the available palette that would be closest in brightness. That is, in fact, the shader is divided into two parts: 1) lower the brightness and 2) select a color from the palette.
With lowering the brightness, everything is simple - we will primitively multiply the color by a factor. But finding the nearest color in the palette is more difficult.
Those who are familiar with shaders understand that any cycle in a shader is tantamount to suicide. So sorting through the palette in search of a suitable color for each pixel is a bad idea. How to be?
The solution is simple and elegant - to create a texture that serves as a color converter. And it is very fortunate that there is such a thing as three-dimensional textures. That is, we take and pre-compute a table for converting the source color to the color index in the palette. And even better - immediately in the final color. In such a texture, the R / G / B components will be located along three axes, and the pixel color at this point will be our resulting color. Everything is simple! It remains only to create such a texture.
Of course, for accurate color conversion, you would have to create a monster-like texture, where the dimension along each axis would correspond to the number of gradations of each component. That is 256x256x256. But in our case, accuracy is not at all important to us, because we make sure that we lower the color depth and reduce all the colors to several colors in the palette.
So, for starters, let's create a palette and immediately remember for each color its brightness:
const int depth = 3; // кол-во градаций цвета в результирующей палитре
const float f_depth = 1.0f / (1.0f * depth - 1.0f);
Color[] palette = new Color[depth*depth*depth];
float[] palette_grey = new float[depth*depth*depth];
		// заполняем палитру используемых цветов
		for (int r = 0; r < depth; r++)
		{
			for (int g = 0; g < depth; g++)
			{
				for (int b = 0; b < depth; b++)
				{
					Color c = new Color(r * f_depth / 2, g * f_depth, b * f_depth, 1);
					int n = r*depth*depth + g*depth + b;
					palette[n] = c;
					palette_grey[n] = c.r*0.21f + c.g*0.72f + c.b*0.07f;
				}
			}
		}
It is worth paying attention to the fact that I eventually divided the R component by 2, because I didn’t like that in the resulting palette the red color was very “sticking out”.
And now - the most interesting. You need to create a 3D texture for conversion.
const int dim = 16; // кол-во градаций цвета в исходной палитре
const float f_dim = 1.0f / (1.0f * dim - 1.0f);
Texture3D tex = new Texture3D(dim, dim, dim, TextureFormat.RGB565, false);
tex.filterMode = FilterMode.Point; // обязательно отключаем фильтрацию!
tex.wrapMode = TextureWrapMode.Clamp;
Color[] t = new Color[dim*dim*dim];
// заполняем текстуру конвертирования
for (int r = 0; r < dim; r++)
{
	for (int g = 0; g < dim; g++)
	{
		for (int b = 0; b < dim; b++)
		{
			float grey = (r * 0.21f + g * 0.72f + b * 0.07f) * f_dim;
			// теперь найдем самый ближайший цвет по яркости серого
			int idx = 0;
			float min_d = grey;
			for (int i = 1; i < palette_grey.Length; i++)
			{
				float d = Mathf.Abs(palette_grey[i] - grey);
				if (d < min_d)
				{
					min_d = d;
					idx = i;
				}
			}
			t[r * dim * dim + g * dim + b] = palette[idx]; // заполним палитру конвертации
		}
	}
}
tex.SetPixels(t);
tex.Apply();
Well, actually, it remains to write the shader itself, but everything is simple:
half4 color = tex2D(_MainTex, i.uv);
half4 rc = tex3D(_PaletteTex, color.rgb * _Br);
float d = abs(Luminance(color) - Luminance(rc));
if ((d < 0.15) || (_Br == 1)) rc = color;
return rc;
Here it is worth paying attention to line c
if. The second condition is obvious - "if the brightness == 1, then we return the original color intact." But the first one is a certain condition that “when the color from the palette is pretty close (within 15%) to the resulting one, then leave the original color too. This is done in order to reduce some unnecessary “rattle” of flowers. Some kind of snapping, if you like. And that’s why you can see that some of the elements on our screen become their color before the final phase. Otherwise, until the last they were not of their color, but as close as possible from the palette. What would look bad for dark colors. Actually, that's all.
Final version:
shader
Shader "Custom/Palette Shader"
{
	Properties {
		_MainTex ("Base (RGB)", 2D) = "white" {}
		_Br("Brightness", Float) = 0
		_PaletteTex ("Pelette texture", 3D) = "white" {}
	}
	SubShader {
		Pass {
			ZTest Always Cull Off ZWrite Off Fog { Mode off }
			CGPROGRAM
			#pragma vertex vert
			#pragma fragment frag
			#pragma fragmentoption ARB_precision_hint_fastest
			#include "UnityCG.cginc"
			#pragma target 3.0
			struct v2f
			{
				float4 pos      : POSITION;
				float2 uv       : TEXCOORD0;
			};
			uniform sampler2D _MainTex;
			uniform sampler3D _PaletteTex;
			uniform float _Br;
			v2f vert(appdata_img v)
			{
				v2f o;
				o.pos = mul(UNITY_MATRIX_MVP, v.vertex);
				o.uv = MultiplyUV(UNITY_MATRIX_TEXTURE0, v.texcoord);
				return o;
			}
			half4 frag(v2f i): COLOR
			{
				half4 color = tex2D(_MainTex, i.uv);
				half4 rc = tex3D(_PaletteTex, color.rgb * _Br);
				float d = abs(Luminance(color) - Luminance(rc));
				if ((d < 0.15) || (_Br == 1)) rc = color;
				return rc;
			}
			ENDCG
		}
	}
	FallBack "Diffuse"
}
c #
using UnityEngine;
[ExecuteInEditMode]
[RequireComponent(typeof(Camera))]
public class PaletteShader : MonoBehaviour
{
	public Shader shader;
	private Material _material;
	[Range(0, 1)] public float brightness = 0.0f;
	[Range(0, 1)] public float random = 1f;
	private float _r = 0f;
	private Texture3D _tex;
	////////////////////////////////////////////////////////////////////////////////////////////////////////////////////
	protected Material material
	{
		get
		{
			if (_material == null)
			{
				_material = new Material(shader);
				_material.hideFlags = HideFlags.HideAndDontSave;
			}
			return _material;
		}
	}
	////////////////////////////////////////////////////////////////////////////////////////////////////////////////////
	private Texture3D GeneratePaletteTexture()
	{
		const int dim = 16; // кол-во градаций цвета в исходной палитре
		const int depth = 3; // кол-во градаций цвета в результирующей палитре
		const float f_dim = 1.0f / (1.0f * dim - 1.0f);
		const float f_depth = 1.0f / (1.0f * depth - 1.0f);
		Texture3D tex = new Texture3D(dim, dim, dim, TextureFormat.RGB565, false);
		tex.filterMode = FilterMode.Point;
		tex.wrapMode = TextureWrapMode.Clamp;
		Color[] palette = new Color[depth*depth*depth];
		float[] palette_grey = new float[depth*depth*depth];
		// заполняем палитру используемых цветов
		for (int r = 0; r < depth; r++)
		{
			for (int g = 0; g < depth; g++)
			{
				for (int b = 0; b < depth; b++)
				{
					Color c = new Color(r * f_depth / 2, g * f_depth, b * f_depth, 1);
					int n = r*depth*depth + g*depth + b;
					palette[n] = c;
					palette_grey[n] = c.r*0.21f + c.g*0.72f + c.b*0.07f;
				}
			}
		}
		Color[] t = new Color[dim*dim*dim];
		// заполняем текстуру конвертирования
		for (int r = 0; r < dim; r++)
		{
			for (int g = 0; g < dim; g++)
			{
				for (int b = 0; b < dim; b++)
				{
					float grey = (r * 0.21f + g * 0.72f + b * 0.07f) * f_dim;
					// теперь найдем самый ближайший цвет по яркости серого
					int idx = 0;
					float min_d = grey;
					for (int i = 1; i < palette_grey.Length; i++)
					{
						float d = Mathf.Abs(palette_grey[i] - grey);
						if (d < min_d)
						{
							min_d = d;
							idx = i;
						}
					}
					t[r * dim * dim + g * dim + b] = palette[idx]; // заполним палитру конвертации
				}
			}
		}
		tex.SetPixels(t);
		tex.Apply();
		return tex;
	}
	////////////////////////////////////////////////////////////////////////////////////////////////////////////////////
	private void OnRenderImage(RenderTexture source, RenderTexture destination)
	{
		if (shader == null) return;
		Material mat = material;
		mat.SetFloat("_Br", brightness);
		if (_tex == null) _tex = GeneratePaletteTexture();
		if (random != _r)
		{
			_r = random;
			_tex = GeneratePaletteTexture();
		}
		mat.SetTexture("_PaletteTex", _tex);
		Graphics.Blit(source, destination, mat);
	}
	////////////////////////////////////////////////////////////////////////////////////////////////////////////////////
	void OnDisable()
	{
		if (_material)	DestroyImmediate(_material);
	}
	////////////////////////////////////////////////////////////////////////////////////////////////////////////////////
}
It is also worth noting that in the code above I introduced such a parameter as “random”. This was done in order to have a simple opportunity to rebuild the color table on the fly and it was more convenient to select the parameters of the palette. That is, I changed the code generating the palette and moving the slider “random” forced the game to regenerate the palette.
All articles in the series:
- Idea, vision, choice of setting, platform, distribution model, etc.
- Shaders for styling pictures under CRT / LCD
- We fasten a scripting language to Unity (UniLua)
- Shader for fade in by palette (a la NES)
- Subtotal (prototype)
- Let's talk about PR indie games
- 2D animations in Unity ("like flash")
- Visual scripting of cut scenes in Unity (uScript)