Creating Trusted iSCSI Storage on Linux, Part 1
- Tutorial
Part two
Today I will tell you how I created a budget fail-safe iSCSI storage from two Linux-based servers to serve the needs of a VMWare vSphere cluster. There were similar articles ( for example ), but my approach is somewhat different, and the solutions (the same heartbeat and iscsitarget) used there are already outdated.
The article is intended for experienced enough administrators who are not afraid of the phrase “patch and compile the kernel”, although some parts could be simplified and dispensed with without compilation, but I will write how I did it myself. I will skip some simple things so as not to inflate the material. The purpose of this article is to show the general principles rather than to outline everything step by step.
My requirements were simple: create a cluster for virtual machines that did not have a single point of failure. And as a bonus - the storage had to be able to encrypt data so that the enemies, having dragged the server, did not reach them.
VSphere was chosen as the hypervisor, as the most well-established and finished product, and iSCSI was chosen as the protocol, as it does not require additional financial injections in the form of FC or FCoE switches. With open source SAS targets, it’s rather tight, if not worse, so this option was also rejected.
Remained storage. Various branded solutions from leading vendors were discarded due to the high cost of both themselves and licenses for synchronous replication. So we will do it ourselves, at the same time and learn.
As software was selected:
As a result, in such a short torment, such a simple scheme was born:
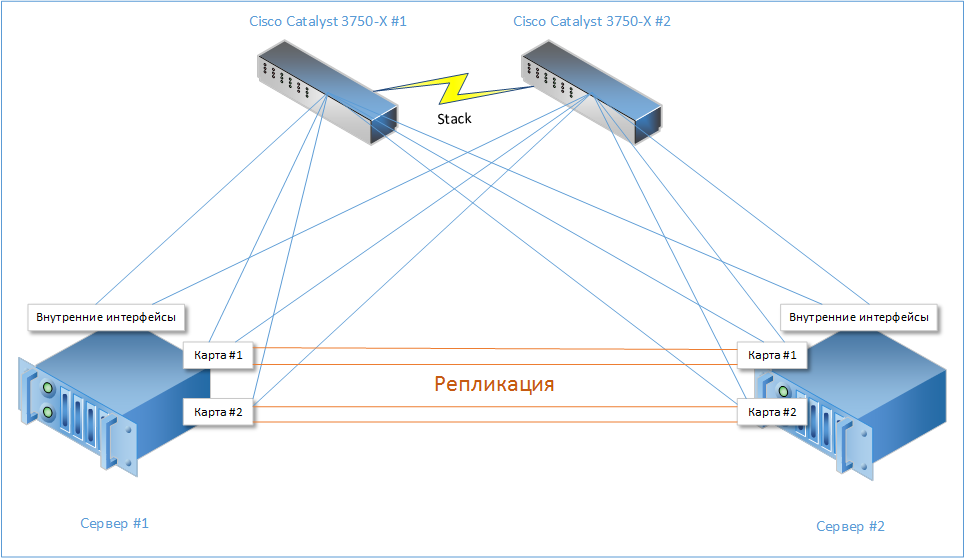
It shows that each of the servers has 10 gigabit interfaces (2 built-in and 4 on additional network cards). 6 of them are connected to the switch stack (3 to each), and the remaining 4 to the neighbor server.
On them replication through DRBD will also go. Replication cards, if desired, can be replaced with 10-Gbps, but I had these on hand, so "I blinded it from what it was."
Thus, the sudden death of any of the cards will not lead to the complete inoperability of any of the subsystems.
Since the main task of these storages is reliable storage of large data (file server, mail archives, etc.), we selected servers with 3.5 "drives:
I created two RAID10 arrays of 8 disks on each server.
I decided to refuse RAID6 since there was enough space, and the performance of RAID10 on random access tasks is higher. Plus, below the rebuild time and load in this case goes only to one disk, and not to the entire array at once.
In general, here everyone decides for himself.
With the iSCSI protocol, it makes no sense to use the Bonding / Etherchannel to speed it up.
The reason is simple - at the same time, hash functions are used to distribute packets over the channels, so it is very difficult to select such IP / MAC addresses so that the packet from IP1 to IP2 goes on one channel, and from IP1 to IP3 on another.
There is even a command on cisco that allows you to look at which of the Etherchannel interfaces the packet will fly:
Therefore, for our purposes, the use of several paths to the LUN is much better suited, which we will configure.
On the switch, I created 6 VLANs (one for each external interface of the server):
Interfaces were made trunked for versatility and something else will be seen later:
The MTU on the switch should be set to the maximum to reduce the load on the server (more packet -> less packets per second -> less interruption is generated). In my case, it is 9198:
ESXi does not support MTUs over 9000, so there is still some margin.
Each VLAN was assigned an address space, for simplicity it looks like this: 10.1. VLAN_ID .0 / 24 (for example, 10.1.24.0/24). With a shortage of addresses, you can keep within smaller subnets, but it’s more convenient.
Each LUN will be represented by a separate iSCSI target, so each common target has been selected with “common” cluster addresses, which will be raised on the node serving this target at the moment: 10.1. VLAN_ID .10 and 10.1. VLAN_ID .20
Also, the servers will have permanent addresses for management, in my case they are 10.1.0.100/24 and .200 (in a separate VLAN)
So, here we install Debian on both servers in a minimal form, I will not dwell on this in detail.
I conducted the assembly on a separate virtual machine, so as not to clutter up the server with compilers and sources.
To build the kernel under Debian, it’s enough to put the build-essential meta-package and, perhaps, something else, I don’t remember exactly.
Download the latest kernel 3.10 from kernel.org : and unpack it:
Next, download through SVN the latest revision of the stable SCST branch, generate a patch for our kernel version and apply it:
Now build the iscsi-scstd daemon:
The resulting iscsi-scstd will need to be put on the server, for example, in / opt / scst
Next, we configure the kernel for our server.
Turn on encryption (if necessary).
Do not forget to include these options for SCST and DRBD:
We collect it in the form of a .deb package (for this you need to install the fakeroot, kernel-package and debhelper at the same time):
At the output, we get the kernel-scst-image-3.10.27_1_amd64.deb
package. Next, we collect the package for DRBD:
We change the debian / rules file to the following state (there is a standard file there, but it does not collect kernel modules):
In the Makefile.in file, we will correct the SUBDIRS variable, remove the documentation from it , otherwise the package will not be collected with a curse on the documentation.
We collect:
We get the drbd_8.4.4_amd64.deb package .
Everything, you don’t need to collect anything else, copy both packages to the servers and install:
The interfaces were renamed to /etc/udev/rules.d/70-persistent-net.rules as follows:
int1-6 go to the switch, and drbd1-4 go to the neighboring server.
/ etc / network / interfaces has an extremely frightening appearance, which is not even a dream in a nightmare:
Since we also want to have fault tolerance for server management, we use a military trick: in bonding in active-backup mode, we collect not the interfaces themselves, but VLAN subinterfaces. Thus, the server will be available as long as at least one interface is running. This is redundant, but purcua would not be pa. And at the same time, the same interfaces can be freely used for iSCSI traffic.
For replication, the bond_drbd interface was created in balance-rr mode , in which packets are sent stupidly sequentially across all interfaces. He was assigned an address from the gray network / 24, but one could manage with / 30 or / 31 as there will be only two hosts.
Since this sometimes leads to the arrival of packets out of turn, we increase the buffer of extraordinary packets in/etc/sysctl.conf . Below I give the whole file, which options do I will not explain, for a very long time. You can read it yourself if you wish.
According to the test results, the replication interface produces somewhere around 3.7 Gb / s , which is quite acceptable.
Since we have a multi-core server, and network cards and a RAID controller can separate the processing of interrupts between several queues, a script was written that links interrupts to the kernels:
Before exporting disks, we will encrypt them and secure master keys for every fireman:
The password must be written on the inside of the skull and never be forgotten, and the key backups should be hidden to hell.
It must be borne in mind that after changing the password on the backup sections of the master key, it will be possible to decrypt the old password.
Next, a script was written to simplify decryption:
The script works with UUIDs of disks to always uniquely identify a disk in the system without binding to / dev / sd * .
The encryption speed depends on the processor frequency and the number of cores, and the recording is parallelized better than reading. You can check how fast the server encrypts in the following simple way:
As you can see, the speeds are not so hot, but they will rarely be achieved in practice since usually random access prevails.
For comparison, the results of the same test on the new Xeon E3-1270 v3 on the Haswell core :
Well, here it’s much more fun. Frequency is a decisive factor, apparently.
And if you deactivate AES-NI, it will be several times slower.
We configure replication, configs from both ends should be 100% identical.
/etc/drbd.d/global_common.conf
Here the most interesting parameter is the protocol, compare them.
Recording is considered successful if the block was recorded ...
The slowest (read - high latency) and, at the same time, reliable is C , and I chose the middle ground.
Next is the definition of the resources that DRBD and the nodes involved in their replication operate on.
/etc/drbd.d/VM_STORAGE_1.res
/etc/drbd.d/VM_STORAGE_2.res
Each resource has its own port.
Now we initialize the DRBD resource metadata and activate it, this must be done on each server:
Next, you need to select one server (you can have one for each resource) and determine that it is the main one and primary synchronization will go from it to another:
Everything, let's go, synchronization has begun.
Depending on the size of the arrays and the speed of the network, it will take a long or very long time.
Its progress can be observed with the watch -n0.1 cat / proc / drbd command , it is very pacifying and philosophical.
In principle, devices can already be used in the synchronization process, but I advise you to relax :)
For one piece, I think that's enough. And so much information is already absorbed.
In the second part, I will talk about setting up the cluster manager and ESXi hosts to work with this share.
Prelude
Today I will tell you how I created a budget fail-safe iSCSI storage from two Linux-based servers to serve the needs of a VMWare vSphere cluster. There were similar articles ( for example ), but my approach is somewhat different, and the solutions (the same heartbeat and iscsitarget) used there are already outdated.
The article is intended for experienced enough administrators who are not afraid of the phrase “patch and compile the kernel”, although some parts could be simplified and dispensed with without compilation, but I will write how I did it myself. I will skip some simple things so as not to inflate the material. The purpose of this article is to show the general principles rather than to outline everything step by step.
Introductory
My requirements were simple: create a cluster for virtual machines that did not have a single point of failure. And as a bonus - the storage had to be able to encrypt data so that the enemies, having dragged the server, did not reach them.
VSphere was chosen as the hypervisor, as the most well-established and finished product, and iSCSI was chosen as the protocol, as it does not require additional financial injections in the form of FC or FCoE switches. With open source SAS targets, it’s rather tight, if not worse, so this option was also rejected.
Remained storage. Various branded solutions from leading vendors were discarded due to the high cost of both themselves and licenses for synchronous replication. So we will do it ourselves, at the same time and learn.
As software was selected:
- Debian Wheezy + LTS Core 3.10
- iSCSI Target SCST
- DRBD for replication
- Pacemaker for cluster resource management and monitoring
- DM-Crypt core subsystem for encryption (AES-NI instructions in the processor will help us a lot)
As a result, in such a short torment, such a simple scheme was born:
It shows that each of the servers has 10 gigabit interfaces (2 built-in and 4 on additional network cards). 6 of them are connected to the switch stack (3 to each), and the remaining 4 to the neighbor server.
On them replication through DRBD will also go. Replication cards, if desired, can be replaced with 10-Gbps, but I had these on hand, so "I blinded it from what it was."
Thus, the sudden death of any of the cards will not lead to the complete inoperability of any of the subsystems.
Since the main task of these storages is reliable storage of large data (file server, mail archives, etc.), we selected servers with 3.5 "drives:
- Housing Supermicro SC836E26-R1200 16 3.5 "drives
- Supermicro X9SRi-F motherboard
- Processor Intel E5-2620
- 4 x 8GB DDR3 ECC memory
- LSI 9271-8i RAID controller with supercapacitor for emergency flash cache flashing
- 16 Seagate Constellation ES.3 3Tb SAS Drives
- 2 x 4-port Intel Ethernet I350-T4 Network Card
For business
Disks
I created two RAID10 arrays of 8 disks on each server.
I decided to refuse RAID6 since there was enough space, and the performance of RAID10 on random access tasks is higher. Plus, below the rebuild time and load in this case goes only to one disk, and not to the entire array at once.
In general, here everyone decides for himself.
Network part
With the iSCSI protocol, it makes no sense to use the Bonding / Etherchannel to speed it up.
The reason is simple - at the same time, hash functions are used to distribute packets over the channels, so it is very difficult to select such IP / MAC addresses so that the packet from IP1 to IP2 goes on one channel, and from IP1 to IP3 on another.
There is even a command on cisco that allows you to look at which of the Etherchannel interfaces the packet will fly:
# test etherchannel load-balance interface port-channel 1 ip 10.1.1.1 10.1.1.2
Would select Gi2/1/4 of Po1
Therefore, for our purposes, the use of several paths to the LUN is much better suited, which we will configure.
On the switch, I created 6 VLANs (one for each external interface of the server):
stack-3750x# sh vlan | i iSCSI
24   iSCSI_VLAN_1                     active
25   iSCSI_VLAN_2                     active
26   iSCSI_VLAN_3                     active
27   iSCSI_VLAN_4                     active
28   iSCSI_VLAN_5                     active
29   iSCSI_VLAN_6                     active
Interfaces were made trunked for versatility and something else will be seen later:
interface GigabitEthernet1/0/11
 description VMSTOR1-1
 switchport trunk encapsulation dot1q
 switchport mode trunk
 switchport nonegotiate
 flowcontrol receive desired
 spanning-tree portfast trunk
end
The MTU on the switch should be set to the maximum to reduce the load on the server (more packet -> less packets per second -> less interruption is generated). In my case, it is 9198:
(config)# system mtu jumbo 9198
ESXi does not support MTUs over 9000, so there is still some margin.
Each VLAN was assigned an address space, for simplicity it looks like this: 10.1. VLAN_ID .0 / 24 (for example, 10.1.24.0/24). With a shortage of addresses, you can keep within smaller subnets, but it’s more convenient.
Each LUN will be represented by a separate iSCSI target, so each common target has been selected with “common” cluster addresses, which will be raised on the node serving this target at the moment: 10.1. VLAN_ID .10 and 10.1. VLAN_ID .20
Also, the servers will have permanent addresses for management, in my case they are 10.1.0.100/24 and .200 (in a separate VLAN)
Software
So, here we install Debian on both servers in a minimal form, I will not dwell on this in detail.
Package assembly
I conducted the assembly on a separate virtual machine, so as not to clutter up the server with compilers and sources.
To build the kernel under Debian, it’s enough to put the build-essential meta-package and, perhaps, something else, I don’t remember exactly.
Download the latest kernel 3.10 from kernel.org : and unpack it:
# cd /usr/src/
# wget https://www.kernel.org/pub/linux/kernel/v3.x/linux-3.10.27.tar.xz
# tar xJf linux-3.10.27.tar.xz
Next, download through SVN the latest revision of the stable SCST branch, generate a patch for our kernel version and apply it:
# svn checkout svn://svn.code.sf.net/p/scst/svn/branches/2.2.x scst-svn
# cd scst-svn
# scripts/generate-kernel-patch 3.10.27 > ../scst.patch
# cd linux-3.10.27
# patch -Np1 -i ../scst.patch
Now build the iscsi-scstd daemon:
# cd scst-svn/iscsi-scst/usr
# make
The resulting iscsi-scstd will need to be put on the server, for example, in / opt / scst
Next, we configure the kernel for our server.
Turn on encryption (if necessary).
Do not forget to include these options for SCST and DRBD:
CONFIG_CONNECTOR=y
CONFIG_SCST=y
CONFIG_SCST_DISK=y
CONFIG_SCST_VDISK=y
CONFIG_SCST_ISCSI=y
CONFIG_SCST_LOCAL=y
We collect it in the form of a .deb package (for this you need to install the fakeroot, kernel-package and debhelper at the same time):
# fakeroot make-kpkg clean prepare
# fakeroot make-kpkg --us --uc --stem=kernel-scst --revision=1 kernel_image
At the output, we get the kernel-scst-image-3.10.27_1_amd64.deb
package. Next, we collect the package for DRBD:
# wget http://oss.linbit.com/drbd/8.4/drbd-8.4.4.tar.gz
# tar xzf drbd-8.4.4.tar.gz
# cd drbd-8.4.4
# dh_make --native --single
После вопроса жмакаем Enter
We change the debian / rules file to the following state (there is a standard file there, but it does not collect kernel modules):
#!/usr/bin/make -f
# Путь до исходников ядра
export KDIR="/usr/src/linux-3.10.27"
override_dh_installdocs:
<тут два таба, без них не будет работать>
override_dh_installchangelogs:
<и тут тоже>
override_dh_auto_configure:
        ./configure \
        --prefix=/usr \
        --localstatedir=/var \
        --sysconfdir=/etc \
        --with-pacemaker \
        --with-utils \
        --with-km \
        --with-udev \
        --with-distro=debian \
        --without-xen \
        --without-heartbeat \
        --without-legacy_utils \
        --without-rgmanager \
        --without-bashcompletion
%:
        dh $@
In the Makefile.in file, we will correct the SUBDIRS variable, remove the documentation from it , otherwise the package will not be collected with a curse on the documentation.
We collect:
# dpkg-buildpackage -us -uc -b
We get the drbd_8.4.4_amd64.deb package .
Everything, you don’t need to collect anything else, copy both packages to the servers and install:
# dpkg -i kernel-scst-image-3.10.27_1_amd64.deb
# dpkg -i drbd_8.4.4_amd64.deb
Server Configuration
Network
The interfaces were renamed to /etc/udev/rules.d/70-persistent-net.rules as follows:
int1-6 go to the switch, and drbd1-4 go to the neighboring server.
/ etc / network / interfaces has an extremely frightening appearance, which is not even a dream in a nightmare:
auto lo
iface lo inet loopback
# Interfaces
auto int1
iface int1 inet manual
    up ip link set int1 mtu 9000 up
    down ip link set int1 down
auto int2
iface int2 inet manual
    up ip link set int2 mtu 9000 up
    down ip link set int2 down
auto int3
iface int3 inet manual
    up ip link set int3 mtu 9000 up
    down ip link set int3 down
auto int4
iface int4 inet manual
    up ip link set int4 mtu 9000 up
    down ip link set int4 down
auto int5
iface int5 inet manual
    up ip link set int5 mtu 9000 up
    down ip link set int5 down
auto int6
iface int6 inet manual
    up ip link set int6 mtu 9000 up
    down ip link set int6 down
# Management interface
auto int1.2
iface int1.2 inet manual
    up ip link set int1.2 mtu 1500 up
    down ip link set int1.2 down
    vlan_raw_device int1
auto int2.2
iface int2.2 inet manual
    up ip link set int2.2 mtu 1500 up
    down ip link set int2.2 down
    vlan_raw_device int2
auto int3.2
iface int3.2 inet manual
    up ip link set int3.2 mtu 1500 up
    down ip link set int3.2 down
    vlan_raw_device int3
auto int4.2
iface int4.2 inet manual
    up ip link set int4.2 mtu 1500 up
    down ip link set int4.2 down
    vlan_raw_device int4
auto int5.2
iface int5.2 inet manual
    up ip link set int5.2 mtu 1500 up
    down ip link set int5.2 down
    vlan_raw_device int5
auto int6.2
iface int6.2 inet manual
    up ip link set int6.2 mtu 1500 up
    down ip link set int6.2 down
    vlan_raw_device int6
auto bond_vlan2
iface bond_vlan2 inet static
    address 10.1.0.100
    netmask 255.255.255.0
    gateway 10.1.0.1
    slaves int1.2 int2.2 int3.2 int4.2 int5.2 int6.2
    bond-mode active-backup
    bond-primary int1.2
    bond-miimon 100
    bond-downdelay 200
    bond-updelay 200
    mtu 1500
# iSCSI
auto int1.24
iface int1.24 inet manual
    up ip link set int1.24 mtu 9000 up
    down ip link set int1.24 down
    vlan_raw_device int1
auto int2.25
iface int2.25 inet manual
    up ip link set int2.25 mtu 9000 up
    down ip link set int2.25 down
    vlan_raw_device int2
auto int3.26
iface int3.26 inet manual
    up ip link set int3.26 mtu 9000 up
    down ip link set int3.26 down
    vlan_raw_device int3
auto int4.27
iface int4.27 inet manual
    up ip link set int4.27 mtu 9000 up
    down ip link set int4.27 down
    vlan_raw_device int4
auto int5.28
iface int5.28 inet manual
    up ip link set int5.28 mtu 9000 up
    down ip link set int5.28 down
    vlan_raw_device int5
auto int6.29
iface int6.29 inet manual
    up ip link set int6.29 mtu 9000 up
    down ip link set int6.29 down
    vlan_raw_device int6
# DRBD bonding
auto bond_drbd
iface bond_drbd inet static
    address 192.168.123.100
    netmask 255.255.255.0
    slaves drbd1 drbd2 drbd3 drbd4
    bond-mode balance-rr
    mtu 9216
Since we also want to have fault tolerance for server management, we use a military trick: in bonding in active-backup mode, we collect not the interfaces themselves, but VLAN subinterfaces. Thus, the server will be available as long as at least one interface is running. This is redundant, but purcua would not be pa. And at the same time, the same interfaces can be freely used for iSCSI traffic.
For replication, the bond_drbd interface was created in balance-rr mode , in which packets are sent stupidly sequentially across all interfaces. He was assigned an address from the gray network / 24, but one could manage with / 30 or / 31 as there will be only two hosts.
Since this sometimes leads to the arrival of packets out of turn, we increase the buffer of extraordinary packets in/etc/sysctl.conf . Below I give the whole file, which options do I will not explain, for a very long time. You can read it yourself if you wish.
net.ipv4.tcp_reordering = 127
net.core.rmem_max = 33554432
net.core.wmem_max = 33554432
net.core.rmem_default = 16777216
net.core.wmem_default = 16777216
net.ipv4.tcp_rmem = 131072 524288 33554432
net.ipv4.tcp_wmem = 131072 524288 33554432
net.ipv4.tcp_no_metrics_save = 1
net.ipv4.tcp_window_scaling = 1
net.ipv4.tcp_timestamps = 0
net.ipv4.tcp_sack = 0
net.ipv4.tcp_dsack = 0
net.ipv4.tcp_fin_timeout = 15
net.core.netdev_max_backlog = 300000
vm.min_free_kbytes = 720896
According to the test results, the replication interface produces somewhere around 3.7 Gb / s , which is quite acceptable.
Since we have a multi-core server, and network cards and a RAID controller can separate the processing of interrupts between several queues, a script was written that links interrupts to the kernels:
#!/usr/bin/perl -w
use strict;
use warnings;
my $irq = 77;
my $ifs = 11;
my $queues = 6;
my $skip = 1;
my @tmpl = ("0", "0", "0", "0", "0", "0");
print "Applying IRQ affinity...\n";
for(my $if = 0; $if < $ifs; $if++) {
    for(my $q = 0; $q < $queues; $q++, $irq++) {
        my @tmp = @tmpl;
        $tmp[$q] = 1;
        my $mask = join("", @tmp);
        my $hexmask = bin2hex($mask);
        #print $irq . " -> " . $hexmask . "\n";
        open(OUT, ">/proc/irq/".$irq."/smp_affinity");
        print OUT $hexmask."\n";
        close(OUT);
    }
    $irq += $skip;
}
sub bin2hex {
    my ($bin) = @_;
    return sprintf('%x', oct("0b".scalar(reverse($bin))));
}
Disks
Before exporting disks, we will encrypt them and secure master keys for every fireman:
# cryptsetup luksFormat --cipher aes-cbc-essiv:sha256 --hash sha256 /dev/sdb
# cryptsetup luksFormat --cipher aes-cbc-essiv:sha256 --hash sha256 /dev/sdc
# cryptsetup luksHeaderBackup /dev/sdb  --header-backup-file /root/header_sdb.bin
# cryptsetup luksHeaderBackup /dev/sdc  --header-backup-file /root/header_sdc.bin
The password must be written on the inside of the skull and never be forgotten, and the key backups should be hidden to hell.
It must be borne in mind that after changing the password on the backup sections of the master key, it will be possible to decrypt the old password.
Next, a script was written to simplify decryption:
#!/usr/bin/perl -w
use strict;
use warnings;
use IO::Prompt;
my %crypto_map = (
    '1bd1f798-d105-4150-841b-f2751f419efc' => 'VM_STORAGE_1',
    'd7fcdb2b-88fd-4d19-89f3-5bdf3ddcc456' => 'VM_STORAGE_2'
);
my $i = 0;
my $passwd = prompt('Password: ', '-echo' => '*');
foreach my $dev (sort(keys(%crypto_map))) {
    $i++;
    if(-e '/dev/mapper/'.$crypto_map{$dev}) {
        print "Mapping '".$crypto_map{$dev}."' already exists, skipping\n";
        next;
    }
    my $ret = system('echo "'.$passwd.'" | /usr/sbin/cryptsetup luksOpen /dev/disk/by-uuid/'.$dev.' '.$crypto_map{$dev});
    if($ret == 0) {
        print $i . ' Crypto mapping '.$dev.' => '.$crypto_map{$dev}.' added successfully' . "\n";
    } else {
        print $i . ' Failed to add mapping '.$dev.' => '.$crypto_map{$dev} . "\n";
        exit(1);
    }
}
The script works with UUIDs of disks to always uniquely identify a disk in the system without binding to / dev / sd * .
The encryption speed depends on the processor frequency and the number of cores, and the recording is parallelized better than reading. You can check how fast the server encrypts in the following simple way:
Создаем виртуальный диск, запись на который будет уходить в никуда, а чтение выдавать нули
# echo "0 268435456 zero" | dmsetup create zerodisk
Создаем на его основе шифрованный виртуальный диск
# cryptsetup --cipher aes-cbc-essiv:sha256 --hash sha256 create zerocrypt /dev/mapper/zerodisk
Enter passphrase: <любой пароль>
Меряем скорость:
# dd if=/dev/zero of=/dev/mapper/zerocrypt bs=1M count=16384
16384+0 records in
16384+0 records out
17179869184 bytes (17 GB) copied, 38.3414 s, 448 MB/s
# dd of=/dev/null if=/dev/mapper/zerocrypt bs=1M count=16384
16384+0 records in
16384+0 records out
17179869184 bytes (17 GB) copied, 74.5436 s, 230 MB/s
As you can see, the speeds are not so hot, but they will rarely be achieved in practice since usually random access prevails.
For comparison, the results of the same test on the new Xeon E3-1270 v3 on the Haswell core :
# dd if=/dev/zero of=/dev/mapper/zerocrypt bs=1M count=16384
16384+0 records in
16384+0 records out
17179869184 bytes (17 GB) copied, 11.183 s, 1.5 GB/s
# dd of=/dev/null if=/dev/mapper/zerocrypt bs=1M count=16384
16384+0 records in
16384+0 records out
17179869184 bytes (17 GB) copied, 19.4902 s, 881 MB/s
Well, here it’s much more fun. Frequency is a decisive factor, apparently.
And if you deactivate AES-NI, it will be several times slower.
DRBD
We configure replication, configs from both ends should be 100% identical.
/etc/drbd.d/global_common.conf
global {
    usage-count no;
}
common {
    protocol B;
    handlers {
    }
    startup {
        wfc-timeout 10;
    }
    disk {
        c-plan-ahead 0;
        al-extents 6433;
        resync-rate 400M;
        disk-barrier no;
        disk-flushes no;
        disk-drain yes;
    }
    net {
        sndbuf-size 1024k;
        rcvbuf-size 1024k;
        max-buffers 8192; # x PAGE_SIZE
        max-epoch-size 8192; # x PAGE_SIZE
        unplug-watermark 8192;
        timeout 100;
        ping-int 15;
        ping-timeout 60; # x 0.1sec
        connect-int 15;
        timeout 50; # x 0.1sec
        verify-alg sha1;
        csums-alg sha1;
        data-integrity-alg crc32c;
        cram-hmac-alg sha1;
        shared-secret "ultrasuperdupermegatopsecretpassword";
        use-rle;
    }
}
Here the most interesting parameter is the protocol, compare them.
Recording is considered successful if the block was recorded ...
- A - to the local disk and hit the local send buffer
- B - to the local disk and hit the remote receive buffer
- C - to local and remote disk
The slowest (read - high latency) and, at the same time, reliable is C , and I chose the middle ground.
Next is the definition of the resources that DRBD and the nodes involved in their replication operate on.
/etc/drbd.d/VM_STORAGE_1.res
resource VM_STORAGE_1 {
    device /dev/drbd0;
    disk /dev/mapper/VM_STORAGE_1;
    meta-disk internal;
    on vmstor1 {
        address 192.168.123.100:7801;
    }
    on vmstor2 {
        address 192.168.123.200:7801;
    }
}
/etc/drbd.d/VM_STORAGE_2.res
resource VM_STORAGE_2 {
    device /dev/drbd1;
    disk /dev/mapper/VM_STORAGE_2;
    meta-disk internal;
    on vmstor1 {
        address 192.168.123.100:7802;
    }
    on vmstor2 {
        address 192.168.123.200:7802;
    }
}
Each resource has its own port.
Now we initialize the DRBD resource metadata and activate it, this must be done on each server:
# drbdadm create-md VM_STORAGE_1
# drbdadm create-md VM_STORAGE_2
# drbdadm up VM_STORAGE_1
# drbdadm up VM_STORAGE_2
Next, you need to select one server (you can have one for each resource) and determine that it is the main one and primary synchronization will go from it to another:
# drbdadm primary --force VM_STORAGE_1
# drbdadm primary --force VM_STORAGE_2
Everything, let's go, synchronization has begun.
Depending on the size of the arrays and the speed of the network, it will take a long or very long time.
Its progress can be observed with the watch -n0.1 cat / proc / drbd command , it is very pacifying and philosophical.
In principle, devices can already be used in the synchronization process, but I advise you to relax :)
End of the first part
For one piece, I think that's enough. And so much information is already absorbed.
In the second part, I will talk about setting up the cluster manager and ESXi hosts to work with this share.