Registration form for applicants
Despite the fact that the acceptance of documents to universities will not begin soon, many graduates who have decided to enter a higher educational institution are horrified to see how they will stand up for long queues in admission commissions.
In this habratopika, we decided to tell how to use MyTaskHelper to create an online registration form for applicants, configure it and build it into the site, thereby greatly facilitating the work of members of the selection committee.
A few words about our advantages. So we can:
Further, only the specifics relating directly to the creation of a form for registration of applicants.
First of all, after registration in the system, it is necessary to create a form for adding information to the general database of applicants. To do this, go to the Form Designer (tab - Forms ), add the necessary fields and select the most suitable data types for them.
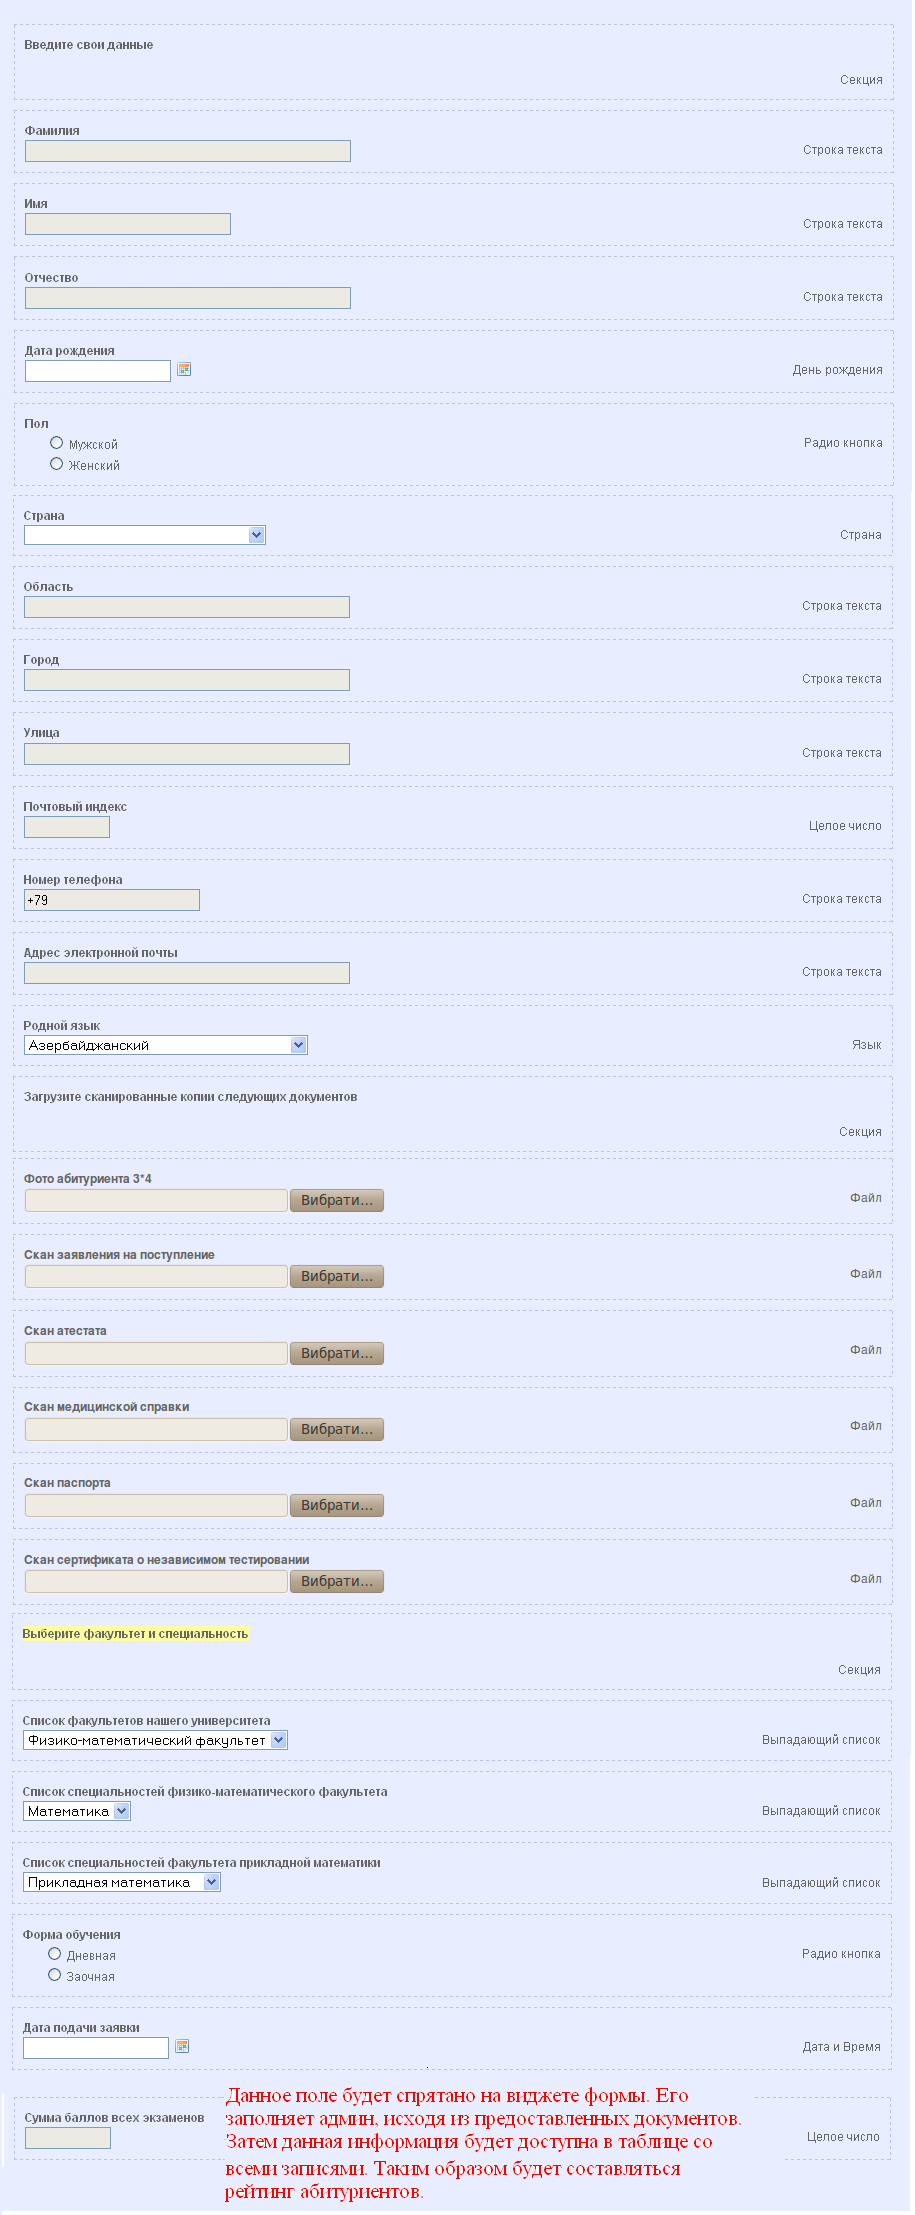
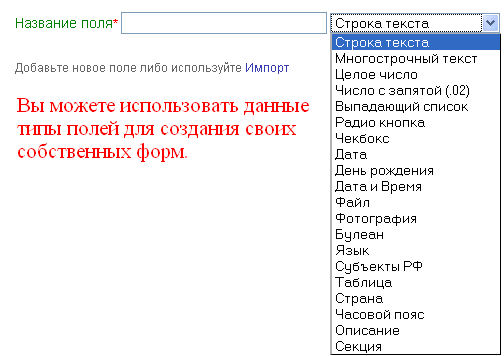
The system contains about 20 different types of data (see screenshot), and therefore you can add any information.
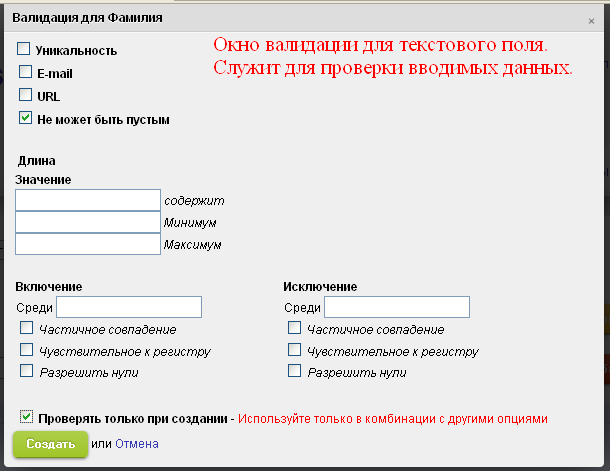
For each field, it is possible to configure validation options. For example, for a field with the Text String data type, you can select the options shown in the screenshot:
Once the web form is created, you can begin to configure it. First of all, we’ll design, that is, set the background color, text color, location of the field names, enter the name of the form, indicate the font size and color for the name, add a logo, specify the size of the indentation and add scrolling. Below in the screenshot you can see all the settings for the appearance of the form:

Next, go to the setting of E-mail notifications.
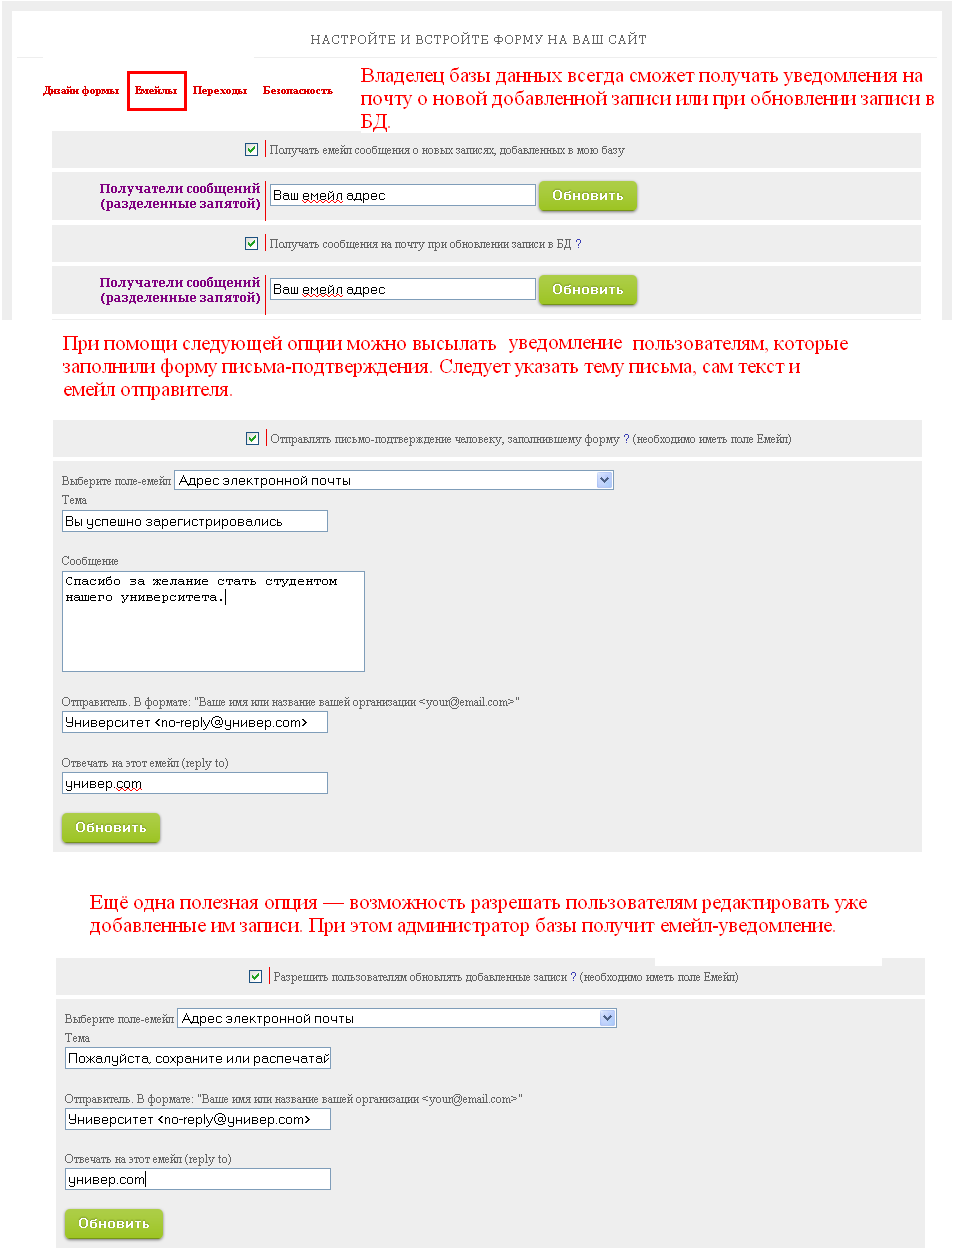
So, the database administrator will be able to add his email address, which will receive a notification that one of the users has filled out a form or updated the record. Here you can configure sending a notification to the person who has just filled out the form. Thus, the applicant will be sure that his data has been successfully entered into the database.
In addition, it is possible to configure user access to the entry added to them so that they can edit the information if necessary.
On the Transitions tab, you can specify which page of the site the applicant will be redirected to after filling out the form. And to protect against spammers, you should go to the Security tab and install simple or complex captcha, enable or disable the ability to flash download files, determine whether moderation of a user-added entry is necessary and put the password on the form.
Everything, just created and configured registration form at the university can be embedded in the site. To do this, copy a few lines of code and paste them into the desired page.
Note that in addition to the form itself, it is possible to embed applicants on the site and the database, the appearance of which is configured exactly the same as for the form.
When embedding such databases on websites, you need to remember one nuance: the database contains both publicly available information (name, date of birth) and personal data (passport data, address, etc.), the publication of which will be a clear violation of human rights. In order not to violate these rights, this information can be hidden and not shown on the page of the site into which the entire database will be built. This is done very simply: just go to the database widget and go to the Hide / Show Columns tab , where you can choose which columns will be visible to all users and which are hidden.
In addition, you can specify what operations an applicant can use to work with the built-in database. These operations can be specified on the Actions tab : An

applicant, having entered the database where all the records of those wishing to enter a particular university are stored, will be able, for example, to delete his profile or sort the information by the column with an average rating, determine whether he has the right to apply for budget place in this educational institution.
Above, we gave an example of how, using the MyTaskHelper system, it is possible to easily and simply reduce the burden on members of admissions committees, whose task now will include the receipt of original documents not from all applicants, but only from those who entered the university.
In this habratopika, we decided to tell how to use MyTaskHelper to create an online registration form for applicants, configure it and build it into the site, thereby greatly facilitating the work of members of the selection committee.
A few words about our advantages. So we can:
- create web forms;
- embed forms on sites;
- generate online databases (including relational);
- provide users with access to information stored in the database;
- allow users to perform operations with the database, namely search, filtering, grouping, editing records, import / export from / to Excel;
- configure security options (the ability to configure E-mail notifications, add captcha, password for forms, disable flash-loading, etc.)
- embed a database in any sites;
Further, only the specifics relating directly to the creation of a form for registration of applicants.
First of all, after registration in the system, it is necessary to create a form for adding information to the general database of applicants. To do this, go to the Form Designer (tab - Forms ), add the necessary fields and select the most suitable data types for them.
The system contains about 20 different types of data (see screenshot), and therefore you can add any information.
For each field, it is possible to configure validation options. For example, for a field with the Text String data type, you can select the options shown in the screenshot:
Once the web form is created, you can begin to configure it. First of all, we’ll design, that is, set the background color, text color, location of the field names, enter the name of the form, indicate the font size and color for the name, add a logo, specify the size of the indentation and add scrolling. Below in the screenshot you can see all the settings for the appearance of the form:
Next, go to the setting of E-mail notifications.
So, the database administrator will be able to add his email address, which will receive a notification that one of the users has filled out a form or updated the record. Here you can configure sending a notification to the person who has just filled out the form. Thus, the applicant will be sure that his data has been successfully entered into the database.
In addition, it is possible to configure user access to the entry added to them so that they can edit the information if necessary.
On the Transitions tab, you can specify which page of the site the applicant will be redirected to after filling out the form. And to protect against spammers, you should go to the Security tab and install simple or complex captcha, enable or disable the ability to flash download files, determine whether moderation of a user-added entry is necessary and put the password on the form.
Everything, just created and configured registration form at the university can be embedded in the site. To do this, copy a few lines of code and paste them into the desired page.
Note that in addition to the form itself, it is possible to embed applicants on the site and the database, the appearance of which is configured exactly the same as for the form.
When embedding such databases on websites, you need to remember one nuance: the database contains both publicly available information (name, date of birth) and personal data (passport data, address, etc.), the publication of which will be a clear violation of human rights. In order not to violate these rights, this information can be hidden and not shown on the page of the site into which the entire database will be built. This is done very simply: just go to the database widget and go to the Hide / Show Columns tab , where you can choose which columns will be visible to all users and which are hidden.
In addition, you can specify what operations an applicant can use to work with the built-in database. These operations can be specified on the Actions tab : An
applicant, having entered the database where all the records of those wishing to enter a particular university are stored, will be able, for example, to delete his profile or sort the information by the column with an average rating, determine whether he has the right to apply for budget place in this educational institution.
Above, we gave an example of how, using the MyTaskHelper system, it is possible to easily and simply reduce the burden on members of admissions committees, whose task now will include the receipt of original documents not from all applicants, but only from those who entered the university.