Home CNC router as an alternative to a 3D printer, part two, tools and accessories
- Tutorial
The other day I was ashamed of them, saying that I swear at amateurs, but I’m not writing anything good myself, but I promised an important “series of articles”. I had to get the old draft and modify it. For those who have forgotten - the first part about choosing a machine here .
Suppose that you have decided on the model of the router, held initial negotiations with the supplier and began to mentally prepare for the purchase. What else will you need to get started?
Although many suppliers invest in a starter kit, it will not be enough for comfortable home use. So immediately we begin to search / buy / do the following:
- Cutting tools - milling cutters / engravers and burs
- Additional collets for the spindle
- Table fasteners
- System of isolation and / or chip removal
And yes, I’ll immediately make a reservation: this article applies to home milling cutters with spindles such as Kress or Chinese girls with Er11 collets, so firstly, we assume that the milling cutter shank is cylindrical up to 6 mm (Kress has 8, but you won’t call it normal with 8koy - he’s weak), secondly, a mechanical tool does not make sense - there isn’t enough power, and thirdly, drill-reamers-taps-fly-cutters are not available, since the minimum speed is 6000 revolutions.
We have a milling machine, so what about milling cutters in the first place.
Milling cutters are divided by: 1. Profile of the cutting edge
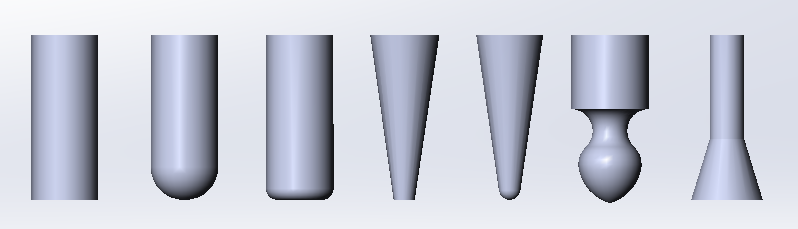
1.1. Straight (end mill) - a mill with a cylindrical working area, ideally giving a groove with a perfectly rectangular bottom
1.2. Round (ball mill) - a mill with a working area ending in radius, ideally giving a groove with radius walls
1.3. Bull nose mill - a straight cutter with a rounded edge, giving a groove with a straight bottom, but a radius transition between the bottom and the wall.
1.4. Conical (cone mill) - a mill with a conical working area ending with a radius or a straight platform
1.5. Shaped (profile mill) - milling cutters with a specific profile, in the case of CNC can make sense either to speed up the work, or to create undercuts.
1.6. Mortise (slot cutter) - milling cutters for creating grooves with undercuts such as T-grooves, dovetails, O-grooves, etc.
2. The method of removal of chips
1.1. Spiral with removal of chips up - work on most materials.
1.2. Straight, they are also half-pipe mill, they are engravers in Russian literature - without removing chips, suitable for layered materials such as plywood, getinaks, etc., or for cutting sheet plastic when a spiral cutter can raise the material above the table
1.3. Spiral with chip removal down - for laminates, if it is important to ensure the most even cut of the laminating coating
1.4. Spiral compression - milling cutters with a variable spiral, the lower part takes the chips up, the upper - down, for double-sided laminates, most often - for cutting alucobond / dibond.
3. The number of cutting edges
To work with plastic / wood, a single or two-edged cutter is usually enough in the entire range of sizes, with a color color of 4-6 mm 3-4 times may already be needed.
4. The ratio of the working part to the shank
4.1. Uniform - the same working part and shank.
4.2. Zero - the shank is wider than the working part. Actual for small cutters.
4.3. Extended - often for shaped milling cutters, I did not see the usual ones on sale, but I did it myself, the shank is already on the working part.
5. Material, sharpening angle, spiral angle, coating, etc.
It’s probably useless to list here - there are a lot of technologies. It is worth noting that the manufacturer usually writes the recommended material and the quality of processing (rough / fine), if you buy on Ali, where the seller disdained to give recommendations or recommendations that are clearly fake (“super clean titanium / diamond / sausage / plywood”), try to find externally similar milling cutter (spiral, one run, yellow) from the eminent manufacturer in the catalog and focus on this data.
Separately, it is worth highlighting boron cutters - cutters with a large number of very small cutting elements and a relatively powerful core. Such cutters are designed for finishing or surface treatment of materials such as grinding, removing a thin layer, engraving hard materials, etc.
Theoretically, you can use drills with the machine, but do not forget to take into account the speed. Still, drills are usually designed for a drill, where the revolutions rarely exceed 800 rpm, and at least 6,000 spindles are discussed. However, for small drills this will be more of a plus, but if it comes to 3 mm or more, first try to purchase coated drills, and secondly, build the drilling path so that the drill does not have time to overheat.
Since the supplier we have is at best a Russian reseller and, at worst, a Chinese reseller, it’s worth counting on minimizing the kit. But more or less serious work with the machine tool implies the presence of a certain number of cutters, most likely with different shanks. Theoretically, there are adapters on sale - additional collets that allow you to insert a mill with a shank of 3 mm into a collet of 6 mm, but it is worth remembering that this will reduce stiffness in the first place and, secondly, reduce the accuracy of the cutter installation.
Of course, the set of collets is secondary from the used cutters, if you have already decided on the set of cutters, then you can not philosophize and type collets for your set. However, collets are usually less accessible than milling cutters and you may find yourself in a situation where there is a milling cutter, and a collet for it can be expected from China for 3 weeks, so I recommend taking at least 3 pieces: 6 mm (maximum), 4 mm (most often under it are small milling cutters and conical engravers) and 3 mm (smooth finishing milling cutters).
Er11 standard implies a full range from 0.5 mm to 7 mm in increments of 0.5, i.e. collets go 0.5-1, 1-1.5, 2-2.5 mm and so on.
The Kress spindle has a proprietary collet, but due to the prevalence of the spindle itself and clones / fakes, it is not a problem to get the collet. In stores, there are usually collets 3,4,5,6 and 8 mm + 3.175 mm of the "American standard", in which we have borfrezy and engravers. Moreover, the collet itself is four-part, i.e. the clamping range is unlikely to be much more than a couple of tens, so there is simply nothing to clamp a mill with a 3.5 mm shank. However, this is unlikely to be a problem in home use.
I almost forgot: collets are usually sold separately from nuts. In principle, there is no problem in throwing the collets in one nut, but I am too lazy, and there is a small one, but the probability is that when throwing some rubbish will be threaded into the thread, and this is dangerous for threading.

Most home routers are equipped with either a table with T-slots, or tables with a grid of threaded holes. In both cases, the most common fasteners look like steel or aluminum clamps with one threaded and a second smooth hole. A T-bolt is inserted into the T-slot, which passes through the clip hole and is fixed with a nut, the second bolt pushes the clip from the table. Four clamps usually come with the machine, which during intensive operation fail quite quickly: the threads on the screws and clamps are cut off. Sometimes the Chinese instead of the T-bolt put ordinary bolts and T-nuts in the kit, I recommend immediately taking care of replacing the T-bolts.

Instead of the rear (thrust) screws, pieces of material or special stepped wedges can be fitted, but in the case of slippery plastic, this can do a disservice: the fasteners will “creep away” from the material being fixed.

An alternative to clamps can be a machine vise - a special vise with a minimized height and a handle (or a turnkey key) adapted for installation on a table. Plus - Less hassle when installing the material, repeatability, relative accuracy. If you work with similar small workpieces, you can once put a yew in your life, write down their coordinates and then start from them. Cons - most of the finished vise eats a minimum of 20-30 mm of height, and the discussed machines rarely have more than 70 mm under the portal, well, with large sizes, yews will be incredibly expensive.
Another option is gluing the workpiece to the table. Oddly enough, the retention force on a good double-sided tape is enough even for the gentle engraving of colormett, not to mention the plastics. In the non-mentioned Roland even in the instructions there was something written about scotch tape. The disadvantages are obvious: variable reliability, and most importantly - to tear off the finished product, and then clean it from tape.
And finally - exotic for home machines, vacuum clamp. In principle, it’s not such a difficult thing, but it requires an additional vacuum pump and eats at least 10 mm of height.
One of the most common problems with using a router at home is noise and dust. And if you can still come to terms with the noise, then the dust pours out specifically. And in the case of stone / getinaks / glass / composites processing, dust is also harmful.
There are 2 possible options for struggle: active suction with a vacuum cleaner with a brush mounted on a spindle, and the creation of a “cabinet” for the machine.

The brush seems to be good, but with many hours of trajectories, the roar of the vacuum cleaner creates a unique atmosphere in the house. Well, if there is a deep sampling, the brush pile constantly bends and deteriorates quite quickly. Therefore, we left the aspiration system only on the largest milling cutter, and small ones were removed to the cabinets from transparent polycarbonate and laminate. Not so compact, of course, but the cabinet extinguishes a bit of sound and dust.
And finally - a small bonus. My personal set of a “young fighter” that I buy / do for each new milling cutter (the main work is 3D milling of molds using PP, POM, PET, composites): Milling
cutters:
Collets: 3, 4, 6 mm, all complete with nuts.
Fasteners: hardened T-screws 80 mm + hardened screws for stops.
The cabinet is homemade.
Industrial vacuum cleaner. In principle, now I came up with a cabinet without a bottom, in which the chips will be poured into the box itself, so the vacuum cleaner will not be very needed. But before that - I bought in every new place where we put the machine, without a vacuum cleaner from the office it is very difficult to get shavings.
This set is quite enough in 99% of cases.
On this, let me take my leave, next time - a little about software, general concepts of processing and processing strategies.
UPD other articles of the series:
Home CNC router as an alternative to a 3D printer, part one - choosing a machine
Home CNC milling machine as an alternative to a 3D printer, part three, software and G-code
Home CNC milling machine as an alternative to a 3D printer, part four. General processing concepts
Suppose that you have decided on the model of the router, held initial negotiations with the supplier and began to mentally prepare for the purchase. What else will you need to get started?
Although many suppliers invest in a starter kit, it will not be enough for comfortable home use. So immediately we begin to search / buy / do the following:
- Cutting tools - milling cutters / engravers and burs
- Additional collets for the spindle
- Table fasteners
- System of isolation and / or chip removal
And yes, I’ll immediately make a reservation: this article applies to home milling cutters with spindles such as Kress or Chinese girls with Er11 collets, so firstly, we assume that the milling cutter shank is cylindrical up to 6 mm (Kress has 8, but you won’t call it normal with 8koy - he’s weak), secondly, a mechanical tool does not make sense - there isn’t enough power, and thirdly, drill-reamers-taps-fly-cutters are not available, since the minimum speed is 6000 revolutions.
Cutting tool
We have a milling machine, so what about milling cutters in the first place.
Milling cutters are divided by: 1. Profile of the cutting edge
1.1. Straight (end mill) - a mill with a cylindrical working area, ideally giving a groove with a perfectly rectangular bottom
1.2. Round (ball mill) - a mill with a working area ending in radius, ideally giving a groove with radius walls
1.3. Bull nose mill - a straight cutter with a rounded edge, giving a groove with a straight bottom, but a radius transition between the bottom and the wall.
1.4. Conical (cone mill) - a mill with a conical working area ending with a radius or a straight platform
1.5. Shaped (profile mill) - milling cutters with a specific profile, in the case of CNC can make sense either to speed up the work, or to create undercuts.
1.6. Mortise (slot cutter) - milling cutters for creating grooves with undercuts such as T-grooves, dovetails, O-grooves, etc.
2. The method of removal of chips
1.1. Spiral with removal of chips up - work on most materials.
1.2. Straight, they are also half-pipe mill, they are engravers in Russian literature - without removing chips, suitable for layered materials such as plywood, getinaks, etc., or for cutting sheet plastic when a spiral cutter can raise the material above the table
1.3. Spiral with chip removal down - for laminates, if it is important to ensure the most even cut of the laminating coating
1.4. Spiral compression - milling cutters with a variable spiral, the lower part takes the chips up, the upper - down, for double-sided laminates, most often - for cutting alucobond / dibond.
3. The number of cutting edges
To work with plastic / wood, a single or two-edged cutter is usually enough in the entire range of sizes, with a color color of 4-6 mm 3-4 times may already be needed.
4. The ratio of the working part to the shank
4.1. Uniform - the same working part and shank.
4.2. Zero - the shank is wider than the working part. Actual for small cutters.
4.3. Extended - often for shaped milling cutters, I did not see the usual ones on sale, but I did it myself, the shank is already on the working part.
5. Material, sharpening angle, spiral angle, coating, etc.
It’s probably useless to list here - there are a lot of technologies. It is worth noting that the manufacturer usually writes the recommended material and the quality of processing (rough / fine), if you buy on Ali, where the seller disdained to give recommendations or recommendations that are clearly fake (“super clean titanium / diamond / sausage / plywood”), try to find externally similar milling cutter (spiral, one run, yellow) from the eminent manufacturer in the catalog and focus on this data.
Separately, it is worth highlighting boron cutters - cutters with a large number of very small cutting elements and a relatively powerful core. Such cutters are designed for finishing or surface treatment of materials such as grinding, removing a thin layer, engraving hard materials, etc.
Theoretically, you can use drills with the machine, but do not forget to take into account the speed. Still, drills are usually designed for a drill, where the revolutions rarely exceed 800 rpm, and at least 6,000 spindles are discussed. However, for small drills this will be more of a plus, but if it comes to 3 mm or more, first try to purchase coated drills, and secondly, build the drilling path so that the drill does not have time to overheat.
Collets and adapters
Since the supplier we have is at best a Russian reseller and, at worst, a Chinese reseller, it’s worth counting on minimizing the kit. But more or less serious work with the machine tool implies the presence of a certain number of cutters, most likely with different shanks. Theoretically, there are adapters on sale - additional collets that allow you to insert a mill with a shank of 3 mm into a collet of 6 mm, but it is worth remembering that this will reduce stiffness in the first place and, secondly, reduce the accuracy of the cutter installation.
Of course, the set of collets is secondary from the used cutters, if you have already decided on the set of cutters, then you can not philosophize and type collets for your set. However, collets are usually less accessible than milling cutters and you may find yourself in a situation where there is a milling cutter, and a collet for it can be expected from China for 3 weeks, so I recommend taking at least 3 pieces: 6 mm (maximum), 4 mm (most often under it are small milling cutters and conical engravers) and 3 mm (smooth finishing milling cutters).
Er11 standard implies a full range from 0.5 mm to 7 mm in increments of 0.5, i.e. collets go 0.5-1, 1-1.5, 2-2.5 mm and so on.
The Kress spindle has a proprietary collet, but due to the prevalence of the spindle itself and clones / fakes, it is not a problem to get the collet. In stores, there are usually collets 3,4,5,6 and 8 mm + 3.175 mm of the "American standard", in which we have borfrezy and engravers. Moreover, the collet itself is four-part, i.e. the clamping range is unlikely to be much more than a couple of tens, so there is simply nothing to clamp a mill with a 3.5 mm shank. However, this is unlikely to be a problem in home use.
I almost forgot: collets are usually sold separately from nuts. In principle, there is no problem in throwing the collets in one nut, but I am too lazy, and there is a small one, but the probability is that when throwing some rubbish will be threaded into the thread, and this is dangerous for threading.
Table fasteners
Most home routers are equipped with either a table with T-slots, or tables with a grid of threaded holes. In both cases, the most common fasteners look like steel or aluminum clamps with one threaded and a second smooth hole. A T-bolt is inserted into the T-slot, which passes through the clip hole and is fixed with a nut, the second bolt pushes the clip from the table. Four clamps usually come with the machine, which during intensive operation fail quite quickly: the threads on the screws and clamps are cut off. Sometimes the Chinese instead of the T-bolt put ordinary bolts and T-nuts in the kit, I recommend immediately taking care of replacing the T-bolts.
Instead of the rear (thrust) screws, pieces of material or special stepped wedges can be fitted, but in the case of slippery plastic, this can do a disservice: the fasteners will “creep away” from the material being fixed.
An alternative to clamps can be a machine vise - a special vise with a minimized height and a handle (or a turnkey key) adapted for installation on a table. Plus - Less hassle when installing the material, repeatability, relative accuracy. If you work with similar small workpieces, you can once put a yew in your life, write down their coordinates and then start from them. Cons - most of the finished vise eats a minimum of 20-30 mm of height, and the discussed machines rarely have more than 70 mm under the portal, well, with large sizes, yews will be incredibly expensive.
Another option is gluing the workpiece to the table. Oddly enough, the retention force on a good double-sided tape is enough even for the gentle engraving of colormett, not to mention the plastics. In the non-mentioned Roland even in the instructions there was something written about scotch tape. The disadvantages are obvious: variable reliability, and most importantly - to tear off the finished product, and then clean it from tape.
And finally - exotic for home machines, vacuum clamp. In principle, it’s not such a difficult thing, but it requires an additional vacuum pump and eats at least 10 mm of height.
Insulation and Chip Removal System
One of the most common problems with using a router at home is noise and dust. And if you can still come to terms with the noise, then the dust pours out specifically. And in the case of stone / getinaks / glass / composites processing, dust is also harmful.
There are 2 possible options for struggle: active suction with a vacuum cleaner with a brush mounted on a spindle, and the creation of a “cabinet” for the machine.
The brush seems to be good, but with many hours of trajectories, the roar of the vacuum cleaner creates a unique atmosphere in the house. Well, if there is a deep sampling, the brush pile constantly bends and deteriorates quite quickly. Therefore, we left the aspiration system only on the largest milling cutter, and small ones were removed to the cabinets from transparent polycarbonate and laminate. Not so compact, of course, but the cabinet extinguishes a bit of sound and dust.
My personal set of "young fighter"
And finally - a small bonus. My personal set of a “young fighter” that I buy / do for each new milling cutter (the main work is 3D milling of molds using PP, POM, PET, composites): Milling
cutters:
- 6 mm single start straight long - edge 40 mm, total length 75, Chinese.
- 6 mm ballpoint good (Widia / Makestag / SGS)
- 4 mm single start straight long chinese
- 3 mm two-way straight long good
- 3 mm double ball-point long good
- 1.5 mm long neck straight good
- 1.5 mm with a normal ball neck
- 0.8 mm with a regular ball neck or conical with a round heel 0.8 mm.
Collets: 3, 4, 6 mm, all complete with nuts.
Fasteners: hardened T-screws 80 mm + hardened screws for stops.
The cabinet is homemade.
Industrial vacuum cleaner. In principle, now I came up with a cabinet without a bottom, in which the chips will be poured into the box itself, so the vacuum cleaner will not be very needed. But before that - I bought in every new place where we put the machine, without a vacuum cleaner from the office it is very difficult to get shavings.
This set is quite enough in 99% of cases.
On this, let me take my leave, next time - a little about software, general concepts of processing and processing strategies.
UPD other articles of the series:
Home CNC router as an alternative to a 3D printer, part one - choosing a machine
Home CNC milling machine as an alternative to a 3D printer, part three, software and G-code
Home CNC milling machine as an alternative to a 3D printer, part four. General processing concepts