Android development in NetBeans IDE without plugins. Part 1
- Tutorial
Usually, a developer has his favorite tool, which is more convenient for him to use than others. However, it happens that the platform forces developers to pick up a tool that is not as convenient as he would like, or simply does not suit something. It so happened that traditionally Android applications are written using Eclipse, since Google decided that they would develop the official plug-in, ADT, for this particular editor. As a result, those developers who did not use it, willy-nilly, had to master it.
Fortunately, Google also provides a build system that works regardless of the IDE available. And this means that you can configure any editor to work with Android applications. Personally, I prefer to write Java code in the NetBeans IDE and want to talk about how you can configure it for this. There are plugins such as nbandroid , but it is developed occasionally by enthusiasts, so it makes sense to take advantage of the flexibility of NetBeans and use the official build system directly from the editor.
When creating a new project, unfortunately, you will have to do more than you could do in Eclipse, but you only need to do this once. Creating a project is done in three steps:
First of all, you need to create a new project through the command line. I will proceed from the assumption that the
Just in case, I will explain that the API level is the very one with which we will compile the project. That is, if the project as a whole is designed for API level 10, but there are some features that are used only on devices with a level of 15 and higher, then you need to set exactly 15. In
Suppose our project is created for Android 4.0.3 (this is level 15) and is called KillerApp. Then you will need to enter the following:
After this command, all the files we need were found in the project folder: configuration files and, most importantly, the build file. This completes the work with the command line, and we will not see it anymore. Now it remains to conjure in the IDE.
In fact, after the last step, you can do nothing more. The project has been created and is already going normally. But you can go further and make many amenities. It’s worth putting a file
These three tasks allow us to do some very useful things.
Of course, this particular sound option is only suitable for Windows; for other OSs, you should choose a different file. Now it remains to add these tasks to the context menu in NetBeans . In the project properties on the Build and Run tab, we have already finalized the Run Project item with the task
Now in the context menu of the project is a whole bunch of the commands we need. You can start the emulator or connect a smartphone, run Run and watch how everything gathers and starts up itself. It remains to make the final touches and enable obfuscation when assembling the final version by uncommenting the line in the file
Also in
Now our project is ready for work.
In fact, there are already two build systems in Android now: one is based on ant, and the other is based on Gradle. In this particular case, we use the ant system. The system with Gradle is being developed in parallel with the new editor, which replaces Eclipse - Android Studio . This build system, I think, is useful for a separate article.
Returning to ant, the following files are in the project folder:
The most important file here is, of course
Actually, you can create an environment variable
FROM
Finally, the file
They further help to collect error reports, since now there is accurate data about which line of code in the project causes a drop or exception.
It also
These lines are taken simply from the SDK build system. Unfortunately, there they are not taken out in a separate task, so I had to do it myself. It is more interesting to look at the other two tasks:
Using XPath, version parameters are obtained here and then file names are generated using them. There is no XPath support in the usual ant, so where did it come from? In the Android SDK Google added their own tools to make working with applications more convenient. Many of their tools come down to running certain files from the SDK, but there are some that make writing assembly files easier, such as
The second task also uses
You need to find an activity that defines a category in its intent filter
There is another snag. Activities are declared in
It was also a very simple task that reproduces sound. It used one of six hooks that twitch from the build file in the SDK:
Hooks reflect the stages through which the program builds: compiling libraries, generating code (RenderScript, aidl, R, BuildConfig), compiling the project, packing the APK, signing and zipalign . Accordingly, it
Today we looked at the most important thing: creating a project. Actually, after this the project is quite working, you can sit down and scribble the code. But we will need to add libraries to the project, debug, and also create tests. All of these actions also work great in NetBeans. How this can be done, I will describe in the next part of the article.
Fortunately, Google also provides a build system that works regardless of the IDE available. And this means that you can configure any editor to work with Android applications. Personally, I prefer to write Java code in the NetBeans IDE and want to talk about how you can configure it for this. There are plugins such as nbandroid , but it is developed occasionally by enthusiasts, so it makes sense to take advantage of the flexibility of NetBeans and use the official build system directly from the editor.
Create a new project
When creating a new project, unfortunately, you will have to do more than you could do in Eclipse, but you only need to do this once. Creating a project is done in three steps:
- Creating files for assembly from the command line;
- Creating a project in the IDE;
- Adding additional commands (to taste).
Creating files for assembly
First of all, you need to create a new project through the command line. I will proceed from the assumption that the
PATHfolder has already been worn out /tools android create project -n <имя проекта> -t android-<уровень API> -p <путь к проекту> -k <пакет программы> -a <название основной активности>Just in case, I will explain that the API level is the very one with which we will compile the project. That is, if the project as a whole is designed for API level 10, but there are some features that are used only on devices with a level of 15 and higher, then you need to set exactly 15. In
AndroidManifest.xml, by the way, this 15 will not light up, there will only be 10 as the minimum required level of API. Suppose our project is created for Android 4.0.3 (this is level 15) and is called KillerApp. Then you will need to enter the following:
android create project -n KillerApp -t android-15 -p KillerApp -k com.damageinc.killerapp -a MainActivityAfter this command, all the files we need were found in the project folder: configuration files and, most importantly, the build file. This completes the work with the command line, and we will not see it anymore. Now it remains to conjure in the IDE.
Creating a project in the IDE
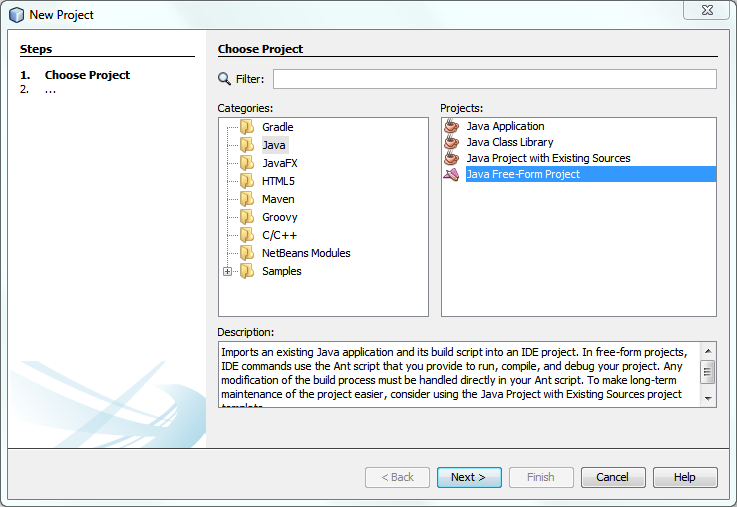
- On the screen for creating a new project in NetBeans, you will need the Java Free-Form Project item , with which we will explain the IDE where to get the assembly file.
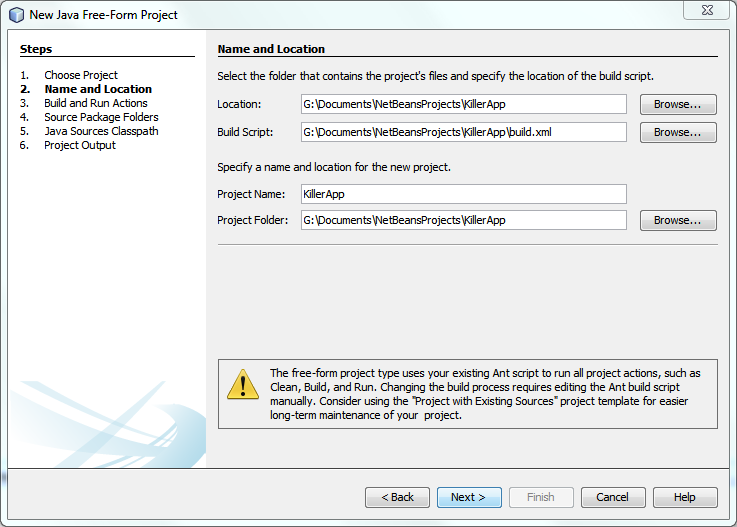
- Next you need to select the project folder. NetBeans itself will find the build file and figure out what the project is called, so after selecting the folder you can safely go to the next screen.
- And now you need to correctly register the build tasks so that the IDE knows what to launch when we go to build the project. Build on the system by debug . It looks a little strange, but the reason for this name is very simple: this task creates an assembly for debugging, signed by the corresponding certificate. Accordingly, there is a release task , which we still get to. Starting a project in our case means assembling and installing, which means executing the install task after assembly. There is also attributed a task
launchthat is not in the standard system, but we will do it ourselves. Cleaning is, as expected, clean, and you need to test in Android through a separate, test project, so what’s in that field can be easily erased.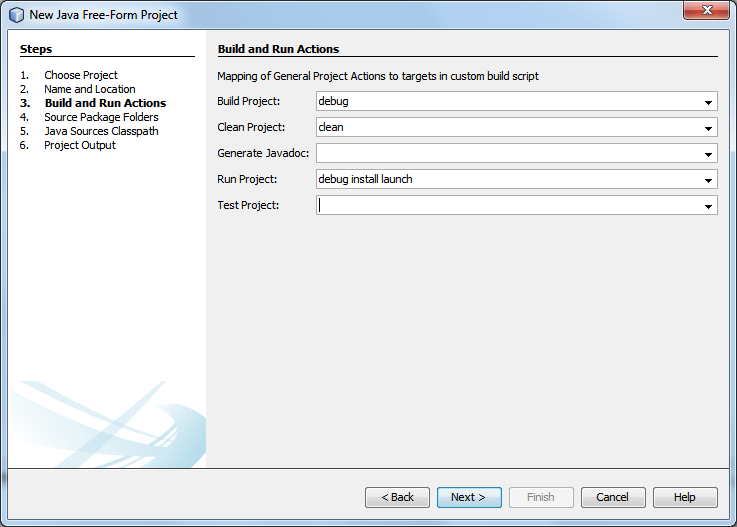
- On the next screen, you need to add the folder
gento the source folders, because it is in this folder that the file will be locatedR.java.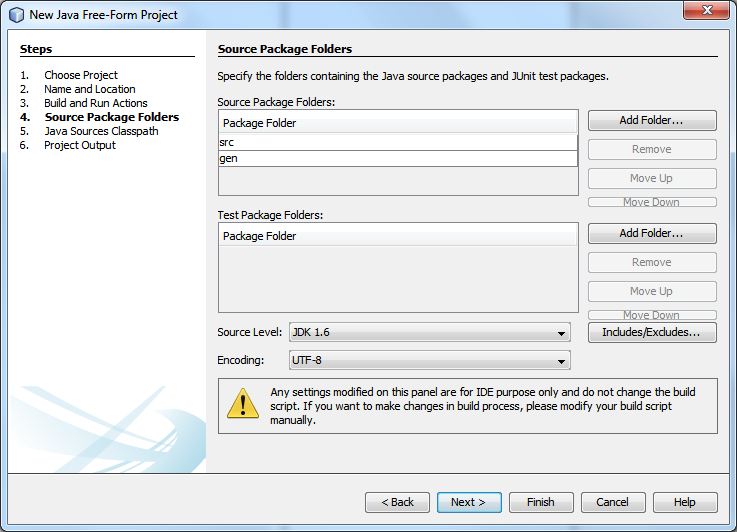
- Now set up the code hints. First of all, it is important to uncheck the separation of folders with source files, otherwise the IDE will think that the file
Rshould not be mentioned in the code of our program, because it lies in a separate folder. You also need to add the correct Android platform to the list of libraries, in this case/platforms/android-15/android.jar 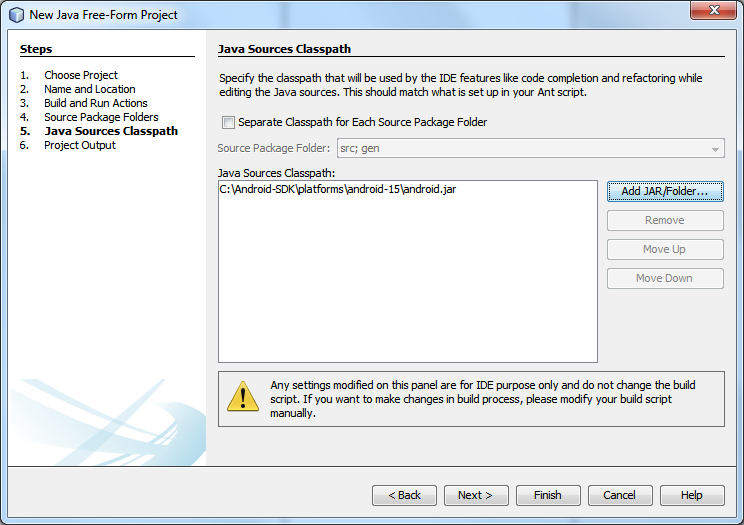
- And finally, the last step, add the folder
bin/classesso that the IDE knows where to look for the compiled code. In principle, this step is not necessary, and you can safely not give a damn about it. But for the sake of completeness, I will make it so that NetBeans shows which files have been recently modified and have not yet been compiled.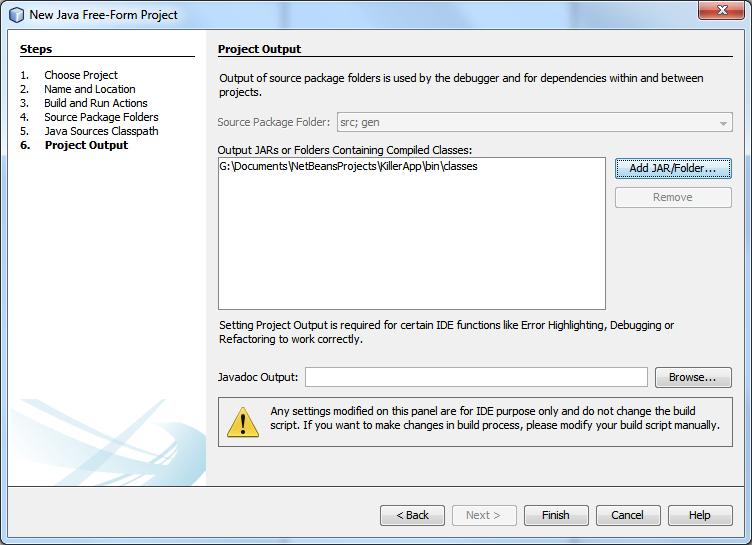
Adding additional commands
In fact, after the last step, you can do nothing more. The project has been created and is already going normally. But you can go further and make many amenities. It’s worth putting a file
custom_rules.xml in the project folder and writing itant tasks we need
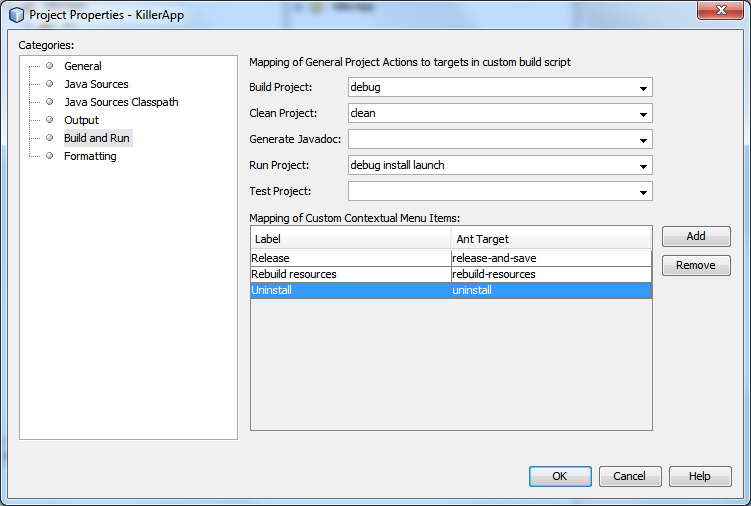
These three tasks allow us to do some very useful things.
rebuild-resourcesallows you to generate a file R(which in Eclipse, by the way, often disappears somewhere or is not updated on time). launchIt will give us the opportunity to launch applications, and release-and-savewill make sure that when assembling the final version it will be saved in a separate folder under the appropriate name along with the ProGuard method map. I also like to add such lines so that after the build a notification is played:Of course, this particular sound option is only suitable for Windows; for other OSs, you should choose a different file. Now it remains to add these tasks to the context menu in NetBeans . In the project properties on the Build and Run tab, we have already finalized the Run Project item with the task
launchat the end. I added the rest of the tasks just done to the user elements of the context menu: Now in the context menu of the project is a whole bunch of the commands we need. You can start the emulator or connect a smartphone, run Run and watch how everything gathers and starts up itself. It remains to make the final touches and enable obfuscation when assembling the final version by uncommenting the line in the file
project.properties : proguard.config=${sdk.dir}/tools/proguard/proguard-android.txt:proguard-project.txtAlso in
ant.propertiesit’s worth registering the lines for signing the final assemblies : key.store = <путь к файлу ключей>key.alias = <название ключа>Now our project is ready for work.
How the build system works in Android
In fact, there are already two build systems in Android now: one is based on ant, and the other is based on Gradle. In this particular case, we use the ant system. The system with Gradle is being developed in parallel with the new editor, which replaces Eclipse - Android Studio . This build system, I think, is useful for a separate article.
Returning to ant, the following files are in the project folder:
- ant.properties
- build.xml
- local.properties
- proguard-project.txt
- project.properties
The most important file here is, of course
build.xml. In fact, this is just a small tail of the main system, and all that it does is load properties from files with the properties extension and call the main system located in the SDK itself. local.propertiescontains only one property: the location of the folder with the SDK. This file needs to be included in the list of exceptions of the version control system , because it contains settings specific to an individual machine. For example, under Windows, this file contains the line sdk.dir=C:\\Android-SDKActually, you can create an environment variable
ANDROID_HOMEwith the contents of the variable from this file and safely send the file to the trash. The main thing, do not forget to restart NetBeans after that. FROM
ant.propertieswe already met, auxiliary variables like the location of the keystore are stored there. There is also a file project.properties. After the steps described in creating the project, there is only a line about the level of the Android API for which the project is going, and about where to look for the ProGuard configuration file. When we add libraries to the project, the lines about them will be there. Finally, the file
proguard-project.txt, which, as the name implies, contains ProGuard instructions. It is initially empty, but this does not mean that ProGuard will work idle, because the SDK folder already has a pre-recorded configuration (remember the uncommented line about ProGuard?), But here we can specify it. For example, I personally like, among others, adding lines-renamesourcefileattribute MyProject-keepattributes SourceFile,LineNumberTableThey further help to collect error reports, since now there is accurate data about which line of code in the project causes a drop or exception.
It also
build.xmldownloads the file custom_rules.xml, if any, in which we have added all the tasks we need. It is worth taking a look at the tasks again.These lines are taken simply from the SDK build system. Unfortunately, there they are not taken out in a separate task, so I had to do it myself. It is more interesting to look at the other two tasks:
Using XPath, version parameters are obtained here and then file names are generated using them. There is no XPath support in the usual ant, so where did it come from? In the Android SDK Google added their own tools to make working with applications more convenient. Many of their tools come down to running certain files from the SDK, but there are some that make writing assembly files easier, such as
xpath. Another useful tool, for example, is ifdoing exactly what the corresponding construction in programming languages does: performing a task depending on the condition. The second task also uses
xpath, this time the task is a bit more complicated:You need to find an activity that defines a category in its intent filter
android.intent.category.LAUNCHER- that’s how Android defines the activities that should be shown in the menu. There may be several (although this is rare), so the task takes the first of them. There is another snag. Activities are declared in
AndroidManifest.xmleither an entry with a full name, or only with the class name with a dot in front if the activity is in the main package. At least that's what the documentation says.. Only the problem is that Eclipse and other tools allow you to omit the point and simply write the name of the activity when it is in the main package. Android suffers such connivance, but the team that launches the applications is no longer there. You have to add a point when it is not enough. This is where the task ifI mentioned recently and regular expressions will help us . It was also a very simple task that reproduces sound. It used one of six hooks that twitch from the build file in the SDK:
- -pre-build
- -pre-compile
- -post-compile
- -post-package
- -post-build
- -pre-clean
Hooks reflect the stages through which the program builds: compiling libraries, generating code (RenderScript, aidl, R, BuildConfig), compiling the project, packing the APK, signing and zipalign . Accordingly, it
-pre-buildis called before all these actions begin, -pre-compileimmediately before compiling the project itself -post-compile— between compilation and packaging -post-build— after packaging, but before signing, and -post-buildis called at the very end. Well, when called -pre-clean, I think it’s clear from the name.Instead of a conclusion
Today we looked at the most important thing: creating a project. Actually, after this the project is quite working, you can sit down and scribble the code. But we will need to add libraries to the project, debug, and also create tests. All of these actions also work great in NetBeans. How this can be done, I will describe in the next part of the article.