Dell VRTX: First Steps
In our reviews, we often consider solutions that come under the Dell brand name. In these reviews, we try to convey to you the essence of our products: consider technical aspects, suggest areas of potential application, note the advantages in relation to competitors or their uniqueness in the market. According to your comments, we, of course, see your ratings, first of all, as professionals, one way or another connected with IT. Often in our descriptions we mention the convenience of setting up, maintaining and monitoring the status of these products. However, we have not yet considered this aspect of Dell's cuisine in detail. As you may have guessed, today we will focus on those software and hardware tools that we implement in our products for the reliable and most comfortable use of all, without exception, Dell-branded devices. And since it will be problematic to consider all of them within the framework of one article, we will break this material into several parts. It seems to us that this will allow us to dwell on each of them in more detail, and it will be easier for you to navigate these products in the future. We understand that some of the things described below may be obvious to you, however, we are sure that they certainly will not be superfluous.
We will start with one of the new products this year - the Dell VRTX server platform, which has been talked about a lot lately, which makes us very pleased. In our blog, we already considered the “vertex” at the time of its appearance on the Russian market, and now it's time to look at it from a practical perspective.
After unpacking the device, you need to choose a place to install it, connect one RJ-45 network cable to the CMC (Chassis Management Controller) port and connect the number of IP connections required for operation on the network switch. After that, connect the system to the power supply. After applying voltage to the power supplies, the LED indicator will become active. You will need to select the language for operation and set the network address of the chassis control card either manually or select DHCP. After receiving the IP address, you can safely close the front wall of the chassis with a key and go to your workplace, where tea and cookies are waiting for you :)

For further work with the device, just enter the IP address assigned at the beginning of installation in the browser window. After authentication (for all Dell devices, the default authentication information is root / calvin), you will be taken to the VRTX Chassis Management Controller main page. You will be prompted to change the root account information, which we strongly recommend that you do immediately after logging in. On the start page, the current status of the system will be displayed in front of you.

Color indicators on the schematic image on the left side of the main page will display the status of the main system nodes: servers, hard drives, power supplies, fans and expansion cards. The colors of the states are standard: green - normal mode, yellow - problems in operation, red - the node does not work. In the left part in the form of a tree structure are all the nodes of the system (settings and current status of servers, disks, input / output cards, etc.), about them a little later. In addition, at the top of the window there are the main tabs for managing and maintaining the device. With their help, you can make basic chassis settings: specify the DNS name of the device, configure the notification system (monitoring, failures and / or warnings) by e-mail or SNMP, or, for example, the orientation of the LCD panel depending on the location of the chassis (tower or rack).
We recommend that you pay attention to the service tag of the device (Service Tag), it will come in handy on the support site.
First of all, we are interested in the Update tab . You can get updates for all your Dell devices in several ways, the choice is only up to you and current conditions.
Firstly, this can be done from the Update tab of the Chassis Management Controller page by first downloading the firmware file. To do this, you can go to the support site and enter the Service Tag. Here you can get all the information on your device: the date of shipment, the warranty period, the original configuration of the product, the current configuration, drivers and available updates to system components and much more.
Secondly, you can use the proprietary Dell Repository Manager utility and use it to download the latest software versions of the entire Dell infrastructure in your enterprise to the local storage.
However, the most convenient and effective, in our opinion, is updating the firmware of nodes using the Lifecycle Controller.
After updating the firmware of all nodes to the current state, you can proceed to the next step - setting up the hardware for operation. In the Server Overview tab, you can view the model, configuration, and current status of installed servers (M520 or M620). It also configures access directly to the iDRAC (integrated Dell Remote Access Controller) of each installed server. The iDRAC controller has its own processor, memory, network connection and access to the system bus. Its main features include power management, virtual server access and remote management capabilities - all accessible through a web browser or command line interface.
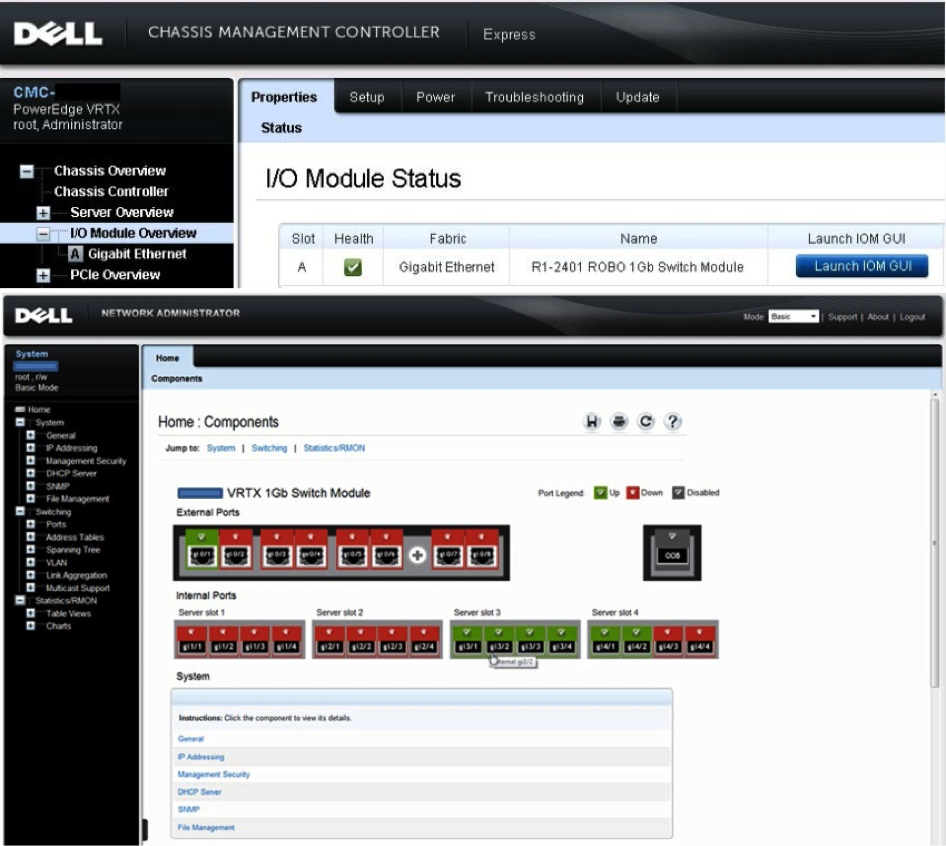
To configure the integrated 1Gb switch, you need to expand the I / O Module Overview taband select Launch IOM GUI . You will be redirected to the Dell Network administration snap-in (do not forget to change the default password for root), where you can assign network ports directly to the servers and configure the network component.
As you already know, VRTX includes 8 PCIe slots to expand the capabilities of the servers included in its configuration. To assign these slots to physical servers, use the PCIe Overview item in the control panel. Here you can see all the expansion cards installed in the chassis and indicate their binding to a specific server. Front Panel

Menu Itemcompletely duplicates the capabilities of the “Vertex” LCD panel and allows you to specify the binding of a physical DVD drive and KVM switch to a physical server.
The Fans , Power Supplies, and Temperature Sensors tabs provide complete information on the current state of the corresponding chassis nodes and allow you to assign an operating mode for them (for example, the configuration of the power supplies according to the formulas 3 + 1, 2 + 2, etc.).
Item Storage responsible for the configuration and operation of integrated VRTX storage. Here you can create the virtual disks you need on physical media of your choice, as well as separately distribute access to them for each of the installed servers.

After setting up the hardware, it is advisable to use the Dell Lifecycle Controller deployment system to install the OS. Depending on your tasks (or just preferences), you can make your choice in the direction of Microsoft Hiper-V or VMWare ESX. Using controllers, iDRAC you can update the software directly on the servers as part of VRTX.

To start the remote installation of the hypervisor (or operating system), you just need to mount the boot disk image into the virtual CD-drive using the Deploy OS Lifecycle Controller snap-in and select this drive at boot time. Then you just have to follow the usual steps for installing the operating system.
In the next article, we will take a look at the highlights of Dell OpenManage Essentials, Dell AppAssure, and Active Infrastructure.
We will start with one of the new products this year - the Dell VRTX server platform, which has been talked about a lot lately, which makes us very pleased. In our blog, we already considered the “vertex” at the time of its appearance on the Russian market, and now it's time to look at it from a practical perspective.
After unpacking the device, you need to choose a place to install it, connect one RJ-45 network cable to the CMC (Chassis Management Controller) port and connect the number of IP connections required for operation on the network switch. After that, connect the system to the power supply. After applying voltage to the power supplies, the LED indicator will become active. You will need to select the language for operation and set the network address of the chassis control card either manually or select DHCP. After receiving the IP address, you can safely close the front wall of the chassis with a key and go to your workplace, where tea and cookies are waiting for you :)
For further work with the device, just enter the IP address assigned at the beginning of installation in the browser window. After authentication (for all Dell devices, the default authentication information is root / calvin), you will be taken to the VRTX Chassis Management Controller main page. You will be prompted to change the root account information, which we strongly recommend that you do immediately after logging in. On the start page, the current status of the system will be displayed in front of you.
Color indicators on the schematic image on the left side of the main page will display the status of the main system nodes: servers, hard drives, power supplies, fans and expansion cards. The colors of the states are standard: green - normal mode, yellow - problems in operation, red - the node does not work. In the left part in the form of a tree structure are all the nodes of the system (settings and current status of servers, disks, input / output cards, etc.), about them a little later. In addition, at the top of the window there are the main tabs for managing and maintaining the device. With their help, you can make basic chassis settings: specify the DNS name of the device, configure the notification system (monitoring, failures and / or warnings) by e-mail or SNMP, or, for example, the orientation of the LCD panel depending on the location of the chassis (tower or rack).
We recommend that you pay attention to the service tag of the device (Service Tag), it will come in handy on the support site.
First of all, we are interested in the Update tab . You can get updates for all your Dell devices in several ways, the choice is only up to you and current conditions.
Firstly, this can be done from the Update tab of the Chassis Management Controller page by first downloading the firmware file. To do this, you can go to the support site and enter the Service Tag. Here you can get all the information on your device: the date of shipment, the warranty period, the original configuration of the product, the current configuration, drivers and available updates to system components and much more.
Secondly, you can use the proprietary Dell Repository Manager utility and use it to download the latest software versions of the entire Dell infrastructure in your enterprise to the local storage.
However, the most convenient and effective, in our opinion, is updating the firmware of nodes using the Lifecycle Controller.
After updating the firmware of all nodes to the current state, you can proceed to the next step - setting up the hardware for operation. In the Server Overview tab, you can view the model, configuration, and current status of installed servers (M520 or M620). It also configures access directly to the iDRAC (integrated Dell Remote Access Controller) of each installed server. The iDRAC controller has its own processor, memory, network connection and access to the system bus. Its main features include power management, virtual server access and remote management capabilities - all accessible through a web browser or command line interface.
To configure the integrated 1Gb switch, you need to expand the I / O Module Overview taband select Launch IOM GUI . You will be redirected to the Dell Network administration snap-in (do not forget to change the default password for root), where you can assign network ports directly to the servers and configure the network component.
As you already know, VRTX includes 8 PCIe slots to expand the capabilities of the servers included in its configuration. To assign these slots to physical servers, use the PCIe Overview item in the control panel. Here you can see all the expansion cards installed in the chassis and indicate their binding to a specific server. Front Panel
Menu Itemcompletely duplicates the capabilities of the “Vertex” LCD panel and allows you to specify the binding of a physical DVD drive and KVM switch to a physical server.
The Fans , Power Supplies, and Temperature Sensors tabs provide complete information on the current state of the corresponding chassis nodes and allow you to assign an operating mode for them (for example, the configuration of the power supplies according to the formulas 3 + 1, 2 + 2, etc.).
Item Storage responsible for the configuration and operation of integrated VRTX storage. Here you can create the virtual disks you need on physical media of your choice, as well as separately distribute access to them for each of the installed servers.
After setting up the hardware, it is advisable to use the Dell Lifecycle Controller deployment system to install the OS. Depending on your tasks (or just preferences), you can make your choice in the direction of Microsoft Hiper-V or VMWare ESX. Using controllers, iDRAC you can update the software directly on the servers as part of VRTX.
To start the remote installation of the hypervisor (or operating system), you just need to mount the boot disk image into the virtual CD-drive using the Deploy OS Lifecycle Controller snap-in and select this drive at boot time. Then you just have to follow the usual steps for installing the operating system.
In the next article, we will take a look at the highlights of Dell OpenManage Essentials, Dell AppAssure, and Active Infrastructure.