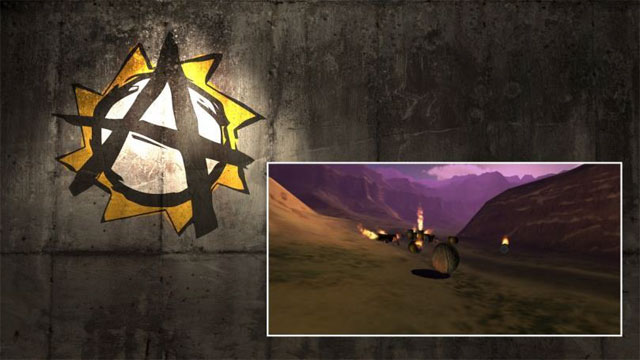
Prototype a 3D game in 60 minutes with Project Anarchy
- Tutorial
In this post you will find step-by-step instructions on how to create a prototype of a mobile 3D game in an incredibly short time using the Project Anarchy game engine. For work, we need:
- PC with installed Project Anarchy SDK , Android SDK and drivers for adb connection;
- USB device connected via USB;
- Installed application vSceneViewer.apk ;
- A set of LiveCodeparisDemo.zip objects ;
- A working Wi-Fi connection on a PC and an Android device.
World creation
Launch vForge. Create a new project in the demo folder ( LiveCodeParisDemo ).
Unzip the feature set on top of the new project.
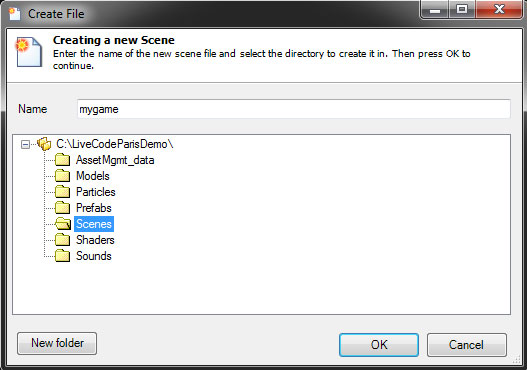
Create a new scene called “mygame” in the scene folder.
Using the scene wizard, select MobileForward Renderer , skip the Post Processors and Lighting options and click OK.
Make sure the editor is in Default Layout mode and select the Shape Creators tab . Find the Static Mesh Instance object and drag it to the middle of the Engine View window . In the Properties tab, select MeshFileNameto open the file browser and select "track11k.vmesh" .
From the pop-up menu, go to Engine-> Edit Sky . Make sure that the mapping value is set to Cubemap and that the corresponding “clear_morning_xxxx.bmp” is set for each of the CubeTexture textures .
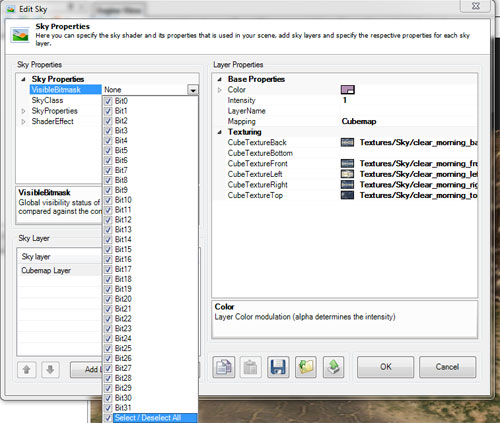
In Sky Properties, select Visible Bitmask and make sure all bits are set. Finally, open the color tool under Color to set the overall color tone to [219,156,217].
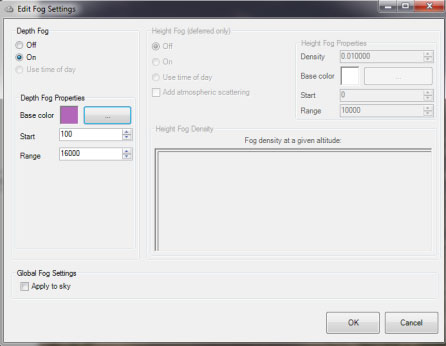
In the drop-down menu Engine-> Edit Fog, enable Depth Fog , set the Start value to 1000, andRange is 16000 and, if required, assign Base color [178,103,185].
Go to the Shape Creators tab and drag Lights (static) - Directional Light from the Lighting section onto the stage. Set the following options:
| Pitch | 0 |
| Multiplier | 0.8 |
| Light color | 255,164,101 |
Click the Shape Creators tab, and from the Lighting section, drag Time-of-day sunlight into the scene. Set Back Light in the popup dialog. Set the following properties:
Sunlight
| Pitch | thirty |
| Light color | 183,172,109 |
Background Light (Back Light)
| Yaw | -180 |
| Pitch | -twenty |
| Light color | 173,150,102 |
From the pop-up menu, select Lighting-> Calculate Lighting . Ignore the warning; for the first time, this is normal. The scene should now be completely flooded with light, and the shadows are counted and added.
Adding objects and players
Add two new layers to the scene: Player and Objects .Select the Player layer .
Click the Asset Browser tab and check Models . Find ballGunBullet.model and drag it into the scene. (note: select a suitable location on an incline). In the Properties tab, set the following:
| Uniformscaling | 4 |
| Castdynamic shadows | True |
Use the move tool to raise the object a few meters above the ground.

Now select the Objects layer .
Click the Components tab , locate the Havok Rigid Body component, and drag it to the Attached Components list . Set the properties of a solid:
| Mass | 25 |
| Striction | 0.8 |
| Restitution | 0.2 |
| Lineardamping | 0.3 |
| Angulardamping | 0.3 |
| TightFitShape | True |
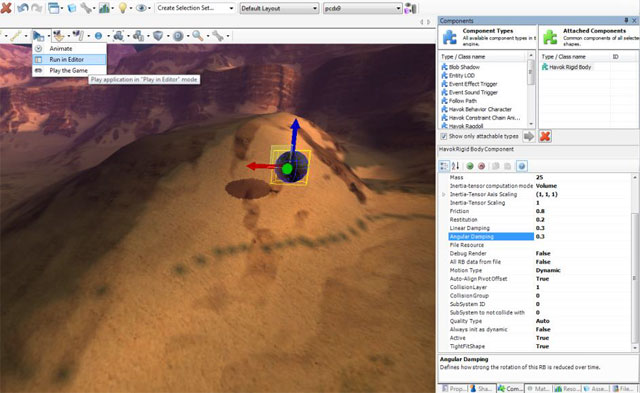
Select the Run in Editor command and see the result. Then stop watching.
Go back to the Asset Browser tab and drag Barrel.model into the scene , placing it in a suitable place below the ball. Place the barrel on the ground by lifting it and while moving, click RMB Drop to Floor -> Bottom center . Select the Components tab and add a Havok Rigid Body with the following properties:
| Mass | 4 |
| TightFitShape | True |
Make a few copies of the barrel (tip: with the object selected, press Shift and move the object to clone and place). Set all barrels on the ground.
Repeat this process using TrafficCone.model with the following properties:
| Mass | 2 |
| TightFitShape | True |
Run Run in Editor and see the result.

Visual Debugger (VDB)
Launch VDB and position the VDB and vForge windows so that they are both visible.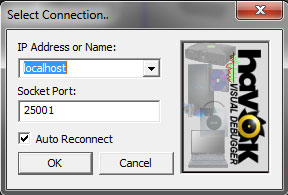
Connect VDB to vForge through localhost and run the simulation in vForge via Run in Editor .
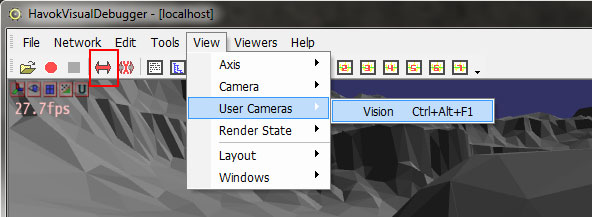
Control your VDB camera to see a better simulation. (Tip: the menu item View-> User Cameras-> Vision will force VDB to use the vForge camera ). Through VDB, you can view and change the properties of Havok Physics . If you press and hold a space when the pointer is over an object, you can “capture” it and move it around the scene. Any manipulations with an object in VDBwill be immediately reflected in vForge .
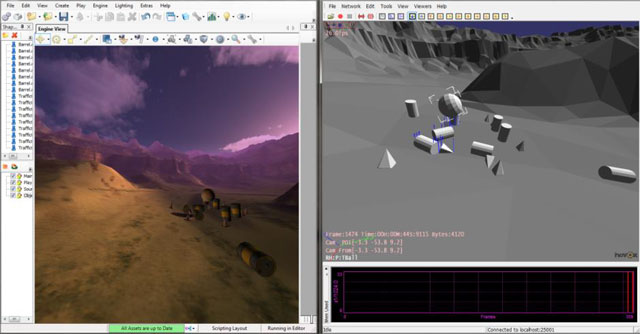
Stop the Run in Editor simulation . This time, start writing to VDB (the icon with a red circle) and enter the appropriate file name to save. Run Run in Editor again and let the simulation run for a while, then stop the simulation and its recording (the black square icon). Download the recording and play the simulation in VDB : zoom in on objects, change the playback speed and pause for a detailed study of the frame.
Adding Player Control
In the Player layer, select ballGunBullet.model .Open the Components tab and add the Player Camera component with the following properties:
| Followfixed | True |
| Cameradistance | 1000 |
| Miniamldistance | 1000 |
| Maximaldistance | 2000 |
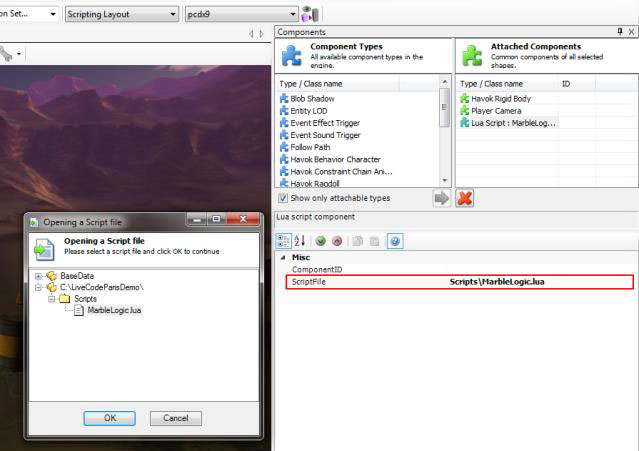
We add the Lua Script component , and in the ScriptFile field set “Scipts \ MarbleLogic.lua” through the file browser.
In the drop-down list, change the Default Layout to the Scripting Layout and select the Script tab . Lua script should be visible and editable. If not, click on the Load existing Script icon and select the “MarbleLogic.lua” file .
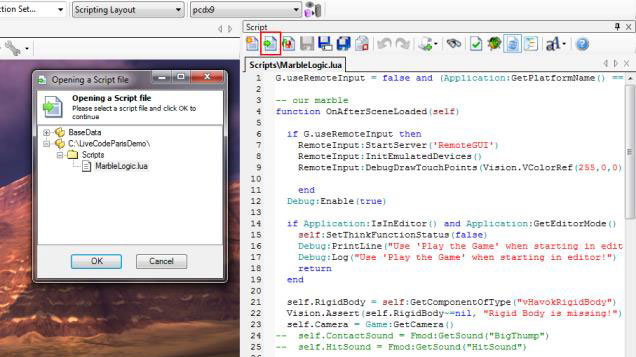
Turn on the Play the Game mode . You can control the ball using the existing game controller. The camera should move smoothly. Press Esc to exit Play the Game mode .
Using remote input
Note: this only works via Wi-Fi connection on the same network as the development PC.In the Script tab, change the first line of the Lua script:
G.useRemoteInput = true and ...
Save the script and run Play the Game . The IP address will be displayed in the upper right corner of the screen. On your device, open an Internet browser and go to the specified IP address.
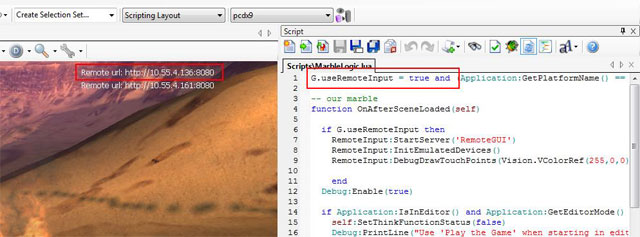
If everything works correctly, touches and accelerometer data from the device will be transferred to vForge and will control the ball.
To disable remote control, correct the script back to
G.useRemoteInput = false and ...
Preparing for Android
From the pop-up menu, select Engine-> Asset Profile Manager . Lock the profile for editing and click the Add Profile icon .In the New Asset Profile dialog, set Platform to ANDROID and click OK. Set Texture: DownscaleLevel to 1 and click OK.

The process of automatic transformation of objects can be tracked along the green progress line at the bottom of the screen.
Select an android profile from the drop-down list. The icon to the right of the profile allows you to view the scene in the selected profile. Switch using this icon to see the difference.

When the conversion is complete, selectFile-> Export-> Export Scene and make sure the Target File Name is set to "Scenes \ mygame" . Click Export Active Profile . Make sure that there are "mygame.android.vscene" and "mygame.android.vscene.data" inside the Scenes folder .
Installation on device
If the File Serve tab does not appear, open it with View-> panels-> File Serve and attach it to the panel.Click the File Serve tab . In Data Directories, click Add and add the path to the project folder.
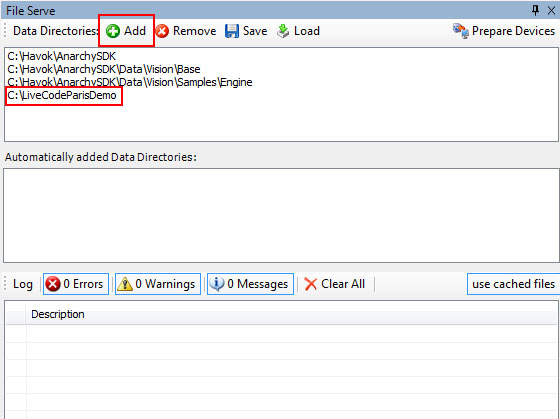
Connect your Android device and verify that it connects correctly, then click Prepare Devices .
On the device, launch vSceneViewer and select mygame . The first download will be a few seconds longer than the next, since there are no cached files. The game should start, and the ball is controlled by tilting the device.
Application setup
You probably noticed that the ball moves on the device much slower than in vForge . Go to the Script tab and change lines 30-31 of the Lua file:self.InputScaleX = 10
self.InputScaleY = 10

Save the file and download the game to the device again. The application will be reloaded from the cache and only the modified Lua file will be downloaded from the file server. Now the ball should become much more manageable.
Adding Background Music
Create a new layer called Sound . From the Shape Creators tab, drag an audio object into the scene and set its properties:| Filename | Sounds \ HeavyIndustrial.ogg |
| Is3d | False |
| Background | True |
Select Play the Game and make sure the music is audible. Re-export the scene and reload it into the device. Music must be heard.
Burning barrels
From the Layout drop-down list, select Particle Editor Layout and open the Particle Editor tab . Click on the Create a New particle Effect icon and select Fire Torch With Smoke from the Template Selection . Open the Objects layer and drag the newly created effect into the scene. In the Shapes window, drag the created effect onto one of the barrels in such a way as to make it a child of the barrel. RMB on the effect object and select Relevant operations-> align to parent . Using the move tool, drag the effect to the bottom of the barrel. In the Properties tab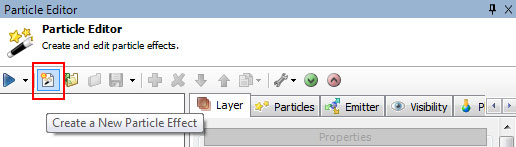

set the following:
| Pitch | -90 |
| Uniformscaling | 4 |
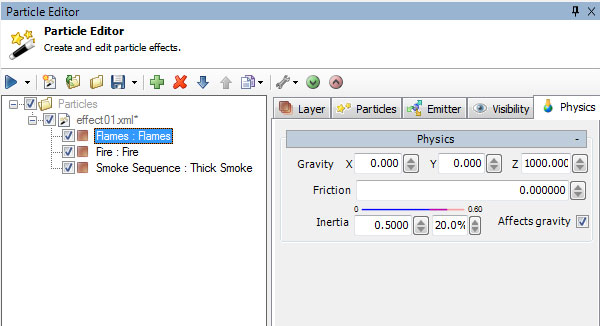
Next, back to the Particle Editor tab and for each of the three subsystems, install the Z component in the Physics tab and make sure Affects gravity is turned on:
| Flames: Flames | Z | 1000 |
| Fire: fire | Z | 1000 |
| Smoke Sequence: Thick Smoke | Z | 300 |
Prefab Creation
In the Shapes window , RMB on the barrel with the effect, select Create Prefab and in the Create File dialog name Name - “Flaming Barrel” . Click OK and then OK in the next Edit Properties dialog . Select the Shape Creators tab and open the Prefabs folder . The new prefab should be on the list. Drag the prefab into the scene several times to fill it with burning barrels.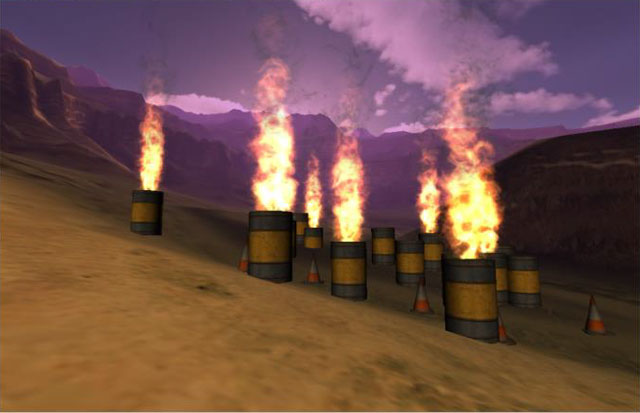
Select Play the Game and see the results.
Re-export the scene and reload it to the device.