Convenient way to test React components
I wrote a custom report builder (custom reporter) for Jest and posted it on GitHub . My builder is called Jest-snapshots-book, it creates an HTML book of snapshots of React-application components.

The article will discuss what Jest is, snapshot testing, for which an additional report builder was needed and how to write them. Basically, all this relates to testing React components, but theoretically it can be used when working with any serializable data.
For example, in the article we will test the paginator component ( Paginator ). It is part of our stocking project for building serverless AWS applications ( GitHub ). The task of such a component is to display buttons for navigating through the pages of a table or something else.
This is a simple functional component with no state of its own (stateless component). As input, it receives from props the total number of pages, the current page and the function that handles clicking on the page. At the output, the component outputs a shaped paginator. To display the buttons use another child component Button . If there are many pages, the paginator shows them not all, combining them and displaying them as dots.

Jest is a well-known opensource library for unit testing JavaScript code. It was created and developed thanks to Facebook. Written on Node.js.
In general terms, the meaning of testing comes down to what you need to come up with the input parameters for your code and immediately describe the output that your code should produce. When executing tests, Jest executes your code with input parameters and compares the result with the expected one. If it matches, the test will pass, and if not, it will not pass.
A small example from the site jestjs.io .
Suppose we have a Node.js module, which is a function that adds two numbers (file sum.js ):
If our module is saved in a file, to test it, we need to create a file sum.test.js , in which to write such code for testing:
In this example, using the test function, we created one test with the name 'adds 1 + 2 to equal 3' . By the second parameter to the test function, we pass the function, which actually performs the test.
The test is that we execute our sum function with input parameters 1 and 2 , and pass the result to the Jest expect () function . Then, using the Jest toBe () function, the transmitted result is compared with the expected ( 3 ). The toBe () function belongs to the Jest (matchers) check function category.
To perform the test, just go to the project folder and calljest on the command line. The jest will find the file with the extension .test.js and run the test. Here is the result he will produce:
Snapshot testing is a relative new feature in Jest. The point is that using a special check function, we ask Jest to save a snapshot of our data structure to disk, and in subsequent test runs compare new snapshots with previously saved ones.
The snapshot in this case is nothing but a simple textual representation of the data. For example, a snapshot of some object will look like this (the array key here is the name of the test):
This is what the Jest check function looks like, which performs a snapshot comparison (parameters are optional):
The value can be any serializable data structure. For the first time, the toMatchSnapshot () function will simply write the snapshot to disk, the next time it will perform the comparison.
Most often, this testing technology is used specifically for testing React-components, and even more accurately, for testing the correctness of rendering React-components. To do this, you need to pass the component as the value after rendering.
Enzyme is a library that greatly simplifies testing React applications by providing convenient component rendering functions. Enzyme is developed by Airbnb.
Enzyme allows you to render components in code. To do this, there are several convenient functions that perform different rendering options:
Let's not delve into rendering options, for snapshot testing, static rendering is enough, which allows you to get static HTML code of a component and its child components:
So, we render our component and pass the result to expect () , and then call the .toMatchSnapshot () function . The it function is just a short name for the test function .
Each time the test is run, toMatchSnapshot () compares two snapshots: the expected one (which was previously recorded on the disc) and the current one (which was the result of the current test run).
If the pictures are identical, the test is considered passed. If there is a difference in the pictures, the test is considered not passed, and the difference between the two pictures is shown to the user in the form of a diff (as in version control systems).
Here is an example of a Jest output when a test fails. Here we see that we have an additional button in the current snapshot.

In this situation, the user must decide what to do. If snapshot changes are planned due to component code changes, then it should overwrite the old snapshot with a new one. And if the changes are unexpected, then you need to look for the problem in your code.
I will give a complete example for testing the paginator (the Paginator.test.js file ).
For more convenient testing of the paginator, I created a snapshoot function (tp, cp) that will accept two parameters: the total number of pages and the current page. This function will perform the test with the specified parameters. Then it remains only to call the snapshoot () function with various parameters (you can even in a loop) and test, test ...
When I started working with this technology of testing, the feeling of the unfinishedness of the initial approach did not leave me. After all, pictures can only be viewed as text.
But what if any component renders a lot of HTML code? Here is the paginator component, consisting of 3 buttons. A snapshot of this component will look like this:
First you need to make sure that the original version of the component is rendered correctly. Not very convenient to do this, just looking at the HTML-code in text form. But these are just three buttons. And if you need to test, for example, a table or something more voluminous? And for full testing, you need to view a lot of pictures. It will be quite uncomfortable and hard.
Then, in the case of not passing the test, you need to understand the difference in the appearance of the components. Diff their HTML-code, of course, will allow you to understand what has changed, but again the opportunity to see firsthand the difference will not be superfluous.
In general, I thought that it would be necessary to make it so that the pictures could be viewed in the browser in the same way that they look in the application. Including with the styles applied to them. So I had an idea to improve the snapshot testing process by writing an additional report builder for Jest.
Looking ahead, that's what I got. Every time my tests run, my builder updates the picture book. Directly in the browser, you can view the components as they appear in the application, as well as immediately see the source code of the images and diff (if the test fails).
The creators of Jest have provided the possibility of writing additional report builders. This is done as follows. You need to write a module on Node.JS that should have one or more of these methods: onRunStart , onTestStart , onTestResult , onRunComplete , which correspond to various test progress events.
Then you need to connect your module in the jest config. For this there is a special directive reporters . If you want to additionally include your builder, then you need to add it to the end of the reporters array .
After that, the Jest will call the methods from your module when certain stages of the test run occur, passing the current results to the methods. The code in these methods should actually create the additional reports that you need. This is in general terms the creation of additional report builders.
I do not specifically insert the module code into the article, as I will improve it further. It can be found on my GitHub, this is the src / index.js file on the project page.
My report builder is called upon completion of tests. I put the code in the onRunComplete method (contexts, results) . It works as follows.
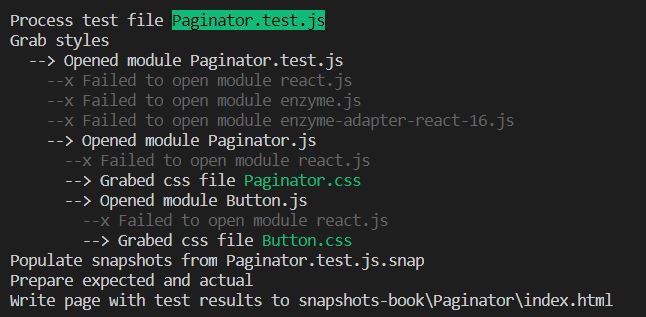
In the results.testResults property the Jest passes an array of test results to this function. Each test result includes a path to the file with tests and an array of messages with the results. My report builder searches for the corresponding test file for each test file. If a snapshot file is found, the report builder creates an HTML page in the snapshot book and writes it to the snapshots-book folder in the root folder of the project.
To generate an HTML page, report builder uses the recursive function grabCSS (moduleName, css = [], level = 0) to collect all styles, starting with the component itself and further down the tree of all the components it imports. Thus, the function collects all the styles that are needed to correctly display the component. Collected styles are added to the snapshot book HTML page.
I use CSS modules in my projects, so I'm not sure that this will work if CSS modules are not used.
If the test is passed, the builder inserts an iFrame into the HTML page with a snapshot in two display options: the source code (snapshot as it is) and the component after rendering. The display option in iFrame is changed by a mouse click.
If the test was not passed, then everything is more complicated. The jest provides in this case only the message that it displays in the console (see the screenshot above).
It contains diffs and additional information about the failed test. In fact, in this case, we are essentially dealing with two shots: the expected one and the actual one . If we have the expected one - it is stored on disk in the snapshot folder, then the current Jest snapshot does not provide.
So I had to write code that applies the Jest diff from the message to the expected snapshot and creates the actual snapshot based on the expected one. After that, the builder displays next to the iFrame of the expected iFrame snapshot of the current snapshot, which can change its content between three options: source code, component after rendering, diff.
This is what the report builder output looks like if you set the verbose = true option for it.
Snapshot testing is not enough to fully test the React application. It covers only the rendering of your components. It is also necessary to test their functioning (reactions to user actions, for example). However, snapshot testing is a very convenient way to ensure that your components are rendered as intended. And jest-snapshots-book makes the process a little easier.
The article will discuss what Jest is, snapshot testing, for which an additional report builder was needed and how to write them. Basically, all this relates to testing React components, but theoretically it can be used when working with any serializable data.
React-component paginator
For example, in the article we will test the paginator component ( Paginator ). It is part of our stocking project for building serverless AWS applications ( GitHub ). The task of such a component is to display buttons for navigating through the pages of a table or something else.
This is a simple functional component with no state of its own (stateless component). As input, it receives from props the total number of pages, the current page and the function that handles clicking on the page. At the output, the component outputs a shaped paginator. To display the buttons use another child component Button . If there are many pages, the paginator shows them not all, combining them and displaying them as dots.
Paginator component code
import React from'react';
import classes from'./Paginator.css';
import Button from'../../UI/Button/Button';
const Paginator = (props) => {
    const { tp, cp, pageClickHandler } = props;
    let paginator = null;
    if (tp !== undefined && tp > 0) {
        let buttons = [];
        buttons.push(
            <Buttonkey={`pback`}
                disabled={cp === 1}clicked={(cp === 1 ? null:event => pageClickHandler(event, 'back'))}>
                ←
                </Button>
        );
        const isDots = (i, tp, cp) =>
            i > 1 &&
            i < tp &&
            (i > cp + 1 || i < cp - 1) &&
            (cp > 4 || i > 5) &&
            (cp < tp - 3 || i < tp - 4);
        let flag;
        for (let i = 1; i <= tp; i++) {
            const dots = isDots(i, tp, cp) && (isDots(i - 1, tp, cp) || isDots(i + 1, tp, cp));
            if (flag && dots) {
                flag = false;
                buttons.push(
                    <Buttonkey={`p${i}`}
                        className={classes.Dots}disabled={true}>
                        ...
                </Button>
                );
            } elseif (!dots) {
                flag = true;
                buttons.push(
                    <Buttonkey={`p${i}`}
                        disabled={i === cp}clicked={(i === cp ? null:event => pageClickHandler(event, i))}>
                        {i}
                    </Button>
                );
            }
        }
        buttons.push(
            <Buttonkey={`pforward`}
                disabled={cp === tp}clicked={(cp === tp ? null:event => pageClickHandler(event, 'forward'))}>
                →
                </Button>
        );
        paginator =
            <divclassName={classes.Paginator}>
                {buttons}
            </div>
    }
    return paginator;
}
exportdefault Paginator;
Button Component Code
import React from'react';
import classes from'./Button.css';
const button = (props) => (
    <buttondisabled={props.disabled}className={classes.Button + (props.className ? ' ' + props.className: '')}
        onClick={props.clicked}>
        {props.children}
    </button>
);
exportdefault button;
Jest
Jest is a well-known opensource library for unit testing JavaScript code. It was created and developed thanks to Facebook. Written on Node.js.
In general terms, the meaning of testing comes down to what you need to come up with the input parameters for your code and immediately describe the output that your code should produce. When executing tests, Jest executes your code with input parameters and compares the result with the expected one. If it matches, the test will pass, and if not, it will not pass.
A small example from the site jestjs.io .
Suppose we have a Node.js module, which is a function that adds two numbers (file sum.js ):
functionsum(a, b) {
  return a + b;
}
module.exports = sum;
If our module is saved in a file, to test it, we need to create a file sum.test.js , in which to write such code for testing:
const sum = require('./sum');
test('adds 1 + 2 to equal 3', () => {
  expect(sum(1, 2)).toBe(3);
});
In this example, using the test function, we created one test with the name 'adds 1 + 2 to equal 3' . By the second parameter to the test function, we pass the function, which actually performs the test.
The test is that we execute our sum function with input parameters 1 and 2 , and pass the result to the Jest expect () function . Then, using the Jest toBe () function, the transmitted result is compared with the expected ( 3 ). The toBe () function belongs to the Jest (matchers) check function category.
To perform the test, just go to the project folder and calljest on the command line. The jest will find the file with the extension .test.js and run the test. Here is the result he will produce:
PASS  ./sum.test.js
✓ adds 1 + 2 to equal 3 (5ms)
Enzyme and snapshot component testing
Snapshot testing is a relative new feature in Jest. The point is that using a special check function, we ask Jest to save a snapshot of our data structure to disk, and in subsequent test runs compare new snapshots with previously saved ones.
The snapshot in this case is nothing but a simple textual representation of the data. For example, a snapshot of some object will look like this (the array key here is the name of the test):
exports[`some test name`] = `
Object {
    "Hello": "world"
}
`;
This is what the Jest check function looks like, which performs a snapshot comparison (parameters are optional):
expect(value).toMatchSnapshot(propertyMatchers, snapshotName)The value can be any serializable data structure. For the first time, the toMatchSnapshot () function will simply write the snapshot to disk, the next time it will perform the comparison.
Most often, this testing technology is used specifically for testing React-components, and even more accurately, for testing the correctness of rendering React-components. To do this, you need to pass the component as the value after rendering.
Enzyme is a library that greatly simplifies testing React applications by providing convenient component rendering functions. Enzyme is developed by Airbnb.
Enzyme allows you to render components in code. To do this, there are several convenient functions that perform different rendering options:
- full rendering (as in the browser, full DOM rendering);
- simplified rendering (shallow rendering);
- static rendering (static rendering).
Let's not delve into rendering options, for snapshot testing, static rendering is enough, which allows you to get static HTML code of a component and its child components:
const wrapper = render(<Footitle="unique" />);So, we render our component and pass the result to expect () , and then call the .toMatchSnapshot () function . The it function is just a short name for the test function .
...
        const wrapper = render(<Paginatortp={tp}cp={cp} />);
        it(`Total = ${tp}, Current = ${cp}`, () => {
            expect(wrapper).toMatchSnapshot();
        });
...
Each time the test is run, toMatchSnapshot () compares two snapshots: the expected one (which was previously recorded on the disc) and the current one (which was the result of the current test run).
If the pictures are identical, the test is considered passed. If there is a difference in the pictures, the test is considered not passed, and the difference between the two pictures is shown to the user in the form of a diff (as in version control systems).
Here is an example of a Jest output when a test fails. Here we see that we have an additional button in the current snapshot.
In this situation, the user must decide what to do. If snapshot changes are planned due to component code changes, then it should overwrite the old snapshot with a new one. And if the changes are unexpected, then you need to look for the problem in your code.
I will give a complete example for testing the paginator (the Paginator.test.js file ).
For more convenient testing of the paginator, I created a snapshoot function (tp, cp) that will accept two parameters: the total number of pages and the current page. This function will perform the test with the specified parameters. Then it remains only to call the snapshoot () function with various parameters (you can even in a loop) and test, test ...
import React from'react';
import { configure, render } from'enzyme';
import Adapter from'enzyme-adapter-react-16';
import Paginator from'./Paginator';
configure({ adapter: new Adapter() });
describe('Paginator', () => {
    const snapshoot = (tp, cp) => {
        const wrapper = render(<Paginatortp={tp}cp={cp} />);
        it(`Total = ${tp}, Current = ${cp}`, () => {
            expect(wrapper).toMatchSnapshot();
        });
    }
    snapshoot(0, 0);
    snapshoot(1, -1);
    snapshoot(1, 1);
    snapshoot(2, 2);
    snapshoot(3, 1);
    for (let cp = 1; cp <=10; cp++) {
        snapshoot(10, cp);
    }
});
Why did you need additional report builder
When I started working with this technology of testing, the feeling of the unfinishedness of the initial approach did not leave me. After all, pictures can only be viewed as text.
But what if any component renders a lot of HTML code? Here is the paginator component, consisting of 3 buttons. A snapshot of this component will look like this:
exports[`Paginator Total = 1, Current = -1 1`] = `
<div
  class="Paginator"
>
  <button
    class="Button"
  >
    ←
  </button>
  <button
    class="Button"
  >
    1
  </button>
  <button
    class="Button"
  >
    →
  </button>
</div>
`;
First you need to make sure that the original version of the component is rendered correctly. Not very convenient to do this, just looking at the HTML-code in text form. But these are just three buttons. And if you need to test, for example, a table or something more voluminous? And for full testing, you need to view a lot of pictures. It will be quite uncomfortable and hard.
Then, in the case of not passing the test, you need to understand the difference in the appearance of the components. Diff their HTML-code, of course, will allow you to understand what has changed, but again the opportunity to see firsthand the difference will not be superfluous.
In general, I thought that it would be necessary to make it so that the pictures could be viewed in the browser in the same way that they look in the application. Including with the styles applied to them. So I had an idea to improve the snapshot testing process by writing an additional report builder for Jest.
Looking ahead, that's what I got. Every time my tests run, my builder updates the picture book. Directly in the browser, you can view the components as they appear in the application, as well as immediately see the source code of the images and diff (if the test fails).
Additional Jest Report Builders
The creators of Jest have provided the possibility of writing additional report builders. This is done as follows. You need to write a module on Node.JS that should have one or more of these methods: onRunStart , onTestStart , onTestResult , onRunComplete , which correspond to various test progress events.
Then you need to connect your module in the jest config. For this there is a special directive reporters . If you want to additionally include your builder, then you need to add it to the end of the reporters array .
After that, the Jest will call the methods from your module when certain stages of the test run occur, passing the current results to the methods. The code in these methods should actually create the additional reports that you need. This is in general terms the creation of additional report builders.
How does the Jest-snapshots-book
I do not specifically insert the module code into the article, as I will improve it further. It can be found on my GitHub, this is the src / index.js file on the project page.
My report builder is called upon completion of tests. I put the code in the onRunComplete method (contexts, results) . It works as follows.
In the results.testResults property the Jest passes an array of test results to this function. Each test result includes a path to the file with tests and an array of messages with the results. My report builder searches for the corresponding test file for each test file. If a snapshot file is found, the report builder creates an HTML page in the snapshot book and writes it to the snapshots-book folder in the root folder of the project.
To generate an HTML page, report builder uses the recursive function grabCSS (moduleName, css = [], level = 0) to collect all styles, starting with the component itself and further down the tree of all the components it imports. Thus, the function collects all the styles that are needed to correctly display the component. Collected styles are added to the snapshot book HTML page.
I use CSS modules in my projects, so I'm not sure that this will work if CSS modules are not used.
If the test is passed, the builder inserts an iFrame into the HTML page with a snapshot in two display options: the source code (snapshot as it is) and the component after rendering. The display option in iFrame is changed by a mouse click.
If the test was not passed, then everything is more complicated. The jest provides in this case only the message that it displays in the console (see the screenshot above).
It contains diffs and additional information about the failed test. In fact, in this case, we are essentially dealing with two shots: the expected one and the actual one . If we have the expected one - it is stored on disk in the snapshot folder, then the current Jest snapshot does not provide.
So I had to write code that applies the Jest diff from the message to the expected snapshot and creates the actual snapshot based on the expected one. After that, the builder displays next to the iFrame of the expected iFrame snapshot of the current snapshot, which can change its content between three options: source code, component after rendering, diff.
This is what the report builder output looks like if you set the verbose = true option for it.
useful links
- Testa-snapshots-book
- Module source code
- Enzyme rendering options
- Snapshot testing
- Directive reporters config jest
PS
Snapshot testing is not enough to fully test the React application. It covers only the rendering of your components. It is also necessary to test their functioning (reactions to user actions, for example). However, snapshot testing is a very convenient way to ensure that your components are rendered as intended. And jest-snapshots-book makes the process a little easier.