Backing up SQL Server 2014 CTP2 DB in Windows Azure
Actually, the idea of reserving a base in the Cloud is not new. This functionality appeared in the now-alive SQL Server 2012 with the release of 01/21/2013 cumulative update No. 2 to Service Pack 1 ( Build 11.0.3339.0 ). We analyzed it in the post Creating a backup copy of the database in Azure Storage. Therefore, I will not repeat that this is a very convenient feature that provides data migration from on-premise SQL Server to cloud (IaaS) and vice versa, and also facilitates the transfer of the database between two on-premise SQL Servers spaced when the Cloud acts as a hub. Until now, this could only be done from a T-SQL script. In the 2014 CTP version, two new features were added to this process. Firstly, you can now back up to Windows Azure directly from the SQL Server Management Studio interface and include it on a regular basis in an automated database support plan , and secondly, importantly, encrypt backups using certificates or asymmetric keys on based on cryptographic security algorithms. However, first things first.
In this post I will do essentially the same as in the previous one , but not from the command line, but from the new graphical interface. Unlike a laconic scripted solution, there will be more pictures.
To begin with, as you might guess, we need, in fact, SQL Server 2014 CTP2, which you can get here. This trial version expires on March 31, 2014. When downloading, you will need to select the type of distribution (iso / cab / Azure), bit capacity (32- or 64-bit), and language. At the moment, English, German, Spanish, Japanese, Chinese (Traditional) are offered. In the release, Russian, as always, will be supported, but for now this is what it is. Installation does not cause any surprises / difficulties compared to the current version. I put 2014 CTP2 side by side with a named instance next to 2012. They coexist normally, they do not fight, unlike PTP1 . You can start experimenting.
Launching the new SQL Server Management Studio. For happy owners of Windows 8.x who do not use detailed tiles on the start screen, where they are grouped by SQL Server 2012, SQL Server 2014, etc.

Fig. 1
a they prefer to quickly type something like “sql” in the search bar:
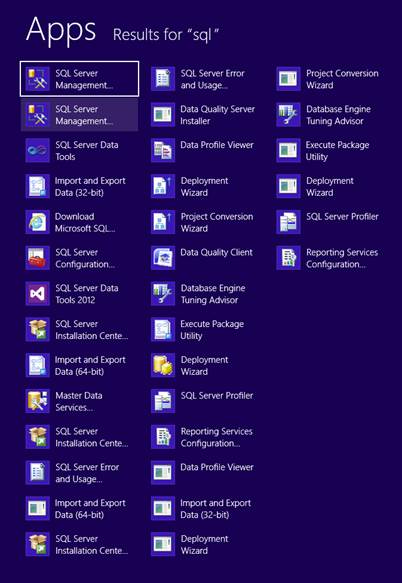
Fig . 2
now there are several of these tiles. You need to choose the one that relates to C: \ ProgramData \ Microsoft \ Windows \ Start Menu \ Programs \ Microsoft SQL Server 2014 CTP2, i.e. refers to C: \ Program Files (x86) \ Microsoft SQL Server \ 120 \ Tools \ Binn \ ManagementStudio \ Ssms.exe.
In SSMS, from the database context menu we select, as always, Tasks -> Back Up and note that in the new backup interface, along with the traditional disk, a URL has appeared as an alternative backup location option.
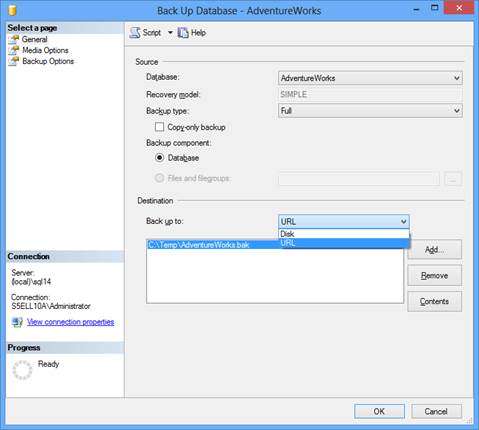
Fig.3
If you connect an instance of the server version 2012 and lower in SSMS 2014 CTP2, this option will not be available for it. For 2014 CTP2 instances, it is available regardless of the compatibility level the database is in.
After choosing Back up to = URL, the interface of the Destination section changes to provide the ability to enter the parameters that we previously used in the BACKUP DATABASE ... TO URL command (see Script 2). Required to ask. File name - the name of the backup file that will be stored in the Windows Azure Store.
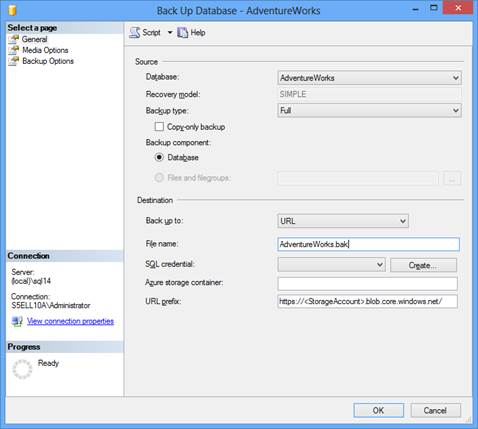
Fig. 4
Pressing the Create button opposite SQL Credential corresponds to the execution of the CREATE CREDENTIAL command (see Script 2). To authenticate when accessing a cloud subscription, you can usemanagement certificate or publication profile (file with the extension .publishsettings). The second method we used in the Introduction to the development and testing of applications in the Cloud post (Fig. 16-17), so here for a change we will see the first method.
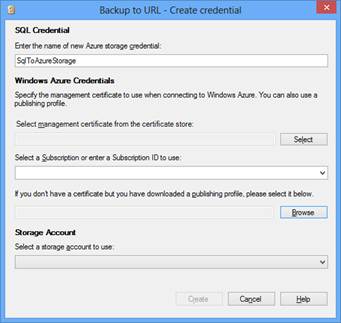
Fig. 5
Open the Visual Studio command line on behalf of the administrator and create a self-signed certificate for working with Windows Azure with a key length of at least 2048 bits, which is stored in the default certificate store - Personal.
Script 1
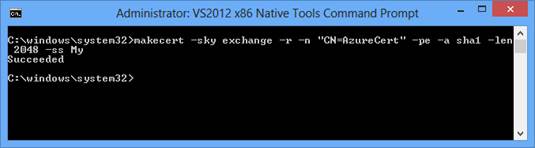
Fig. 6
If there is no Visual Studio, makecert can be downloaded, for example, as part of the Windows 8 SDK . After that, you need to look for it somewhere in C: \ Program Files (x86) \ Windows Kits \ 8.x \ bin \ x64.
To verify that the certificate was created successfully, we call the usual command window (better again, on behalf of the administrator) and enter certmgr.msc. In the Personal section, we see a freshly created certificate.

Fig. 7 We
export it (without a private key) to a .cer file. From the certificate context menu, select All Tasks -> Export:
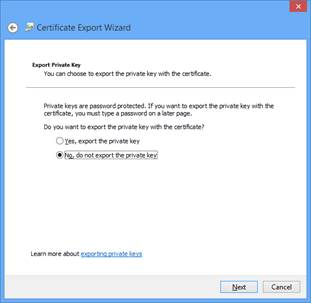
Fig . 8 Fig.
9 Fig.

10
Now we go to the Windows Azure administration portal, select the last Settings item in the left panel, click Management Certificates in the upper menu, and click the Upload button below and select The .cer file exported in Figure 10.

Fig. 11
It appears in the list of certificates:
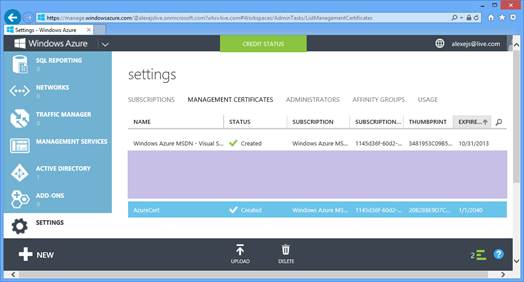
Fig . 12
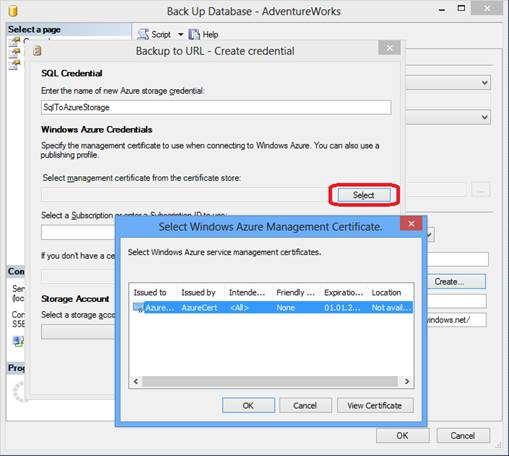
We return to Figure 5, click the Select button (management certificate from the certificate store) and in the window that opens, select the line with the freshly created AzureCert certificate:
Figure
13 A thumbprint of the specified certificate appears in the text box to the left of the Select button.
It remains to enter the subscription - its name or ID can be found there, in the Settings of the Windows Azure administration portal (Fig. 11-12), if you move to the left in the upper menu to the Subcriptions item.
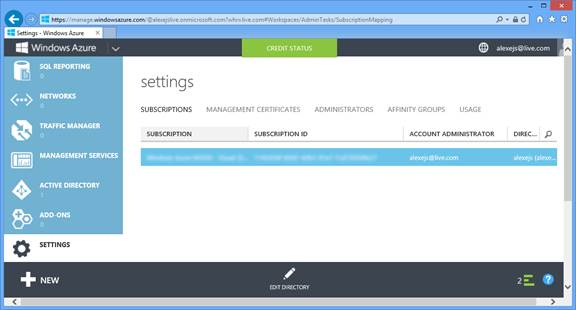
Fig. 14
After entering the Windows Azure management certificate and Subscription ID, we move to the Storage Account combo box. There is a slight pause during which SSMS tries to enter the cloud, indicating the specified subscription and certificate, everything is obtained, and the list of Azure storage accounts related to this subscription opens below.
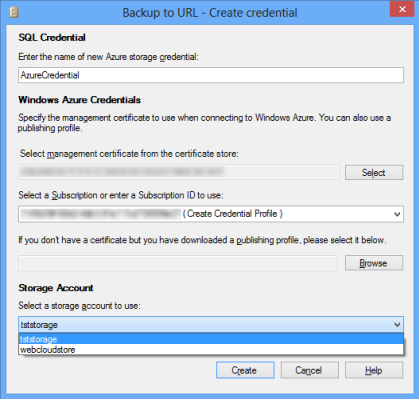
Fig. 15
Choose the one of interest in which the backup will take place, and click the Create button. A Credential is created, and we return to Figure 4. It remains to specify the container of the selected Azure storage account. As in the previous post , I will indicate the public container container1. The prefix URL field is automatically populated. If everything is correct, you do not need to edit it.

Fig.16
Click the OK button, the backup starts to run.
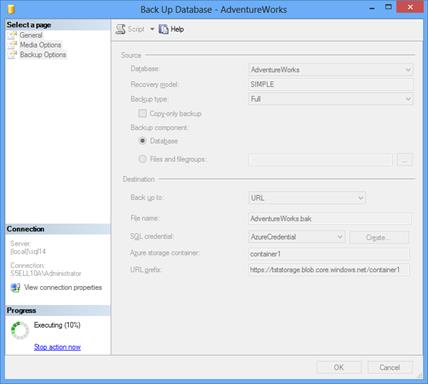
Figure 17.
After his graduation go into the container container1 tststorage storage account on the Windows Azure Management Portal, and seeing it in the newly created blob in which the backup file database AdventureWorks:
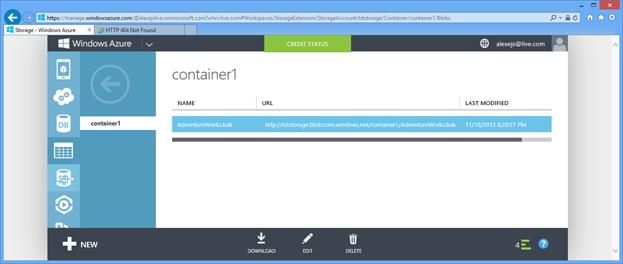
Figure 18.
Recovery is similar.
In the next series, we’ll look at new backup encryption options.
In this post I will do essentially the same as in the previous one , but not from the command line, but from the new graphical interface. Unlike a laconic scripted solution, there will be more pictures.
To begin with, as you might guess, we need, in fact, SQL Server 2014 CTP2, which you can get here. This trial version expires on March 31, 2014. When downloading, you will need to select the type of distribution (iso / cab / Azure), bit capacity (32- or 64-bit), and language. At the moment, English, German, Spanish, Japanese, Chinese (Traditional) are offered. In the release, Russian, as always, will be supported, but for now this is what it is. Installation does not cause any surprises / difficulties compared to the current version. I put 2014 CTP2 side by side with a named instance next to 2012. They coexist normally, they do not fight, unlike PTP1 . You can start experimenting.
Launching the new SQL Server Management Studio. For happy owners of Windows 8.x who do not use detailed tiles on the start screen, where they are grouped by SQL Server 2012, SQL Server 2014, etc.
Fig. 1
a they prefer to quickly type something like “sql” in the search bar:
Fig . 2
now there are several of these tiles. You need to choose the one that relates to C: \ ProgramData \ Microsoft \ Windows \ Start Menu \ Programs \ Microsoft SQL Server 2014 CTP2, i.e. refers to C: \ Program Files (x86) \ Microsoft SQL Server \ 120 \ Tools \ Binn \ ManagementStudio \ Ssms.exe.
In SSMS, from the database context menu we select, as always, Tasks -> Back Up and note that in the new backup interface, along with the traditional disk, a URL has appeared as an alternative backup location option.
Fig.3
If you connect an instance of the server version 2012 and lower in SSMS 2014 CTP2, this option will not be available for it. For 2014 CTP2 instances, it is available regardless of the compatibility level the database is in.
After choosing Back up to = URL, the interface of the Destination section changes to provide the ability to enter the parameters that we previously used in the BACKUP DATABASE ... TO URL command (see Script 2). Required to ask. File name - the name of the backup file that will be stored in the Windows Azure Store.
Fig. 4
Pressing the Create button opposite SQL Credential corresponds to the execution of the CREATE CREDENTIAL command (see Script 2). To authenticate when accessing a cloud subscription, you can usemanagement certificate or publication profile (file with the extension .publishsettings). The second method we used in the Introduction to the development and testing of applications in the Cloud post (Fig. 16-17), so here for a change we will see the first method.
Fig. 5
Open the Visual Studio command line on behalf of the administrator and create a self-signed certificate for working with Windows Azure with a key length of at least 2048 bits, which is stored in the default certificate store - Personal.
makecert -sky exchange -r -n "CN=AzureCert" -pe -a sha1 -len 2048 -ss MyScript 1
Fig. 6
If there is no Visual Studio, makecert can be downloaded, for example, as part of the Windows 8 SDK . After that, you need to look for it somewhere in C: \ Program Files (x86) \ Windows Kits \ 8.x \ bin \ x64.
To verify that the certificate was created successfully, we call the usual command window (better again, on behalf of the administrator) and enter certmgr.msc. In the Personal section, we see a freshly created certificate.
Fig. 7 We
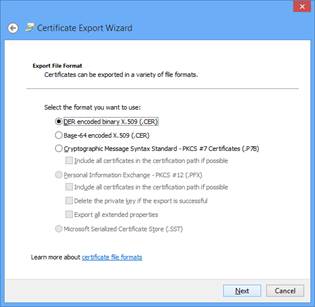
export it (without a private key) to a .cer file. From the certificate context menu, select All Tasks -> Export:
Fig . 8 Fig.
9 Fig.
10
Now we go to the Windows Azure administration portal, select the last Settings item in the left panel, click Management Certificates in the upper menu, and click the Upload button below and select The .cer file exported in Figure 10.
Fig. 11
It appears in the list of certificates:
Fig . 12
We return to Figure 5, click the Select button (management certificate from the certificate store) and in the window that opens, select the line with the freshly created AzureCert certificate:
Figure
13 A thumbprint of the specified certificate appears in the text box to the left of the Select button.
It remains to enter the subscription - its name or ID can be found there, in the Settings of the Windows Azure administration portal (Fig. 11-12), if you move to the left in the upper menu to the Subcriptions item.
Fig. 14
After entering the Windows Azure management certificate and Subscription ID, we move to the Storage Account combo box. There is a slight pause during which SSMS tries to enter the cloud, indicating the specified subscription and certificate, everything is obtained, and the list of Azure storage accounts related to this subscription opens below.
Fig. 15
Choose the one of interest in which the backup will take place, and click the Create button. A Credential is created, and we return to Figure 4. It remains to specify the container of the selected Azure storage account. As in the previous post , I will indicate the public container container1. The prefix URL field is automatically populated. If everything is correct, you do not need to edit it.
Fig.16
Click the OK button, the backup starts to run.
Figure 17.
After his graduation go into the container container1 tststorage storage account on the Windows Azure Management Portal, and seeing it in the newly created blob in which the backup file database AdventureWorks:
Figure 18.
Recovery is similar.
In the next series, we’ll look at new backup encryption options.