Blur on iOS7
With the seventh version of iOS, many UI elements began to look more attractive (see Session 226, Implementing Engaging UI on iOS ).
For example, now pop overs, most bars and alerts have a blurry background.

What to do if you want to add bluer to your control, this article will tell.
There are two types of blues: static and dynamic. As the name implies, the first one blurs the content once, and the second is updated at short intervals.
It is not difficult to implement blues. The general scheme is as follows: take a background picture behind the view (for example, using renderInContext ), blur it and set the resulting image as the background view. In the case of dynamic bluer, all of the above actions are performed on a timer. As an example of this approach, I recommend looking at FXBlurView .
The main advantage of 7-ki in terms of bluer is the high speed. For example, you can watch a video and at the same time, a panel with volume control will bluetooth in real time without any lags.
So, ways to implement fast blues in iOS 7.
The idea is pretty simple. Since UIToolbar has transparency, you can take and use its layer as a background.
The approach is good, it works stably and is very simple.
There is already a ready-made implementation called iOS-blur (available through CocoaPods).
If the task is to make up a tricky bluer, then you have to take the background yourself and blur it.
Fortunately, iOS 7 introduced an extremely fast way to create snapshots. View drawViewHierarchyInRect: afterScreenUpdates .
The picture from the presentation shows that the speed of obtaining a view picture has increased by 15 times!
Use is quite simple ( ready-made implementation ):
In this example, the category UIImage + ImageEffects taken from WWDC and using the power of the Accelerate Framework is used for the bluer . Of course you can blub and anything else. For example, CIFilter or its private implementation as done in JMIBlurView . The main idea is that from 7-ki you can persuade to use renderInContext , which runs for almost a second and achieve real-time bluer without using shaders.
As an example of the implementation of dynamic bluer, I recommend looking at 7blur .
Blur on iOS7 is very fast and easy to implement. So feel free to use it in your applications without fear of losing performance.
For example, now pop overs, most bars and alerts have a blurry background.
What to do if you want to add bluer to your control, this article will tell.
Blur is different
There are two types of blues: static and dynamic. As the name implies, the first one blurs the content once, and the second is updated at short intervals.
It is not difficult to implement blues. The general scheme is as follows: take a background picture behind the view (for example, using renderInContext ), blur it and set the resulting image as the background view. In the case of dynamic bluer, all of the above actions are performed on a timer. As an example of this approach, I recommend looking at FXBlurView .
The main advantage of 7-ki in terms of bluer is the high speed. For example, you can watch a video and at the same time, a panel with volume control will bluetooth in real time without any lags.
So, ways to implement fast blues in iOS 7.
Layer Theft
The idea is pretty simple. Since UIToolbar has transparency, you can take and use its layer as a background.
UIToolbar *toolbar = [[UIToolbar alloc] initWithFrame:[self bounds]]];
[toolbar setBarTintColor:[UIColor greenColor]];
[self.layer insertSublayer:[self.toolbar layer] atIndex:0];
The approach is good, it works stably and is very simple.
There is already a ready-made implementation called iOS-blur (available through CocoaPods).
Using drawViewHierarchyInRect: afterScreenUpdates
If the task is to make up a tricky bluer, then you have to take the background yourself and blur it.
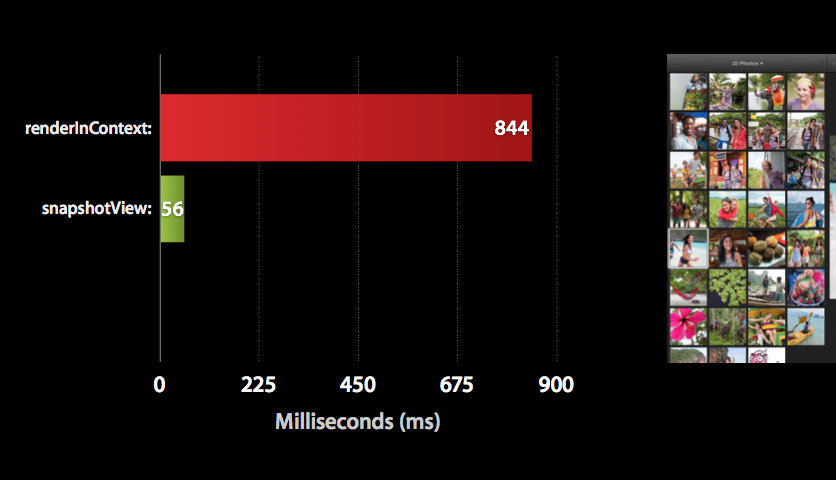
Fortunately, iOS 7 introduced an extremely fast way to create snapshots. View drawViewHierarchyInRect: afterScreenUpdates .
The picture from the presentation shows that the speed of obtaining a view picture has increased by 15 times!
Use is quite simple ( ready-made implementation ):
-(UIImage *)blurredSnapshot
{
    UIGraphicsBeginImageContextWithOptions(self.bounds.size, NO, self.window.screen.scale);
    [self drawViewHierarchyInRect:self.frame afterScreenUpdates:NO];
    UIImage *snapshotImage = UIGraphicsGetImageFromCurrentImageContext();
    UIImage *blurredSnapshotImage = [snapshotImage applyLightEffect];
    UIGraphicsEndImageContext();
    return blurredSnapshotImage;
}
In this example, the category UIImage + ImageEffects taken from WWDC and using the power of the Accelerate Framework is used for the bluer . Of course you can blub and anything else. For example, CIFilter or its private implementation as done in JMIBlurView . The main idea is that from 7-ki you can persuade to use renderInContext , which runs for almost a second and achieve real-time bluer without using shaders.
As an example of the implementation of dynamic bluer, I recommend looking at 7blur .
Conclusion
Blur on iOS7 is very fast and easy to implement. So feel free to use it in your applications without fear of losing performance.