Monitor everything: extending Windows and Linux agents with scripts
- Tutorial
If we need to monitor the status of servers and other computerized workstations using Zabbix, then this can be done in two ways.
The first way is through SNMP requests, which Zabbix does a great job of sending. So you can pull out and load the network interfaces, and load the processor, memory. On top of this, server manufacturers can give us a lot of information about the state of iron via SNMP.
The second is to use the Zabbix agent , which we will run on the observed system. Listobserved parameters includes simple things like CPU loading, memory usage, as well as trickier ones, such as reading text log files with rotation support or tracking the fact of changing any file. You can even use the output of any arbitrary command on the system as a parameter. Zabbix agent features grow from version to version.
What to do if what we want to control through Zabbix is not in the list of Zabbix agent features? Wait until the developers implement it in the next release? Not necessary.
We were left with several standard interfaces in order to expand the capabilities of Zabbix to monitor servers as much as our imagination and the availability of free time for writing scripts allow us. The interfaces are UserParameter and zabbix_sender. The first one will be discussed, and as examples, it will be shown how you can collect the status of SMART hard drives and control when someone uninstalls or installs new programs on their Windows machine.
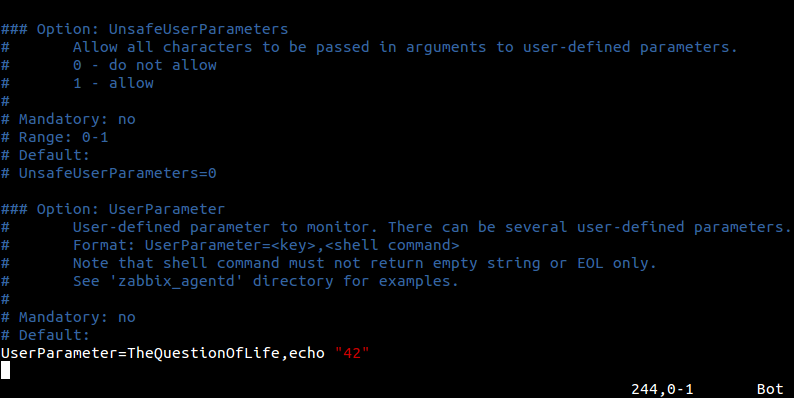
If you have already set up Zabbix agent on the server at least once, then it will not be difficult to start using UserParameter . To add a new parameter, you need to do several things:
<key> is a unique name that we come up with ourselves. We will use it when setting up a data item in Zabbix.
<command> is the command to be executed on the monitored host .
And here is a very simple example, which lies in every standard config for Linux:
So, the key is system.test , and we execute the who | wc -l , which returns the number of open sessions in the system. Add (or uncomment this line if you already have it), move on.
To do this, click "Create data item"
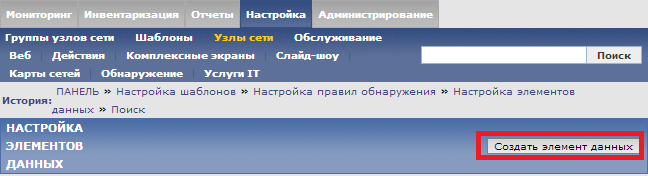
and then set the key to the same as specified in the config file, and the type of Zabbix agent:

We observe the result in the latest data :

The example above has little practical use, given that there is already a standard key system.users.num that does exactly the same thing.
So now let's look at an example that already looks more realistic.
If we are interested in monitoring the moment when it is time to plan to change the hard drives, then there are two options:
On Debian, installing SMARTMONTOOLS boils down to:
and the utility is ready to use.
For each drive that is on the system, first check that SMART is enabled:
if suddenly SMART is supported by the drive, but is turned off, then activate it:
Now we can check the status of SMART with the command:
This is the command we will write in our zabbix_agentd.conf:
where uHDD.health is the key.
This raises the reasonable question of what to do if there are two disks. The easiest way to solve this problem will be the ability of UserParameter to pass parameters to an agent, which we have not mentioned yet. But everything is done very simply, immediately an example:
In the Zabbix web interface, in the key, we will substitute the parameters in square brackets instead of *. For example, for one data item we write sda , and for another sdb . In the command, this parameter will be reflected where the variable $ 1 stands .
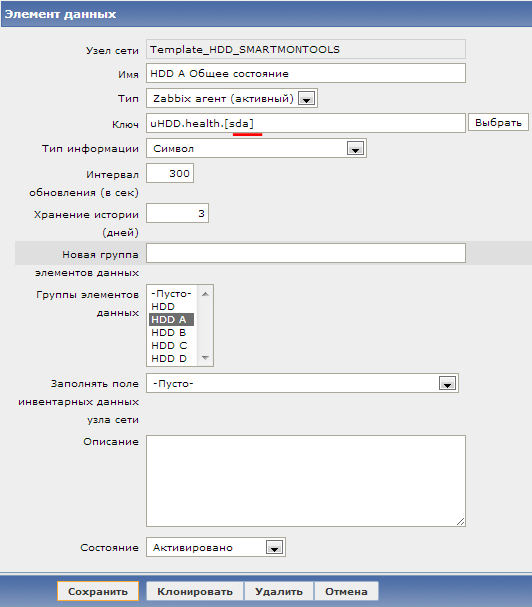
Let's create a data element for the second disk :

And after a while we can observe the result in the latest data:

Everything worked out. But here a reasonable question arises, what if the disks are not two, but twenty-two. And here we come in handy a wonderful opportunity for low-level detection (LLD), which we have already talked about .
Low-level detection allows the monitoring system to detect how many same-type elements are present on the network node and dynamically create the necessary data elements, triggers and graphs by templatefor these elements. Out of the box, the system has the ability to find file systems, network interfaces, and SNMP OIDs. However, here the developers left the opportunity to supplement the standard features, you just need to transfer information to the system about which elements are found in the JSON format. We will use this.
Create a small perl script, smartctl-disks-discovery.pl . It will find all the disks in the system and output this information in JSON, also transmitting information whether the drive has SMART enabled or not, and also tries to turn on SMART itself if it is turned off:
When launched, the script produces:
Now, in order for the script to be automatically launched by Zabbix, we simply add one more UserParameter to zabbix_agentd.conf :
Having finished configuring, we go to the web interface, where we create a new discovery rule for smartctl:
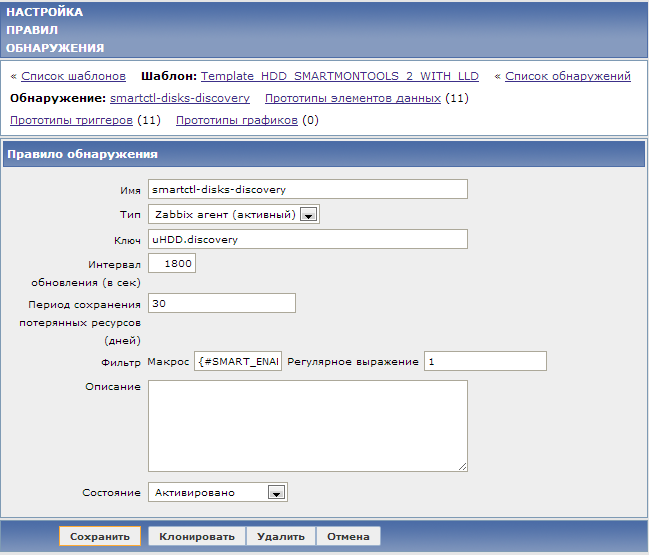
Pay attention to the key and the filter , ({#SMART_ENABLED} = 1) thanks to the latter, only those detected drives that support SMART will be added. Now we can rewrite our two data elements for sda and sdb disks into one prototype data element, simply replacing the disk name with the macro {#DISKNAME}:

Last, before Zabbix can run the commands that we specified in zabbix_agentd.conf from root and monitor SMART, you need to add permissions for his user to run this command without entering a password, for this we add the line to / etc / sudoers:
I apply the finished template for SMART monitoring with the rest of the data elements, using the triggers, as well as the config configured for it.
Zabbix agent installed on Windows can also be expanded via UserParameter , only the commands will be different. Although, for example, smartctl is a cross-platform utility, it can also be used to control hard drives in Windows.
Let us briefly consider another example. The task is to receive a notification every time a user uninstalls or installs programs on his own.
To do this, we will use our vbs script:
To integrate it with Zabbix, add a UserParameter to the config file:
Add a data element to the template for Windows:

Add a trigger :
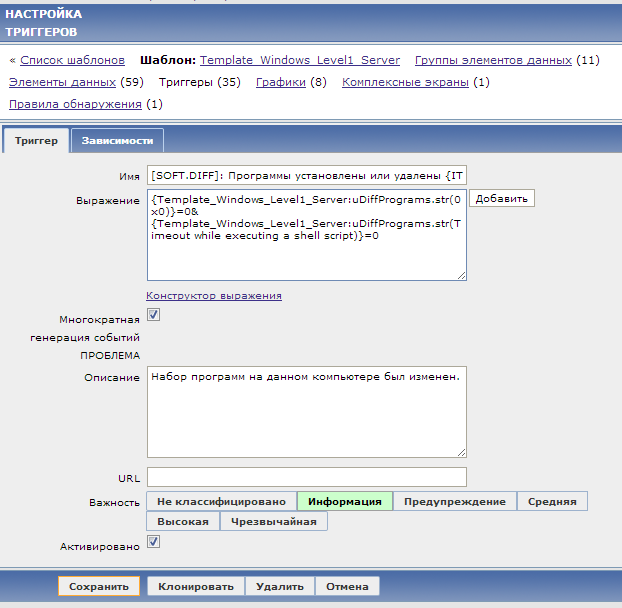
and an action that will send an e-mail notification:

The whole monitoring process looks like this: every hour the Zabbix script is launched by an agent that compares two lists of programs: the current and the previous. Then the script writes all the changes to a separate file. If there are no changes, then 0x0 is written to the file. The
contents of the file go to the Zabbix server, where the trigger is raised if the value of the uDiffProgramms data element is different from 0x0. Then a separate action sends a notification by mail with a list of what was installed or removed on this computer:

UserParameter is a great and easy way to expand the functionality of the system yourself. It is worth mentioning alternatives: zabbix_sender, which, for example, is suitable for those cases when you need to send data to Zabbix not according to a schedule (as UserParameter does ), but according to some event; and system.run [] , which is similar to UserParameter , but more convenient in that you do not need to make changes to all agent configs, just add this data item to the template. Moreover, in the next major release of Zabbix 2.2, another new way to expand the capabilities of the agent awaits us is plug-ins . Look forward to!
So, consider that if you can learn something about the system with a script or command, then you can always pass this to Zabbix.
The first way is through SNMP requests, which Zabbix does a great job of sending. So you can pull out and load the network interfaces, and load the processor, memory. On top of this, server manufacturers can give us a lot of information about the state of iron via SNMP.
The second is to use the Zabbix agent , which we will run on the observed system. Listobserved parameters includes simple things like CPU loading, memory usage, as well as trickier ones, such as reading text log files with rotation support or tracking the fact of changing any file. You can even use the output of any arbitrary command on the system as a parameter. Zabbix agent features grow from version to version.
What to do if what we want to control through Zabbix is not in the list of Zabbix agent features? Wait until the developers implement it in the next release? Not necessary.
We were left with several standard interfaces in order to expand the capabilities of Zabbix to monitor servers as much as our imagination and the availability of free time for writing scripts allow us. The interfaces are UserParameter and zabbix_sender. The first one will be discussed, and as examples, it will be shown how you can collect the status of SMART hard drives and control when someone uninstalls or installs new programs on their Windows machine.
A bit of materiel
If you have already set up Zabbix agent on the server at least once, then it will not be difficult to start using UserParameter . To add a new parameter, you need to do several things:
- Add a line of the form at the end of the configuration file zabbix_agentd.conf
UserParameter=<ключ>,<команда><key> is a unique name that we come up with ourselves. We will use it when setting up a data item in Zabbix.
<command> is the command to be executed on the monitored host .
And here is a very simple example, which lies in every standard config for Linux:
UserParameter=system.test,who|wc -lSo, the key is system.test , and we execute the who | wc -l , which returns the number of open sessions in the system. Add (or uncomment this line if you already have it), move on.
- In the Zabbix Web console, create a new data item with the key that we used, if we take the example above, then this is system.test.
To do this, click "Create data item"
and then set the key to the same as specified in the config file, and the type of Zabbix agent:
- Restart Zabbix agent for the changes in the config file to take effect
We observe the result in the latest data :
SMART monitoring through UserParameter
The example above has little practical use, given that there is already a standard key system.users.num that does exactly the same thing.
So now let's look at an example that already looks more realistic.
If we are interested in monitoring the moment when it is time to plan to change the hard drives, then there are two options:
- If the disks are behind the hardware RAID controller, then, as a rule, the operating system does not “see” the disks themselves. Therefore, we are looking for ways to get information about the status of hard drives through utilities or an SNMP sub-agent, which we kindly provided (or did not provide) with the manufacturer of the RAID controller. For each individual series of controllers, its own path to this information.
- If we are talking about just workstations, servers with software RAID, etc., then there is access to the disks from the operating system, and we are free to use various utilities to read their status. In the case of Zabbix , the smartctl utility from the SMARTMONTOOLS package is suitable for us.
On Debian, installing SMARTMONTOOLS boils down to:
sudo apt-get install smartmontoolsand the utility is ready to use.
For each drive that is on the system, first check that SMART is enabled:
sudo smartctl -i /dev/sda | grep SMART
SMART support is: Available - device has SMART capability.
SMART support is: Enabled
if suddenly SMART is supported by the drive, but is turned off, then activate it:
sudo smartctl -s on -S on -o on /dev/sda
smartctl version 5.37 [i686-pc-linux-gnu] Copyright (C) 2002-6 Bruce Allen
Home page is http://smartmontools.sourceforge.net/
=== START OF ENABLE/DISABLE COMMANDS SECTION ===
SMART Enabled.
SMART Attribute Autosave Enabled.
SMART Automatic Offline Testing Enabled every four hours.
Now we can check the status of SMART with the command:
sudo smartctl -H /dev/sda |grep "test"| cut -f2 -d: |tr -d " "This is the command we will write in our zabbix_agentd.conf:
UserParameter=uHDD.health,sudo smartctl -H /dev/sda |grep "test"| cut -f2 -d: |tr -d " "where uHDD.health is the key.
SMART monitoring through Flexible UserParameter
This raises the reasonable question of what to do if there are two disks. The easiest way to solve this problem will be the ability of UserParameter to pass parameters to an agent, which we have not mentioned yet. But everything is done very simply, immediately an example:
UserParameter=uHDD.health.[*],sudo smartctl -H /dev/$1 |grep "test"| cut -f2 -d: |tr -d " "In the Zabbix web interface, in the key, we will substitute the parameters in square brackets instead of *. For example, for one data item we write sda , and for another sdb . In the command, this parameter will be reflected where the variable $ 1 stands .
Let's create a data element for the second disk :
And after a while we can observe the result in the latest data:
SMART monitoring through Flexible UserParameter with Low-level Discovery
Everything worked out. But here a reasonable question arises, what if the disks are not two, but twenty-two. And here we come in handy a wonderful opportunity for low-level detection (LLD), which we have already talked about .
Low-level detection allows the monitoring system to detect how many same-type elements are present on the network node and dynamically create the necessary data elements, triggers and graphs by templatefor these elements. Out of the box, the system has the ability to find file systems, network interfaces, and SNMP OIDs. However, here the developers left the opportunity to supplement the standard features, you just need to transfer information to the system about which elements are found in the JSON format. We will use this.
Create a small perl script, smartctl-disks-discovery.pl . It will find all the disks in the system and output this information in JSON, also transmitting information whether the drive has SMART enabled or not, and also tries to turn on SMART itself if it is turned off:
#!/usr/bin/perl#must be run as root
$first = 1;
print"{\n";
print"\t\"data\":[\n\n";
for (`ls -l /dev/disk/by-id/ | cut -d"/" -f3 | sort -n | uniq -w 3`) {
    #DISK LOOP
    $smart_avail=0;
    $smart_enabled=0;
    $smart_enable_tried=0;
    #next when total 0 at outputif ($_ eq "total 0\n") {
        next;
    }
    print"\t,\n"ifnot $first;
    $first = 0;
    $disk =$_;
    chomp($disk);
    #SMART STATUS LOOPforeach(`smartctl -i /dev/$disk | grep SMART`) {
        $line=$_;
        # if SMART available -> continueif ($line = /Available/){
            $smart_avail=1;
            next;
        }
        #if SMART is disabled then try to enable it (also offline tests etc)if ($line = /Disabled/ & $smart_enable_tried == 0){
            foreach(`smartctl -i /dev/$disk -s on -o on -S on | grep SMART`) {
                if (/SMART Enabled/){
                    $smart_enabled=1;
                    next;
                }
            }
            $smart_enable_tried=1;
        }
        if ($line = /Enabled/){
            $smart_enabled=1;
        }
    }
    print"\t{\n";
    print"\t\t\"{#DISKNAME}\":\"$disk\",\n";
    print"\t\t\"{#SMART_ENABLED}\":\"$smart_enabled\"\n";
    print"\t}\n";
}
print"\n\t]\n";
print"}\n";
When launched, the script produces:
$ /usr/local/bin/smartctl-disks-discovery.pl
{
"data":[
    {
        "{#DISKNAME}":"md0",
        "{#SMART_ENABLED}":"0"
    },
    {
        "{#DISKNAME}":"md1",
        "{#SMART_ENABLED}":"0"
    },
    {
        "{#DISKNAME}":"sda",
        "{#SMART_ENABLED}":"1"
    },
    {
        "{#DISKNAME}":"sdb",
        "{#SMART_ENABLED}":"1"
    }]
}
Now, in order for the script to be automatically launched by Zabbix, we simply add one more UserParameter to zabbix_agentd.conf :
UserParameter=uHDD.discovery,sudo /usr/local/bin/smartctl-disks-discovery.plHaving finished configuring, we go to the web interface, where we create a new discovery rule for smartctl:
Pay attention to the key and the filter , ({#SMART_ENABLED} = 1) thanks to the latter, only those detected drives that support SMART will be added. Now we can rewrite our two data elements for sda and sdb disks into one prototype data element, simply replacing the disk name with the macro {#DISKNAME}:
Last, before Zabbix can run the commands that we specified in zabbix_agentd.conf from root and monitor SMART, you need to add permissions for his user to run this command without entering a password, for this we add the line to / etc / sudoers:
zabbix ALL= (ALL) NOPASSWD: /usr/sbin/smartctl,/usr/local/bin/smartctl-disks-discovery.plI apply the finished template for SMART monitoring with the rest of the data elements, using the triggers, as well as the config configured for it.
Control over the installation of new programs on Windows
Zabbix agent installed on Windows can also be expanded via UserParameter , only the commands will be different. Although, for example, smartctl is a cross-platform utility, it can also be used to control hard drives in Windows.
Let us briefly consider another example. The task is to receive a notification every time a user uninstalls or installs programs on his own.
To do this, we will use our vbs script:
uDiffPrograms.vbs
'KNOWN ISSUE: If Application name conatins '-' symbol then e-mail alert containing software list will be sent all on one line instead of each packet on a single line
variable=InstalledApplications(".")
'WScript.Echo strConvert(variable,"Windows-1251","cp866")Const ForReading = 1
zabbix_dir="C:\zabbix\"Set objFSO = CreateObject("Scripting.FileSystemObject")
'Create old file if does not existIf objFSO.FileExists(zabbix_dir&"uDiffPrograms_old.txt")=0ThenSet objFile4 = objFSO.CreateTextFile(zabbix_dir&"uDiffPrograms_old.txt")
objFile4.WriteLine variable
objFile4.Close
Call ConvertCharsetFile("0x0")
WScript.Quit
Endif'Create 'new' fileSet objFile3 = objFSO.CreateTextFile(zabbix_dir&"uDiffPrograms_new.txt")
objFile3.WriteLine variable
objFile3.Close
'Compare old and new filesSet objArgs = Wscript.Arguments
Set objFile5= objFSO.GetFile(zabbix_dir&"uDiffPrograms_new.txt")
Set objFile6 = objFSO.GetFile(zabbix_dir&"uDiffPrograms_old.txt")
If objFile5.Size <> objFile6.Size Then' Wscript.Echo "The file is different."Else'Wscript.Echo "They are the same."
objFSO.DeleteFile zabbix_dir&"uDiffPrograms_new.txt"Call ConvertCharsetFile("0x0")
WScript.Quit
EndIf'Search for removed applicationsSet objFile2 = objFSO.OpenTextFile(zabbix_dir&"uDiffPrograms_old.txt", ForReading)
Do Until objFile2.AtEndOfStream
strAddress2 = objFile2.ReadLine
IfInStr(variable, strAddress2&vbCrLf) = 0Then
strNotCurrent2 = strNotCurrent2 & strAddress2 & vbCrLf
EndIfLoop
objFile2.Close
'Search for installed applicationsSet objFile1 = objFSO.OpenTextFile(zabbix_dir&"uDiffPrograms_old.txt", ForReading)
oldvar = objFile1.ReadAll
objFile1.Close
objFSO.DeleteFile zabbix_dir&"uDiffPrograms_old.txt"Set objFile2 = objFSO.OpenTextFile(zabbix_dir&"uDiffPrograms_new.txt", ForReading)
Do Until objFile2.AtEndOfStream
strAddress = objFile2.ReadLine
IfInStr(oldvar, strAddress&vbCrLf) = 0Then
strNotCurrent = strNotCurrent & strAddress & vbCrLf
EndIfLoop
objFile2.Close
'Rename C:\zabbix\uDiffPrograms_new.txt to C:\zabbix\uDiffPrograms_old.txt
objFSO.MoveFile zabbix_dir&"uDiffPrograms_new.txt" , zabbix_dir&"uDiffPrograms_old.txt"'Outputif strNotCurrent <> ""and strNotCurrent2 <> ""thenCall ConvertCharsetFile("Новые программы были установлены:" & vbCrLf & strNotCurrent & vbCrLf & "Следующие программы были удалены:" & vbCrLf & strNotCurrent2)
Wscript.Quit
Endifif strNotCurrent <> ""thenCall ConvertCharsetFile("Новые программы были установлены:" & vbCrLf & strNotCurrent)
Endifif strNotCurrent2 <> ""thenCall ConvertCharsetFile("Следующие программы были удалены:" & vbCrLf & strNotCurrent2)
EndIfFunction InstalledApplications(node)
'''with VersionsConst HKLM = &H80000002 'HKEY_LOCAL_MACHINESet oRegistry = GetObject("winmgmts://" _
& node & "/root/default:StdRegProv")
sBaseKey = _
"SOFTWARE\Microsoft\Windows\CurrentVersion\Uninstall\"
iRC = oRegistry.EnumKey(HKLM, sBaseKey, arSubKeys)
ForEach sKey In arSubKeys
iRC = oRegistry.GetStringValue( _
HKLM, sBaseKey & sKey, "DisplayName", sValue)
If iRC <> 0Then
oRegistry.GetStringValue _
HKLM, sBaseKey & sKey, "QuietDisplayName", sValue
EndIfIf sValue <> ""andinstr(sValue, "KB")=0Then'instr(sValue, "KB")=0 - to exlude KB-indexed Microsoft PatchesIfinstr(InstalledApplications, sValue&vbCrLf)=0then'and instr(InstalledApplications, sValue&vbCrLf)=0 - to exlude possible dublicates
InstalledApplications = _
InstalledApplications & sValue & vbCrLf
EndIfEndIfNextEndFunctionFunction ConvertCharsetFile(input)
Const adTypeBinary = 1Const adTypeText = 2Const bOverwrite = TrueConst bAsASCII = False'Write to temp fileSet objFSO = CreateObject("Scripting.FileSystemObject")
If objFSO.FileExists( zabbix_dir&"uDiffPrograms_temp.txt" ) Then objFSO.DeleteFile zabbix_dir&"uDiffPrograms_temp.txt"Set objFile3 = objFSO.CreateTextFile(zabbix_dir&"uDiffPrograms_temp.txt")
objFile3.WriteLine input
objFile3.Close
Dim oFS : Set oFS = CreateObject( "Scripting.FileSystemObject" )
Dim sFFSpec : sFFSpec = oFS.GetAbsolutePathName( zabbix_dir&"uDiffPrograms_temp.txt" )
Dim oFrom : Set oFrom = CreateObject( "ADODB.Stream" )
Dim sFrom : sFrom = "windows-1251"Dim oTo : Set oTo = CreateObject( "ADODB.Stream" )
Dim sTo : sTo = "utf-8"
oFrom.Type = adTypeText
oFrom.Charset = sFrom
oFrom.Open
oFrom.LoadFromFile sFFSpec
oTo.Type = adTypeText
oTo.Charset = sTo
oTo.Open
oTo.WriteText oFrom.ReadText
oFrom.Close
If oFS.FileExists( sFFSpec ) Then oFS.DeleteFile sFFSpec
oTo.SaveToFile sFFSpec
oTo.Close
EndFunction'=============================================================================
To integrate it with Zabbix, add a UserParameter to the config file:
UserParameter=uDiffPrograms, cscript.exe /nologo "C:\zabbix\uDiffPrograms.vbs" & type C:\zabbix\uDiffPrograms_temp.txtAdd a data element to the template for Windows:
Add a trigger :
and an action that will send an e-mail notification:
The whole monitoring process looks like this: every hour the Zabbix script is launched by an agent that compares two lists of programs: the current and the previous. Then the script writes all the changes to a separate file. If there are no changes, then 0x0 is written to the file. The
contents of the file go to the Zabbix server, where the trigger is raised if the value of the uDiffProgramms data element is different from 0x0. Then a separate action sends a notification by mail with a list of what was installed or removed on this computer:
Eventually
UserParameter is a great and easy way to expand the functionality of the system yourself. It is worth mentioning alternatives: zabbix_sender, which, for example, is suitable for those cases when you need to send data to Zabbix not according to a schedule (as UserParameter does ), but according to some event; and system.run [] , which is similar to UserParameter , but more convenient in that you do not need to make changes to all agent configs, just add this data item to the template. Moreover, in the next major release of Zabbix 2.2, another new way to expand the capabilities of the agent awaits us is plug-ins . Look forward to!
So, consider that if you can learn something about the system with a script or command, then you can always pass this to Zabbix.