AndEngine GLES2 - Live Wallpaper
- Tutorial
Last winter (most likely on a sunny day :) I became interested in the AndEngine graphics library, because I wanted to work with two-dimensional graphics on a mobile phone (using OpenGL), and this solution seemed to me the most interesting and affordable. Having made several graphical applications, I decided to create live wallpapers, especially since a special library comes with AndEngine for creating such ones. Now I will share my experience in creating live wallpapers with you.
Especially for this, I prepared a project (has abundant comments), a "template" to show the principle of operation of live wallpaper.

Training
First of all, you need to install AndEngine itself and, in particular, the AndEngineLiveWallpaperExtension library (I recommend immediately installing all available libraries) since it will be the base. Since this article is not a basic one for studying AndEngine, I will not tell you how to install libraries, especially since you can easily find this information, for example, here - http://www.matim-dev.com/how-to-setup-andengine .html . Now you need to open the attached project and start it. If it does not start immediately, then most likely you need to check the connected libraries to the project. As a result, you should get something like this - http://youtu.be/HRKzBma9vz0
Functional
And now briefly and in order (most of the functionality also applies to all other AndEngine GLES2 applications). The ancestor of the main class of the project is “BaseLiveWallpaperService”, it is this class that is responsible for all work with GLES2. Required to override are the functions:
public void onSurfaceChanged (final GLState pGLState, final int pWidth, final int pHeight) - a function for determining the screen size and setting the camera.
public EngineOptions onCreateEngineOptions () - function for setting the operation of the live wallpaper engine. This function returns to the system the selected parameters for GLES2 configuration.
public void onCreateResources (OnCreateResourcesCallback pOnCreateResourcesCallback) - as the name implies, this function is designed to create all (media) resources that will participate in the application.
public void onCreateScene (OnCreateSceneCallback pOnCreateSceneCallback) - the function of creating a scene and placing all the desired objects on it.
Download Testing
Texture loading takes place in three stages: determining the atlas; texture definition; loading texture into the atlas. Consider them using the background loading example:
The first line defines the size for the texture atlas. It is necessary to determine in advance which textures and in what order will be located on this atlas and calculate its size. If it is incorrect to calculate the position of the textures in the atlas or make it smaller than the required size, the program will not work correctly. In our case, the atlas will contain only one image (sprite) and therefore the size of the atlas will be equal to the size of the image.
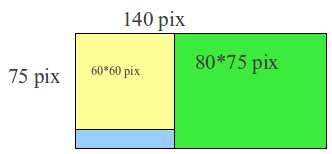
If you need to upload two pictures (sprite) or more, then the size of the atlas will have to be calculated. For example: We want to upload two pictures 60 * 60 and 80 * 75 pixels in size. To find the width of the atlas, add the width of the first and second pictures, we get 140. In this case, the height of the atlas should equal the largest of these pictures. If necessary, the layout of the atlas can be of any complexity, everything is limited only by the imagination of the programmer and the maximum size (2048 * 2048).

The second line defines the object through which in the future you can get the texture of interest. The arguments of the constructor are as follows: atlas for storing texture; context; texture location address; X coordinate, starting from which the texture is located; Y coordinate, starting at which the texture is located. All textures should be stored in the gfx park ( project / assets / gfx ).
The third line contains the loader itself, with the help of which all the graphics are loaded into the atlas.
Scene creation
The scene is created with just one line - mScene = new Scene (), then the most interesting thing happens - the placement of all the necessary objects on the scene. The main building unit of all applications built using AndEngine are sprites (since the library works exclusively with two-dimensional objects). Consider the example of creating a simple sprite:
The first line creates a sprite. The constructor has the following arguments: position on the scene along the X axis; position on the scene along the Y axis; texture object; buffer manager. The second line redefines the size of the sprite, by default it is equal to the size of the texture. The third line redefines the position of the sprite on the screen. In the fourth line, the sprite is directly added to the screen.
If you look at the code of the attached example, you will notice that the Sun class is defined in it. He is a descendant of the Sprite class. In this class, the animation logic of the object is written, which consists in rotating the object relative to its center.
The LiveWallpapperSettings class is also defined, which is responsible for setting up live wallpapers. Since this is a fairly standard thing, I will not describe the logic of the settings (you can easily find the information of interest in Yandex or other search engines).
Conclusion The
library is very easy to use and functional. Its main drawback is the freezing mechanism, which works when the wallpaper is hidden and does not always turn off when they continue to be displayed. This minus is clearly visible when the wallpapers have a relatively large number of sprites on the scene (as for example here - https://play.google.com/store/apps/details?id=com.livewallpaper.summermeado_wfull ). If someone has solved the problem with freezing, please share the solution.
I intentionally did not inflate the example and add the maximum amount of functionality to show that graphical applications for Android are quick and easy.
Have a nice test!
Live Wallpaper Project - http://www.anprog.com/documents/AE_gles2_LiveWallpaper.zip
Especially for this, I prepared a project (has abundant comments), a "template" to show the principle of operation of live wallpaper.

Training
First of all, you need to install AndEngine itself and, in particular, the AndEngineLiveWallpaperExtension library (I recommend immediately installing all available libraries) since it will be the base. Since this article is not a basic one for studying AndEngine, I will not tell you how to install libraries, especially since you can easily find this information, for example, here - http://www.matim-dev.com/how-to-setup-andengine .html . Now you need to open the attached project and start it. If it does not start immediately, then most likely you need to check the connected libraries to the project. As a result, you should get something like this - http://youtu.be/HRKzBma9vz0
Functional
And now briefly and in order (most of the functionality also applies to all other AndEngine GLES2 applications). The ancestor of the main class of the project is “BaseLiveWallpaperService”, it is this class that is responsible for all work with GLES2. Required to override are the functions:
onSurfaceChanged
onCreateEngineOptions
onCreateResources
onCreateScene
public void onSurfaceChanged (final GLState pGLState, final int pWidth, final int pHeight) - a function for determining the screen size and setting the camera.
public EngineOptions onCreateEngineOptions () - function for setting the operation of the live wallpaper engine. This function returns to the system the selected parameters for GLES2 configuration.
public void onCreateResources (OnCreateResourcesCallback pOnCreateResourcesCallback) - as the name implies, this function is designed to create all (media) resources that will participate in the application.
public void onCreateScene (OnCreateSceneCallback pOnCreateSceneCallback) - the function of creating a scene and placing all the desired objects on it.
Download Testing
Texture loading takes place in three stages: determining the atlas; texture definition; loading texture into the atlas. Consider them using the background loading example:
this.mOnScreenControlTexture0 = new BitmapTextureAtlas(this.getTextureManager(), 1930, 1050, TextureOptions.BILINEAR_PREMULTIPLYALPHA);
this.bg_TextureRegion = BitmapTextureAtlasTextureRegionFactory.createFromAsset(this.mOnScreenControlTexture0,this,"gfx/bg.jpg", 0, 0);
this.getEngine().getTextureManager().loadTexture(this.mOnScreenControlTexture0);
The first line defines the size for the texture atlas. It is necessary to determine in advance which textures and in what order will be located on this atlas and calculate its size. If it is incorrect to calculate the position of the textures in the atlas or make it smaller than the required size, the program will not work correctly. In our case, the atlas will contain only one image (sprite) and therefore the size of the atlas will be equal to the size of the image.
If you need to upload two pictures (sprite) or more, then the size of the atlas will have to be calculated. For example: We want to upload two pictures 60 * 60 and 80 * 75 pixels in size. To find the width of the atlas, add the width of the first and second pictures, we get 140. In this case, the height of the atlas should equal the largest of these pictures. If necessary, the layout of the atlas can be of any complexity, everything is limited only by the imagination of the programmer and the maximum size (2048 * 2048).

The second line defines the object through which in the future you can get the texture of interest. The arguments of the constructor are as follows: atlas for storing texture; context; texture location address; X coordinate, starting from which the texture is located; Y coordinate, starting at which the texture is located. All textures should be stored in the gfx park ( project / assets / gfx ).
The third line contains the loader itself, with the help of which all the graphics are loaded into the atlas.
Scene creation
The scene is created with just one line - mScene = new Scene (), then the most interesting thing happens - the placement of all the necessary objects on the scene. The main building unit of all applications built using AndEngine are sprites (since the library works exclusively with two-dimensional objects). Consider the example of creating a simple sprite:
bg = new Sprite(0, 0, this.bg_TextureRegion, getVertexBufferObjectManager());
bg.setSize(bg.getWidth() * 2, bg.getHeight() * 2);
bg.setPosition(10, 20);
mScene.attachChild(bg);
The first line creates a sprite. The constructor has the following arguments: position on the scene along the X axis; position on the scene along the Y axis; texture object; buffer manager. The second line redefines the size of the sprite, by default it is equal to the size of the texture. The third line redefines the position of the sprite on the screen. In the fourth line, the sprite is directly added to the screen.
If you look at the code of the attached example, you will notice that the Sun class is defined in it. He is a descendant of the Sprite class. In this class, the animation logic of the object is written, which consists in rotating the object relative to its center.
The LiveWallpapperSettings class is also defined, which is responsible for setting up live wallpapers. Since this is a fairly standard thing, I will not describe the logic of the settings (you can easily find the information of interest in Yandex or other search engines).
Conclusion The
library is very easy to use and functional. Its main drawback is the freezing mechanism, which works when the wallpaper is hidden and does not always turn off when they continue to be displayed. This minus is clearly visible when the wallpapers have a relatively large number of sprites on the scene (as for example here - https://play.google.com/store/apps/details?id=com.livewallpaper.summermeado_wfull ). If someone has solved the problem with freezing, please share the solution.
I intentionally did not inflate the example and add the maximum amount of functionality to show that graphical applications for Android are quick and easy.
Have a nice test!
Live Wallpaper Project - http://www.anprog.com/documents/AE_gles2_LiveWallpaper.zip
