ActionBar on Android 2.1+ using the Support Library. Part 3 - Useful Features
- Tutorial
Good day to all!
Hmm, for a long time I did not write articles on Habr. Well, I will correct this matter.
In general, the ActionBar in Android is a pretty complicated thing. In the first and second parts, I examined only its main functions - the menu and navigation. But there are many additional ones: Split ActionBar, custom View for the menu item and ActionProvider. About them and will be discussed. In addition, a bonus: many people know that the Up button serves to go to the previous Activity. But if the screen can be accessed only from one other Activity, then you can not code the transition up. Are you intrigued? I ask for cat.
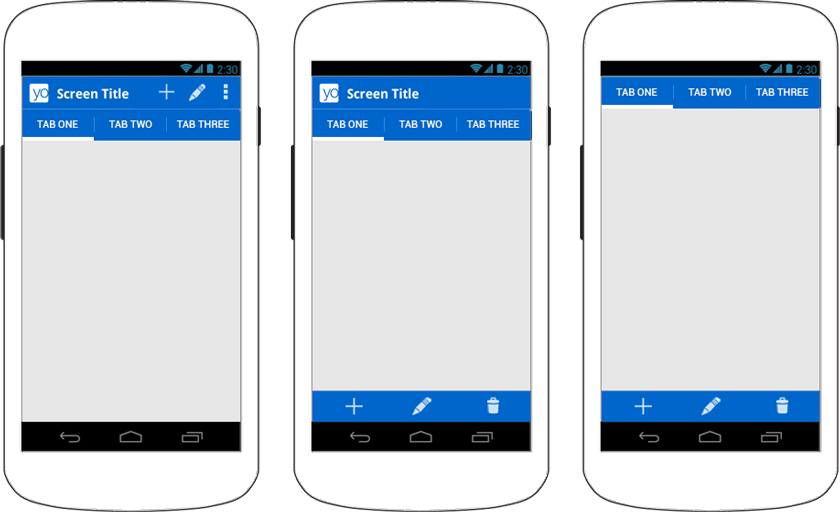
Split ActionBar is a bar at the bottom of the screen with menu items. It can be used if the ActionBar is mostly out of space (in the middle) or missing (on the right). Adding it is easy: just add the following lines for the Activity or the entire application in the manifest file:
To remove the top ActionBar (as in the figure on the right), you need to call the ActionBar methods setDisplayShowHomeEnabled (false) and setDisplayShowTitleEnabled (false) .
By default, the menu item looks like a picture (icon). There are two ways to change it:
-Add the actionLayout attribute to the tag. It accepts a link to the layout file
as an input. -Add the actionViewClass attribute for the tag where to write the name of the class, the inheritor of the View, to use instead of the standard view
Older versions of the android namespace do not have these attributes, so you need to use the Support Library namespace - for this, add the line xmlns: yourapp = " schemas.android.com/apk/res-auto " and use the yourapp: actionViewClass attribute . You can programmatically change the layout of MenuItem by using the methods MenuItemCompat setActionView (MenuItem item, int resId) and setActionView (MenuItem item, View view) , get the current View - getActionView (MenuItem item) .
One example of an ActionView is SearchView, which is described in more detail here .
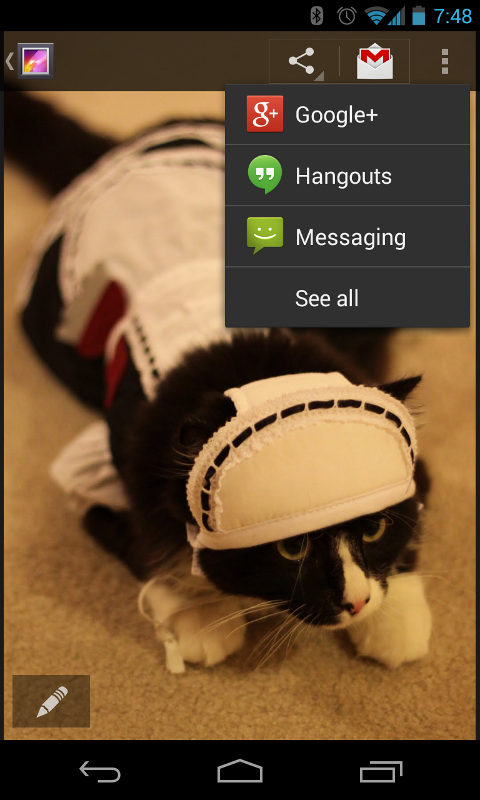
ActionProvider has much in common with ActionView. It also replaces the button with its own layout, but can show a drop-down list and control the behavior of the menu item. To set it for a menu item, it’s enough for the tag to add the attribute actionProviderClass , where to write the address of your class. It should be inherited from ActionProvider and redefine the following methods:
- ActionProvider (Context context) –constructor, takes an input to the context that must be stored in the class field for use in other methods;
- onCreateActionView (MenuItem) - here we create a view for the menu item using LayoutInflater, obtained from the context, and return it;
-onPerformDefaultAction () - called when the user clicks on an item in the ActionBar.
If you use an ActionProvider, you should NOT handle clicking on it in onOptionsItemSelected () , well, or return false there, because otherwise onPerformDefaultAction () will not be called.
If your ActionProvider shows a submenu, then you must override its hasSubMenu () method and return true. Then instead of onPerformDefaultAction (), onPrepareSubMenu (SubMenu subMenu) will be called . There you create or change a submenu.
Android has its own ActionProvider for sending content - ShareActionProvider . When creating a menu with it, you need to get its instance in the onCreateOptionsMenu method using MenuItemCompat.getActionProvider (MenuItem) and call setShareIntent () , where to pass the Intent with ACTION_SEND and the attached content:
Since the content on the screen can change (for example, turning over pictures), you need to call setShareIntent () every time the content changes.
If the screen in the application can be accessed only with ONE other Activity, then it makes sense to configure automatic transition to it by pressing the Up button in ActionBar. It is very simple to do this: add lines in the manifest file for the desired Activity:
Let me remind you that the Home button works like Up; call the SupportActionBar setHomeButtonEnabled (true) and setDisplayHomeAsUpEnabled (true) methods .
All information is taken from here (official guide in English).
Part 1 - Adding a Support Library to a project, a simple example, search
Part 2 - Navigating with tabs and a drop-down list
Hmm, for a long time I did not write articles on Habr. Well, I will correct this matter.
In general, the ActionBar in Android is a pretty complicated thing. In the first and second parts, I examined only its main functions - the menu and navigation. But there are many additional ones: Split ActionBar, custom View for the menu item and ActionProvider. About them and will be discussed. In addition, a bonus: many people know that the Up button serves to go to the previous Activity. But if the screen can be accessed only from one other Activity, then you can not code the transition up. Are you intrigued? I ask for cat.
Split ActionBar
Split ActionBar is a bar at the bottom of the screen with menu items. It can be used if the ActionBar is mostly out of space (in the middle) or missing (on the right). Adding it is easy: just add the following lines for the Activity or the entire application in the manifest file:
//Для API 14+
To remove the top ActionBar (as in the figure on the right), you need to call the ActionBar methods setDisplayShowHomeEnabled (false) and setDisplayShowTitleEnabled (false) .
Actionview
By default, the menu item looks like a picture (icon). There are two ways to change it:
-Add the actionLayout attribute to the tag. It accepts a link to the layout file
as an input. -Add the actionViewClass attribute for the tag where to write the name of the class, the inheritor of the View, to use instead of the standard view
Older versions of the android namespace do not have these attributes, so you need to use the Support Library namespace - for this, add the line xmlns: yourapp = " schemas.android.com/apk/res-auto " and use the yourapp: actionViewClass attribute . You can programmatically change the layout of MenuItem by using the methods MenuItemCompat setActionView (MenuItem item, int resId) and setActionView (MenuItem item, View view) , get the current View - getActionView (MenuItem item) .
One example of an ActionView is SearchView, which is described in more detail here .
Action provider
ActionProvider has much in common with ActionView. It also replaces the button with its own layout, but can show a drop-down list and control the behavior of the menu item. To set it for a menu item, it’s enough for the tag to add the attribute actionProviderClass , where to write the address of your class. It should be inherited from ActionProvider and redefine the following methods:
- ActionProvider (Context context) –constructor, takes an input to the context that must be stored in the class field for use in other methods;
- onCreateActionView (MenuItem) - here we create a view for the menu item using LayoutInflater, obtained from the context, and return it;
-onPerformDefaultAction () - called when the user clicks on an item in the ActionBar.
If you use an ActionProvider, you should NOT handle clicking on it in onOptionsItemSelected () , well, or return false there, because otherwise onPerformDefaultAction () will not be called.
If your ActionProvider shows a submenu, then you must override its hasSubMenu () method and return true. Then instead of onPerformDefaultAction (), onPrepareSubMenu (SubMenu subMenu) will be called . There you create or change a submenu.
ShareActionProvider
Android has its own ActionProvider for sending content - ShareActionProvider . When creating a menu with it, you need to get its instance in the onCreateOptionsMenu method using MenuItemCompat.getActionProvider (MenuItem) and call setShareIntent () , where to pass the Intent with ACTION_SEND and the attached content:
private ShareActionProvider mShareActionProvider;
@Override
public boolean onCreateOptionsMenu(Menu menu) {
    getMenuInflater().inflate(R.menu.main_activity_actions, menu);
    Intent share_intent = new Intent(Intent.ACTION_SEND);
    intent.setType("image/*");
    mShareActionProvider = (ShareActionProvider)  getActionProvider(menu.findItem(R.id.action_share));
    mShareActionProvider.setShareIntent(share_intent);
    return super.onCreateOptionsMenu(menu);
}
Since the content on the screen can change (for example, turning over pictures), you need to call setShareIntent () every time the content changes.
Parent Activity
If the screen in the application can be accessed only with ONE other Activity, then it makes sense to configure automatic transition to it by pressing the Up button in ActionBar. It is very simple to do this: add lines in the manifest file for the desired Activity:
 // Главная Activity
        ...

   ...
     //Для API 16+
Let me remind you that the Home button works like Up; call the SupportActionBar setHomeButtonEnabled (true) and setDisplayHomeAsUpEnabled (true) methods .
For API 11+
If your application only supports Android 3 or higher, then instead of MenuItemCompat methods, use the same ones for MenuItem, instead of SupportActionBar - ActionBar. In addition, all the attributes in the menu will begin with android:, and the line xmlns: yourapp = http: //schemas.android.com/apk/res-auto is not needed.
All information is taken from here (official guide in English).
Part 1 - Adding a Support Library to a project, a simple example, search
Part 2 - Navigating with tabs and a drop-down list