Windows Azure Recovery Services. Part 3: Working with Backup Agent
- Tutorial
Hello! We continue to configure Windows Azure Recovery Services. The last time we stayed at that downloaded the necessary certificates for use with the service. Let's now finally configure the Windows Azure Backup Agent to complete the backup process.
Now that the backup storage has been created, we have created and imported the necessary certificates on the Windows Azure Management Portal and on machines running Windows Server, all that remains for us is to install the Windows Azure Backup Agent on these machines and configure it accordingly.
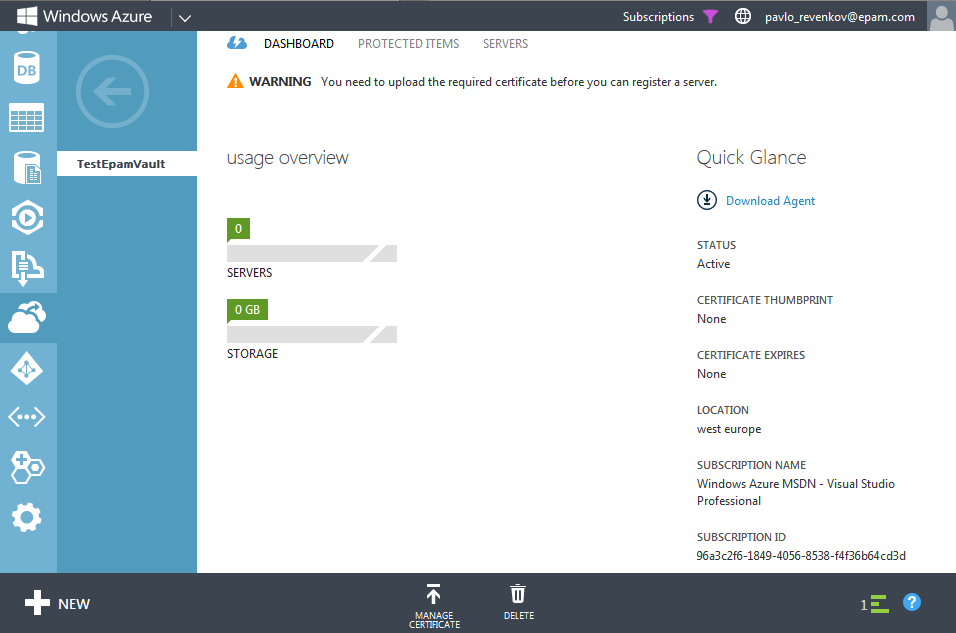
Open the Windows Azure Management Portal and go to the Recovery Services section. After that, select the created backup storage and go to the “Dashboard” tab.
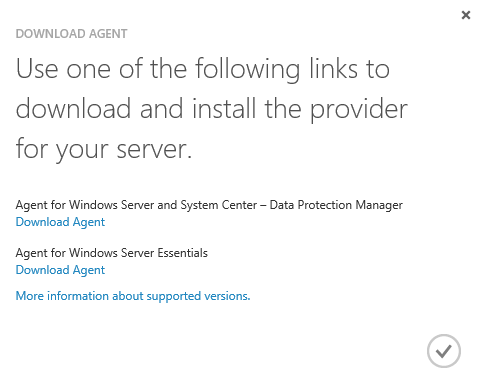
On machines running Windows Server, you must install the Windows Azure Backup Agent. Download it by clicking on the “Download Agent” link. In the window that appears, select the option “Agent for Windows Server and System Center”.
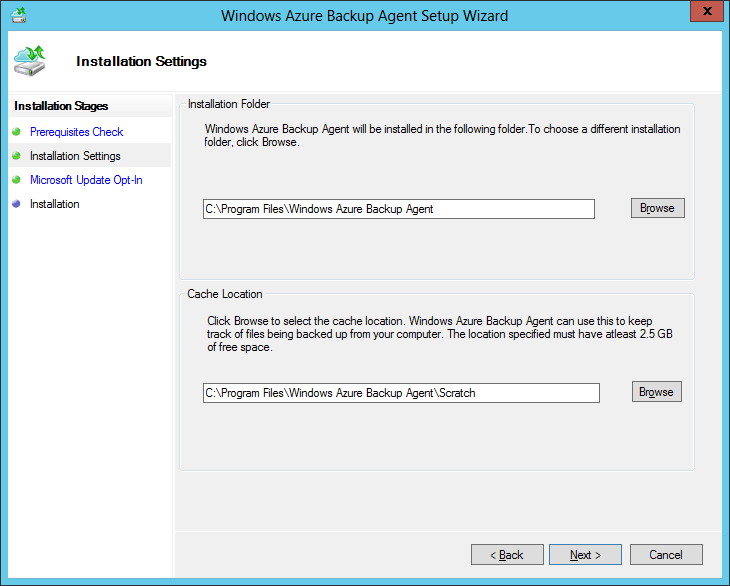
Installing Windows Azure Backup Agent is quite simple, so I will not dwell on it. In most cases, you should leave the default settings.
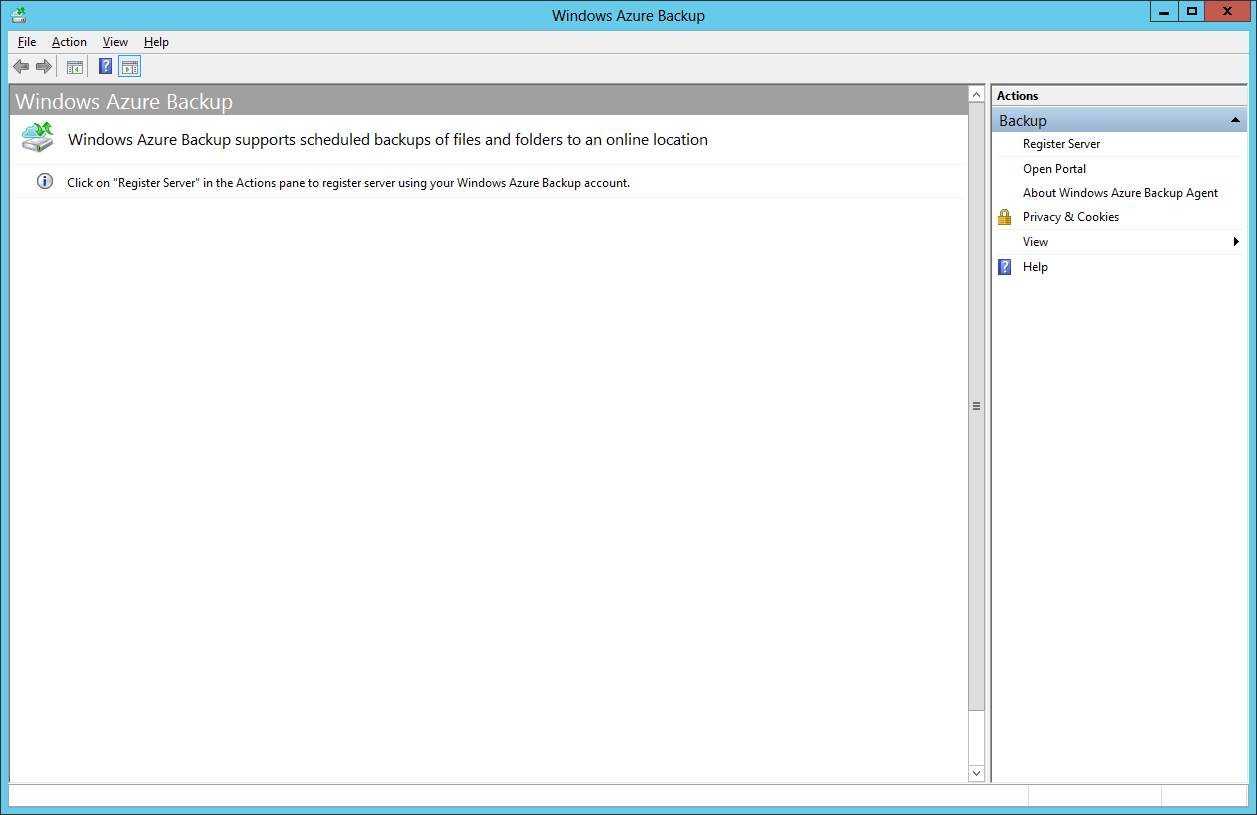
Run the installed Windows Azure Backup Agent. The first thing we are invited to do right after launch is to register the machine we are currently working on as a server, the data of which will be backed up in Windows Azure. We do this by selecting “Register Server”.
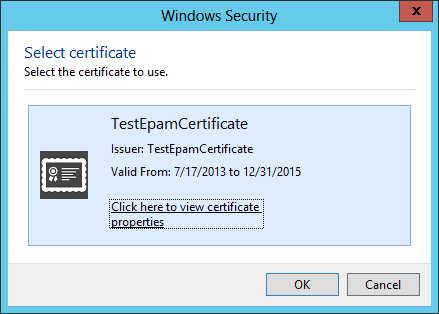
In the server registration wizard, we will be asked to specify a certificate that will be used for authorization in Windows Azure Recovery Services. Since we have already imported the corresponding certificate into the local storage, we will be asked to select it.
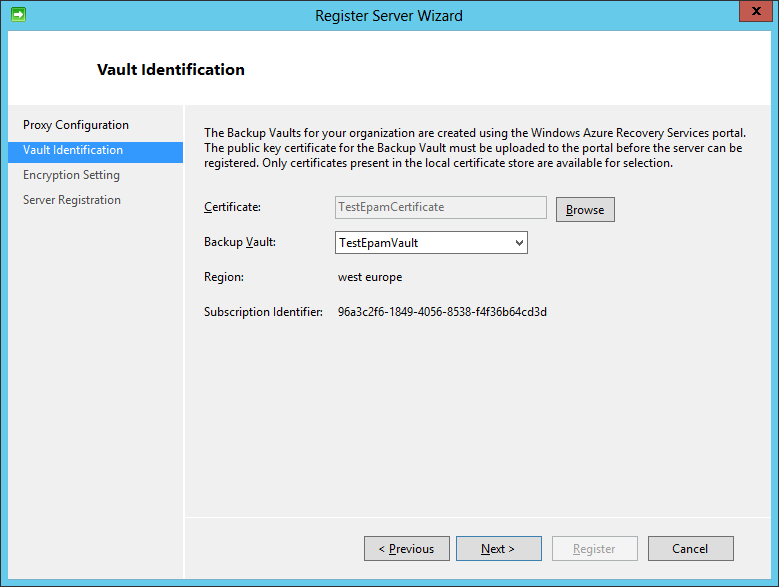
After that, select the available backup vault from the drop-down list.
The last step - you need to set a password for (ra) encryption of backups of this machine. You can create your own (the length must be at least 16 characters), or you can use the generator by clicking the “Generate Passphrase” button.
You must also specify the location of the text file with the password. It is recommended that you save it to external media.
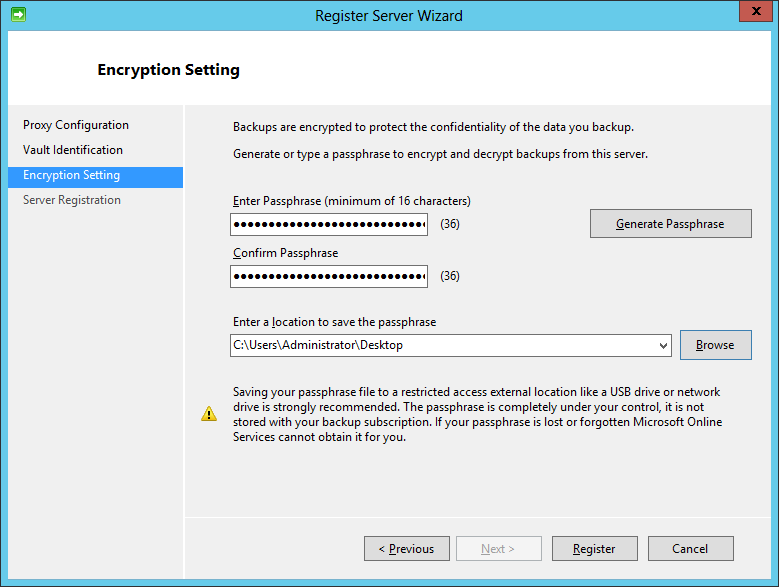
Complete the server registration by clicking the “Register” button.

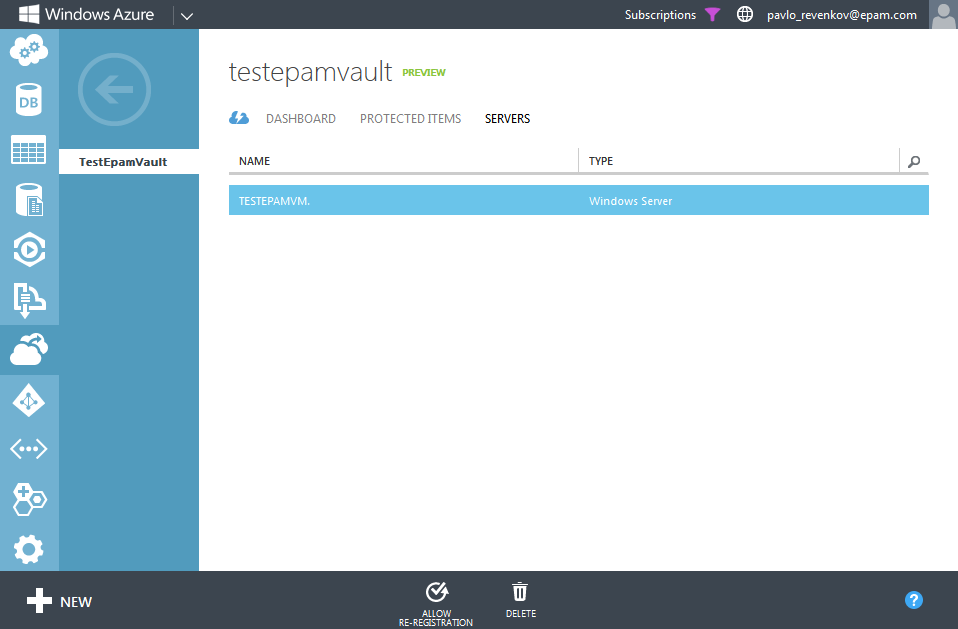
Before we go directly to setting up the Windows Azure Backup Agent, let's check if our machine has appeared in the list of servers in the Windows Azure Management Portal.
Select the created backup storage in the Recovery Services section and go to the “Servers” tab. Your machine should appear in this list.
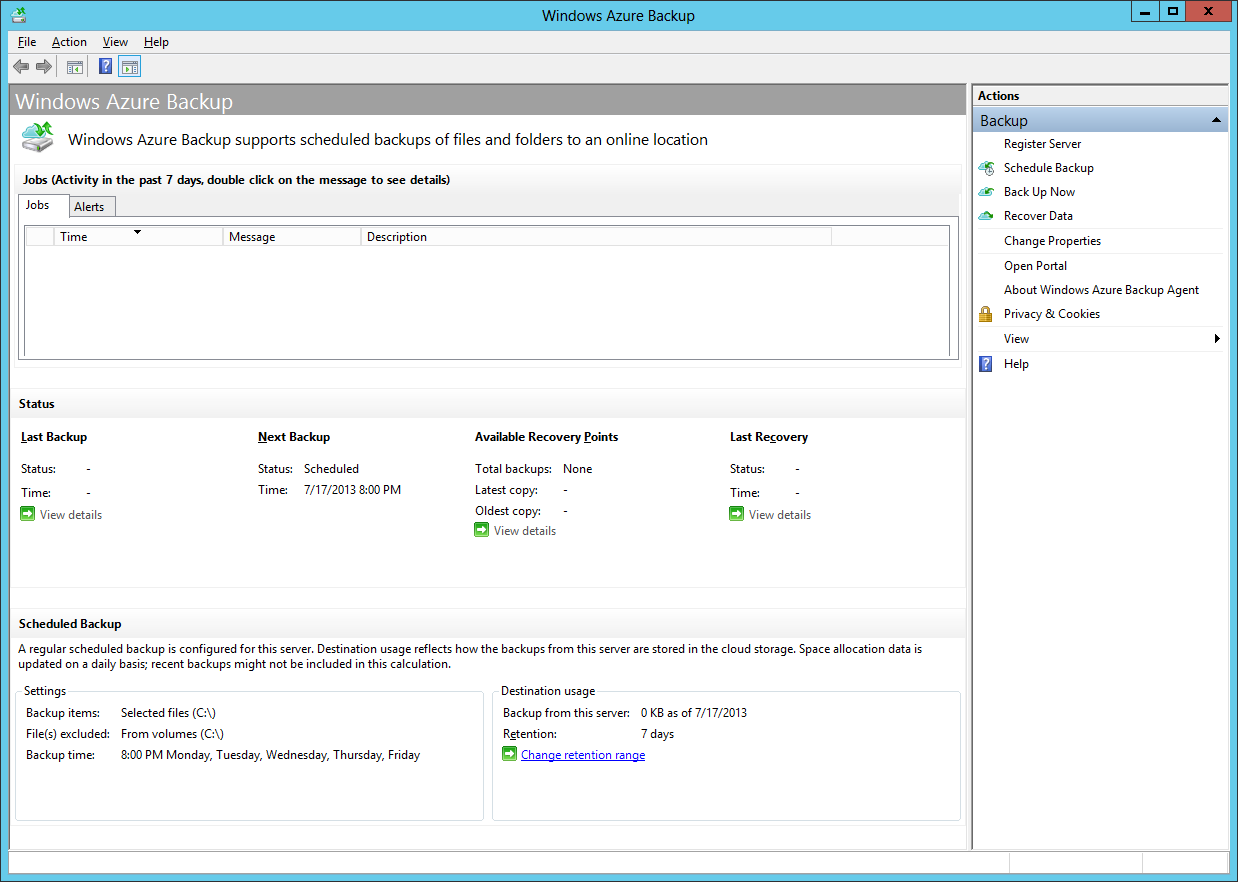
Now back to setting up the Windows Azure Backup Agent. After registering the server on the Windows Azure Management Portal, the program window will look as follows.
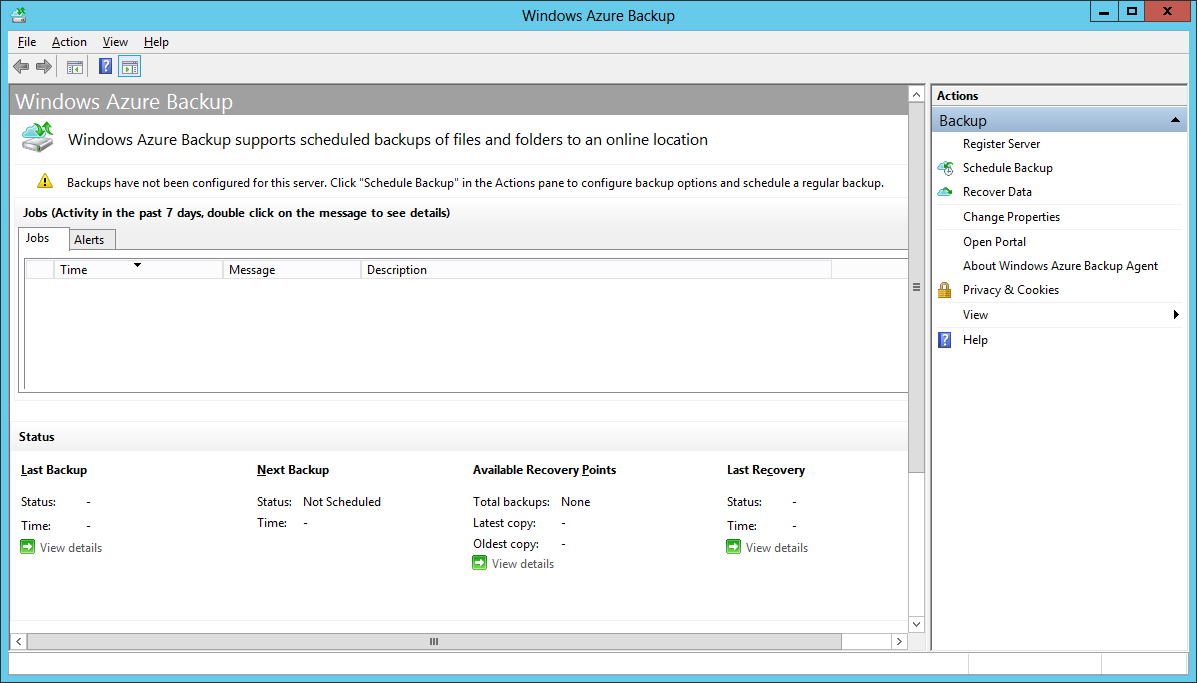
As we see, now we are invited to create a backup schedule for this server. That is, in essence, the Windows Azure Backup Agent is a scheduler for creating backups. Create a new schedule by clicking the “Schedule Backup” button.
Specify the directories in which data should be stored in the cloud. For an example we will select a profile of the current user.
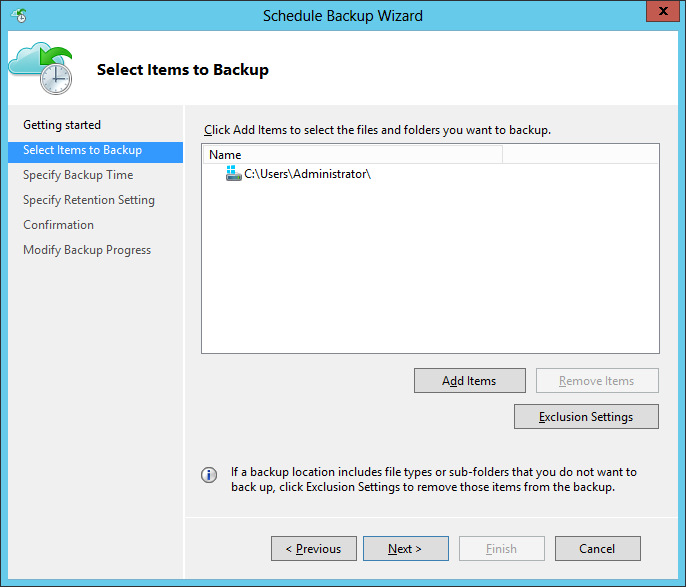
Since the profile of the current user may contain, in addition to useful data, some unnecessary ones, for example, files with the extension .tmp, we can tell the scheduler that files with such an extension do not need to be taken into account. To do this, click on the “Exclusion Settings” button, specify the exact same folder that we want to store in the cloud and mark the .tmp extension to ignore. You must also set the “Subfolders” parameter to “Yes” so that the scheduler uses this rule for all subfolders in the root folder.

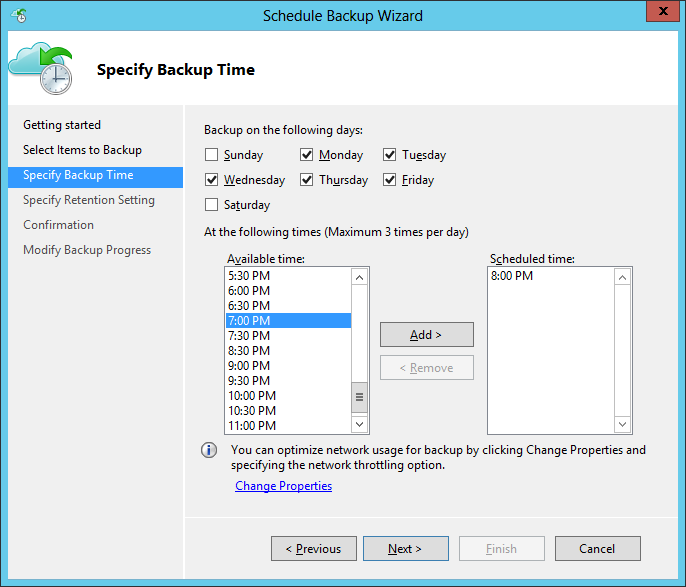
At the next step, we will be asked to indicate the frequency of this task. The task itself can be performed no more than 3 times a day.
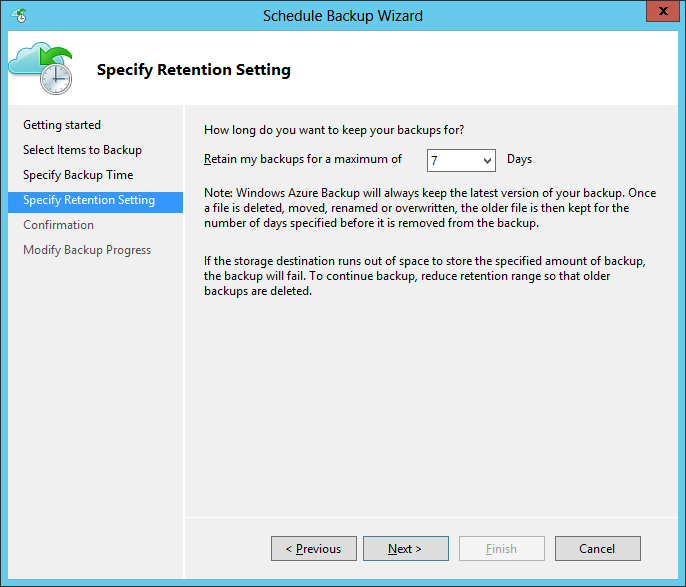
The last step is to indicate how long backups will be stored in the store. Possible values: for the last 7, 15 and 30 days.
On this, the creation of a schedule for performing data backup operations is completed. You can add additional tasks according to your requirements.
Let's now try to start the backup process manually, without waiting for the timer to work. To do this, select “Back Up Now”.
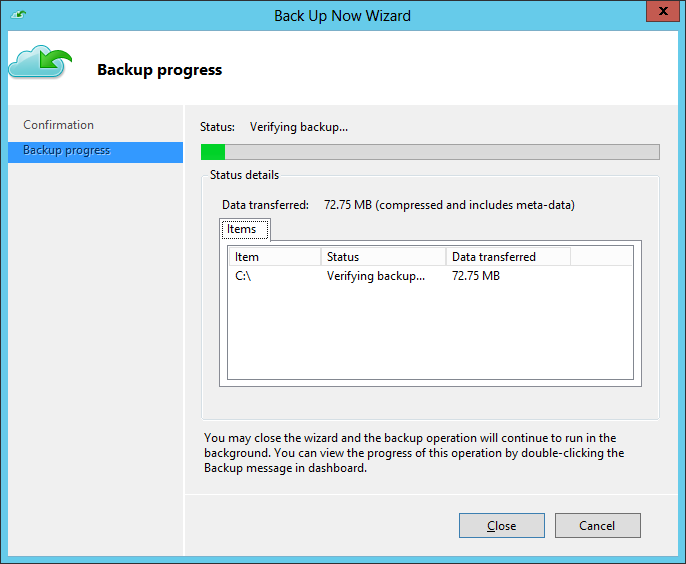
In the window that appears, we can monitor the process of performing the backup operation. Since the operation is performed in the background, you can close this window by clicking the “Close” button.
As soon as the process is completed, we will see the completed task in the general list of tasks.

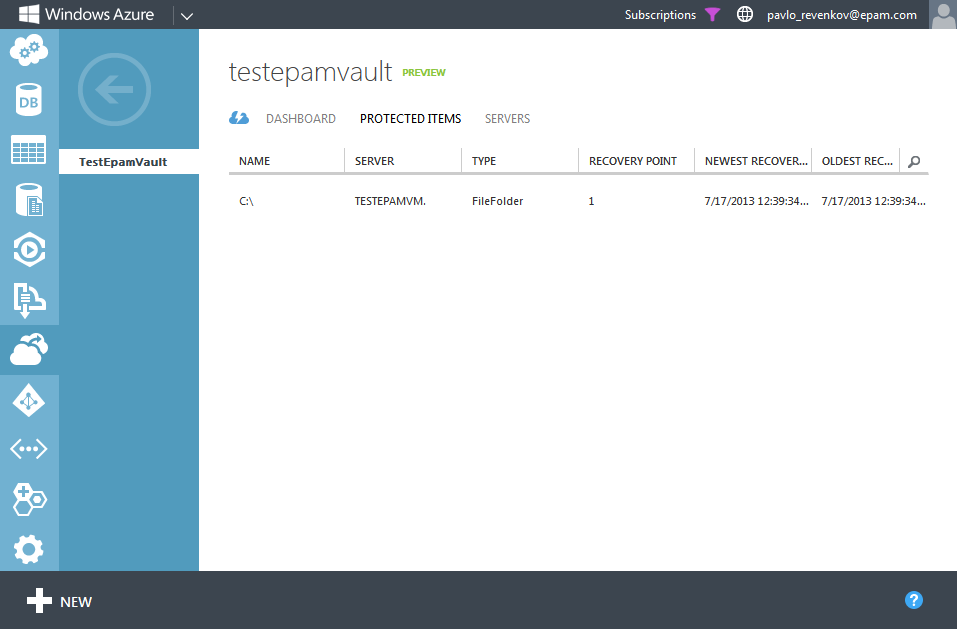
If we return to the Windows Azure Management Portal, the Recovery Services section and select the “Protected Items” tab, we will see a list of directories that are stored in this repository, information about where they came from and when.
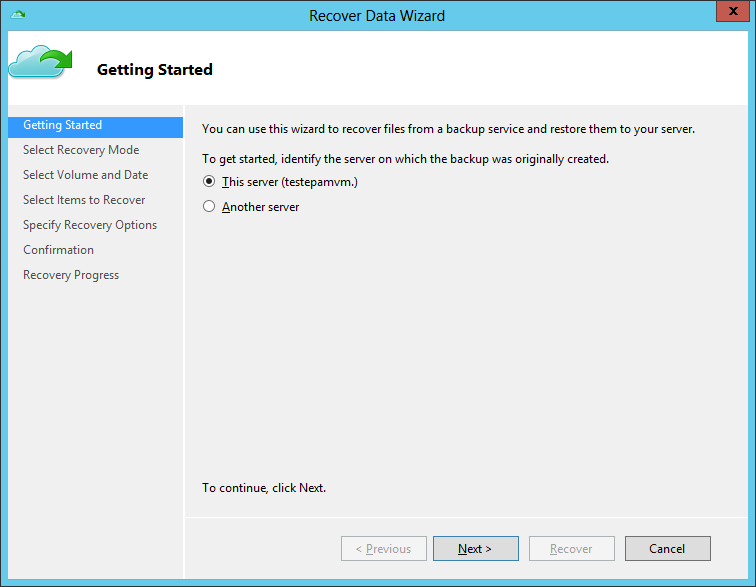
Now let's try to recover data from storage located in the cloud. To do this, select “Recover Data” in the Windows Azure Backup Agent window.
In the first step, we will be asked to indicate the source of the data that we are going to restore on this computer. In this case, backups were made from the same computer, therefore, leaves the “This server” item.
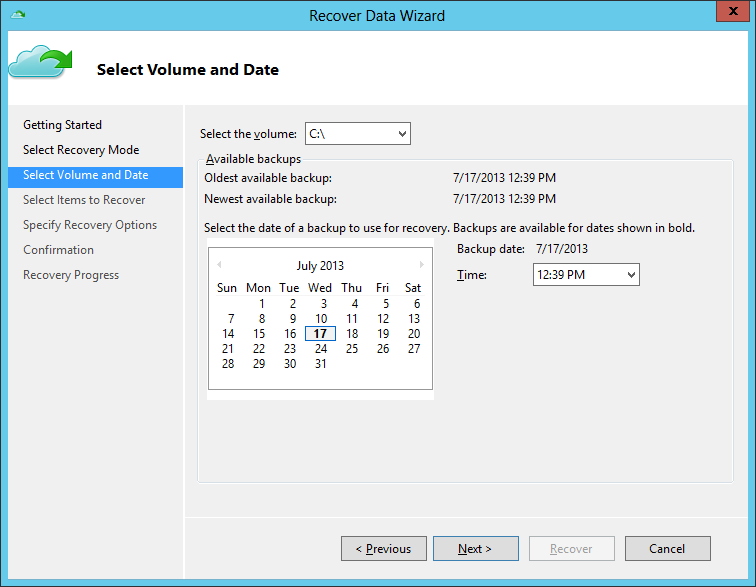
In the next step, we must choose the partition for data recovery, as well as the time when the data snapshot was created (in fact, the recovery point).
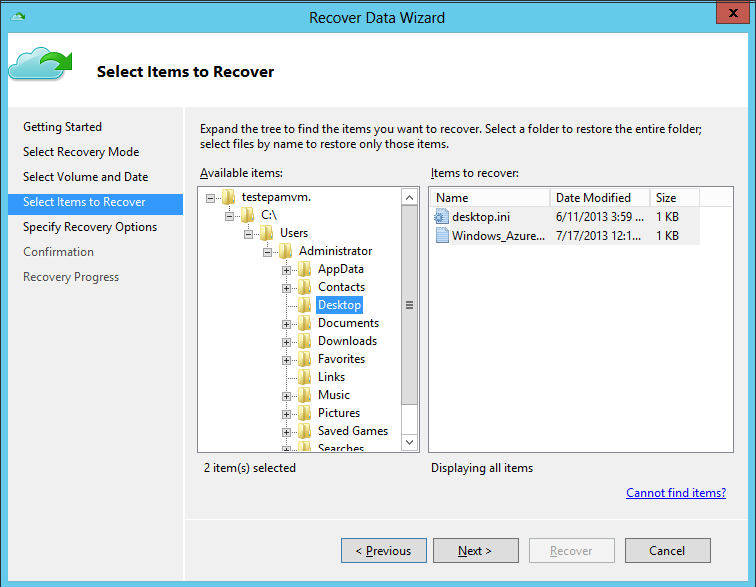
The next step is the direct selection of data for recovery. You can restore both the entire amount of data and individual elements.
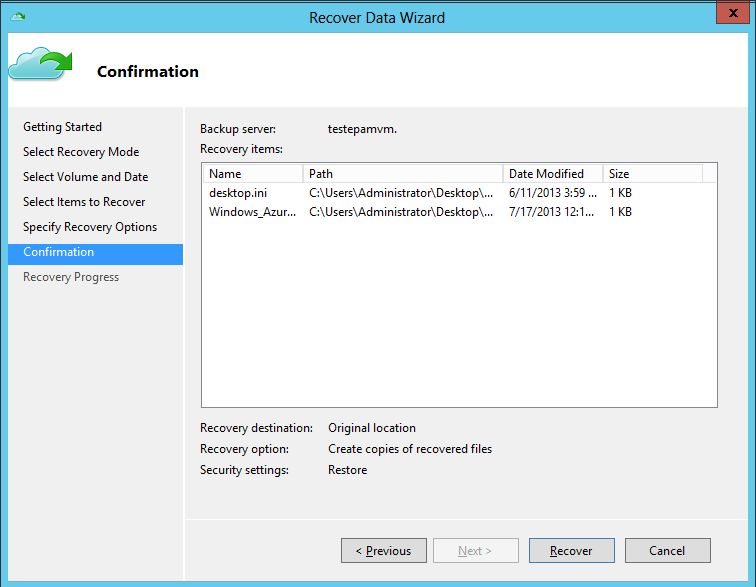
The last step is to set additional recovery options. For example, at this stage, we can specify what to do with files that are already in the directory for recovery, and also specify a directory for recovery. In addition, you can specify whether to restore access rights to files and folders.

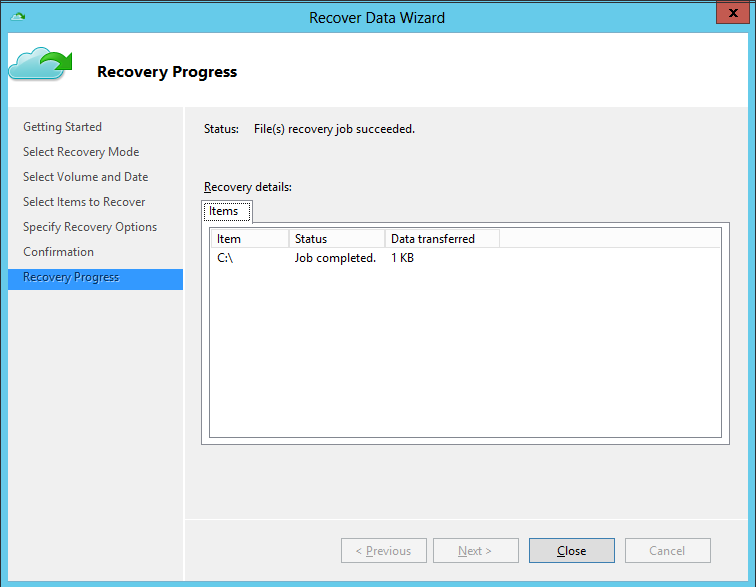
Complete file recovery by clicking the “Recover” button.
Actually, this is how work with Windows Azure Recovery Services is organized. Of course, we did not consider the possibility of integration with System Center. but this is the topic of a separate article. Thank you all for your attention!
Register a new server
Now that the backup storage has been created, we have created and imported the necessary certificates on the Windows Azure Management Portal and on machines running Windows Server, all that remains for us is to install the Windows Azure Backup Agent on these machines and configure it accordingly.
Open the Windows Azure Management Portal and go to the Recovery Services section. After that, select the created backup storage and go to the “Dashboard” tab.
On machines running Windows Server, you must install the Windows Azure Backup Agent. Download it by clicking on the “Download Agent” link. In the window that appears, select the option “Agent for Windows Server and System Center”.
Installing Windows Azure Backup Agent is quite simple, so I will not dwell on it. In most cases, you should leave the default settings.
Run the installed Windows Azure Backup Agent. The first thing we are invited to do right after launch is to register the machine we are currently working on as a server, the data of which will be backed up in Windows Azure. We do this by selecting “Register Server”.
In the server registration wizard, we will be asked to specify a certificate that will be used for authorization in Windows Azure Recovery Services. Since we have already imported the corresponding certificate into the local storage, we will be asked to select it.
After that, select the available backup vault from the drop-down list.
The last step - you need to set a password for (ra) encryption of backups of this machine. You can create your own (the length must be at least 16 characters), or you can use the generator by clicking the “Generate Passphrase” button.
You must also specify the location of the text file with the password. It is recommended that you save it to external media.
Complete the server registration by clicking the “Register” button.
Before we go directly to setting up the Windows Azure Backup Agent, let's check if our machine has appeared in the list of servers in the Windows Azure Management Portal.
Select the created backup storage in the Recovery Services section and go to the “Servers” tab. Your machine should appear in this list.
Creating a backup schedule
Now back to setting up the Windows Azure Backup Agent. After registering the server on the Windows Azure Management Portal, the program window will look as follows.
As we see, now we are invited to create a backup schedule for this server. That is, in essence, the Windows Azure Backup Agent is a scheduler for creating backups. Create a new schedule by clicking the “Schedule Backup” button.
Specify the directories in which data should be stored in the cloud. For an example we will select a profile of the current user.
Since the profile of the current user may contain, in addition to useful data, some unnecessary ones, for example, files with the extension .tmp, we can tell the scheduler that files with such an extension do not need to be taken into account. To do this, click on the “Exclusion Settings” button, specify the exact same folder that we want to store in the cloud and mark the .tmp extension to ignore. You must also set the “Subfolders” parameter to “Yes” so that the scheduler uses this rule for all subfolders in the root folder.
At the next step, we will be asked to indicate the frequency of this task. The task itself can be performed no more than 3 times a day.
The last step is to indicate how long backups will be stored in the store. Possible values: for the last 7, 15 and 30 days.
On this, the creation of a schedule for performing data backup operations is completed. You can add additional tasks according to your requirements.
Let's now try to start the backup process manually, without waiting for the timer to work. To do this, select “Back Up Now”.
In the window that appears, we can monitor the process of performing the backup operation. Since the operation is performed in the background, you can close this window by clicking the “Close” button.
As soon as the process is completed, we will see the completed task in the general list of tasks.
If we return to the Windows Azure Management Portal, the Recovery Services section and select the “Protected Items” tab, we will see a list of directories that are stored in this repository, information about where they came from and when.
Data recovery
Now let's try to recover data from storage located in the cloud. To do this, select “Recover Data” in the Windows Azure Backup Agent window.
In the first step, we will be asked to indicate the source of the data that we are going to restore on this computer. In this case, backups were made from the same computer, therefore, leaves the “This server” item.
In the next step, we must choose the partition for data recovery, as well as the time when the data snapshot was created (in fact, the recovery point).
The next step is the direct selection of data for recovery. You can restore both the entire amount of data and individual elements.
The last step is to set additional recovery options. For example, at this stage, we can specify what to do with files that are already in the directory for recovery, and also specify a directory for recovery. In addition, you can specify whether to restore access rights to files and folders.
Complete file recovery by clicking the “Recover” button.
Actually, this is how work with Windows Azure Recovery Services is organized. Of course, we did not consider the possibility of integration with System Center. but this is the topic of a separate article. Thank you all for your attention!