Proper splicing when intercepting functions prepared for HotPatch
In a previous article, I examined five options for intercepting functions, including their variations.
True, in it I left two unpleasant situations not considered:
1. Calling an intercepted function at the moment when the trap is removed.
2. Simultaneous call of the intercepted function from two different threads.
In the first case, the programmer who installed the interceptor will not see the whole picture, because some of the data will pass by him.
The second case threatens with more serious consequences, up to the fall of the application in which the interceptor is installed.
Both of these situations can only occur if splicing is used. When intercepted through import / export tables, etc. body modification of the intercepted function does not occur, therefore, these options for interception do not require excessive body movements.
This article will examine in more detail the splicing of the entry point of a function prepared for HopPatch, as These functions provide us with a way to avoid the above errors.
Splicing through JMP NEAR OFFSET or PUSH ADDR + RET (the most vulnerable to these errors) will not be considered, because in a good way, without implementing a length disassembler, it will not work to get this option to intercept as it should.
First, prepare an application that will clearly show us data loss when intercepting the API due to the fact that the call to the intercepted function can occur at the moment when the interception is removed from it.
Create a new project and place three elements on the main form: TMemo, TOpenDialog and TButton.
The essence of the application: when the button is clicked, an interception will be set to the CreateWindowExW function and a dialog will be displayed. After closing the dialog, TMemo will display information about all the windows created by the dialog.
To do this, we need a part of the code from the previous article , namely:
1. The declaration of types and constants for interception:
2. Procedures for recording NEAR JMP and atomic recording SHORT JMP
3. Slightly modified initialization of the THotPachSpliceData structure
All this code will be placed in a separate SpliceHelper module, we will need it in the following chapters.
Now let's move on to the main form, we need two global variables:
The HotPathSpliceRec variable will contain information about the interceptor. The second will contain a list of created windows.
In the form constructor, initialize the THotPachSpliceData structure.
Create an interceptor function called instead of the original function.
And it remains at the end to implement the button handler.
Everything is ready, you can run the program for execution.
I will not talk in detail about the code implemented in this chapter, it is more than described in more detail in the previous article , it does not make sense to paint a second time.
Run the program, click the button and close the dialog by clicking the "Cancel" button, it should turn out like this:
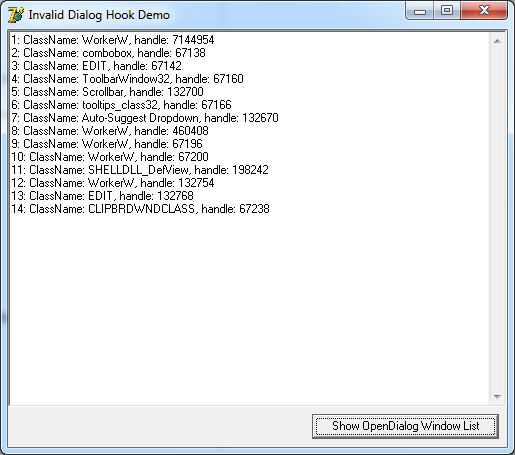
Thus, we found out that when you open the usual TOpenDialog, 14 windows of various classes are created.
Now let's find out if this is actually so.
To check the operation of our interceptor, you need to insure yourself with a third-party utility that can display the current list of windows for the application, with which we will find out whether all the information we received with our interceptor or not.
You can, of course, use third-party programs, like Spy ++, but we are programmers, so we should implement it ourselves, especially since the time to implement it is cheap.
Create a new project and place TTreeView on the main form and then implement the following code:
Actually, everything can be run for execution:

Now compare the results of both programs. We do it as follows.
1. Run the program with the interceptor and click on the button that displays the dialog.
2. Run the utility from the second chapter
3. Close the dialog of the first program to get the result about intercepted windows.
We look: The

window with the Auto-Suggest DropDown class is highlighted in red, let's see what it is:
But it turns out to contain 4 more windows, two scrollbars, ListView, which also holds SysHeader32 child. But this is already interesting. The window handles in both applications are the same, but neither ListView, nor SysHeader32, not even two scrolles in the first application.
But, the fact that we do not see them in the first list does not mean anything. These windows were created at the moment when our interceptor was removed, and this could happen only for one reason - because the call to CreateWindowExW can lead to a recursive call to itself.
So you need to implement the interceptor code in such a way that the removal and restoration of the interception is not required.
Let's look at this picture from the last article.
This is the beginning of the MessageBoxW function. The very first instruction is the do-nothing instruction MOV EDI, EDI, preceded by five NOP instructions.
This is exactly what the functions prepared for interception by HotPatch look like for the most part, including CreateWindowExW intercepted by us.
In case of interception of the function, instead of the allocated seven bytes, occupied by nothing-doing instructions, the following code will be located:
Actually, this is the interceptor we installed.
Instead of the MOV EDI, EDI instruction, the JMP -7 code is placed, which transfers control to the previous instruction.
Instead of five NOP instructions, there is a jump to the beginning of the interceptor function.
If we start the execution not from the address of the start of the CreateWindowExW function, but from the address of its first useful PUSH EBP instruction, then we will not affect the interceptor we installed, and if so, then there is no point in removing it.
In code form, it looks like this:
After calculating the address of the first useful instruction equal to the offset from the beginning of the function by two bytes, we store it in the temporary variable ACreateWindowExW, after which we call the function in the usual way.
Let's see what happens in this case, this is what we expect:

And this is what we find in the list given to us:
Well, we found our “losses”, all the same, 26 windows are created when TOpenDialog is called, and not 14. The
whole thing was in the notorious recursive call, which can be seen in the procedure call stack, if you set the breakpoint at the beginning of the InterceptedCreateWindowExW function.

With this error, the same is simple. If you constantly remove and restore the function interceptor, at some point we will be given an error in the SpliceLockJmp function on the instruction “lock xchg word ptr [ecx], ax”. The fact is that at this moment the operation of returning the page attributes to the address of the interceptor from another thread can be completed and, despite the fact that in our thread we allowed writing to this address, the real page attributes will be completely different.
This is precisely the behavior that the author of this branch encountered: intercepting recv .
This error must be solved in the same way as shown above.
True, one should not forget about the interception handler, it should also be ThreadSafe, but the implementation of the handler is up to you.
An interesting question and the answer to it is no, not always.
When functions are prepared for interception using the HotPatch method, Microsoft guarantees only that they will always have five NOP instructions in front of them and each such function will begin with a double-byte instruction. Nothing more is guaranteed to us.
If you look at the MessageBoxW or CreateWindowExW code, you can see that their first useful PUSH EBP instruction takes up one byte. Thus, since it does not satisfy the conditions, the body of this function is preceded by an empty call MOV EDI, EDI. The same will be true for functions starting with instructions of three or more bytes in length. However, if the function starts with a two-byte instruction, it makes no sense to inflate its body with an empty stub, because all the conditions for HotPatch are met (five NOP and 2 bytes).
In this case, if we apply the method described above, we will not be able to see anything but an error.
An example of such a function is RtlCreateUnicodeString.
It starts with the helpful PUSH $ 0C instruction.

The easiest solution would be to restore the original instruction before calling the original function, but as I said from the very beginning, this is fraught with errors.
Therefore, we faced the task of ensuring the invocation of the jammed instruction and ensuring the functionality of the function even with the interception code set:

In principle, we have the machine code of the jammed instruction in the HotPathSpliceRec.LockJmp structure, but we cannot directly call it for several reasons.
Well, firstly, this structure is located on the heap (well, more precisely, not on the heap, but in the allocated memory, because Delphi does not work directly with the Heap mechanism) which has no execution attributes, i.e. if we somehow execute the CALL at the address HotPathSpliceRec.LockJmp we will get an error.
You can of course set the correct page attributes, but this is too clumsy, yet the executable code should not be mixed with the data area.
Secondly, even if we transfer execution to this instruction, we must force the JMP instruction to the correct address after it (in this case it will be $ 77B062FB, see the previous picture), taking into account the offset of the called instruction.
Thirdly, in addition to the call, we must place on the stack in the correct order the parameters passed to the called function, which at least will lead us to the necessity of using asm inserts.
Let's try to solve everything in order.
In order not to get involved with passing parameters from the ASM insert, we can implement some kind of springboard function by assigning this task to the compiler.
Those. roughly write an interceptor like this:
In this case, the interceptor will deal with a springboard call and logging.
Inside the springboard function, 7 bytes are reserved, which is just enough for us to write a two-byte jammed instruction and a five-byte NEAR JMP.
The function itself is located in the code area, and it should not cause difficulties with its invocation.
And now an important nuance.
If we write these 7 bytes in place of the reserved block, then we will come across one unpleasant feature of Delphi. The fact is that the Delphi compiler almost always generates a prolog and an epilogue for functions.
For example, let's say after the patch, the code of our function began to look like this:
In fact, it will turn to the following:

That is, on the stack, instead of the two parameters DestinationString and SourceString, the values of the EBP and ECX registers will be placed, which will result in absolutely unpredictable consequences.
We absolutely do not need this, so we’ll do it easier, namely the springboard code will be written right from the beginning of this function, overwriting the instructions for the function prolog.
But in reality, we absolutely do not need these instructions, because after jumping into the body of the intercepted function and its execution, the control will return not to the springboard function that has been distorted by our actions, but directly to the place from where it was called, i.e. to the function is the interception handler.
Thus, we implement the initialization of the interceptor in the following way:
The initialization and invocation of the intercepted function itself is as follows:
Now you can click on the button and see the result of the interception in the form of a message.
As a result, the splicing implementation option, shown in the sixth chapter, is the most universal in case of interception of functions prepared for HotPatch. It will work correctly in the case of a MOV EDI, EDI stub and in the case of a useful instruction at the beginning of the function being intercepted. It is not subject to the errors described at the very beginning of the article, but it’s impossible to intercept ordinary functions using this algorithm, however I wrote about this earlier .
I apologize for having to split the information into pieces and give out not all at once, but as I was advised a year ago, it is better to give the material in small portions so that there is time for digesting it :)
On the other hand, if you put all the material in a heap, then firstly it will take quite a while, which I don’t have, and secondly, it will be unreadable due to the large volume (there were precedents).
Therefore, it is better that way.
The source code for the examples can be taken from this link .
© Alexander (Rouse_) Bagel
May, 2013
True, in it I left two unpleasant situations not considered:
1. Calling an intercepted function at the moment when the trap is removed.
2. Simultaneous call of the intercepted function from two different threads.
In the first case, the programmer who installed the interceptor will not see the whole picture, because some of the data will pass by him.
The second case threatens with more serious consequences, up to the fall of the application in which the interceptor is installed.
Both of these situations can only occur if splicing is used. When intercepted through import / export tables, etc. body modification of the intercepted function does not occur, therefore, these options for interception do not require excessive body movements.
This article will examine in more detail the splicing of the entry point of a function prepared for HopPatch, as These functions provide us with a way to avoid the above errors.
Splicing through JMP NEAR OFFSET or PUSH ADDR + RET (the most vulnerable to these errors) will not be considered, because in a good way, without implementing a length disassembler, it will not work to get this option to intercept as it should.
1. We implement the application intercepting a call to CreateWindowExW
First, prepare an application that will clearly show us data loss when intercepting the API due to the fact that the call to the intercepted function can occur at the moment when the interception is removed from it.
Create a new project and place three elements on the main form: TMemo, TOpenDialog and TButton.
The essence of the application: when the button is clicked, an interception will be set to the CreateWindowExW function and a dialog will be displayed. After closing the dialog, TMemo will display information about all the windows created by the dialog.
To do this, we need a part of the code from the previous article , namely:
1. The declaration of types and constants for interception:
const
  LOCK_JMP_OPKODE: Word = $F9EB;
  JMP_OPKODE: Word = $E9;
type
  // структура для обычного сплайса через JMP NEAR OFFSET
  TNearJmpSpliceRec = packed record
    JmpOpcode: Byte;
    Offset: DWORD;
  end;
  THotPachSpliceData = packed record
    FuncAddr: FARPROC;
    SpliceRec: TNearJmpSpliceRec;
    LockJmp: Word;
  end;
const
  NearJmpSpliceRecSize = SizeOf(TNearJmpSpliceRec);
  LockJmpOpcodeSize = SizeOf(Word);
2. Procedures for recording NEAR JMP and atomic recording SHORT JMP
// процедура пищет новый блок данных по адресу функции
procedure SpliceNearJmp(FuncAddr: Pointer; NewData: TNearJmpSpliceRec);
var
  OldProtect: DWORD;
begin
  VirtualProtect(FuncAddr, NearJmpSpliceRecSize,
    PAGE_EXECUTE_READWRITE, OldProtect);
  try
    Move(NewData, FuncAddr^, NearJmpSpliceRecSize);
  finally
    VirtualProtect(FuncAddr, NearJmpSpliceRecSize,
      OldProtect, OldProtect);
  end;
end;
// процедура атомарно изменяет два байта по переданному адресу
procedure SpliceLockJmp(FuncAddr: Pointer; NewData: Word);
var
  OldProtect: DWORD;
begin
  VirtualProtect(FuncAddr, LockJmpOpcodeSize, PAGE_EXECUTE_READWRITE, OldProtect);
  try
    asm
      mov  ax, NewData
      mov  ecx, FuncAddr
      lock xchg word ptr [ecx], ax
    end;
  finally
    VirtualProtect(FuncAddr, LockJmpOpcodeSize, OldProtect, OldProtect);
  end;
end;
3. Slightly modified initialization of the THotPachSpliceData structure
// процедура инициализирует структуру для установки перехвата
procedure InitHotPatchSpliceRec(const LibraryName, FunctionName: string;
  InterceptHandler: Pointer; out HotPathSpliceRec: THotPachSpliceData);
begin
  // запоминаем оригинальный адрес перехватываемой функции
  HotPathSpliceRec.FuncAddr :=
    GetProcAddress(GetModuleHandle(PChar(LibraryName)), PChar(FunctionName));
  // читаем два байта с ее начала, их мы будем перезатирать
  Move(HotPathSpliceRec.FuncAddr^, HotPathSpliceRec.LockJmp, LockJmpOpcodeSize);
  // инициализируем опкод JMP NEAR
  HotPathSpliceRec.SpliceRec.JmpOpcode := JMP_OPKODE;
  // рассчитываем адрес прыжка (поправка на NearJmpSpliceRecSize не нужна,
  // т.к. адрес находится уже со смещением)
  HotPathSpliceRec.SpliceRec.Offset :=
    PAnsiChar(InterceptHandler) - PAnsiChar(HotPathSpliceRec.FuncAddr);
end;
All this code will be placed in a separate SpliceHelper module, we will need it in the following chapters.
Now let's move on to the main form, we need two global variables:
var
  HotPathSpliceRec: THotPachSpliceData;
  WindowList: TStringList;
The HotPathSpliceRec variable will contain information about the interceptor. The second will contain a list of created windows.
In the form constructor, initialize the THotPachSpliceData structure.
procedure TForm1.FormCreate(Sender: TObject);
begin
  // инициализируем структуру для перехватчика
  InitHotPatchSpliceRec(user32, 'CreateWindowExW',
    @InterceptedCreateWindowExW, HotPathSpliceRec);
  // пишем прыжок в область NOP-ов
  SpliceNearJmp(PAnsiChar(HotPathSpliceRec.FuncAddr) - NearJmpSpliceRecSize,
    HotPathSpliceRec.SpliceRec);
end;
Create an interceptor function called instead of the original function.
function InterceptedCreateWindowExW(dwExStyle: DWORD; lpClassName: PWideChar;
  lpWindowName: PWideChar; dwStyle: DWORD; X, Y, nWidth, nHeight: Integer;
  hWndParent: HWND; hMenu: HMENU; hInstance: HINST; lpParam: Pointer): HWND; stdcall;
var
  S: string;
  Index: Integer;
begin
  // снимаем перехват
  SpliceLockJmp(HotPathSpliceRec.FuncAddr, HotPathSpliceRec.LockJmp);
  try
    // запоминаем информацию о созданном окне
    Index := -1;
    if not IsBadReadPtr(lpClassName, 1) then
    begin
      S := 'ClassName: ' + string(lpClassName);
      S := IntToStr(WindowList.Count + 1) + ': ' + S;
      Index := WindowList.Add(S);
    end;
    // вызываем оригинальную функцию
    Result := CreateWindowExW(dwExStyle, lpClassName, lpWindowName, dwStyle,
      X, Y, nWidth, nHeight, hWndParent, hMenu, hInstance, lpParam);
    // добавляем информацию о вызове в список
    if Index >= 0 then
    begin
      S := S + ', handle: ' + IntToStr(Result);
      WindowList[Index] := S;
    end;
  finally
    // восстанавливаем перехват
    SpliceLockJmp(HotPathSpliceRec.FuncAddr, LOCK_JMP_OPKODE);
  end;
end;
And it remains at the end to implement the button handler.
procedure TForm1.Button1Click(Sender: TObject);
begin
  // перехватываем CreateWindowExW
  SpliceLockJmp(HotPathSpliceRec.FuncAddr, LOCK_JMP_OPKODE);
  try
    // Создаем список в котором будет хранится информация о созданных окнах
    WindowList := TStringList.Create;
    try
      // открываем диалог
      OpenDialog1.Execute;
      // по завершении отображаем полученный список
      Memo1.Lines.Text := WindowList.Text;
    finally
      WindowList.Free;
    end;
  finally
    // снимаем перехват
    SpliceLockJmp(HotPathSpliceRec.FuncAddr, HotPathSpliceRec.LockJmp);
  end;
end;
Everything is ready, you can run the program for execution.
I will not talk in detail about the code implemented in this chapter, it is more than described in more detail in the previous article , it does not make sense to paint a second time.
Run the program, click the button and close the dialog by clicking the "Cancel" button, it should turn out like this:
Thus, we found out that when you open the usual TOpenDialog, 14 windows of various classes are created.
Now let's find out if this is actually so.
2. Create an auxiliary utility for viewing the tree of application windows.
To check the operation of our interceptor, you need to insure yourself with a third-party utility that can display the current list of windows for the application, with which we will find out whether all the information we received with our interceptor or not.
You can, of course, use third-party programs, like Spy ++, but we are programmers, so we should implement it ourselves, especially since the time to implement it is cheap.
Create a new project and place TTreeView on the main form and then implement the following code:
type
  TdlgWindowTree = class(TForm)
    WindowTreeView: TTreeView;
    procedure FormCreate(Sender: TObject);
  private
    procedure Sys_Windows_Tree(Node: TTreeNode;
      AHandle: HWND; ALevel: Integer);
  end;
...
procedure TdlgWindowTree.FormCreate(Sender: TObject);
begin
  Sys_Windows_Tree(nil, GetDesktopWindow, 0);
end;
procedure TdlgWindowTree.Sys_Windows_Tree(Node: TTreeNode;
  AHandle: HWND; ALevel: Integer);
type
  TRootNodeData = record
    Node: TTreeNode;
    PID: Cardinal;
  end;
var
  szClassName, szCaption, szLayoutName: array[0..MAXCHAR - 1] of Char;
  szFileName : array[0..MAX_PATH - 1] of Char;
  Result: String;
  PID, TID: Cardinal;
  I: Integer;
  RootItems: array of TRootNodeData;
  IsNew: Boolean;
begin
  //Запускаем цикл пока не закончатся окна
  while AHandle <> 0 do
  begin
    //Получаем имя класса окна
    GetClassName(AHandle, szClassName, MAXCHAR);
    //Получаем текст (Его Caption) окна
    GetWindowText(AHandle, szCaption, MAXCHAR);
    // Получаем имя модуля
    if GetWindowModuleFilename(AHandle, szFileName, SizeOf(szFileName)) = 0 then
      FillChar(szFileName, 256, #0);
    TID := GetWindowThreadProcessId(AHandle, PID);
    // Раскладка процесса
    AttachThreadInput(GetCurrentThreadId, TID, True);
    VerLanguageName(GetKeyboardLayout(TID) and $FFFF, szLayoutName, MAXCHAR);
    AttachThreadInput(GetCurrentThreadId, TID, False);
    // Результат
    Result := Format('%s [%s] Caption = %s, Handle = %d, Layout = %s',
      [String(szClassName), String(szFileName), String(szCaption),
      AHandle, String(szLayoutName)]);
    // Смотрим в какое место добавлять окно
    if ALevel in [0..1] then
    begin
      IsNew := True;
      for I := 0 to Length(RootItems) - 1 do
        if RootItems[I].PID = PID then
        begin
          Node := RootItems[I].Node;
          IsNew := False;
          Break;
        end;
      if IsNew then
      begin
        SetLength(RootItems, Length(RootItems) + 1);
        RootItems[Length(RootItems) - 1].PID := PID;
        RootItems[Length(RootItems) - 1].Node :=
          WindowTreeView.Items.AddChild(nil, 'PID: ' + IntToStr(PID));
        Node := RootItems[Length(RootItems) - 1].Node;
      end;
    end;
    // Пускаем рекурсию
    Sys_Windows_Tree(WindowTreeView.Items.AddChild(Node, Result),
      GetWindow(AHandle, GW_CHILD), ALevel + 1);
    //Получаем хэндл следующего (не дочернего) окна
    AHandle := GetNextWindow(AHandle, GW_HWNDNEXT);
  end;
end;
Actually, everything can be run for execution:
3. Analyze the results
Now compare the results of both programs. We do it as follows.
1. Run the program with the interceptor and click on the button that displays the dialog.
2. Run the utility from the second chapter
3. Close the dialog of the first program to get the result about intercepted windows.
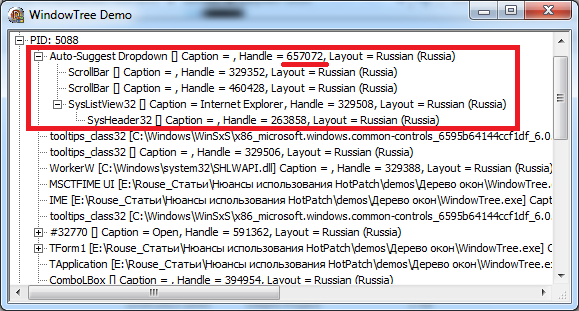
We look: The
window with the Auto-Suggest DropDown class is highlighted in red, let's see what it is:
But it turns out to contain 4 more windows, two scrollbars, ListView, which also holds SysHeader32 child. But this is already interesting. The window handles in both applications are the same, but neither ListView, nor SysHeader32, not even two scrolles in the first application.
But, the fact that we do not see them in the first list does not mean anything. These windows were created at the moment when our interceptor was removed, and this could happen only for one reason - because the call to CreateWindowExW can lead to a recursive call to itself.
So you need to implement the interceptor code in such a way that the removal and restoration of the interception is not required.
4. Calling the intercepted function without removing the interception code.
Let's look at this picture from the last article.
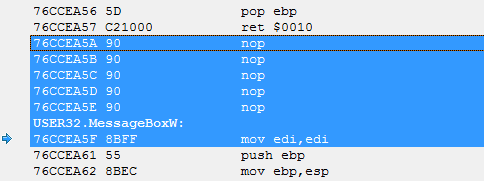
This is the beginning of the MessageBoxW function. The very first instruction is the do-nothing instruction MOV EDI, EDI, preceded by five NOP instructions.
This is exactly what the functions prepared for interception by HotPatch look like for the most part, including CreateWindowExW intercepted by us.
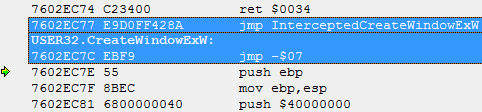
In case of interception of the function, instead of the allocated seven bytes, occupied by nothing-doing instructions, the following code will be located:
Actually, this is the interceptor we installed.
Instead of the MOV EDI, EDI instruction, the JMP -7 code is placed, which transfers control to the previous instruction.
Instead of five NOP instructions, there is a jump to the beginning of the interceptor function.
If we start the execution not from the address of the start of the CreateWindowExW function, but from the address of its first useful PUSH EBP instruction, then we will not affect the interceptor we installed, and if so, then there is no point in removing it.
In code form, it looks like this:
type
  TCreateWindowExW = function(dwExStyle: DWORD; lpClassName: PWideChar;
    lpWindowName: PWideChar; dwStyle: DWORD; X, Y, nWidth, nHeight: Integer;
    hWndParent: HWND; AMenu: HMENU; hInstance: HINST; lpParam: Pointer): HWND; stdcall;
function InterceptedCreateWindowExW(dwExStyle: DWORD; lpClassName: PWideChar;
  lpWindowName: PWideChar; dwStyle: DWORD; X, Y, nWidth, nHeight: Integer;
  hWndParent: HWND; hMenu: HMENU; hInstance: HINST; lpParam: Pointer): HWND; stdcall;
var
  S: string;
  Index: Integer;
  ACreateWindowExW: TCreateWindowExW;
begin
  // запоминаем информацию о созданном окне
  Index := -1;
  if not IsBadReadPtr(lpClassName, 1) then
  begin
    S := 'ClassName: ' + string(lpClassName);
    S := IntToStr(WindowList.Count + 1) + ': ' + S;
    Index := WindowList.Add(S);
  end;
  // вызываем оригинальную функцию
  @ACreateWindowExW := PAnsiChar(HotPathSpliceRec.FuncAddr) + LockJmpOpcodeSize;
  Result := ACreateWindowExW(dwExStyle, lpClassName, lpWindowName, dwStyle,
    X, Y, nWidth, nHeight, hWndParent, hMenu, hInstance, lpParam);
  // добавляем информацию о вызове в список
  if Index >= 0 then
  begin
    S := S + ', handle: ' + IntToStr(Result);
    WindowList[Index] := S;
  end;
end;
After calculating the address of the first useful instruction equal to the offset from the beginning of the function by two bytes, we store it in the temporary variable ACreateWindowExW, after which we call the function in the usual way.
Let's see what happens in this case, this is what we expect:
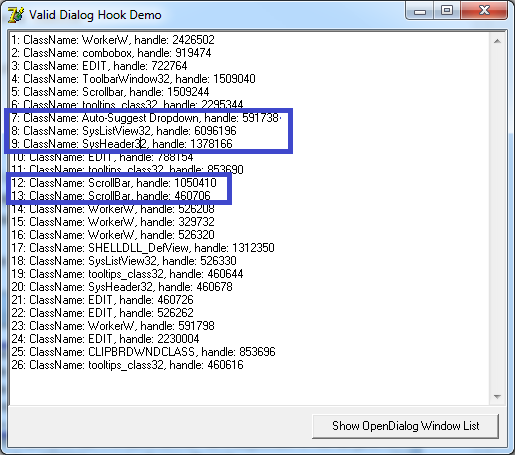
And this is what we find in the list given to us:
Well, we found our “losses”, all the same, 26 windows are created when TOpenDialog is called, and not 14. The
whole thing was in the notorious recursive call, which can be seen in the procedure call stack, if you set the breakpoint at the beginning of the InterceptedCreateWindowExW function.
5. An error occurred while calling a hooked function from different threads.
With this error, the same is simple. If you constantly remove and restore the function interceptor, at some point we will be given an error in the SpliceLockJmp function on the instruction “lock xchg word ptr [ecx], ax”. The fact is that at this moment the operation of returning the page attributes to the address of the interceptor from another thread can be completed and, despite the fact that in our thread we allowed writing to this address, the real page attributes will be completely different.
This is precisely the behavior that the author of this branch encountered: intercepting recv .
This error must be solved in the same way as shown above.
True, one should not forget about the interception handler, it should also be ThreadSafe, but the implementation of the handler is up to you.
6. Is it always possible to skip the first two bytes of the function being intercepted?
An interesting question and the answer to it is no, not always.
When functions are prepared for interception using the HotPatch method, Microsoft guarantees only that they will always have five NOP instructions in front of them and each such function will begin with a double-byte instruction. Nothing more is guaranteed to us.
If you look at the MessageBoxW or CreateWindowExW code, you can see that their first useful PUSH EBP instruction takes up one byte. Thus, since it does not satisfy the conditions, the body of this function is preceded by an empty call MOV EDI, EDI. The same will be true for functions starting with instructions of three or more bytes in length. However, if the function starts with a two-byte instruction, it makes no sense to inflate its body with an empty stub, because all the conditions for HotPatch are met (five NOP and 2 bytes).
In this case, if we apply the method described above, we will not be able to see anything but an error.
An example of such a function is RtlCreateUnicodeString.
It starts with the helpful PUSH $ 0C instruction.
The easiest solution would be to restore the original instruction before calling the original function, but as I said from the very beginning, this is fraught with errors.
Therefore, we faced the task of ensuring the invocation of the jammed instruction and ensuring the functionality of the function even with the interception code set:
In principle, we have the machine code of the jammed instruction in the HotPathSpliceRec.LockJmp structure, but we cannot directly call it for several reasons.
Well, firstly, this structure is located on the heap (well, more precisely, not on the heap, but in the allocated memory, because Delphi does not work directly with the Heap mechanism) which has no execution attributes, i.e. if we somehow execute the CALL at the address HotPathSpliceRec.LockJmp we will get an error.
You can of course set the correct page attributes, but this is too clumsy, yet the executable code should not be mixed with the data area.
Secondly, even if we transfer execution to this instruction, we must force the JMP instruction to the correct address after it (in this case it will be $ 77B062FB, see the previous picture), taking into account the offset of the called instruction.
Thirdly, in addition to the call, we must place on the stack in the correct order the parameters passed to the called function, which at least will lead us to the necessity of using asm inserts.
Let's try to solve everything in order.
In order not to get involved with passing parameters from the ASM insert, we can implement some kind of springboard function by assigning this task to the compiler.
Those. roughly write an interceptor like this:
function TrampolineRtlCreateUnicodeString(DestinationString: PUNICODE_STRING;
  SourceString: PWideChar): Integer; stdcall;
begin
  asm
    db $90, $90, $90, $90, $90, $90, $90
  end;
end;
function InterceptedRtlCreateUnicodeString(DestinationString: PUNICODE_STRING;
  SourceString: PWideChar): Integer; stdcall;
begin
  Result := TrampolineRtlCreateUnicodeString(DestinationString, SourceString);
  ShowMessage(DestinationString^.Buffer);
end;
In this case, the interceptor will deal with a springboard call and logging.
Inside the springboard function, 7 bytes are reserved, which is just enough for us to write a two-byte jammed instruction and a five-byte NEAR JMP.
The function itself is located in the code area, and it should not cause difficulties with its invocation.
And now an important nuance.
If we write these 7 bytes in place of the reserved block, then we will come across one unpleasant feature of Delphi. The fact is that the Delphi compiler almost always generates a prolog and an epilogue for functions.
For example, let's say after the patch, the code of our function began to look like this:
function TrampolineRtlCreateUnicodeString(DestinationString: PUNICODE_STRING;
  SourceString: PWideChar): Integer; stdcall;
begin
  asm
    push $0C        // выполняем затертый параметр
    jmp $77B062FB   // делаем прыжок на правильную инструкцию
  end;
end;
In fact, it will turn to the following:
That is, on the stack, instead of the two parameters DestinationString and SourceString, the values of the EBP and ECX registers will be placed, which will result in absolutely unpredictable consequences.
We absolutely do not need this, so we’ll do it easier, namely the springboard code will be written right from the beginning of this function, overwriting the instructions for the function prolog.
But in reality, we absolutely do not need these instructions, because after jumping into the body of the intercepted function and its execution, the control will return not to the springboard function that has been distorted by our actions, but directly to the place from where it was called, i.e. to the function is the interception handler.
Thus, we implement the initialization of the interceptor in the following way:
// процедура инициализирует структуру для установки перехвата и подготавливает трамплин для вызова
procedure InitHotPatchSpliceRecEx(const LibraryName, FunctionName: string;
  InterceptHandler, Trampoline: Pointer; out HotPathSpliceRec: THotPachSpliceData);
var
  OldProtect: DWORD;
  TrampolineSplice: TNearJmpSpliceRec;
begin
  // запоминаем оригинальный адрес перехватываемой функции
  HotPathSpliceRec.FuncAddr :=
    GetProcAddress(GetModuleHandle(PChar(LibraryName)), PChar(FunctionName));
  // читаем два байта с ее начала, их мы будем перезатирать
  Move(HotPathSpliceRec.FuncAddr^, HotPathSpliceRec.LockJmp, LockJmpOpcodeSize);
  // Подготавливаем трамплин
  VirtualProtect(Trampoline, LockJmpOpcodeSize + NearJmpSpliceRecSize,
    PAGE_EXECUTE_READWRITE, OldProtect);
  try
    Move(HotPathSpliceRec.LockJmp, Trampoline^, LockJmpOpcodeSize);
    TrampolineSplice.JmpOpcode := JMP_OPKODE;
    TrampolineSplice.Offset := PAnsiChar(HotPathSpliceRec.FuncAddr) -
      PAnsiChar(Trampoline) - NearJmpSpliceRecSize;
    Trampoline := PAnsiChar(Trampoline) + LockJmpOpcodeSize;
    Move(TrampolineSplice, Trampoline^, SizeOf(TNearJmpSpliceRec));
  finally
    VirtualProtect(Trampoline, LockJmpOpcodeSize + NearJmpSpliceRecSize,
      OldProtect, OldProtect);
  end;
  // инициализируем опкод JMP NEAR
  HotPathSpliceRec.SpliceRec.JmpOpcode := JMP_OPKODE;
  // рассчитываем адрес прыжка (поправка на NearJmpSpliceRecSize не нужна,
  // т.к. адрес находится уже со смещением)
  HotPathSpliceRec.SpliceRec.Offset :=
    PAnsiChar(InterceptHandler) - PAnsiChar(HotPathSpliceRec.FuncAddr);
end;
The initialization and invocation of the intercepted function itself is as follows:
type
  UNICODE_STRING = record
    Length: WORD;
    MaximumLength: WORD;
    Buffer: PWideChar;
  end;
  PUNICODE_STRING = ^UNICODE_STRING;
  function  RtlCreateUnicodeString(DestinationString: PUNICODE_STRING;
    SourceString: PWideChar): BOOLEAN; stdcall; external 'ntdll.dll';
...
procedure TForm2.FormCreate(Sender: TObject);
begin
  // инициализируем структуру для перехватчика и трамплин
  InitHotPatchSpliceRecEx('ntdll.dll', 'RtlCreateUnicodeString',
    @InterceptedRtlCreateUnicodeString, @TrampolineRtlCreateUnicodeString,
    HotPathSpliceRec);
  // пишем прыжок в область NOP-ов
  SpliceNearJmp(PAnsiChar(HotPathSpliceRec.FuncAddr) - NearJmpSpliceRecSize,
    HotPathSpliceRec.SpliceRec);
end;
procedure TForm2.Button1Click(Sender: TObject);
var
  US: UNICODE_STRING;
begin
  // перехватываем RtlCreateUnicodeString
  SpliceLockJmp(HotPathSpliceRec.FuncAddr, LOCK_JMP_OPKODE);
  try
    RtlCreateUnicodeString(@US, 'Test UNICODE String');
  finally
    // снимаем перехват
    SpliceLockJmp(HotPathSpliceRec.FuncAddr, HotPathSpliceRec.LockJmp);
  end;
end;
Now you can click on the button and see the result of the interception in the form of a message.
In conclusion
As a result, the splicing implementation option, shown in the sixth chapter, is the most universal in case of interception of functions prepared for HotPatch. It will work correctly in the case of a MOV EDI, EDI stub and in the case of a useful instruction at the beginning of the function being intercepted. It is not subject to the errors described at the very beginning of the article, but it’s impossible to intercept ordinary functions using this algorithm, however I wrote about this earlier .
I apologize for having to split the information into pieces and give out not all at once, but as I was advised a year ago, it is better to give the material in small portions so that there is time for digesting it :)
On the other hand, if you put all the material in a heap, then firstly it will take quite a while, which I don’t have, and secondly, it will be unreadable due to the large volume (there were precedents).
Therefore, it is better that way.
The source code for the examples can be taken from this link .
© Alexander (Rouse_) Bagel
May, 2013