Ceph FS Distributed File System in 15 Minutes
- From the sandbox
- Tutorial
We need only a few minutes to raise the Ceph FS distributed file system
Quick reference
Ceph is an open source development of flexible, easily scalable petabyte storage. The basis is the union of the disk spaces of several dozen servers in the object storage, which allows for flexible multiple pseudorandom data redundancy. Ceph developers complement this object store with three more projects:
- RADOS Gateway - S3- and Swift-compatible RESTful interface
- RBD - a block device with support for thin growth and snapshots
- Ceph FS - Distributed POSIX-compliant File System
Example description
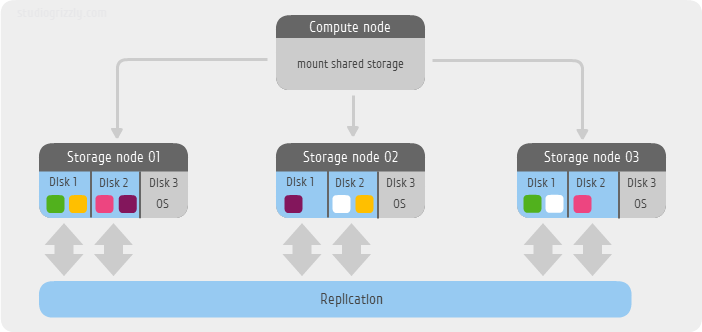
In my small example, I use only 3 servers as storage. Each server is available to me 3 SATA drive:
/dev/sdaas a system and /dev/sdband /dev/sdca data Ceph FS file system. The OS in this example will be Ubuntu 12.04 LTS. Another server will mount the file system, that is, in fact, act as a client. We use the default redundancy level, that is, two replicas of the same block. At the time of this writing, developers are offering two methods for creating simple configurations - the old, using
mkcephfsor the new one ceph-deploy. For newer versions, starting with branch 0.6x (cuttlefish), it is already recommended to use ceph-deploy. But in this example, I am using an earlier, stable release of the 0.56.x (bobtail) branch, applying mkcephfs.I must warn you right away - Ceph FS is still in pre-production status, but by the activity of the community this project is called one of the hottest among software defined storage.
Let's get started.
Step 0. Installing the OS
We perform a minimal installation. Additionally, you need to install
ntpdateyour favorite editor, for example vim.aptitude update && aptitude install ntpdate vim
Step 1. Install Ceph packages
On each node of the cluster and client, install Ceph packages
wget -q -O- 'https://ceph.com/git/?p=ceph.git;a=blob_plain;f=keys/release.asc' | sudo apt-key add -
echo deb http://ceph.com/debian-bobtail/ $(lsb_release -sc) main | tee /etc/apt/sources.list.d/ceph.list
aptitude update && aptitude install ceph
Step 2. Create a configuration file
On each node and client, create a single configuration file
/etc/ceph/ceph.conf[global]
auth cluster required = cephx
auth service required = cephx
auth client required = cephx
[osd]
osd journal size = 2000
osd mkfs type = xfs
osd mkfs options xfs = -f -i size=2048
osd mount options xfs = rw,noatime,inode64
[mon.a]
host = node01
mon addr = 192.168.2.31:6789
[mon.b]
host = node02
mon addr = 192.168.2.32:6789
[mon.c]
host = node03
mon addr = 192.168.2.33:6789
[osd.0]
host = node01
devs = /dev/sdb
[osd.1]
host = node01
devs = /dev/sdc
[osd.2]
host = node02
devs = /dev/sdb
[osd.3]
host = node02
devs = /dev/sdc
[osd.4]
host = node03
devs = /dev/sdb
[osd.5]
host = node03
devs = /dev/sdc
[mds.a]
host = node01
Making the file readable for everyone
chmod 644 /etc/ceph/ceph.conf
Step 3. Making passwordless entry between nodes
We set a root password, generate ssh keys without specifying a passphrase
passwd root
ssh-keygen
Create ssh aliases
/root/.ssh/configaccording to the name of the nodes in your caseHost node01
Hostname node01.ceph.labspace.studiogrizzly.com
User root
Host node02
Hostname node02.ceph.labspace.studiogrizzly.com
User root
Host node03
Hostname node03.ceph.labspace.studiogrizzly.com
User root
Add public keys to neighboring nodes of the cluster.
ssh-copy-id root@node02
ssh-copy-id root@node03
Step 4. Expand the cluster
First, prepare the necessary drives for work
mkfs -t xfs fs-options -f -i size=2048 /dev/sdb
mkfs -t xfs fs-options -f -i size=2048 /dev/sdc
Next, we prepare working directories and mount disks according to our design.
So for node01
mkdir -p /var/lib/ceph/osd/ceph-0
mkdir -p /var/lib/ceph/osd/ceph-1
mount /dev/sdb /var/lib/ceph/osd/ceph-0 -o noatime,inode64
mount /dev/sdc /var/lib/ceph/osd/ceph-1 -o noatime,inode64
for node02
mkdir -p /var/lib/ceph/osd/ceph-2
mkdir -p /var/lib/ceph/osd/ceph-3
mount /dev/sdb /var/lib/ceph/osd/ceph-2 -o noatime,inode64
mount /dev/sdc /var/lib/ceph/osd/ceph-3 -o noatime,inode64
and for node03
mkdir -p /var/lib/ceph/osd/ceph-4
mkdir -p /var/lib/ceph/osd/ceph-5
mount /dev/sdb /var/lib/ceph/osd/ceph-4 -o noatime,inode64
mount /dev/sdc /var/lib/ceph/osd/ceph-5 -o noatime,inode64
Finally, on node01, run the Ceph repository creation script
mkcephfs -a -c /etc/ceph/ceph.conf -k /etc/ceph/ceph.keyring
and then copy the key
ceph.keyringto the other nodes of the clusterscp /etc/ceph/ceph.keyring node02:/etc/ceph/ceph.keyring
scp /etc/ceph/ceph.keyring node03:/etc/ceph/ceph.keyring
and on the client node, in my case -
192.168.2.39scp /etc/ceph/ceph.keyring 192.168.2.39:/etc/ceph/ceph.keyring
We set read access to keys
chmod 644 /etc/ceph/ceph.keyring
Step 5. Launch and Status
Thanks to the passwordless entry between nodes, we start the entire cluster from any node
service ceph -a start
There we check the cluster status
ceph -s
The most expected status during normal operation is
HEALTH_OKOn the client side, create a directory in the required place, for example
/mnt/cephfs, parse the key for the kernel module cephand mount the file systemmkdir /mnt/cephfs
ceph-authtool --name client.admin /etc/ceph/ceph.keyring --print-key | tee /etc/ceph/admin.secret
mount -t ceph node01:6789,node02:6789,node03:6789:/ /mnt/cephfs -o name=admin,secretfile=/etc/ceph/admin.secret,noatime
Afterword
This is how we get the distributed Ceph FS file system in just 15 minutes. Issues of performance, safety and maintenance require a more detailed immersion and this material is on a separate article, or even not one.
PS
The OpenNebula + Ceph bundle got stuck using only Ceph object storage, without the Ceph FS file system. Read more in the hub I am PR .