CRUD application on Ext JS and Ruby on Rails in 7 minutes
- Transfer
- Tutorial
This is an updated version of an outdated post .
This post will show you simple steps to create a TODO task manager using Ext JS, Ruby on Rails, and Netzke . It will take you about 7 minutes, and if you are curious in advance whether it is worth it, take a direct look at the “Discussing Results” section (by the way, the largest one). Our goal is to create a web application that will allow us to add, edit and delete TODO tasks, as well as mark them as completed. In addition to this, you can sort tasks, do a search on them, edit several tasks at the same time - and that's not all. If you want, time on a stopwatch - and let's get started.
When creating this tutorial, I used the following library versions: Rails 3.2.8, netzke-core v0.8.0, netzke-basepack v0.8.0, Ext JS 4.1.1a - as well as Ruby 1.9.3 and Mac OSX Mountain Lion
Create a new Rails application:
Add Netzke to the Gemfile:
Install gems:
We link the Ext JS library, and (optionally) the FamFamFam icons , in
Specify Netzke Routes and comment out the root rout in
Generate a welcome controller:
Do not forget to delete
We
Note that a helper
3 minutes have passed - and we are ready to start the really interesting part!
Let's create a model of the Task, which will have the attributes of
Update the schema of our database:
We want our tasks to at least always have some kind of name, so let's add the appropriate validation (file
Let's create our first Netzke component, inheriting it from a fully functional one
In this directory, create the tasks.rb file with the following contents:
Our component is a Ruby class inherited from
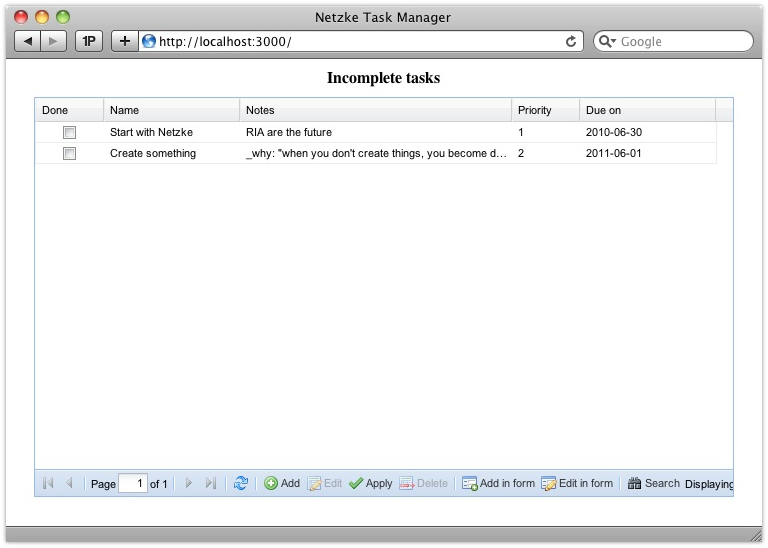
Let's start the server:
... and see how it looks in the browser at http: // localhost: 3000 / :

Our application works and at first glance looks pretty good. In a minute I will give you an impressive list of what features it provides, but first, let's make some minor corrections to improve the look of the application (we still have enough time for this).
The final code for our component will look like this:
Excellent. We will use the remaining two minutes to bring the last, purely visual, edit. To put our grid in the middle of the page, add a couple of styles to
Add the h1 header to
That's it! You can stop the stopwatch and discuss the results:
Since it
In our application, we created fields in the Task model with several different types: integer, boolean, string, text and date. Each field automatically receives a column that supports the corresponding type (for example, you cannot enter letters in the priority field, the date field has a calendar, etc.).
Even if the tasks table contains tens of thousands of records, this is not a problem for the Netzke grid thanks to the built-in page support.
Adding, updating and deleting several records at once is easy:
Some functions of the buttons in the bottom panel of the grid are duplicated in the context menu:
Rails validations are taken into account:

Click on the column heading to sort the entries:
Smart filters are integrated by default in each column, according to the type of field.
For date:

For priority:

Sometimes adding or editing records is easier to do through the form. Netzke provides you with such an opportunity (editing multiple entries is also supported - just select several lines and click "Edit in form").
Click the Search button to call up the complex query editor:
What you found out is just a very small part of what Netzke can do. In fact, I just showed how to use a pre-created component built on the basis of the incredibly powerful Netzke Core platform, which, among other things, allows combining components into new (composite) components, supports dynamic loading of components from the server, flexible interaction between client and server parts of the component - and much more, making Netzke, leveraging the power of Ext JS and Rails, the ideal platform for creating incredibly complex single-page web applications.
In continuation of this post, I will show you how to easily place 3 instances of our component on the bookmarks bar, each of which will show its selection of tasks: completed tasks, unfinished tasks, and all tasks at the same time. See the next part of the tutorial .
Note from the translator: components from Netzke Basepack support Russian localization .
This post will show you simple steps to create a TODO task manager using Ext JS, Ruby on Rails, and Netzke . It will take you about 7 minutes, and if you are curious in advance whether it is worth it, take a direct look at the “Discussing Results” section (by the way, the largest one). Our goal is to create a web application that will allow us to add, edit and delete TODO tasks, as well as mark them as completed. In addition to this, you can sort tasks, do a search on them, edit several tasks at the same time - and that's not all. If you want, time on a stopwatch - and let's get started.
When creating this tutorial, I used the following library versions: Rails 3.2.8, netzke-core v0.8.0, netzke-basepack v0.8.0, Ext JS 4.1.1a - as well as Ruby 1.9.3 and Mac OSX Mountain Lion
Initial steps
Create a new Rails application:
$ rails new netzke_task_manager && cd netzke_task_manager
Add Netzke to the Gemfile:
gem 'netzke-core', '~>0.8.0'
gem 'netzke-basepack', '~>0.8.0'
Install gems:
$ bundle install
We link the Ext JS library, and (optionally) the FamFamFam icons , in
public/extjsand, public/images/iconsrespectively. For example ( for example! ):$ ln -s ~/code/extjs/ext-4.1.1 public/extjs
$ mkdir public/images
$ ln -s ~/assets/famfamfam-silk public/images/icons
Specify Netzke Routes and comment out the root rout in
config/routes.rb:NetzkeTaskManager::Application.routes.draw do
netzke
root to: "welcome#index"
end
Generate a welcome controller:
$ rails g controller welcome index
Do not forget to delete
public/index.html. We
app/views/layouts/application.html.erbreplace the default code that includes JavaScript and styles with the load_netzke helper. The result should look something like this:Netzke Task Manager
<%= load_netzke %>
<%= csrf_meta_tag %>
<%= yield %>
Note that a helper
load_netzkeis all that is needed to connect scripts and styles of both Netzke and Ext JS itself. 3 minutes have passed - and we are ready to start the really interesting part!
Model creation
Let's create a model of the Task, which will have the attributes of
name, priority, notes, due_dateand a flag done:$ rails g model Task done:boolean name notes:text priority:integer due:date
Update the schema of our database:
$ rake db:migrate
We want our tasks to at least always have some kind of name, so let's add the appropriate validation (file
app/models/task.rb):class Task < ActiveRecord::Base
attr_accessible :done, :due, :name, :notes, :priority
validates :name, presence: true
end
Creating the Tasks Grid Component
Let's create our first Netzke component, inheriting it from a fully functional one
Netzke::Basepack::Grid. But first we need to create a directory app/components:$ mkdir app/components
In this directory, create the tasks.rb file with the following contents:
class Tasks < Netzke::Basepack::Grid
  def configure(c)
    super
    c.model = "Task"
  end
end
Our component is a Ruby class inherited from
Netzke::Basepack::Gridand configured to use a previously created model Task. Now we need to embed the created component in the view of our application. In the file, app/views/welcome/index.html.erbreplace the default code with the following line:<%= netzke :tasks, height: 400 %>
Let's start the server:
$ rails s
... and see how it looks in the browser at http: // localhost: 3000 / :
Our application works and at first glance looks pretty good. In a minute I will give you an impressive list of what features it provides, but first, let's make some minor corrections to improve the look of the application (we still have enough time for this).
Netzke::Basepack::Grid, from which our grid is inherited, is flexibly configured. Let's make 4 simple improvements:- denote which columns we go to see (hide
created_atandupdated_at) - change the column heading “Due” to “Due on”
- configure the “Notes” column so that it fills the entire remaining width using the property
flexfromExt.grid.column.Column - we will use the configuration parameter of
scopeour grid to exclude those entries in which the flag is setdone
The final code for our component will look like this:
class Tasks < Netzke::Basepack::Grid
  def configure(c)
    super
    c.model = "Task"
    c.columns = [
      :done,
      :name,
      {name: :notes, flex: 1},
      :priority,
      {name: :due, header: "Due on"}
    ]
    c.scope = {done: [nil, false]}
  end
end
Excellent. We will use the remaining two minutes to bring the last, purely visual, edit. To put our grid in the middle of the page, add a couple of styles to
app/views/layouts/application.html.erb, right after the helper load_netzke:Add the h1 header to
app/views/welcome/index.html.erb:Incomplete tasks
<%= netzke :tasks, height: 400 %>
That's it! You can stop the stopwatch and discuss the results:
We discuss the results
Since it
Netzke::Basepack::Gridis a fully functional component, we get a bunch of functionality without writing a single line of code for this. Let's take a look in more detail.Automatically detect field types
In our application, we created fields in the Task model with several different types: integer, boolean, string, text and date. Each field automatically receives a column that supports the corresponding type (for example, you cannot enter letters in the priority field, the date field has a calendar, etc.).
Pages
Even if the tasks table contains tens of thousands of records, this is not a problem for the Netzke grid thanks to the built-in page support.
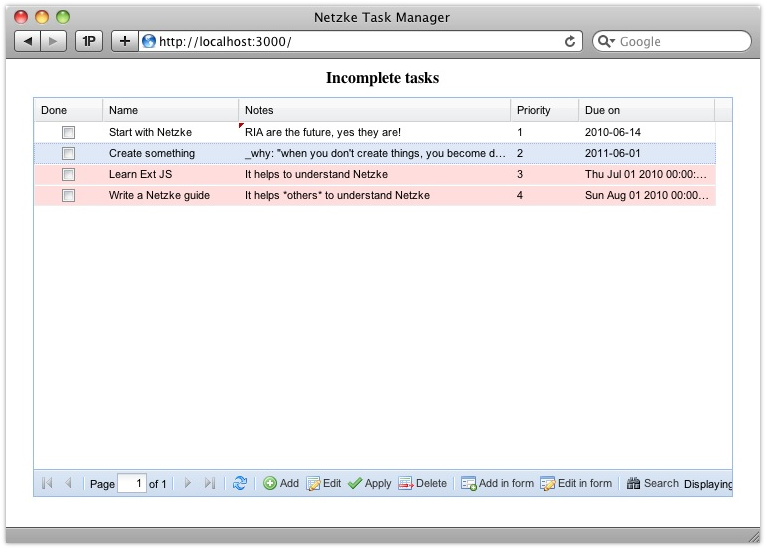
Ability to edit multiple lines at once
Adding, updating and deleting several records at once is easy:
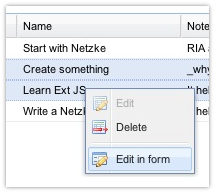
Context menu
Some functions of the buttons in the bottom panel of the grid are duplicated in the context menu:
Rails validation support
Rails validations are taken into account:
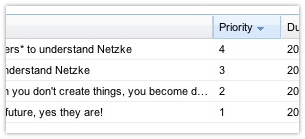
Sorting records on the server
Click on the column heading to sort the entries:
Filtering records on the server
Smart filters are integrated by default in each column, according to the type of field.
For date:
For priority:
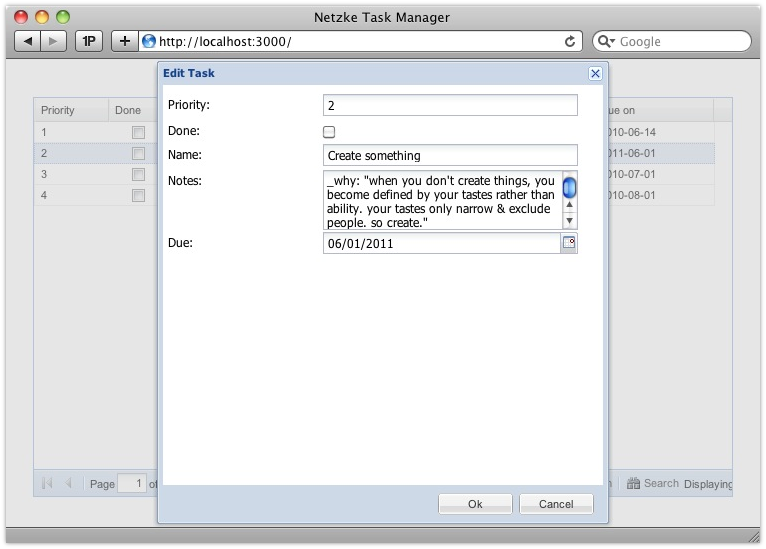
Adding and editing entries through the form
Sometimes adding or editing records is easier to do through the form. Netzke provides you with such an opportunity (editing multiple entries is also supported - just select several lines and click "Edit in form").
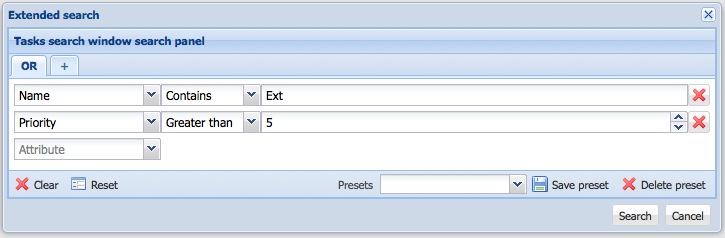
Advanced Search with Support for Saving Queries
Click the Search button to call up the complex query editor:
Only the tip of the iceberg
What you found out is just a very small part of what Netzke can do. In fact, I just showed how to use a pre-created component built on the basis of the incredibly powerful Netzke Core platform, which, among other things, allows combining components into new (composite) components, supports dynamic loading of components from the server, flexible interaction between client and server parts of the component - and much more, making Netzke, leveraging the power of Ext JS and Rails, the ideal platform for creating incredibly complex single-page web applications.
In continuation of this post, I will show you how to easily place 3 instances of our component on the bookmarks bar, each of which will show its selection of tasks: completed tasks, unfinished tasks, and all tasks at the same time. See the next part of the tutorial .
Note from the translator: components from Netzke Basepack support Russian localization .