Live video for the site
Recently, I and my colleagues are often asked the question "How to implement the broadcast of live video from the camera on a website?". Many people asking this question are mistaken, believing that this can only be done using IP cameras. No, this is also done on the basis of inexpensive USB cameras. Specialists who know “how” often have another misconception - why pay for an expensive IP camera when everything can be implemented on USB cameras for $ 20-30? And let's say the camera needs to be installed on the street, at the other end of the building, 70m long. Do you know a lot of USB cameras with IP66 housing and -20C operating temperature? How long can a USB cable be? According to Wiki, the maximum length of the USB cable (in the screen) should not exceed 5m. And how to connect the camera at a distance of 70m (and this is a straight line, without taking into account the bends of the cable duct)? You can put usb-hub with power every 5m. And how much money will the cost of usb extension cords and active usb hubs take with the organization of catering for them? Agree, this will pay off even more than one IP camera. Someone will say, "I will put, in the immediate vicinity of the camera, a computer in ITX design and there are no problems." Yes, this is an option, but in the end the cost of “comp + USB camera” will come out, at best, equal to the cost of an IP camera. And the service, and uninterrupted power? And if the cameras are spaced hundreds of meters, or even kilometers, for example, the beaches of Crimea? IP camera definitely wins!
What is the best way to “throw out” a camera image on a site? You can of course give the image to the user directly from the IP camera. But IP cameras are not designed for a large number of simultaneous connections and most of them after the 5-6th connection will begin to "die", up to a complete hang. And if you want to see the beach and the sea dozens, if not hundreds? The problem is solved with the help of an intermediary media server. There are a lot of articles describing such a solution, for example, " Streaming video using ffserver & ffmpeg". True, this article describes a solution for a USB camera, but the principle of operation is also suitable for IP cameras. But such an approach requires good knowledge of Linux, and most importantly - a high-performance, respectively quite expensive processor. A simple Intel Atom with the task of transcoding real-time video from M-JPEG to FLV, MPEG4 or H.264 is unlikely to cope. And to give the image in the M-JPEG codec to the site is a stream of ~ 3-4Mbit / s with a picture of 640x480 with 15 frames / s. What outgoing bandwidth is required if dozens of users watch it? Yes, and "pump" these same ~ 3-4Mbit / s, not every user is able to.
There is a simple solution - an add-on for D-Link DNS-325 & DNS-345 network drives called Webcam. All the “tools” in it are available, it will be enough to perform the simplest actions, which I will describe below. I checked only on D-Link IP cameras, but in theory it should work with others.
Let's start by installing Add-On. Take here http://dlink.ua/dns or here http://dlink.vtverdohleb.org.ua/Add-On/ .
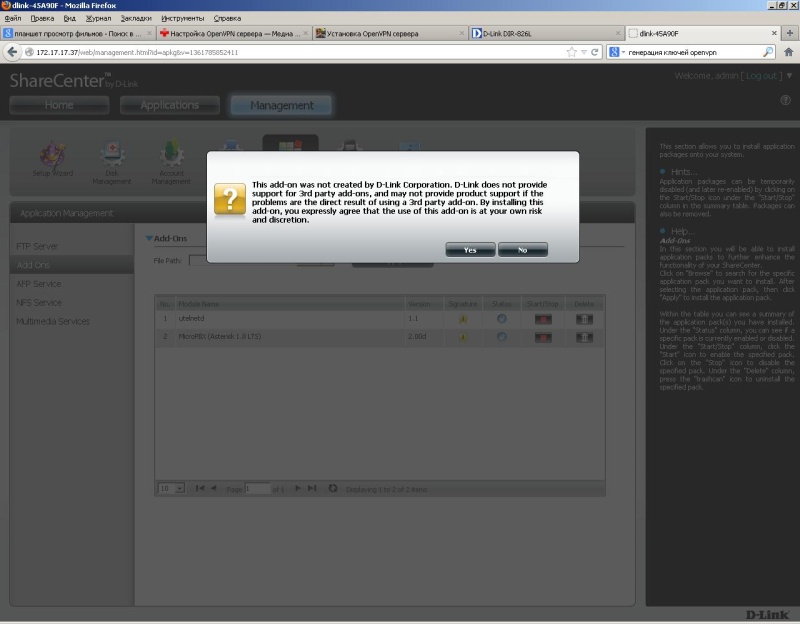
Go to the "Management / Application Management / Add Ons" section and install the Add-On appropriate for your drive model.

Messages "Third-party Add-On ..." do not be alarmed, click Yes.
After installation is complete, start Add-On with the Start button, go to the Applications section and open the Webcam web interface.


But first you need to configure the IP camera accordingly. For example, I’ll give you the configuration of the D-Link DCS-2310L IP camera. Go to the Setup / Audio and Video section and add a new one or modify an existing profile.
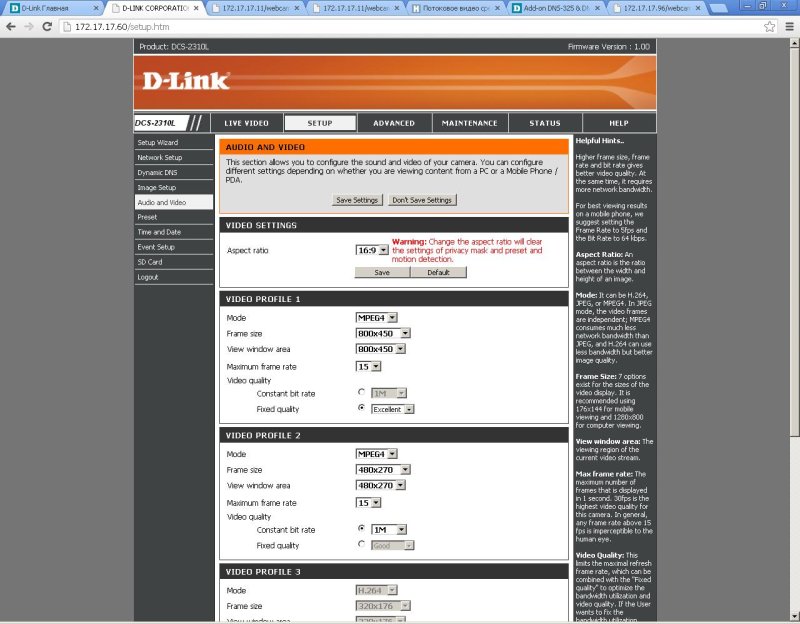
The main requirement is that only MPEG4 codec will not work with others. The rest of the settings are up to you, but I would recommend the following:
1. “Frame size & View window area” no more than 800x600. It will work, but the speed of the video stream will be too big for the site.
2. "Maximum frame rate" no more than 15 frames / s, and preferably 4-7 frames / s. The reason is the same as in paragraph 1.
3. "Video quality", for this model of camera, it is better to select "Constant bit rate" 1M, or less. This indicator is better to select according to the visual perception of the resulting image. But the smaller the better.
Next, go to the “Setup / Network Setup” section and remember the name “RTSP / Access name for stream” for the profile you configured. In my case, profile 2 corresponds to "live2.sdp".
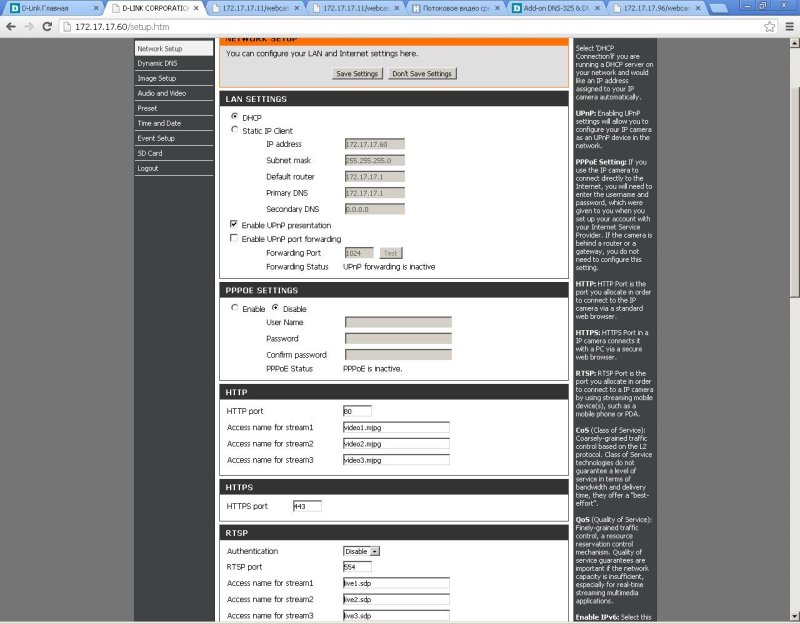
“Authentication & RTSP port” leave unchanged.
Let's get back to setting up Webcam. In the Cam IP field, enter the IP address of your camera, in the RTSP name field, the corresponding RTSP / Access name for stream. Turn on the “Audio” checkbox if you want to transfer video with sound. But I would not recommend including Audio, as this will give a significant load to the drive’s processor, and for the site the main picture is not the sound. Click Submit. If, for some reason, the addition failed, a message will be displayed to the right of “Camera 1”, for example, “Error: Bad IP or RTSP URL”. If everything went well, you will see the following:

If you want to change the IP camera, RTSP name or image resolution, you will need to click “Delete” and enter the parameters again.
If everything is OK, start broadcasting with the "Start" button.

The broadcast went, now you need to add the html-code of access to the video on the page of your site. Click “Site code”.
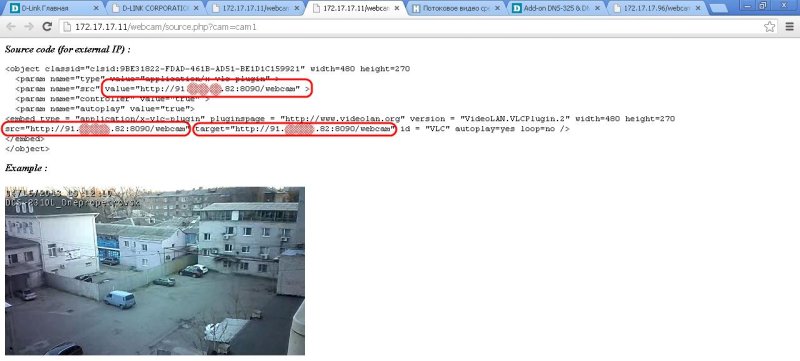
It is assumed that your drive is inside a LAN network and not accessible from the outside. Therefore, the external IP address of your router is substituted in the html code. Accordingly, in order for the image to be seen from the Internet, a “port forwarding” (Virtual Server or Port Forwarding) needs to be done on the router. TCP protocol, port 8090. I will not tell you how to forward the probes, since there is no universal instruction, each manufacturer has its own configuration interface. For example, so http://dlink.ru/ru/faq/246/1156.html
As a result, we get such a picture
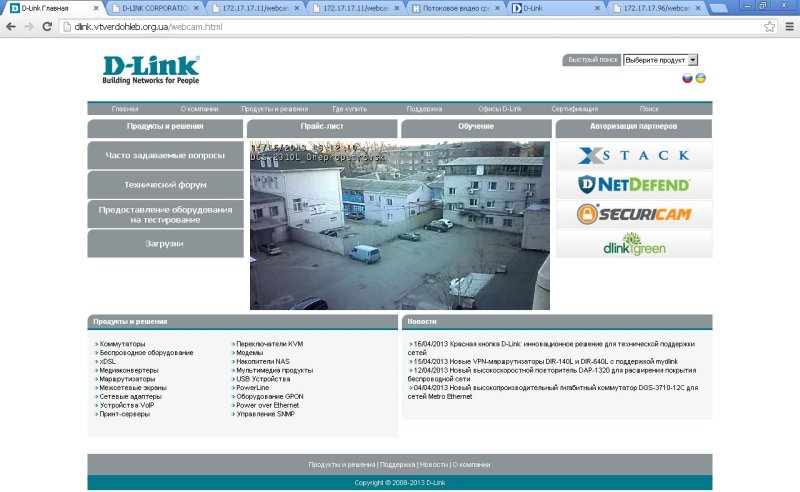
How it really works can be seen on the demo page
http://dlink.vtverdohleb.org.ua/webcam.html
True, I can’t guarantee that the page will always work, for some reason beyond my control, the camera may have to be turned off. But I will try not to turn it off for a month, after posting the article.
Possible problems:
1. Broadcasting is based on vlc-mozilla-plugin. Therefore, there will be no picture if the computer does not have VLC Player. But searches in Google of some absolutely universal system yielded nothing. For example, on my tablet, after installing VLC Player, the video went, but it doesn’t show sites with SWF flash.
2. The outgoing bandwidth of your channel is lower than the total flow for everyone. Well, here are the options - to increase the outgoing speed of the channel or to “squeeze” the speed of the video stream by reducing frames / s and decreasing the “Video quality / Constant bit rate” with a deterioration in picture quality.
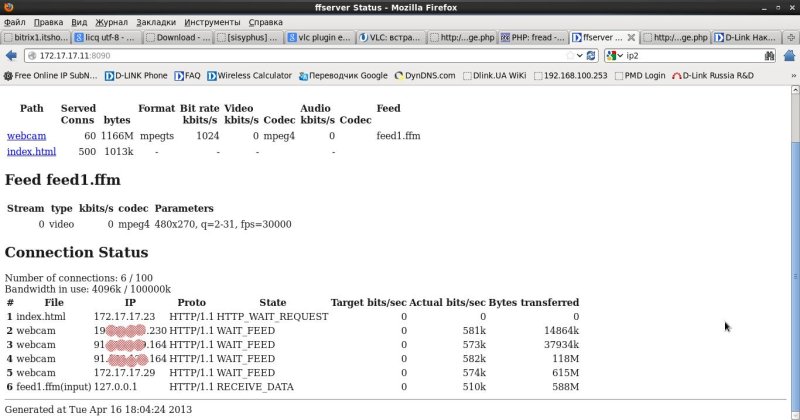
You can see who is watching and what flow rates can be found on the status page:
http: // storage ip_address: 8090 /
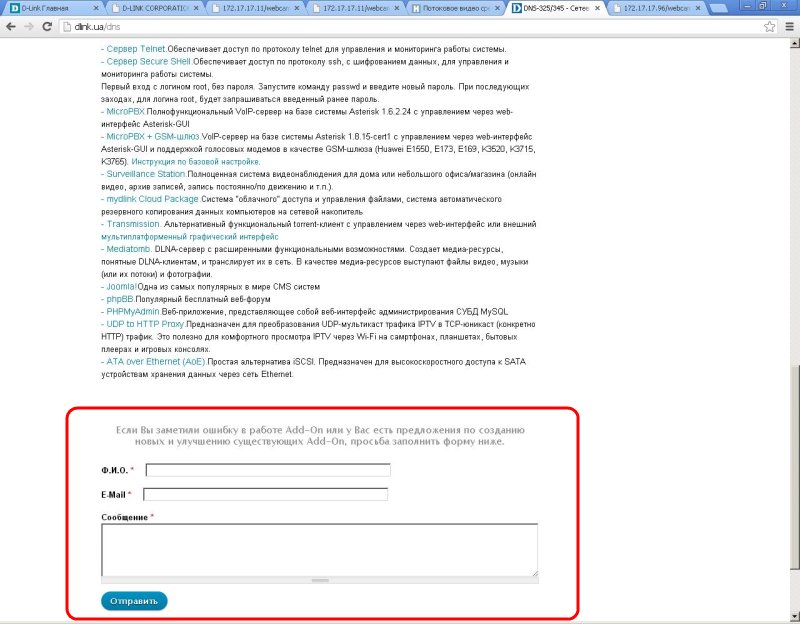
In the next version of Webcam, the ability to work with 5 cameras will be added. If you have comments and suggestions on the current version, please write them out in writing at http://dlink.ua/dns or in the comments on the article.
Anticipating the comment “But how can a weak NAS handle the distribution of 5 cameras to a couple of dozen users?” I give an example top

As you can see, ffserver & ffmpeg broadcasting consumes only 3% of the percentage for the first camera and 4 users in viewing.
In general, D-Link DNS-325 & DNS-345 are very successful devices that can do everything that competing devices offer and even more. I already described some of their functionality in previous articles:
Is IPTV over Wi-Fi a problem? Absolutely no problem!
What should we build a telephone exchange!
Have a nice viewing!
What is the best way to “throw out” a camera image on a site? You can of course give the image to the user directly from the IP camera. But IP cameras are not designed for a large number of simultaneous connections and most of them after the 5-6th connection will begin to "die", up to a complete hang. And if you want to see the beach and the sea dozens, if not hundreds? The problem is solved with the help of an intermediary media server. There are a lot of articles describing such a solution, for example, " Streaming video using ffserver & ffmpeg". True, this article describes a solution for a USB camera, but the principle of operation is also suitable for IP cameras. But such an approach requires good knowledge of Linux, and most importantly - a high-performance, respectively quite expensive processor. A simple Intel Atom with the task of transcoding real-time video from M-JPEG to FLV, MPEG4 or H.264 is unlikely to cope. And to give the image in the M-JPEG codec to the site is a stream of ~ 3-4Mbit / s with a picture of 640x480 with 15 frames / s. What outgoing bandwidth is required if dozens of users watch it? Yes, and "pump" these same ~ 3-4Mbit / s, not every user is able to.
There is a simple solution - an add-on for D-Link DNS-325 & DNS-345 network drives called Webcam. All the “tools” in it are available, it will be enough to perform the simplest actions, which I will describe below. I checked only on D-Link IP cameras, but in theory it should work with others.
Let's start by installing Add-On. Take here http://dlink.ua/dns or here http://dlink.vtverdohleb.org.ua/Add-On/ .
Go to the "Management / Application Management / Add Ons" section and install the Add-On appropriate for your drive model.
Messages "Third-party Add-On ..." do not be alarmed, click Yes.
After installation is complete, start Add-On with the Start button, go to the Applications section and open the Webcam web interface.
But first you need to configure the IP camera accordingly. For example, I’ll give you the configuration of the D-Link DCS-2310L IP camera. Go to the Setup / Audio and Video section and add a new one or modify an existing profile.
The main requirement is that only MPEG4 codec will not work with others. The rest of the settings are up to you, but I would recommend the following:
1. “Frame size & View window area” no more than 800x600. It will work, but the speed of the video stream will be too big for the site.
2. "Maximum frame rate" no more than 15 frames / s, and preferably 4-7 frames / s. The reason is the same as in paragraph 1.
3. "Video quality", for this model of camera, it is better to select "Constant bit rate" 1M, or less. This indicator is better to select according to the visual perception of the resulting image. But the smaller the better.
Next, go to the “Setup / Network Setup” section and remember the name “RTSP / Access name for stream” for the profile you configured. In my case, profile 2 corresponds to "live2.sdp".
“Authentication & RTSP port” leave unchanged.
Let's get back to setting up Webcam. In the Cam IP field, enter the IP address of your camera, in the RTSP name field, the corresponding RTSP / Access name for stream. Turn on the “Audio” checkbox if you want to transfer video with sound. But I would not recommend including Audio, as this will give a significant load to the drive’s processor, and for the site the main picture is not the sound. Click Submit. If, for some reason, the addition failed, a message will be displayed to the right of “Camera 1”, for example, “Error: Bad IP or RTSP URL”. If everything went well, you will see the following:
If you want to change the IP camera, RTSP name or image resolution, you will need to click “Delete” and enter the parameters again.
If everything is OK, start broadcasting with the "Start" button.
The broadcast went, now you need to add the html-code of access to the video on the page of your site. Click “Site code”.
It is assumed that your drive is inside a LAN network and not accessible from the outside. Therefore, the external IP address of your router is substituted in the html code. Accordingly, in order for the image to be seen from the Internet, a “port forwarding” (Virtual Server or Port Forwarding) needs to be done on the router. TCP protocol, port 8090. I will not tell you how to forward the probes, since there is no universal instruction, each manufacturer has its own configuration interface. For example, so http://dlink.ru/ru/faq/246/1156.html
As a result, we get such a picture
How it really works can be seen on the demo page
http://dlink.vtverdohleb.org.ua/webcam.html
True, I can’t guarantee that the page will always work, for some reason beyond my control, the camera may have to be turned off. But I will try not to turn it off for a month, after posting the article.
Possible problems:
1. Broadcasting is based on vlc-mozilla-plugin. Therefore, there will be no picture if the computer does not have VLC Player. But searches in Google of some absolutely universal system yielded nothing. For example, on my tablet, after installing VLC Player, the video went, but it doesn’t show sites with SWF flash.
2. The outgoing bandwidth of your channel is lower than the total flow for everyone. Well, here are the options - to increase the outgoing speed of the channel or to “squeeze” the speed of the video stream by reducing frames / s and decreasing the “Video quality / Constant bit rate” with a deterioration in picture quality.
You can see who is watching and what flow rates can be found on the status page:
http: // storage ip_address: 8090 /
In the next version of Webcam, the ability to work with 5 cameras will be added. If you have comments and suggestions on the current version, please write them out in writing at http://dlink.ua/dns or in the comments on the article.
Anticipating the comment “But how can a weak NAS handle the distribution of 5 cameras to a couple of dozen users?” I give an example top
As you can see, ffserver & ffmpeg broadcasting consumes only 3% of the percentage for the first camera and 4 users in viewing.
In general, D-Link DNS-325 & DNS-345 are very successful devices that can do everything that competing devices offer and even more. I already described some of their functionality in previous articles:
Is IPTV over Wi-Fi a problem? Absolutely no problem!
What should we build a telephone exchange!
Have a nice viewing!