JavaScript hyperspace
Khabrovites! Happy Cosmonautics Day!
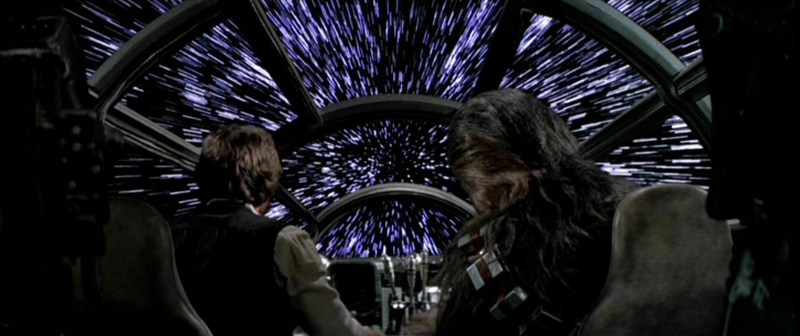
In one project, timed to coincide with today's holiday, designers were tasked with creating an imitation of hyperspace. After thinking a bit, I decided that it would be more appropriate to use the Canvas element - there are quite a lot of elements for SVG, and the support among browsers is not so good, the background is too big for the video, which means the file is too large and the download takes too long. Canvas, by the way, is also not an ideal option - it heavily loads the processor and takes up a lot of RAM. But still…
The design had a picture of the starry sky, which I decided to use. Took, loaded, put on Canvas. Then I added another pixel with an increase. Then again. The picture is beautiful, but you won’t be able to customize it in any way.
Full code and demo on jsfiddle .
There is nothing to comment on in the code, so just the code.
This approach has no life for several reasons:
It was decided to draw each star and a loop from it separately.
Full code and demo on jsfiddle . Movement hanged on mousemove event.
So, we create an array of stars, we generate initial values for them. Here x and y, of course, the coordinates of the star, currentLife is an indicator of the current length of the loop from the star, nx, ny and life are used to reinitialize the star after stopping. color - one of the options in the colors array. In principle, any color could be made in general, but a feature in limiting the number of available colors will come in handy later. There are two arrays, so at the moment of decay it is necessary to show moving and motionless stars at the same time. Of course, this can be (and probably even necessary) done through one array with a separate property for the star, but further logic depends on it and therefore I'm too lazy to rewrite everything.
Now let's talk about the display of a star. Here we have included simple math:
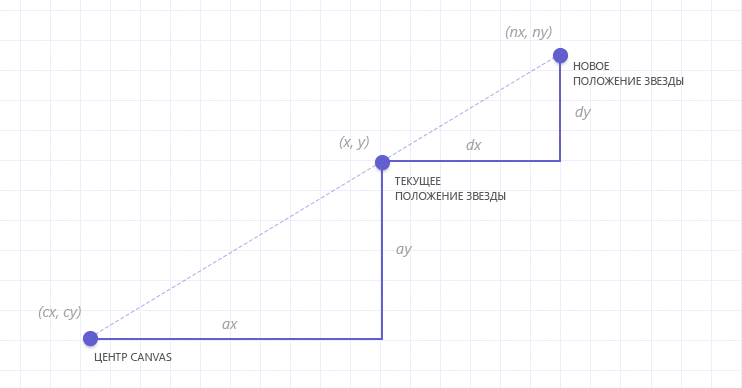
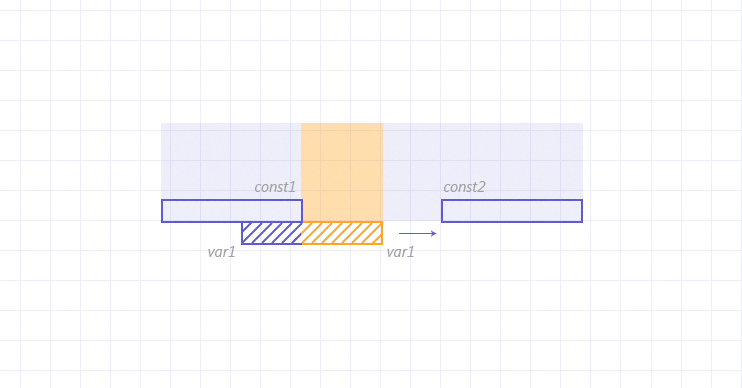
I think there is no need to explain that dx refers to dy in the same way as ax refers to ay. If we take dx equal to the value of currentLife, then dy = currentLife * (y - cy) / (x - cx). In addition, each star has two states - when the train grows and when it decreases. To implement this is quite simple through 4 values: 2 constants and 2 variables. Draw from (var1> const1? Var1: const1) to (var2 <const2? Var2: const2). First we get a growing, and then a fading star.
It remains to calculate all this:
Depending on what quarter our star falls into, the signs before the values and comparisons are different, therefore the code is almost duplicated 4 times. In addition, the mod variable remembers which coordinate is considered the leading one (that is, equating dx with currentLife or dy). Without a mod, stars in the vicinity of the ordinate axis will “fly” too fast, because of the wide angle.
And the last remark - in the original, only two colors are used, therefore, in one pass, the canvas is drawn only two times (since two colors are indicated). All stars of the same color are formed in one way, and then displayed on Canvas.
It remains to wrap it all in a loop and run.
By the right approach, I understand the use of common ready-made solutions and libraries. There were no ready-made solutions during a quick inspection. As a library, I decided to try libcanvas. Fortunately on Habrahabr it is represented quite strongly.
Full code and demo on jsfiddle . (JSFiddle may not load atom and libcanvas with github, so it may be necessary to reload the page several times)
The result is the following:
I must say that here, in contrast to the combat version, adequate mathematics with trigonometry is used, but I did not begin to add to the same functionality. The speed of code execution on libCanvas is not much different from the native method, but the code is several times slower and the development speed is much higher. From the very beginning, I did not use libCanvas for several reasons: I had never used it before, I was used to pure JavaScript and I was afraid that the add-in version would be noticeably slower. As it turned out, I was afraid in vain.
Example of jsfiddle . It looks especially nice in fullScreen .
The creation and tuning of a star is moved to a separate class. For each star, speed, color and lifetime are determined.
Initially, fewer stars are created, and then added to each frame:
// UPD end
That's all and again with the day of astronautics!
Links:
An example with a picture on jsfiddle .
The "battle" example on jsfiddle .
AtomJS and libCanvas for the third example.
Third example on libCanvas on jsfiddle . (may not work right away due to the features of jsfiddle and github)
Promo site for which the effect was created.
In one project, timed to coincide with today's holiday, designers were tasked with creating an imitation of hyperspace. After thinking a bit, I decided that it would be more appropriate to use the Canvas element - there are quite a lot of elements for SVG, and the support among browsers is not so good, the background is too big for the video, which means the file is too large and the download takes too long. Canvas, by the way, is also not an ideal option - it heavily loads the processor and takes up a lot of RAM. But still…
Margin entry
The code will use the reqestAnimFrame function normalizing the operation of requestAnimationFrame in different browsers, and the same simple function to generate a random integer. Here is their source code:
        window.requestAnimFrame = (function(){
            return  window.requestAnimationFrame       ||
                    window.webkitRequestAnimationFrame ||
                    window.mozRequestAnimationFrame    ||
                    window.oRequestAnimationFrame      ||
                    window.msRequestAnimationFrame     ||
                    function(/* function */ callback, /* DOMElement */ element){
                        window.setTimeout(callback, 1000 / 60);
                    };
        })();
        function getRandomInt(min, max){
            return Math.floor( Math.random() * (max - min + 1) ) + min;
        }
Approach 1. Overlay a scaled image.
The design had a picture of the starry sky, which I decided to use. Took, loaded, put on Canvas. Then I added another pixel with an increase. Then again. The picture is beautiful, but you won’t be able to customize it in any way.
Full code and demo on jsfiddle .
There is nothing to comment on in the code, so just the code.
This approach has no life for several reasons:
- The original image is always the same size, which means it is difficult to maintain different resolutions.
- There are few possibilities for customizing the resulting picture.
- To erase after a while already traveled the path is quite difficult.
- Quality at high magnification is too low.
- This is an uninteresting decision.
Approach 2. Combat.
It was decided to draw each star and a loop from it separately.
Full code and demo on jsfiddle . Movement hanged on mousemove event.
So, we create an array of stars, we generate initial values for them. Here x and y, of course, the coordinates of the star, currentLife is an indicator of the current length of the loop from the star, nx, ny and life are used to reinitialize the star after stopping. color - one of the options in the colors array. In principle, any color could be made in general, but a feature in limiting the number of available colors will come in handy later. There are two arrays, so at the moment of decay it is necessary to show moving and motionless stars at the same time. Of course, this can be (and probably even necessary) done through one array with a separate property for the star, but further logic depends on it and therefore I'm too lazy to rewrite everything.
      var colors = ["white","rgb(200,200,255)"];
        function newStar(){
            var life = getRandomInt(50,150);
            var dx = getRandomInt(0,canvas.width);
            var dy = getRandomInt(0,canvas.height);
            return {
                x : dx,
                y : dy,
                nx : dx,
                ny : dy,
                life : life,
                currentLife : life,
                color : colors[getRandomInt(0,1)]
            };
        }
        var stars = [];
        var finStars = [];
        var maxStars = 350;
        for(var i = 0; i < maxStars; i++){
            finStars.push(newStar());
        }
Now let's talk about the display of a star. Here we have included simple math:
I think there is no need to explain that dx refers to dy in the same way as ax refers to ay. If we take dx equal to the value of currentLife, then dy = currentLife * (y - cy) / (x - cx). In addition, each star has two states - when the train grows and when it decreases. To implement this is quite simple through 4 values: 2 constants and 2 variables. Draw from (var1> const1? Var1: const1) to (var2 <const2? Var2: const2). First we get a growing, and then a fading star.
It remains to calculate all this:
                        var x = stars[j].x, // (x,y) - это const1
                            y = stars[j].y,
                            dx = cx - stars[j].x,
                            dy = cy - stars[j].y;
                        if ( Math.abs(dx) > Math.abs(dy) ){
                            var xLife = dx > 0 ? stars[j].life : - stars[j].life, // (xLife, yLife) - const2. Вообще star.life это вся продолжительность "жизни" звезды
                                yLife = xLife * dy / dx,
                                xCur = dx > 0 ? - stars[j].currentLife :  stars[j].currentLife, // (xCur,yCur) -var1
                                yCur = xCur * dy / dx,
                                xLast = dx > 0 ? xCur + stars[j].life : xCur - stars[j].life, // (xLast,yLast) - var2
                                yLast = xLast * dy / dx,
                                mod = "x";
                        } else {
                            var yLife = dy > 0 ? stars[j].life : - stars[j].life,
                                xLife = yLife * dx / dy,
                                yCur = dy > 0 ? - stars[j].currentLife :  stars[j].currentLife,
                                xCur = yCur * dx / dy,
                                yLast = dy > 0 ? yCur + stars[j].life : yCur - stars[j].life,
                                xLast = yLast * dx / dy,
                                mod = "y";
                        }
                        if(dx > 0 && dy > 0)
                        {
                            var qx = x - ( xLife < xLast ? xLife : xLast);
                            var qy = y - ( yLife < yLast ? yLife : yLast);
                            ctx.moveTo( qx < cx ? qx : cx, qy < cy ? qy : cy);
                            var sx = x - ( xCur > 0 ? xCur : 0);
                            var sy = y - ( yCur > 0 ? yCur : 0);
                            ctx.lineTo( sx < cx ? sx : cx, sy < cy ? sy : cy);
                            if ( mod == "x"){
                                ctx.lineTo( qx < cx ? qx : cx, (qy < cy ? qy : cy) + 2);
                            } else {
                                ctx.lineTo( (qx < cx ? qx : cx) + 2, qy < cy ? qy : cy);
                            }
                            ctx.lineTo( qx < cx ? qx : cx, qy < cy ? qy : cy);
                            ctx.closePath();
                            stars[j].nx = sx < cx ? sx : cx;
                            stars[j].ny = sy < cy ? sy : cy;
                        }
                        if(dx < 0 && dy < 0)
                        {
                            var qx = x - ( xLife > xLast ? xLife : xLast);
                            var qy = y - ( yLife > yLast ? yLife : yLast);
                            ctx.moveTo( qx > cx ? qx : cx, qy > cy ? qy : cy);
                            var sx = x - ( xCur < 0 ? xCur : 0);
                            var sy = y - ( yCur < 0 ? yCur : 0);
                            ctx.lineTo( sx > cx ? sx : cx, sy > cy ? sy : cy);
                            if ( mod == "x" ){
                                ctx.lineTo( qx > cx ? qx : cx, (qy > cy ? qy : cy) + 2);
                            } else {
                                ctx.lineTo( (qx > cx ? qx : cx) + 2, qy > cy ? qy : cy);
                            }
                            ctx.lineTo( qx > cx ? qx : cx, qy > cy ? qy : cy);
                            ctx.closePath();
                            stars[j].nx = sx > cx ? sx : cx;
                            stars[j].ny = sy > cy ? sy : cy;
                        }
                        if(dx < 0 && dy > 0)
                        {
                            var qx = x - ( xLife > xLast ? xLife : xLast);
                            var qy = y - ( yLife < yLast ? yLife : yLast);
                            ctx.moveTo( qx > cx ? qx : cx, qy < cy ? qy : cy);
                            var sx = x - ( xCur < 0 ? xCur : 0);
                            var sy = y - ( yCur > 0 ? yCur : 0);
                            ctx.lineTo( sx > cx ? sx : cx, sy < cy ? sy : cy);
                            if ( mod == "x" ){
                                ctx.lineTo( qx > cx ? qx : cx, (qy < cy ? qy : cy) + 2);
                            } else {
                                ctx.lineTo( (qx > cx ? qx : cx) + 2, qy < cy ? qy : cy);
                            }
                            ctx.lineTo( qx > cx ? qx : cx, qy < cy ? qy : cy);
                            ctx.closePath();
                            stars[j].nx = sx > cx ? sx : cx;
                            stars[j].ny = sy < cy ? sy : cy;
                        }
                        if(dx > 0 && dy < 0)
                        {
                            var qx = x - ( xLife < xLast ? xLife : xLast);
                            var qy = y - ( yLife > yLast ? yLife : yLast);
                            ctx.moveTo( qx < cx ? qx : cx, qy > cy ? qy : cy);
                            var sx = x - ( xCur > 0 ? xCur : 0);
                            var sy = y - ( yCur < 0 ? yCur : 0);
                            ctx.lineTo( sx < cx ? sx : cx, sy > cy ? sy : cy);
                            if ( mod == "x" ){
                                ctx.lineTo( qx < cx ? qx : cx, (qy > cy ? qy : cy) + 2);
                            } else {
                                ctx.lineTo( (qx < cx ? qx : cx) + 2, qy > cy ? qy : cy);
                            }
                            ctx.lineTo( qx < cx ? qx : cx, qy > cy ? qy : cy);
                            ctx.closePath();
                            stars[j].nx = sx < cx ? sx : cx;
                            stars[j].ny = sy > cy ? sy : cy;
                        }
Depending on what quarter our star falls into, the signs before the values and comparisons are different, therefore the code is almost duplicated 4 times. In addition, the mod variable remembers which coordinate is considered the leading one (that is, equating dx with currentLife or dy). Without a mod, stars in the vicinity of the ordinate axis will “fly” too fast, because of the wide angle.
And the last remark - in the original, only two colors are used, therefore, in one pass, the canvas is drawn only two times (since two colors are indicated). All stars of the same color are formed in one way, and then displayed on Canvas.
It remains to wrap it all in a loop and run.
Approach 3. Correct.
By the right approach, I understand the use of common ready-made solutions and libraries. There were no ready-made solutions during a quick inspection. As a library, I decided to try libcanvas. Fortunately on Habrahabr it is represented quite strongly.
Full code and demo on jsfiddle . (JSFiddle may not load atom and libcanvas with github, so it may be necessary to reload the page several times)
The result is the following:
    new function () {
        var center, i, helper, stars;
        LibCanvas.extract();
        helper = new App.Light(new Size( document.width, document.height));
        center = helper.app.rectangle.center;
        stars = [];
        for(i = 0; i < 350; i++){
            new function() {
                var point = new Point(getRandomInt(document.width/2,document.width),document.height/2),
                    length = getRandomInt(50,150),
                    angle = getRandomInt(0,360),
                    coords = [
                        new Point(0,0),
                        new Point(0,0),
                        new Point(0,0)
                    ],
                    path = helper.createVector( new Path()
                            .moveTo( coords[0] )
                            .lineTo( coords[1] )
                            .lineTo( coords[2] )
                            .lineTo( coords[0] )).setStyle({fill:"rgb(150,150,150)",stroke:"rgb(150,150,150)"});
                point.rotate( - angle.degree(), center);
                var star = {
                    point : point,
                    length : length,
                    angle : angle,
                    coords : coords,
                    live : 0,
                    setLength : function(){
                        if (arguments.length > 0){
                            this.live = arguments[0];
                        }
                        this.coords[0].x = this.point.x;
                        this.coords[0].y = this.point.y;
                        this.coords[1].x = this.coords[0].x + this.live * Math.cos( this.angle.degree() );
                        this.coords[1].y = this.coords[0].y - this.live * Math.sin( this.angle.degree() );
                        this.coords[2].x = this.coords[1].x + 2 * Math.sin( this.angle.degree() );
                        this.coords[2].y = this.coords[1].y + 2 * Math.cos( this.angle.degree() );
                    },
                    path : path
                };
                star.setLength();
                stars.push(star);
            };
        }
        setInterval(function(){
            for(var i = 0; i < 350; i++){
                stars[i].setLength( stars[i].live + 1 );
                stars[i].path.redraw();
            }
        },10);
    };
I must say that here, in contrast to the combat version, adequate mathematics with trigonometry is used, but I did not begin to add to the same functionality. The speed of code execution on libCanvas is not much different from the native method, but the code is several times slower and the development speed is much higher. From the very beginning, I did not use libCanvas for several reasons: I had never used it before, I was used to pure JavaScript and I was afraid that the add-in version would be noticeably slower. As it turned out, I was afraid in vain.
UPD The correct implementation on LibCanvas from TheShock
Example of jsfiddle . It looks especially nice in fullScreen .
The creation and tuning of a star is moved to a separate class. For each star, speed, color and lifetime are determined.
atom.declare( 'Star', App.Element, {
    progress: 0,
    opacity: 1,
    configure: function () {
        var screenRectangle = this.layer.ctx.rectangle;
        this.animate = new atom.Animatable(this).animate;
        this.from  = screenRectangle.getRandomPoint();
        this.shape = new Polygon(this.from.clone(), this.from.clone(), this.from.clone());
        this.angle = -this.from.angleTo(screenRectangle.center);
        this.sin   = this.angle.sin();
        this.cos   = this.angle.cos();
        this.progressSpeed = Math.random() + 0.5;
        this.color = new atom.Color(128, 128, Number.random(128, 192)).toString();
        setTimeout(this.fadeOut.bind(this), Number.random(1000, 8000));
    },
    fadeOut: function () {
        this.animate({
            time: 2000,
            props: { opacity: 0 },
            onComplete: this.destroy
        });
    },
    onUpdate: function () {
        var sin = this.sin, cos = this.cos, p = this.shape.points;
        this.progress += this.progressSpeed;
        p[1].x = p[0].x + this.progress * cos;
        p[1].y = p[0].y - this.progress * sin;
        p[2].x = p[1].x + 2 * sin;
        p[2].y = p[1].y + 2 * cos;
        this.redraw();
    },
    renderTo: function (ctx) {
        ctx.save();
        if (this.opacity < 1) ctx.set({ globalAlpha: this.opacity });
        ctx.fill( this.shape, this.color );
        ctx.restore();
    }
});
Initially, fewer stars are created, and then added to each frame:
new function () {
    var helper = new App.Light(
        new Size(document.width || 800, document.height || 800),
        { intersection: 'full', invoke: true }
    );
    for(i = 0; i < 200; i++) new Star(helper.layer);
    atom.frame.add(function () {
        new Star(helper.layer);
    });
};
// UPD end
That's all and again with the day of astronautics!
Links:
An example with a picture on jsfiddle .
The "battle" example on jsfiddle .
AtomJS and libCanvas for the third example.
Third example on libCanvas on jsfiddle . (may not work right away due to the features of jsfiddle and github)
Promo site for which the effect was created.