Wi-Fi with a username and password for each user or make WPA2-EAP / TLS available means
- Tutorial
From a practical point of view, it would be convenient to manage Wi-Fi networks by issuing a password to each user. This makes it easy to access your wireless network. Using the so-called WPA2 PSK authorization, to prevent access to an accidental user, you need to change the key, and also go through the authorization process on each individual Wi-Fi device. In addition, if you have several access points, the key needs to be changed on all of them. And if you need to hide the password from someone, you will have to give out a new one to all employees.
Imagine a situation - someone else came into your office (client, counterparty?), And you need to give him access to the Internet. Instead of giving him a WPA2 key, you can create a separate account for him, which then, after his departure, can bedeletedto block. This will give you the flexibility to manage your accounts, and users will be very pleased.
We will make a convenient scheme used in corporate networks, but completely from improvised means with minimal financial and hardware investments. She will be approved by the security service and management.
Once upon a time, IEEE engineers came up with the 802.1x standard. This standard is responsible for the ability to authorize a user immediately when connected to a data transmission medium. In other words, if for a connection, for example, PPPoE, you are connecting to a medium (switch), and you can already transfer data, authorization is needed to access the Internet. In the case of 802.1x, you cannot do anything until you log in. The end device itself will not allow you. A similar situation with Wi-Fi access points. The decision on the admission of you is made on an external authorization server. It can be RADIUS, TACACS, TACACS +, etc.
In general, user authorization at a point can be of the following types:
Now, let's look at options for how the access point will know for itself whether it is possible to provide the user access to the network or not:
There are also a fairly large number of ways of connecting the end device to the authorization server (PEAP, TLS, TTLS ...). I will not describe them here.
For a clear understanding, we give the general scheme of our future scheme:
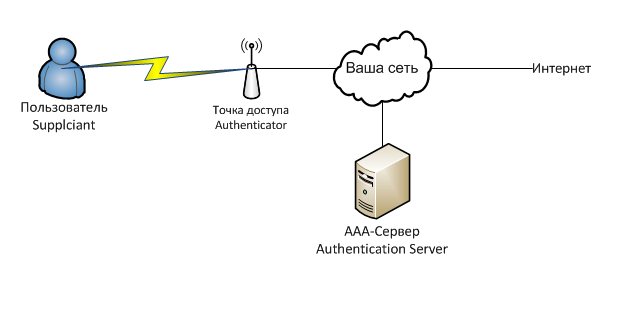
If in words, then the client, when connected to a Wi-Fi point, is prompted to enter a username and password. Having received the login and password, the Wi-Fi point transfers this data to the RADIUS server, to which the server answers what can be done with this client. Depending on the answer, the point decides whether to give it access, to cut speed or something else.
Our server with freeradius installed will be responsible for authorizing users. Freeradius is an implementation of the RADIUS protocol , which in turn is an implementation of the general AAA protocol. AAA is a set of tools for performing the following actions:
Authentication - checks the validity of the login and password.
Authorization - checks for rights to perform certain actions.
Accounting - takes into account your actions in the system.
The protocol itself passes the username, a list of attributes and their values for it. That is, for example, the attribute Auth-Type: = Reject - reject this client, and Client-Password == "password" - compare the attribute in the request with the password value.
Generally speaking, the database of accounts and rights for them does not have to be stored on a RADIUS server, and the database can be anything - nick users, users of a Windows domain ... yes even a text file. But in our case, everything will be in one place.
In this article, we will be primarily interested in the WPA2-EAP / TLS authentication method.
Almost all modern Wi-Fi access points worth more than 3 thousand rubles support the technology we need. Client devices support even more so.
In the article I will use the following hardware and software:
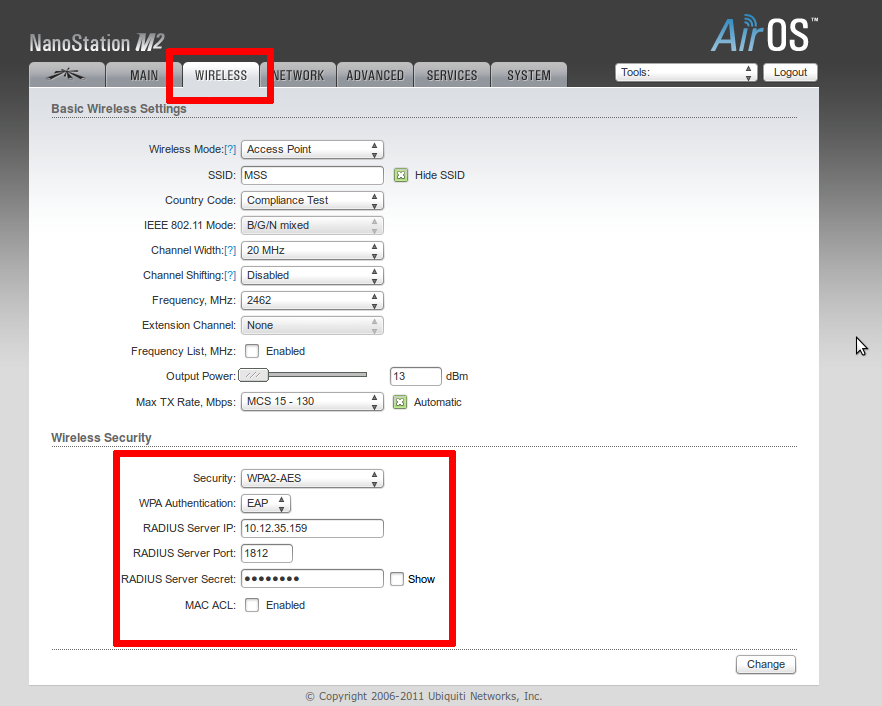
The main thing is that the point supports the desired authentication method. It can be called differently in different devices: WPA-EAP, WPA2 Enterprise, etc. In any case, we select authentication, set the IP address and port of the RADIUS server and the key that we entered in clients.conf when setting up Freeradius.
I will give a picture from the configured Ubiquiti point. Marked with a daw is what needs to be changed.
Let's go to our Linux computer and install a RADIUS server. I took freeradius, and I put it on gentoo. To my surprise, in RuNet there are no materials related to the configuration of Freeradius 2 for our purposes. All articles are quite old, refer to the old versions of this software.
That's all :) The RADIUS server can already work :) You can check it like this:
This is debug-mode. All information falls out on the console. Let's set it up.
As usual in Linux, configuration is done through configuration files. Configuration files are stored in / etc / raddb. Let's do the preparatory steps - copy the original configs, clean the configuration from any garbage.
Next, add the client - the access point. Add the following lines to the / etc / raddb / clients file:
Next, add the domain for users. Let's make default.
And finally, add users to the / etc / raddb / users file:
Wow, you can start!
Our server is running and waiting for connections!
Let's go over the configuration of the main user devices. Our employees have clients working on Android, iOS and Windows 7. We will make a reservation right away: since we use self-created certificates, we need to make all kinds of exceptions several times and confirm the actions. If we used purchased certificates, perhaps everything would be easier.
Everything is simpler on iOS devices. Enter the username and password, click "Accept Certificate", and go.
It looks a little more complicated, but in practice, everything is also simple on Android. There are a few more input fields.
Well, on Windows 7 you have to configure a little. We will carry out the following steps:
We go to the center of wireless connections.
Next, I will present screenshots of dialog boxes especially for people like me who have their eyes scattered from Windows dialog boxes.
Now, one problem remains - if you want to add-remove a new user, then you will have to change users and restart radius. To avoid this, we’ll connect a database and make our own mini-billing for users. Using the database, you can always sketch a simple script to add, lock, change the user password. And all this will happen without shutting down the entire system.
For myself, I used Postgres, you can choose as you wish. I bring the basic configuration of Postgres, without delving into various access rights, passwords and other tricks and conveniences.
First, create the database itself:
Next, you need to create the necessary tables. In general, Freeradius provides documentation on table schemas for various databases, although they are located in different places in different distributions. For me personally, this lies in /etc/raddb/sql/postgresql/schema.sql. Just paste these lines in psql, or just run
Just in case, add a diagram for Postgres here:
Great, the base is prepared. Now let's configure Freeradius.
Add, if it’s not there, in /etc/raddb/radiusd.conf the line
Now edit /etc/raddb/sql.conf to suit your reality. It looks like this for me:
Add some new users test1, test2, test3, and ... block test3
Well, restart freeradius and try to connect. Everything should work!
Of course, the billing turned out to be flawed - we do not store information on accounting (accounting for user actions) anywhere, but we don’t need it here either. To keep accounting, you also need Wi-Fi points more expensive than 3 thousand rubles. But already and so we easily manage users.
In the last section, we have collected our own small billing! It remains to complete the picture by screwing up some WEB-interface for managing the Database, add the required password change once a month for the kroon. And if the certificate and the Wi-Fi controller of access points are still ruined, then you have a full-fledged corporate wireless network in your hands. But even without these costs and with little effort on your part, having made your users such access, they will thank you very much.
Old but partially current instructions on ixbt
WIKI FreeRadius
Used Wi-Fi point Ubiquiti Nanostation M2
Imagine a situation - someone else came into your office (client, counterparty?), And you need to give him access to the Internet. Instead of giving him a WPA2 key, you can create a separate account for him, which then, after his departure, can be
We will make a convenient scheme used in corporate networks, but completely from improvised means with minimal financial and hardware investments. She will be approved by the security service and management.
Bit of theory
Once upon a time, IEEE engineers came up with the 802.1x standard. This standard is responsible for the ability to authorize a user immediately when connected to a data transmission medium. In other words, if for a connection, for example, PPPoE, you are connecting to a medium (switch), and you can already transfer data, authorization is needed to access the Internet. In the case of 802.1x, you cannot do anything until you log in. The end device itself will not allow you. A similar situation with Wi-Fi access points. The decision on the admission of you is made on an external authorization server. It can be RADIUS, TACACS, TACACS +, etc.
Terminology
In general, user authorization at a point can be of the following types:
- Open - available to everyone
- WEP - old encryption. Already at all bald spots that it is not necessary to use it at all
- WPA - Used by TKIP as an encryption protocol
- WPA2 - Using AES Encryption
Now, let's look at options for how the access point will know for itself whether it is possible to provide the user access to the network or not:
- WPA-PSK, WPA2-PSK - the access key is at the very point.
- WPA-EAP, WPA2-EAP - the access key is checked against some remote database on a third-party server
There are also a fairly large number of ways of connecting the end device to the authorization server (PEAP, TLS, TTLS ...). I will not describe them here.
General network diagram
For a clear understanding, we give the general scheme of our future scheme:
If in words, then the client, when connected to a Wi-Fi point, is prompted to enter a username and password. Having received the login and password, the Wi-Fi point transfers this data to the RADIUS server, to which the server answers what can be done with this client. Depending on the answer, the point decides whether to give it access, to cut speed or something else.
Our server with freeradius installed will be responsible for authorizing users. Freeradius is an implementation of the RADIUS protocol , which in turn is an implementation of the general AAA protocol. AAA is a set of tools for performing the following actions:
Authentication - checks the validity of the login and password.
Authorization - checks for rights to perform certain actions.
Accounting - takes into account your actions in the system.
The protocol itself passes the username, a list of attributes and their values for it. That is, for example, the attribute Auth-Type: = Reject - reject this client, and Client-Password == "password" - compare the attribute in the request with the password value.
Generally speaking, the database of accounts and rights for them does not have to be stored on a RADIUS server, and the database can be anything - nick users, users of a Windows domain ... yes even a text file. But in our case, everything will be in one place.
Basic setting
In this article, we will be primarily interested in the WPA2-EAP / TLS authentication method.
Almost all modern Wi-Fi access points worth more than 3 thousand rubles support the technology we need. Client devices support even more so.
In the article I will use the following hardware and software:
- Ubiquiti NanoStation M2 Access Point
- Gentoo Server and Freeradius
- Client equipment with installed software Windows 7, Android, iOS
Access Point Setup
The main thing is that the point supports the desired authentication method. It can be called differently in different devices: WPA-EAP, WPA2 Enterprise, etc. In any case, we select authentication, set the IP address and port of the RADIUS server and the key that we entered in clients.conf when setting up Freeradius.
I will give a picture from the configured Ubiquiti point. Marked with a daw is what needs to be changed.
RADIUS server
Let's go to our Linux computer and install a RADIUS server. I took freeradius, and I put it on gentoo. To my surprise, in RuNet there are no materials related to the configuration of Freeradius 2 for our purposes. All articles are quite old, refer to the old versions of this software.
root@localhost ~ # emerge -v freeradius
That's all :) The RADIUS server can already work :) You can check it like this:
root@localhost ~ # radiusd -fX
This is debug-mode. All information falls out on the console. Let's set it up.
As usual in Linux, configuration is done through configuration files. Configuration files are stored in / etc / raddb. Let's do the preparatory steps - copy the original configs, clean the configuration from any garbage.
root@localhost ~ # cp -r /etc/raddb /etc/raddb.olg
root@localhost ~ # find /etc/raddb -type f -exec file {} \;  | grep 'text' | cut -d':' -f1 | xargs sed -i '/^ *\t* *#/d;/^$/d'
Next, add the client - the access point. Add the following lines to the / etc / raddb / clients file:
root@localhost ~ # cat /etc/raddb/clients.conf | sed '/client test-wifi/,/}/!d'
client test-wifi {
        ipaddr = 192.168.0.1 #IP адрес точки, которая будет обращаться к радиусу
        secret = secret_key #Секретный ключик. Такой же надо будет поставить на Wi-Fi точке.
        require_message_authenticator = no  #Лучше так, с каким-то D-Linkом у меня не получилось иначе
}
Next, add the domain for users. Let's make default.
root@localhost ~ # cat /etc/raddb/proxy.conf | sed '/realm DEFAULT/, /^}/!d'
realm DEFAULT {
        type = radius
        authhost = LOCAL
        acchost = LOCAL
}
Domains in RADIUS
It should be noted here that you can divide users into domains. Namely, the domain can be specified in the username format (for example, user @ radius). DEFAULT means any undefined domain. NULL - without a domain. Depending on the domain (you can say the prefix in the username), you can perform various actions, such as giving the right to authenticate to another host, whether to separate the name from the domain during login verification, etc.
And finally, add users to the / etc / raddb / users file:
root@localhost ~ # cat /etc/raddb/users | sed '10,$!d'
user1 Cleartext-Password := "password1"
user2 Cleartext-Password := "password2"
user3 Cleartext-Password := "password3"
Wow, you can start!
root@localhost ~ # radiusd -fX
Our server is running and waiting for connections!
Customer setup
Let's go over the configuration of the main user devices. Our employees have clients working on Android, iOS and Windows 7. We will make a reservation right away: since we use self-created certificates, we need to make all kinds of exceptions several times and confirm the actions. If we used purchased certificates, perhaps everything would be easier.
Everything is simpler on iOS devices. Enter the username and password, click "Accept Certificate", and go.
IOS screenshot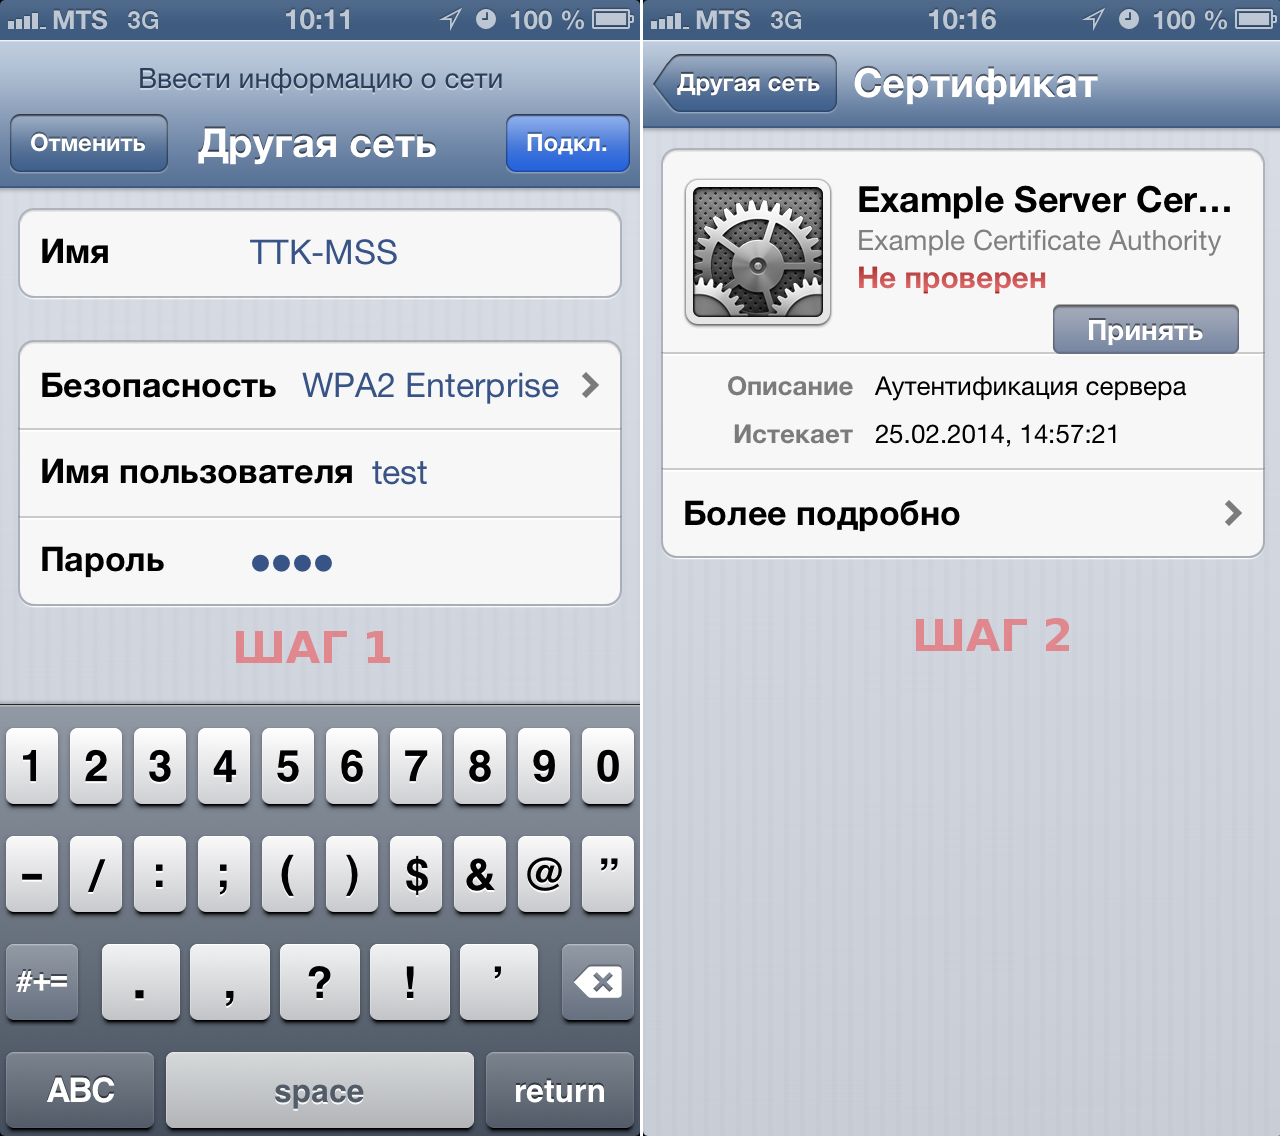
It looks a little more complicated, but in practice, everything is also simple on Android. There are a few more input fields.
Android screenshot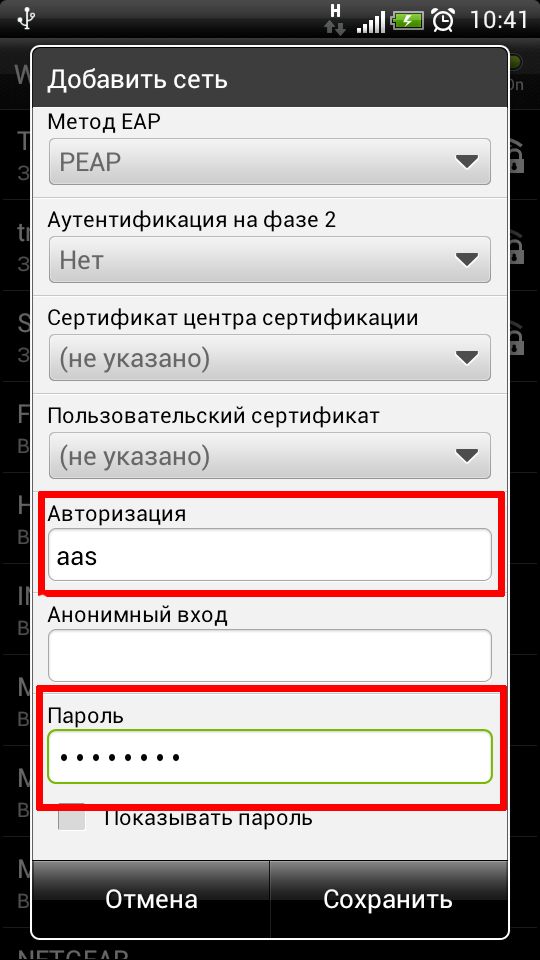
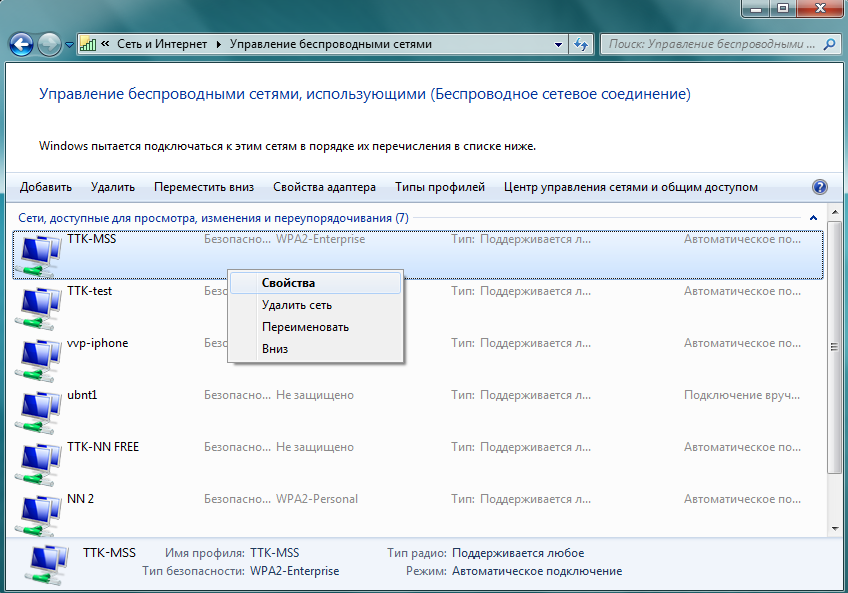
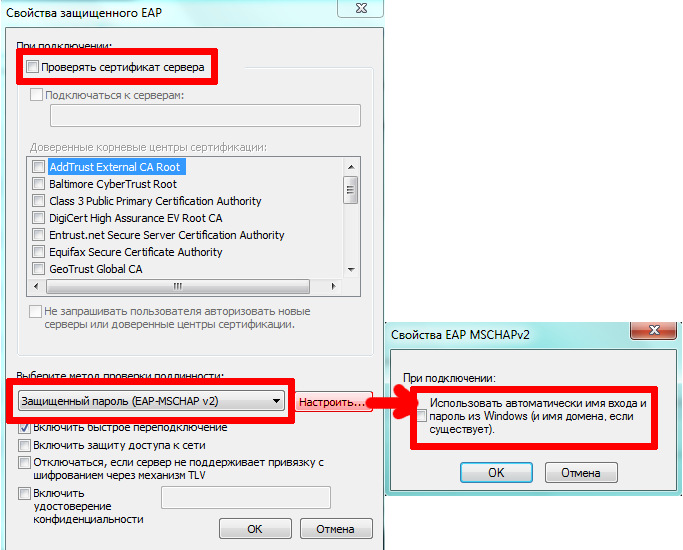
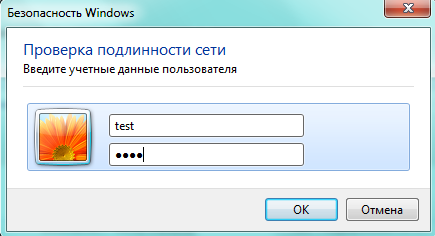
Well, on Windows 7 you have to configure a little. We will carry out the following steps:
We go to the center of wireless connections.
- Set the necessary parameters in the properties of your wireless connection
- Set the necessary parameters in the advanced EAP settings
- Set the necessary parameters in the advanced settings Advanced options
- We connect to the Wi-Fi network in the taskbar and enter the login password, enjoy access to Wi-Fi
Next, I will present screenshots of dialog boxes especially for people like me who have their eyes scattered from Windows dialog boxes.
Windows Screenshots
Step 1
Step 2
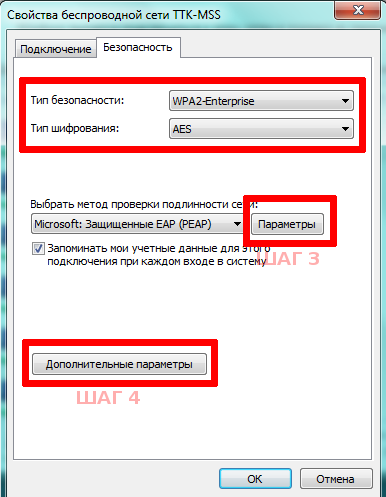
Step 3
Step 4

Step 5
Step 2
Step 3
Step 4
Step 5
Own mini billing
Now, one problem remains - if you want to add-remove a new user, then you will have to change users and restart radius. To avoid this, we’ll connect a database and make our own mini-billing for users. Using the database, you can always sketch a simple script to add, lock, change the user password. And all this will happen without shutting down the entire system.
For myself, I used Postgres, you can choose as you wish. I bring the basic configuration of Postgres, without delving into various access rights, passwords and other tricks and conveniences.
First, create the database itself:
root@localhost ~ # psql -U postgres
radius_wifi=> create user radius_wifi with password 1111;
radius_wifi=> create database radius_wifi with owner=radius_wifi;
radius_wifi=> \q
Next, you need to create the necessary tables. In general, Freeradius provides documentation on table schemas for various databases, although they are located in different places in different distributions. For me personally, this lies in /etc/raddb/sql/postgresql/schema.sql. Just paste these lines in psql, or just run
root@localhost ~ # cat /etc/raddb/sql/postgresql/schema.sql | psql -U radius_wifi radius_wifi
Just in case, add a diagram for Postgres here:
Scheme for Postgres
root@localhost ~ # cat /etc/raddb/sql/postgresql/schema.sql | sed '/^--/d;/\/\*/d;/\*/d;/^$/d;'
CREATE TABLE radacct (
        RadAcctId               BIGSERIAL PRIMARY KEY,
        AcctSessionId           VARCHAR(64) NOT NULL,
        AcctUniqueId            VARCHAR(32) NOT NULL UNIQUE,
        UserName                VARCHAR(253),
        GroupName               VARCHAR(253),
        Realm                   VARCHAR(64),
        NASIPAddress            INET NOT NULL,
        NASPortId               VARCHAR(15),
        NASPortType             VARCHAR(32),
        AcctStartTime           TIMESTAMP with time zone,
        AcctStopTime            TIMESTAMP with time zone,
        AcctSessionTime         BIGINT,
        AcctAuthentic           VARCHAR(32),
        ConnectInfo_start       VARCHAR(50),
        ConnectInfo_stop        VARCHAR(50),
        AcctInputOctets         BIGINT,
        AcctOutputOctets        BIGINT,
        CalledStationId         VARCHAR(50),
        CallingStationId        VARCHAR(50),
        AcctTerminateCause      VARCHAR(32),
        ServiceType             VARCHAR(32),
        XAscendSessionSvrKey    VARCHAR(10),
        FramedProtocol          VARCHAR(32),
        FramedIPAddress         INET,
        AcctStartDelay          INTEGER,
        AcctStopDelay           INTEGER
);
CREATE INDEX radacct_active_user_idx ON radacct (UserName, NASIPAddress, AcctSessionId) WHERE AcctStopTime IS NULL;
CREATE INDEX radacct_start_user_idx ON radacct (AcctStartTime, UserName);
CREATE TABLE radcheck (
        id              SERIAL PRIMARY KEY,
        UserName        VARCHAR(64) NOT NULL DEFAULT '',
        Attribute       VARCHAR(64) NOT NULL DEFAULT '',
        op              CHAR(2) NOT NULL DEFAULT '==',
        Value           VARCHAR(253) NOT NULL DEFAULT ''
);
create index radcheck_UserName on radcheck (UserName,Attribute);
CREATE TABLE radgroupcheck (
        id              SERIAL PRIMARY KEY,
        GroupName       VARCHAR(64) NOT NULL DEFAULT '',
        Attribute       VARCHAR(64) NOT NULL DEFAULT '',
        op              CHAR(2) NOT NULL DEFAULT '==',
        Value           VARCHAR(253) NOT NULL DEFAULT ''
);
create index radgroupcheck_GroupName on radgroupcheck (GroupName,Attribute);
CREATE TABLE radgroupreply (
        id              SERIAL PRIMARY KEY,
        GroupName       VARCHAR(64) NOT NULL DEFAULT '',
        Attribute       VARCHAR(64) NOT NULL DEFAULT '',
        op              CHAR(2) NOT NULL DEFAULT '=',
        Value           VARCHAR(253) NOT NULL DEFAULT ''
);
create index radgroupreply_GroupName on radgroupreply (GroupName,Attribute);
CREATE TABLE radreply (
        id              SERIAL PRIMARY KEY,
        UserName        VARCHAR(64) NOT NULL DEFAULT '',
        Attribute       VARCHAR(64) NOT NULL DEFAULT '',
        op              CHAR(2) NOT NULL DEFAULT '=',
        Value           VARCHAR(253) NOT NULL DEFAULT ''
);
create index radreply_UserName on radreply (UserName,Attribute);
CREATE TABLE radusergroup (
        UserName        VARCHAR(64) NOT NULL DEFAULT '',
        GroupName       VARCHAR(64) NOT NULL DEFAULT '',
        priority        INTEGER NOT NULL DEFAULT 0
);
create index radusergroup_UserName on radusergroup (UserName);
CREATE TABLE radpostauth (
        id                      BIGSERIAL PRIMARY KEY,
        username                VARCHAR(253) NOT NULL,
        pass                    VARCHAR(128),
        reply                   VARCHAR(32),
        CalledStationId         VARCHAR(50),
        CallingStationId        VARCHAR(50),
        authdate                TIMESTAMP with time zone NOT NULL default 'now()'
);
Great, the base is prepared. Now let's configure Freeradius.
Add, if it’s not there, in /etc/raddb/radiusd.conf the line
$INCLUDE sql.conf
Now edit /etc/raddb/sql.conf to suit your reality. It looks like this for me:
My sql.conf
root@localhost ~ # cat /etc/raddb/sql.conf
sql {
        database = "postgresql"
        driver = "rlm_sql_${database}"
        server = "localhost"
        login = "radius_wifi"
        password = "1111"
        radius_db = "radius_wifi"
        acct_table1 = "radacct"
        acct_table2 = "radacct"
        postauth_table = "radpostauth"
        authcheck_table = "radcheck"
        authreply_table = "radreply"
        groupcheck_table = "radgroupcheck"
        groupreply_table = "radgroupreply"
        usergroup_table = "radusergroup"
        deletestalesessions = yes
        sqltrace = no
        sqltracefile = ${logdir}/sqltrace.sql
        num_sql_socks = 5
        connect_failure_retry_delay = 60
        lifetime = 0
        max_queries = 0
        nas_table = "nas"
        $INCLUDE sql/${database}/dialup.conf
}
Add some new users test1, test2, test3, and ... block test3
root@localhost ~ # psql -U postgres
radius_wifi=> insert into radcheck (username, attribute, op, value) values ('test1', 'Cleartext-Password', ':=', '1111');
radius_wifi=> insert into radcheck (username, attribute, op, value) values ('test2', 'Cleartext-Password', ':=', '1111');
radius_wifi=> insert into radcheck (username, attribute, op, value) values ('test3', 'Cleartext-Password', ':=', '1111');
radius_wifi=> insert into radcheck (username, attribute, op, value) values ('test3', 'Auth-Type', ':=', 'Reject');
Well, restart freeradius and try to connect. Everything should work!
Of course, the billing turned out to be flawed - we do not store information on accounting (accounting for user actions) anywhere, but we don’t need it here either. To keep accounting, you also need Wi-Fi points more expensive than 3 thousand rubles. But already and so we easily manage users.
What's next
In the last section, we have collected our own small billing! It remains to complete the picture by screwing up some WEB-interface for managing the Database, add the required password change once a month for the kroon. And if the certificate and the Wi-Fi controller of access points are still ruined, then you have a full-fledged corporate wireless network in your hands. But even without these costs and with little effort on your part, having made your users such access, they will thank you very much.
useful links
Old but partially current instructions on ixbt
WIKI FreeRadius
Used Wi-Fi point Ubiquiti Nanostation M2