Available mixed reality: how to create a virtual space
- Tutorial
We continue the series of articles on Windows Mixed Reality. Within its framework, from scratch, we will develop a mixed reality application for Unity in lab work format (lab work). You can, in parallel with the publication of articles, create such an application. Today we'll talk about setting up a VR environment, including creating a virtual room.

To run Speaker Placement in virtual reality (that is, in closed or immersive headsets), we need to create a virtual room and set up the environment so that we can teleport inside the room.
If you did not work in Unity before, we recommend using the standard Unity panel layout to perform the following actions. A description of the action is given with this original location.
To switch to the default layout of panels in Unity, select the command Window -> Layouts -> Default (Window -> Location -> Standard).
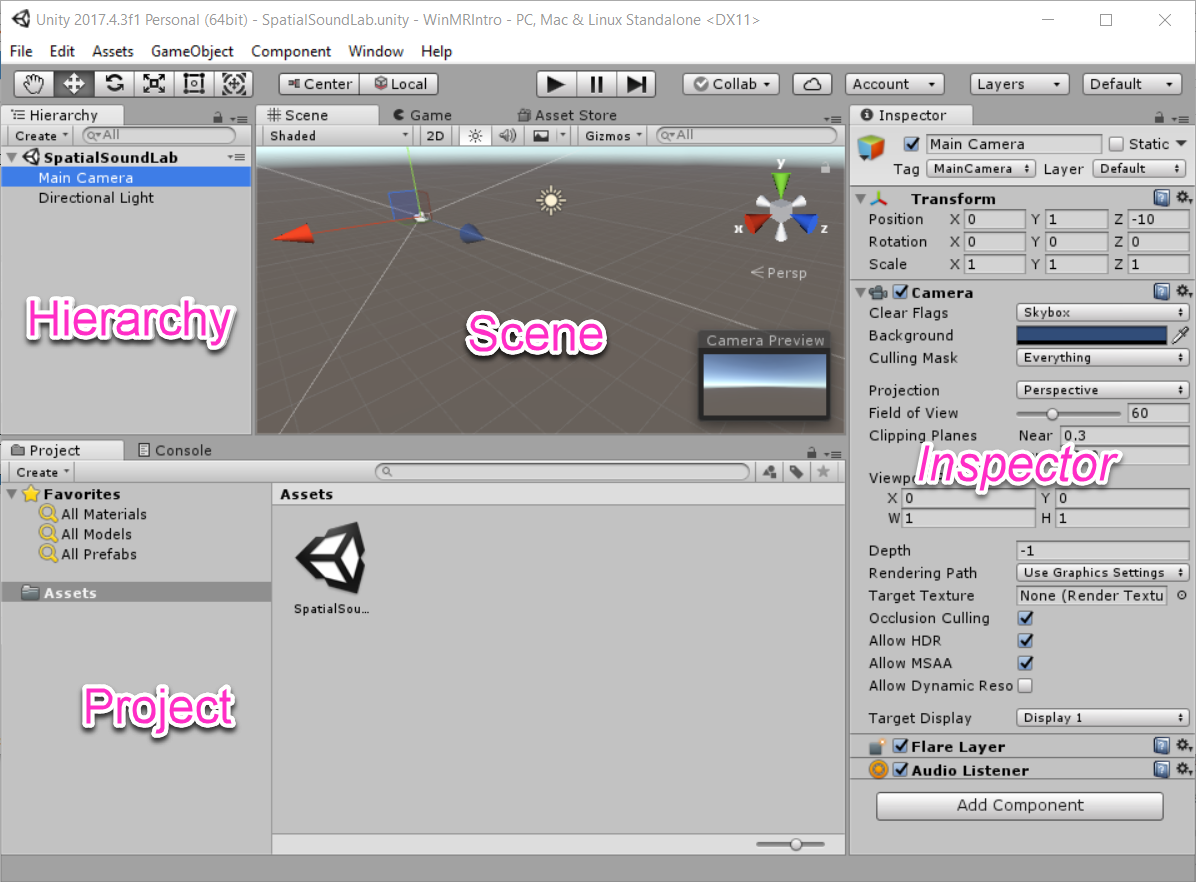
After that, the panels will be arranged as shown below. Pay attention to the different panel names in Unity - we will refer to them in our instructions.

Let's add to the scene the room we prepared earlier.
In the Unity Project panel, find the RoomPrefab.prefab room prefab in the Assets -> Prefabs folder (Resources -> Prefabs) and drag it to the Hierarchy panel. The prefab must be dragged to the empty part of the Hierarchy panel to prevent the room from being added to any other object as a child.
Since adding a prefab to the hierarchy adds it to the scene, our room should now be displayed in the Scene panel.
Try searching the room using the keyboard shortcuts and mouse buttons listed below, but do not move nearby objects. If you accidentally move or move scene objects, simply remove the RoomPrefab prefab from the hierarchy and add it again.
Additional options and ways to move around the scene can be found in the Unity documentation. Navigating the scene .
In the game object MixedRealityCameraParent, added in the previous section, there is a Boundary object, which we must configure in order to be able to navigate through our virtual room. First, we set the floor.
1. In the Hierarchy panel, expand the RoomPrefab prefab to see all of its children.
2. In the Hierarchy panel, expand the MixedRealityCameraParent element and select (or click) the Boundary object. After that, the Boundary object will be selected in the Hierarchy panel, and its properties will be displayed in the Inspector panel.
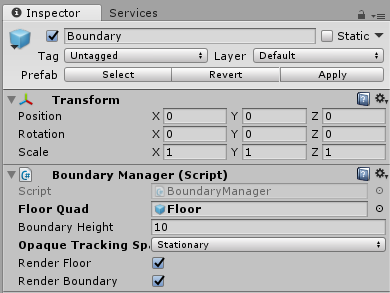
3. Leaving the Boundary object selected (try not to click on any other item in the hierarchy panel), scroll down the hierarchy pane, locate the Floor object and drag it to the Floor Quad property of the Boundary Manager section (Inspector panel Inspector).
Note. If you do not want to drag (for example, you do not have a mouse to accurately select an object), you can set properties using the button with the scopes icon to the right of the Floor Quad property in the Inspector panel only when selecting a target Select objects that are on the Scene tab, and not the Assets tab.
Since we will work with the configuration of standing-scale, we will change the type of space to stationary.
4. While the Boundary object is still selected, for the Opaque Tracking Space Type parameter, select the Stationary value.

You can learn more about the various configurations of Mixed Reality applications in this documentation.
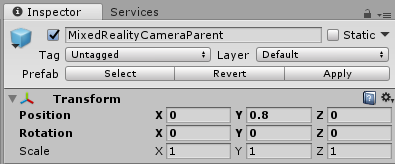
5. Last change: select MixedRealityCameraParent in the Hierarchy panel and change the value of Transform -> Position -> Y to 0.8. The camera will be located at the level of human eyes.

Now we can move to our virtual room.
If you have a headset, here are a few recommendations on what to look for when exploring the scene.
If you are using a simulator, follow the instructions in these documents for setting up the simulator and controlling it using the keyboard, mouse, or Xbox gamepad.
But quite expectations! Click the play icon in the Unity editor, put on the headset and explore the room.
Original
Authors: Eric Ahlstrom, cbarkerms, Madison Hight

The entire manual will consist of 5 parts. It will be updated every week. Below you can go to the part you need.
Part 1: Export a UWP app for Windows Mixed Reality from Unity ;
Part 2: Setting up the environment (VR) ;
Part 3: Controllers ;
Part 4: Spatial sound ;
Part 5: HoloLens and graphics .
Environment Setup (VR)
To run Speaker Placement in virtual reality (that is, in closed or immersive headsets), we need to create a virtual room and set up the environment so that we can teleport inside the room.
Switch to standard panel layout [optional step]
If you did not work in Unity before, we recommend using the standard Unity panel layout to perform the following actions. A description of the action is given with this original location.
To switch to the default layout of panels in Unity, select the command Window -> Layouts -> Default (Window -> Location -> Standard).
After that, the panels will be arranged as shown below. Pay attention to the different panel names in Unity - we will refer to them in our instructions.

Creating a virtual room
Let's add to the scene the room we prepared earlier.
In the Unity Project panel, find the RoomPrefab.prefab room prefab in the Assets -> Prefabs folder (Resources -> Prefabs) and drag it to the Hierarchy panel. The prefab must be dragged to the empty part of the Hierarchy panel to prevent the room from being added to any other object as a child.
Since adding a prefab to the hierarchy adds it to the scene, our room should now be displayed in the Scene panel.
Try searching the room using the keyboard shortcuts and mouse buttons listed below, but do not move nearby objects. If you accidentally move or move scene objects, simply remove the RoomPrefab prefab from the hierarchy and add it again.
- To rotate the scene, press the Alt key and move the mouse in the desired direction.
- To move around the scene, use the arrow keys (right, left, up, down).
- To move to the object and place it in the center of the scene, select the object and press Shift + F.
Additional options and ways to move around the scene can be found in the Unity documentation. Navigating the scene .
Space Type Setup
In the game object MixedRealityCameraParent, added in the previous section, there is a Boundary object, which we must configure in order to be able to navigate through our virtual room. First, we set the floor.
1. In the Hierarchy panel, expand the RoomPrefab prefab to see all of its children.
2. In the Hierarchy panel, expand the MixedRealityCameraParent element and select (or click) the Boundary object. After that, the Boundary object will be selected in the Hierarchy panel, and its properties will be displayed in the Inspector panel.
3. Leaving the Boundary object selected (try not to click on any other item in the hierarchy panel), scroll down the hierarchy pane, locate the Floor object and drag it to the Floor Quad property of the Boundary Manager section (Inspector panel Inspector).
Note. If you do not want to drag (for example, you do not have a mouse to accurately select an object), you can set properties using the button with the scopes icon to the right of the Floor Quad property in the Inspector panel only when selecting a target Select objects that are on the Scene tab, and not the Assets tab.
Since we will work with the configuration of standing-scale, we will change the type of space to stationary.
4. While the Boundary object is still selected, for the Opaque Tracking Space Type parameter, select the Stationary value.

You can learn more about the various configurations of Mixed Reality applications in this documentation.
5. Last change: select MixedRealityCameraParent in the Hierarchy panel and change the value of Transform -> Position -> Y to 0.8. The camera will be located at the level of human eyes.

Study virtual room
Now we can move to our virtual room.
If you have a headset, here are a few recommendations on what to look for when exploring the scene.
- The headset will track the movements of your head and, by moving your head, you will see different parts of the room. Tracking is performed in such a way that you will feel as if you are really in this room.
- Walk around the room (for example, step aside) and watch the headset track your position.
If you are using a simulator, follow the instructions in these documents for setting up the simulator and controlling it using the keyboard, mouse, or Xbox gamepad.
But quite expectations! Click the play icon in the Unity editor, put on the headset and explore the room.
Original
Authors: Eric Ahlstrom, cbarkerms, Madison Hight
