Translation of the SDL Game Framework Series. Part 2 - SDL Coordinates and Bliting
- Transfer
- Tutorial
Based on the first lesson , we will delve into the world of SDL surfaces . As I said, SDL surfaces are basically images stored in memory. Imagine that we have a blank window of 320x240 pixels in size. In the SDL coordinate system , the window is presented as follows:
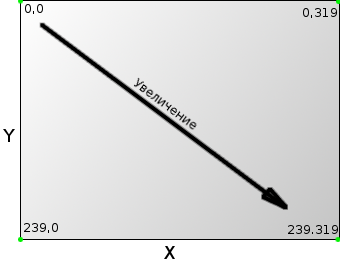
This coordinate system is different from the one you are used to (I'm talking about Cartesian). But the main difference between these systems is that the Y coordinate "grows" down. Understanding the SDL coordinate system is important in order to correctly draw images on the screen, so get a good grasp.
Since we already have a prepared and customized surface ( Surf_Display), we just have to find a way to render images. This method is called blitting (from the English blitting - moving a group of bits from one place to another, in our case, we mean transferring an image (or part of it) on top of another), i.e. kind of overlay. But before we can do this, we must also find a way to load these images into memory. SDL offers a simple function to implement its plan - SDL_LoadBMP (note: SDL_LoadBMP provides the ability to download images only in * .BMP format , as its name implies. To load images of other formats, you need to connect the SDL_image library to the project , as rightlynoticed in the comments comrade alrusdi in the first lesson, and use the function IMG_Load ). Sample code might look like this:
Everything is quite simple here, SDL_LoadBMP takes only one argument as a parameter - the path to the file you want to load, and it returns the surface containing the specified image. If the function returns NULL, then either the file was not found, or damaged, or other, more complex errors occurred. Unfortunately, to the detriment of efficiency, this method does not provide full coverage of all kinds of loading errors. Very often, the downloaded image does not match the pixel-by-pixel format of the surface into which we load it. Thus, during display, performance, image colors, etc. may be lost. (it is important that the prepared surface and the loaded image fit each other in all respects, i.e. (exaggerating) the size of the box would fit the dimensions of the load). Fortunately, the SDL has a quick and painless workaround for this problem - SDL_DisplayFormat . This function sets up an already loaded image, and returns a new surface suitable for the format displayed.
Now you need to open the project created in the previous lesson and add two files: CSurface.h and CSurface.cpp . Open CSurface.h and add the following:
Thus, we created a simple OnLoad function that will load the surface for us. Now open CSurface.cpp and add:
So, a couple of things that you should pay attention to:
1. Always reset your pointers before using them in any way (NULL or “0” does not matter). This will help to avoid the heap of a variety of problems and errors;
2. Remember that SDL_DisplayFormat returns a new surface based on the old one, so do not forget to free up the resources occupied by that old surface. Otherwise, we will observe the surface “wandering” in the memory as it pleases.
Now we have a way to load surfaces into memory, but we also need a way to map them to other surfaces. As well as for loading images, SDL has a function for this: SDL_BlitSurface. It may not be as easy to use as SDL_LoadBMP , but don't be scared. Open CSurface.h and add the following function prototype:
Open CSurface.cpp again and add the following:
First of all, let's take a look at the arguments that are passed to the OnDraw function . We see two surfaces, and two variables of type int . The first surface is taken as the base (remember the board in the first lesson?), I.e. the one on which we will display everything in the future. Accordingly, the second surface is the one that we will impose on the base (and here are our stickers). Basically, we just put Surf_Src on top of Surf_Dest , that's the whole secret. X and Y are variables that indicate the coordinates of the location on the Surf_Dest surface to which we will map Surf_Src .
At the beginning of the function, we need to make sure that we have surfaces, otherwise we return false . Next, we create a variable of type SDL_Rect . This structure SDL , which consists of four properties: X , Y , W , H . Of course, you already guessed that it just sets the parameters of the displayed region of the surface. So far, we are only interested in the coordinates of the place where we will display the rectangle, and we do not care about its size. So, further we assign the coordinates transferred to the X , Y function to the structure of the displayed region. If you're wondering what the NULL parameter isgot it in our SDL_BlitSurface (yes, the author, we are interested!), this is another parameter of the SDL_Rect type . We will come back to this a bit later.
Later came! I think that no one will be offended if we disassemble the SDL_BlitSurface signature a little earlier. I’ll briefly explain: we don’t always need to display the entire surface on top of another, there are many cases when you need to select some part of the image (for example, we have a tileset (from English tileset - a set of images, just a lot of pictures assembled in one image) and you need to select from it a certain square with a texture or character, etc.). So here
accepts as parameters in order, from left to right:
I think now everything has become more or less transparent and understandable.
At the end of the function, we draw customized surfaces and return true .
Now, to make sure everything works, let's create a test surface. Open CApp.h , and add a new surface, and include the CSurface.h header file we created :
Also, in the constructor, do not forget to first zero out our surfaces:
And remember to clean!
The time has come to download something. Open CApp_OnInit.cpp and make it look like this:
Make sure you really have the myimage.bmp file . If not, download or draw it yourself and put it in the directory with the executable file of your game. Open CApp_OnRender.cpp and add the following:
Check out the new SDL_Flip function . It updates the buffer and displays Surf_Display on the screen. This is called double buffering. It prepares the created surfaces first in memory, and then displays the prepared one on the screen. If we had not used it, we would have seen a flickering screen. Remember the SDL_DOUBLEBUF flag that we specified when creating the surface? It is precisely this which enables the double buffering mode.
Now you can compile the project, and make sure that everything works correctly. You should see an image in the upper left corner of the window. If so, congratulations, you are one step closer to the real game. If not, make sure you have myimage.bmplies in the same folder as the executable file, and also that it normally opens in the graphics viewer. Here's what happened to me:

(And yes, Icheated a little modified the code and uploaded my avatar in * .PNG format using IMG_Load . I advise you to experiment with this function too, and with others too. Go for it and you will succeed!) . If you get a message,
Let's move on! We entertained ourselves by finally displaying our first image in the window, but very often we need to display only a part of it, as an example - the tilesets listed below:
Those. having only one image, we need to draw only part of it. Open CSurface.h , and add the following code:
Open CSurface.cpp , and add the following function (Important, we add the second OnDraw function , and not replace the existing one! Do you know about function overloading ?) :
You see, this is basically the same function as before, except we added another SDL_Rect . This region allows you to specify which pixels from the overlay surface you want to copy to the main one. Now, together with the coordinates, we also indicate the remaining two parameters - the width and height 0, 0, 50, 50 and as a result we get the displayed region in the form of a square of 50x50 pixels.

And here is a piece of my avatar indented 100 pixels from the top and left edge of the screen:

Source code links:
Links to all lessons:
This coordinate system is different from the one you are used to (I'm talking about Cartesian). But the main difference between these systems is that the Y coordinate "grows" down. Understanding the SDL coordinate system is important in order to correctly draw images on the screen, so get a good grasp.
Since we already have a prepared and customized surface ( Surf_Display), we just have to find a way to render images. This method is called blitting (from the English blitting - moving a group of bits from one place to another, in our case, we mean transferring an image (or part of it) on top of another), i.e. kind of overlay. But before we can do this, we must also find a way to load these images into memory. SDL offers a simple function to implement its plan - SDL_LoadBMP (note: SDL_LoadBMP provides the ability to download images only in * .BMP format , as its name implies. To load images of other formats, you need to connect the SDL_image library to the project , as rightlynoticed in the comments comrade alrusdi in the first lesson, and use the function IMG_Load ). Sample code might look like this:
Example
SDL_Surface* Surf_Temp;
if((Surf_Temp = SDL_LoadBMP("mypicture.bmp")) == NULL) {
    //Обшибка!
}
Everything is quite simple here, SDL_LoadBMP takes only one argument as a parameter - the path to the file you want to load, and it returns the surface containing the specified image. If the function returns NULL, then either the file was not found, or damaged, or other, more complex errors occurred. Unfortunately, to the detriment of efficiency, this method does not provide full coverage of all kinds of loading errors. Very often, the downloaded image does not match the pixel-by-pixel format of the surface into which we load it. Thus, during display, performance, image colors, etc. may be lost. (it is important that the prepared surface and the loaded image fit each other in all respects, i.e. (exaggerating) the size of the box would fit the dimensions of the load). Fortunately, the SDL has a quick and painless workaround for this problem - SDL_DisplayFormat . This function sets up an already loaded image, and returns a new surface suitable for the format displayed.
Now you need to open the project created in the previous lesson and add two files: CSurface.h and CSurface.cpp . Open CSurface.h and add the following:
CSurface.h
#ifndef _CSURFACE_H_
    #define _CSURFACE_H_
#include
class CSurface {
    public:
        CSurface();
    public:
        static SDL_Surface* OnLoad(char* File);
};
#endif
Thus, we created a simple OnLoad function that will load the surface for us. Now open CSurface.cpp and add:
CSurface.cpp
#include "CSurface.h"
CSurface::CSurface() {
}
SDL_Surface* CSurface::OnLoad(char* File) {
    SDL_Surface* Surf_Temp = NULL;
    SDL_Surface* Surf_Return = NULL;
    if((Surf_Temp = SDL_LoadBMP(File)) == NULL) {
        return NULL;
    }
    Surf_Return = SDL_DisplayFormat(Surf_Temp);
    SDL_FreeSurface(Surf_Temp);
    return Surf_Return;
}
So, a couple of things that you should pay attention to:
1. Always reset your pointers before using them in any way (NULL or “0” does not matter). This will help to avoid the heap of a variety of problems and errors;
2. Remember that SDL_DisplayFormat returns a new surface based on the old one, so do not forget to free up the resources occupied by that old surface. Otherwise, we will observe the surface “wandering” in the memory as it pleases.
Now we have a way to load surfaces into memory, but we also need a way to map them to other surfaces. As well as for loading images, SDL has a function for this: SDL_BlitSurface. It may not be as easy to use as SDL_LoadBMP , but don't be scared. Open CSurface.h and add the following function prototype:
CSurface.h
#ifndef _CSURFACE_H_
    #define _CSURFACE_H_
#include
class CSurface {
    public:
        CSurface();
    public:
        static SDL_Surface* OnLoad(char* File);
        static bool OnDraw(SDL_Surface* Surf_Dest, SDL_Surface* Surf_Src, int X, int Y);
};
#endif
Open CSurface.cpp again and add the following:
CSurface.cpp
#include "CSurface.h"
CSurface::CSurface() {
}
SDL_Surface* CSurface::OnLoad(char* File) {
    SDL_Surface* Surf_Temp = NULL;
    SDL_Surface* Surf_Return = NULL;
    if((Surf_Temp = SDL_LoadBMP(File)) == NULL) {
        return NULL;
    }
    Surf_Return = SDL_DisplayFormat(Surf_Temp);
    SDL_FreeSurface(Surf_Temp);
    return Surf_Return;
}
bool CSurface::OnDraw(SDL_Surface* Surf_Dest, SDL_Surface* Surf_Src, int X, int Y) {
    if(Surf_Dest == NULL || Surf_Src == NULL) {
        return false;
    }
    SDL_Rect DestR;
    DestR.x = X;
    DestR.y = Y;
    SDL_BlitSurface(Surf_Src, NULL, Surf_Dest, &DestR);
    return true;
}
First of all, let's take a look at the arguments that are passed to the OnDraw function . We see two surfaces, and two variables of type int . The first surface is taken as the base (remember the board in the first lesson?), I.e. the one on which we will display everything in the future. Accordingly, the second surface is the one that we will impose on the base (and here are our stickers). Basically, we just put Surf_Src on top of Surf_Dest , that's the whole secret. X and Y are variables that indicate the coordinates of the location on the Surf_Dest surface to which we will map Surf_Src .
At the beginning of the function, we need to make sure that we have surfaces, otherwise we return false . Next, we create a variable of type SDL_Rect . This structure SDL , which consists of four properties: X , Y , W , H . Of course, you already guessed that it just sets the parameters of the displayed region of the surface. So far, we are only interested in the coordinates of the place where we will display the rectangle, and we do not care about its size. So, further we assign the coordinates transferred to the X , Y function to the structure of the displayed region. If you're wondering what the NULL parameter isgot it in our SDL_BlitSurface (yes, the author, we are interested!), this is another parameter of the SDL_Rect type . We will come back to this a bit later.
Later came! I think that no one will be offended if we disassemble the SDL_BlitSurface signature a little earlier. I’ll briefly explain: we don’t always need to display the entire surface on top of another, there are many cases when you need to select some part of the image (for example, we have a tileset (from English tileset - a set of images, just a lot of pictures assembled in one image) and you need to select from it a certain square with a texture or character, etc.). So here
int SDL_BlitSurface(SDL_Surface *src, SDL_Rect *srcrect, SDL_Surface *dst, SDL_Rect *dstrect);
accepts as parameters in order, from left to right:
- surface to be applied;
- parameters of the display region of the superimposed surface (i.e., what part of it we will display);
- the surface on which we will impose;
- Well, and, accordingly, the parameters of the region of the base surface in which we will impose.
I think now everything has become more or less transparent and understandable.
At the end of the function, we draw customized surfaces and return true .
Now, to make sure everything works, let's create a test surface. Open CApp.h , and add a new surface, and include the CSurface.h header file we created :
CApp.h
#ifndef _CAPP_H_
    #define _CAPP_H_
#include
#include "CSurface.h"
class CApp {
    private:
        bool            Running;
        SDL_Surface*    Surf_Display;
        SDL_Surface*    Surf_Test;
    public:
        CApp();
        int OnExecute();
    public:
        bool OnInit();
        void OnEvent(SDL_Event* Event);
        void OnLoop();
        void OnRender();
        void OnCleanup();
};
#endif
Also, in the constructor, do not forget to first zero out our surfaces:
CApp.cpp
CApp::CApp() {
    Surf_Test = NULL;
    Surf_Display = NULL;
    Running = true;
}
And remember to clean!
CApp_OnCleanup.cpp
#include "CApp.h"
void CApp::OnCleanup() {
    SDL_FreeSurface(Surf_Test);
    SDL_FreeSurface(Surf_Display);
    SDL_Quit();
}
The time has come to download something. Open CApp_OnInit.cpp and make it look like this:
CApp_OnInit.cpp
#include "CApp.h"
bool CApp::OnInit() {
    if(SDL_Init(SDL_INIT_EVERYTHING) < 0) {
        return false;
    }
    if((Surf_Display = SDL_SetVideoMode(640, 480, 32, SDL_HWSURFACE | SDL_DOUBLEBUF)) == NULL) {
        return false;
    }
    if((Surf_Test = CSurface::OnLoad("myimage.bmp")) == NULL) {
        return false;
    }
    return true;
}
Make sure you really have the myimage.bmp file . If not, download or draw it yourself and put it in the directory with the executable file of your game. Open CApp_OnRender.cpp and add the following:
CApp_OnRender.cpp
#include "CApp.h"
void CApp::OnRender() {
    CSurface::OnDraw(Surf_Display, Surf_Test, 0, 0);
    SDL_Flip(Surf_Display);
}
Check out the new SDL_Flip function . It updates the buffer and displays Surf_Display on the screen. This is called double buffering. It prepares the created surfaces first in memory, and then displays the prepared one on the screen. If we had not used it, we would have seen a flickering screen. Remember the SDL_DOUBLEBUF flag that we specified when creating the surface? It is precisely this which enables the double buffering mode.
Now you can compile the project, and make sure that everything works correctly. You should see an image in the upper left corner of the window. If so, congratulations, you are one step closer to the real game. If not, make sure you have myimage.bmplies in the same folder as the executable file, and also that it normally opens in the graphics viewer. Here's what happened to me:
(And yes, I
deprecated conversion from string constant to ‘char*’ -wwrite-stringsyou need to change the signature of the OnLoad (char * File) function to OnLoad (const char * File) in CSurface.h and, accordingly, in CSurface.cpp .Let's move on! We entertained ourselves by finally displaying our first image in the window, but very often we need to display only a part of it, as an example - the tilesets listed below:
Tilesets


Those. having only one image, we need to draw only part of it. Open CSurface.h , and add the following code:
CSurface.h
#ifndef _CSURFACE_H_
    #define _CSURFACE_H_
#include
class CSurface {
    public:
        CSurface();
    public:
        static SDL_Surface* OnLoad(char* File);
        static bool OnDraw(SDL_Surface* Surf_Dest, SDL_Surface* Surf_Src, int X, int Y);
        static bool OnDraw(SDL_Surface* Surf_Dest, SDL_Surface* Surf_Src, int X, int Y, int X2, int Y2, int W, int H);
};
#endif
Open CSurface.cpp , and add the following function (Important, we add the second OnDraw function , and not replace the existing one! Do you know about function overloading ?) :
CSurface.cpp
bool CSurface::OnDraw(SDL_Surface* Surf_Dest, SDL_Surface* Surf_Src, int X, int Y, int X2, int Y2, int W, int H) {
    if(Surf_Dest == NULL || Surf_Src == NULL) {
        return false;
    }
    SDL_Rect DestR;
    DestR.x = X;
    DestR.y = Y;
    SDL_Rect SrcR;
    SrcR.x = X2;
    SrcR.y = Y2;
    SrcR.w = W;
    SrcR.h = H;
    SDL_BlitSurface(Surf_Src, &SrcR, Surf_Dest, &DestR);
    return true;
}
You see, this is basically the same function as before, except we added another SDL_Rect . This region allows you to specify which pixels from the overlay surface you want to copy to the main one. Now, together with the coordinates, we also indicate the remaining two parameters - the width and height 0, 0, 50, 50 and as a result we get the displayed region in the form of a square of 50x50 pixels.
CApp_OnRender.cpp
#include "CApp.h"
void CApp::OnRender() {
    CSurface::OnDraw(Surf_Display, Surf_Test, 0, 0);
    CSurface::OnDraw(Surf_Display, Surf_Test, 100, 100, 0, 0, 50, 50);
    SDL_Flip(Surf_Display);
}
And here is a piece of my avatar indented 100 pixels from the top and left edge of the screen:
Source code links:
Links to all lessons:
- Development of a game framework. Part 1 - SDL Basics
- Development of a game framework. Part 2 - Coordinates and mapping
- Development of a game framework. Part 3 - Events
- Development of a game framework. Part 4 - Tic Tac Toe
- Development of a game framework. Part 5 - Animation
- Development of a game framework. Part 6 - Entities