New Google Compute Engine VM Images for Deep Learning
- Transfer
Co-author: Mike Cheng
The Google Cloud Platform now has virtual machine images in its portfolio designed specifically for those involved in Deep Learning. Today we will talk about what these images are, what advantages they give developers and researchers, and of course how to create a virtual machine based on them.
Lyrical digression: at the time of this writing, the product was still in Beta, accordingly, no SLAs apply to it.
What kind of beast is this, virtual machine images for Google's Deep Learning?
Google's Deep Learning VMs are images of Debian 9, which are out of the box and have everything you need for Deep Learning. Currently, there are versions of images with TensorFlow, PyTorch, and general purpose images. Each version is edited for CPU-only and GPU instances. In order to understand a little better what image you need, I drew a small cheat sheet:
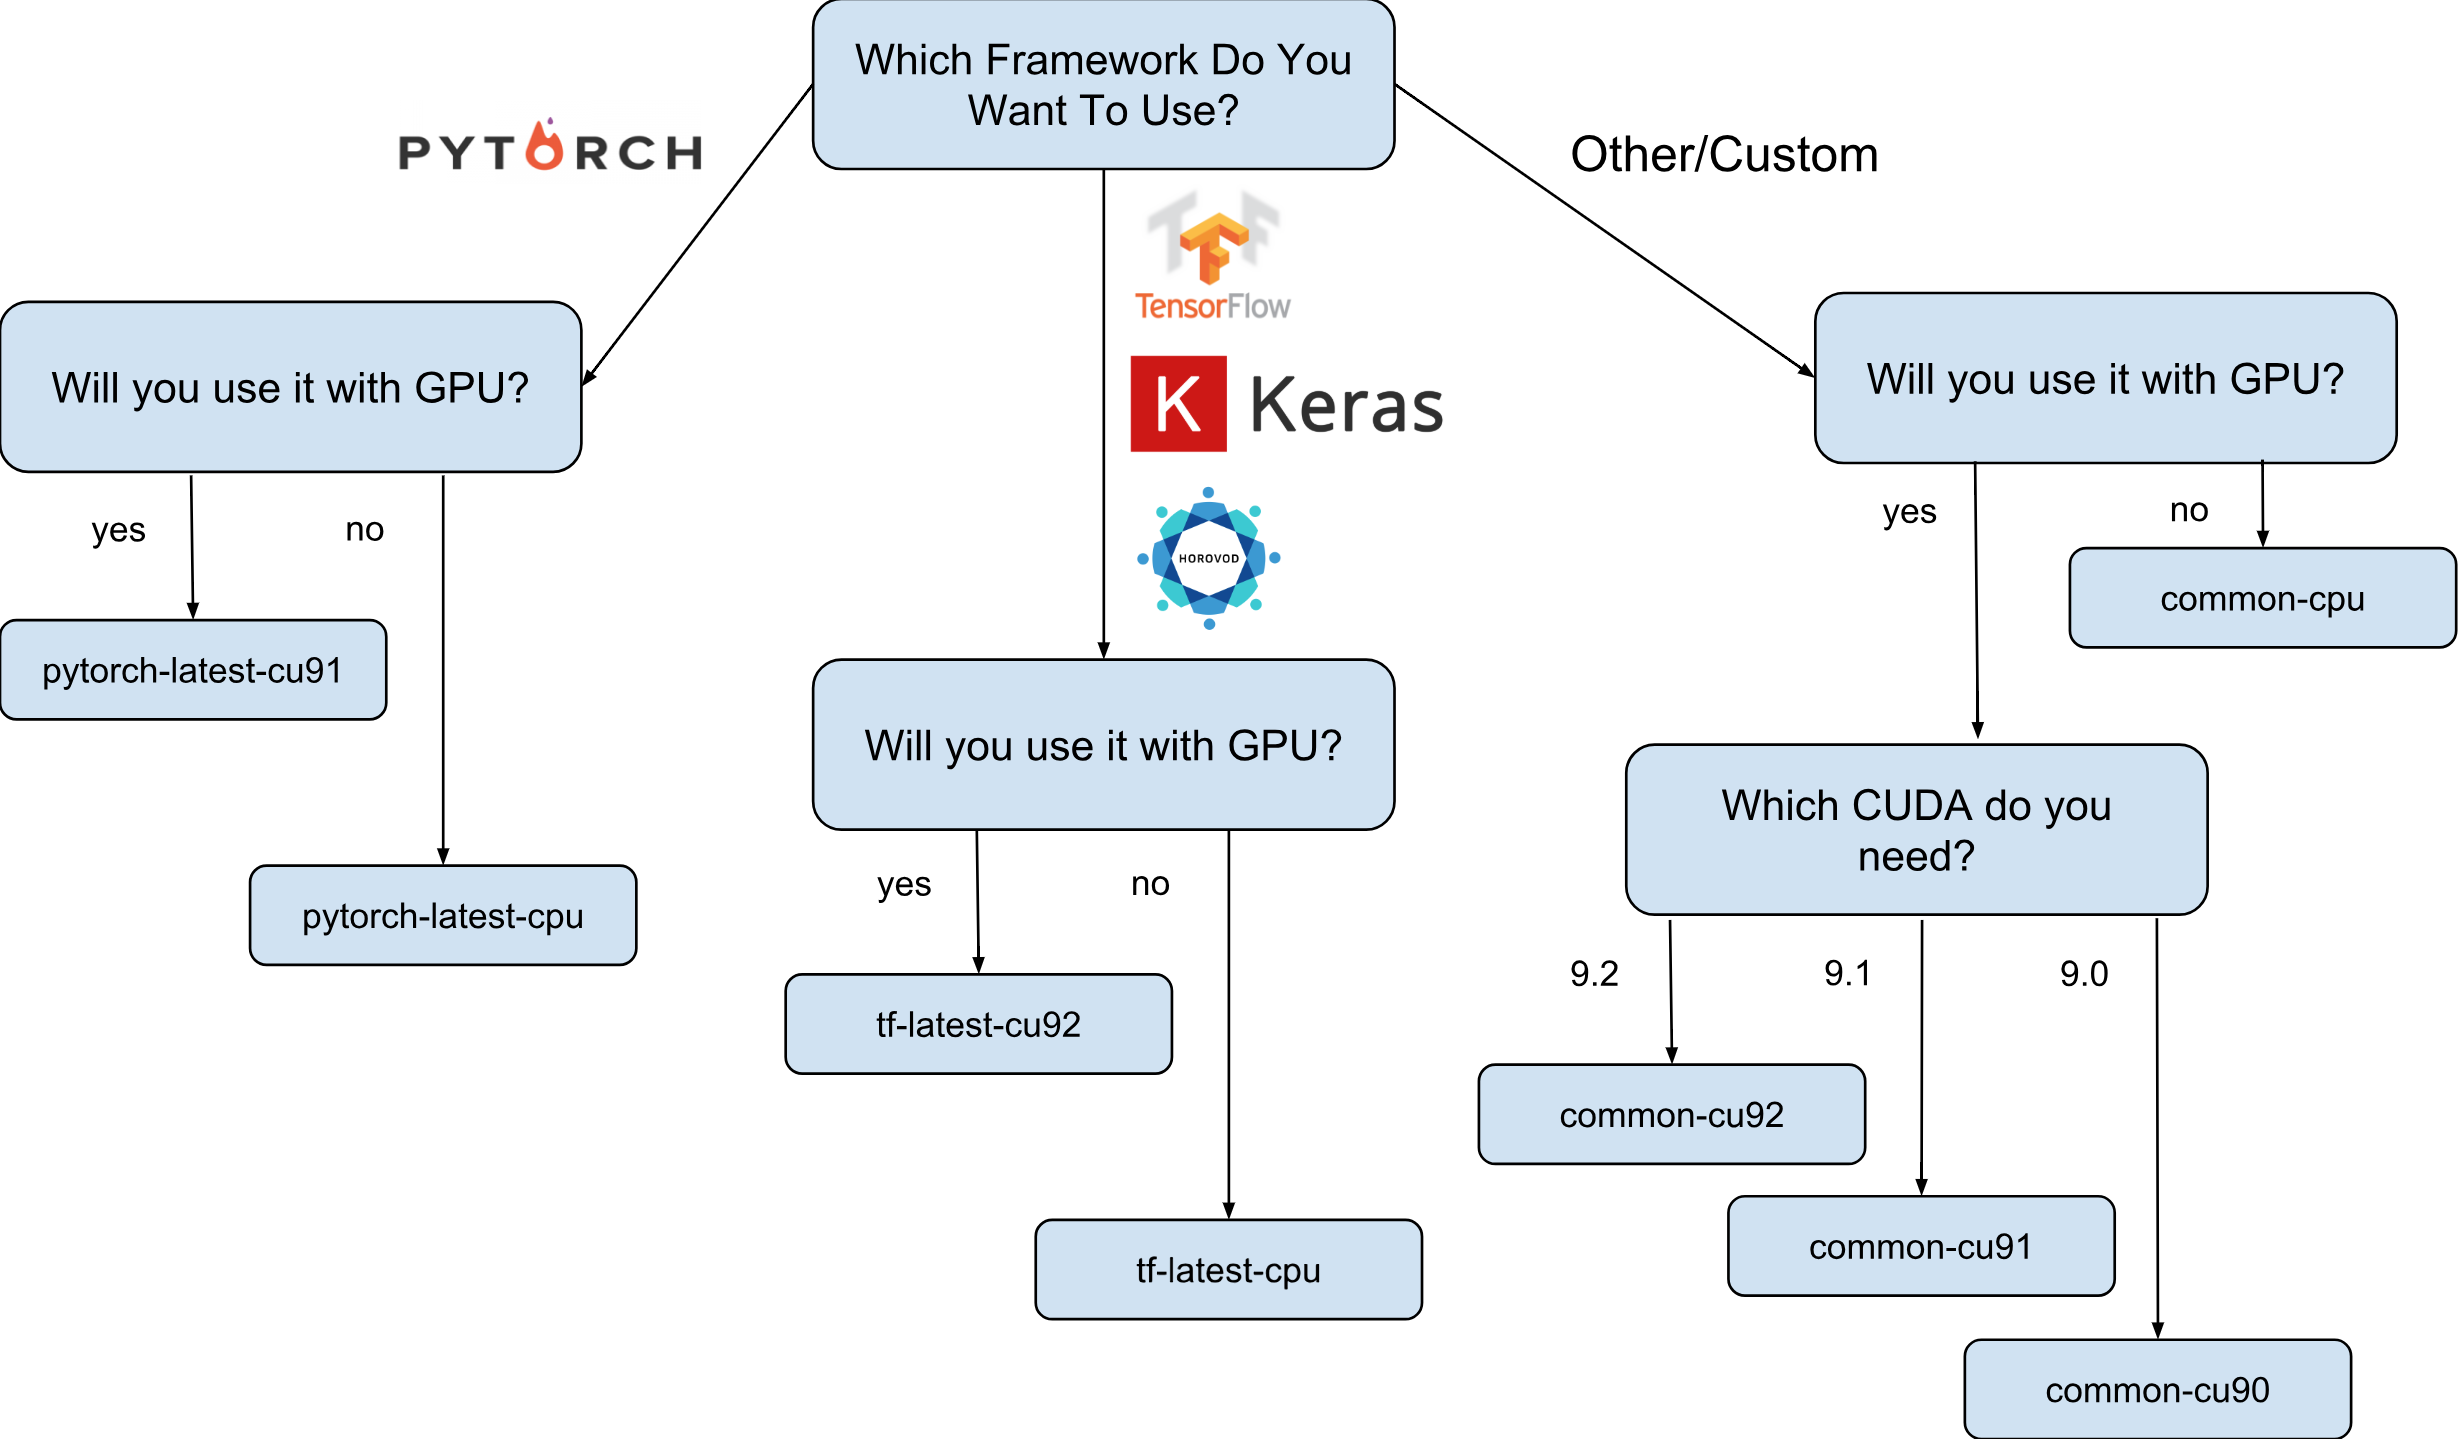
As shown on the cheat sheet, there are 8 different families of images. As already mentioned, they are all based on Debian 9.
What exactly is pre-installed on the images?
All images have Python 2.7 / 3.5 with the following pre-installed packages:
- numpy
- sklearn
- scipy
- pandas
- nltk
- pillow
- Jupyter environments (Lab and Notebook)
- and much more.
Configured stack from Nvidia (only in GPU images):
- CUDA 9. *
- CuDNN 7.1
- NCCL 2. *
- latest nvidia driver
The list is constantly updated, so stay tuned to the official page .
And why are these images actually needed?
Let's assume that you need to train a neural network model with Keras (with TensorFlow). You need learning speed and you decide to use a GPU. To use a GPU, you will need to install and configure the Nvidia stack (Nvidia driver + CUDA + CuDNN + NCCL). Not only is this process quite complex in itself (especially if you are not a system engineer, but a researcher), it also complicates the fact that you need to take into account the binary dependencies of your version of the TensorFlow library. For example, the official TensorFlow 1.9 distribution is compiled with CUDA 9.0 and it will not work if you have a stack that has CUDA 9.1 or 9.2 installed. Setting up this stack can be a "fun" process, I think no one will argue with that (especially those who have done this).
Now suppose that after several sleepless nights everything is set up and working. Question: this configuration that you were able to configure, is it the most optimal for your hardware? For example, is it true that the installed CUDA 9.0 and the official binary package TensorFlow 1.9 show the fastest speed on an instance with a SkyLake processor and one Volta V100 GPU?
It is almost impossible to answer without performing testing with other versions of CUDA. To answer for sure, you need to manually reassemble TensorFlow in different configurations and get rid of your tests. All this should be carried out on the expensive iron on which it is planned to subsequently train the model. And finally, all these measurements can be thrown out as soon as the new version of TensorFlow or the stack from Nvidia is released. We can safely say that most researchers simply will not do this and will simply use the standard TensorFlow assembly, having not the optimal speed.
This is where Google's Deep Learning images appear on the scene. For example, images with TensorFlow have their own build TensorFlow, which is optimized for hardware that is on the Google Cloud Engine. They are tested with different configurations of the Nvidia stack and are based on the one that showed the greatest performance (spoiler: this is not always the newest). And most importantly - almost everything that is needed for research is already preinstalled!
How can I create an instance based on one of the images?
There are two options to create a new instance based on these images:
- Using Google Cloud Marketplace Web UI
- Using gcloud
So, as I am a big fan of the terminal and CLI utilities, in this article I will talk about this version. Moreover, if you like the UI, there is pretty good documentation describing how to create an instance using the Web UI .
Before continuing, install (if not already installed) the gcloud tool . Optionally, you can use Google Cloud Shell , but note that the WebPreview function in Google Cloud Shell is currently not supported and therefore you cannot use Jupyter Lab or Notebook there.
The next step is to select a family of images. Allow me to once again lead the cheat sheet with the choice of a family of images.
For an example, we will assume that your choice fell on tf-latest-cu92, we will use it later in the text.
Wait a minute, but what if I need a specific version of TensorFlow, not the “last” one?
Suppose we have a project that requires TensorFlow 1.8, but at the same time 1.9 has already been released and the images in the tf-latest family already have 1.9. For this case, we have a family of images that always has a specific version of the framework (in our case, tf-1-8-cpu and tf-1-8-cu92). These image families will be updated, but the TensorFlow version will not change in them.
Since this is only Beta release, now we support only TensorFlow 1.8 / 1.9 and PyTorch 0.4. We plan to support subsequent releases, but at the current stage we cannot clearly answer the question of how long the old versions will be maintained.
What if I want to create a cluster or use the same image?
Indeed, there may be many cases in which it is necessary to reuse the same image again and again (and not the family of images). Strictly speaking, using images directly is almost always the preferred option. Well, for example, if you start a cluster with several instances, it is not recommended in this case to specify the family of images in your scripts directly, since if the family is updated at the time the script is running, it is likely that different cluster instances will be created from different images (and may have different versions of libraries!). In such cases, it is preferable to first obtain the specific name of the image of their family, and only then use the specific name.
If you are interested in this topic, you can look at my article “How to use family of images correctly”.
You can see the name of the last image in the family with a simple command:
gcloud compute images describe-from-family tf-latest-cu92 \
        --project deeplearning-platform-release
Assume that the name of a particular image is tf-latest-cu92–1529452792, you can use it anywhere:
Time to create our first instance!
To create an instance from the family of images, it is enough to execute one simple command:
export IMAGE_FAMILY="tf-latest-cu92"# подставьте нужное семейство образовexport ZONE="us-west1-b"export INSTANCE_NAME="my-instance"
gcloud compute instances create $INSTANCE_NAME \
        --zone=$ZONE \
        --image-family=$IMAGE_FAMILY \
        --image-project=deeplearning-platform-release \
        --maintenance-policy=TERMINATE \
        --accelerator='type=nvidia-tesla-v100,count=8' \
        --metadata='install-nvidia-driver=True'
If you use the image name, not the image family, you need to replace “- image-family = $ IMAGE_FAMILY” with “- image = $ IMAGE-NAME”.
If you are using an instance with a GPU, then you need to pay attention to the following circumstances:
You need to choose the right zone . If you create an instance with a specific GPU, you need to make sure that this type of GPU is available in the zone in which you create the instance. Here there can be found by appropriate zones GPU type. As you can see, us-west1-b is the only zone in which there are all 3 possible types of GPUs (K80 / P100 / V100).
Make sure you have enough quotas to create an instance with the GPU . Even if you have chosen the right region, it does not mean that you have a quota for creating an instance with a GPU in this region. By default, the quota on the GPU is set to zero in all regions, so all attempts to create an instance from the GPU will fail. A good explanation of how to increase the quota can be found here .
Make sure there is enough GPU in the zone to satisfy your request . Even if you have chosen the right region and you have a quota for the GPU in this region, this does not mean that the GPU you are interested in is in this zone. Unfortunately, I do not know how else you can check the availability of the GPU, except as an attempt to create an instance and see what happens =)
Choose the correct number of GPUs (depending on the type of GPU) . The fact is that the “accelerator” flag in our team is responsible for the type and number of GPUs that will be available to the instance: i.e. “- accelerator = 'type = nvidia-tesla-v100, count = 8'” will create an instance with eight available Nvidia Tesla V100 (Volta) GPUs. Each type of GPU has a valid list of count values. Here is the list for each type of GPU:
- nvidia-tesla-k80, can have counts: 1, 2, 4, 8
- nvidia-tesla-p100, can have counts: 1, 2, 4
- nvidia-tesla-v100, can have counts: 1, 8
Give Google Cloud permission to install the Nvidia driver on your behalf at the time of the instance launch . The driver from Nvidia is a mandatory component. For reasons beyond the scope of this article, the images do not have a pre-installed Nvidia driver. However, you can give Google Cloud the right to install it on your behalf when you first start the instance. This is done by adding the “- metadata = 'install-nvidia-driver = True'” flag. If you do not specify this flag, then when you first connect via SSH you will be asked to install the driver.
Unfortunately, the driver installation process takes time when it first loads, since it needs to download and install this driver itself (and this also causes the instance to restart). In total, this should not take more than 5 minutes. We'll talk a little later on how to reduce the time of the first boot.
Connecting to an SSH instance
It is simpler than a steamy turnip and can be done with one command:
gcloud compute ssh $INSTANCE_NAMEgcloud will create a pair of keys and automatically upload them to the newly created instance, and also create your user on it. If you want to make this process even simpler, you can use a function that simplifies this:
functiongssh() {
  gcloud compute ssh $@
}
gssh $INSTANCE_NAME
By the way, you can find all my gcloud bash functions right here . Well, before we get to the question of how fast these images are, well, or what can be done with them, let me clarify the problem with the launch speed of the instances.
How can I reduce the time of the first run?
Technically, the time of the very first run - no way. But you can:
- create the cheapest n1-standard-1 instance with one K80;
- wait until the first download is over;
- check that the Nvidia driver is installed (this can be done by running “nvidia-smi”);
- stop instance;
- create your own image from a stopped instance;
- Profit - all instances created from your derivative image will have a legendary 15 second launch time.
So, from this list, we already know how to create a new instance and connect to it, we also know how to check the drivers for operability. It remains only to talk about how to stop the instance and create an image from it.
To stop the instance, run the following command:
functionginstance_stop() {
  gcloud compute instances stop - quiet $@
}
ginstance_stop $INSTANCE_NAME
And here is the image creation command:
export IMAGE_NAME="my-awesome-image"export IMAGE_FAMILY="family1"
gcloud compute images create $IMAGE_NAME \
        --source-disk $INSTANCE_NAME \
        --source-disk-zone $ZONE \
        --family $IMAGE_FAMILY
Congratulations, you now have your image with Nvidia installed drivers.
What about Jupyter Lab?
Once your instance is working, the next logical step would be to launch Jupyter Lab to do business directly :) With new images, this is very simple. Jupyter Lab is already running since the instance was launched. All you need to do is connect to the instance with the port forwarding on which Jupyter Lab is listening. And this is port 8080. This is done by the following command:
gssh $INSTANCE_NAME -- -L 8080:localhost:8080Everything is ready, now you can simply open your favorite browser and go to http: // localhost: 8080
How much faster is TensorFlow from images?
A very important question, since the speed of training the model is real money. However, the full answer to this question will be the longest that is already written in this article. So you have to wait for the next article :)
In the meantime, I will indulge you with some numbers obtained on my little personal experiment. So, the speed of training on ImageNet was 6100 images per second (ResNet-50 network). My personal budget did not allow me to complete the training of the model completely, however, at this speed, I assume that you can achieve 75% accuracy in 5 hours and a little.
Where to get help?
If you need any information regarding new images you can:
- ask a question on stackoverflow, with a google-dl-platform tag;
- write to the open Google Group ;
- You can email me or twitter .
Your feedback is very important, if you have something to say about the images, please feel free to contact me in any way convenient for you or leave a comment under this article.