How does it feel to create a game for Game Boy in 2017
- Transfer
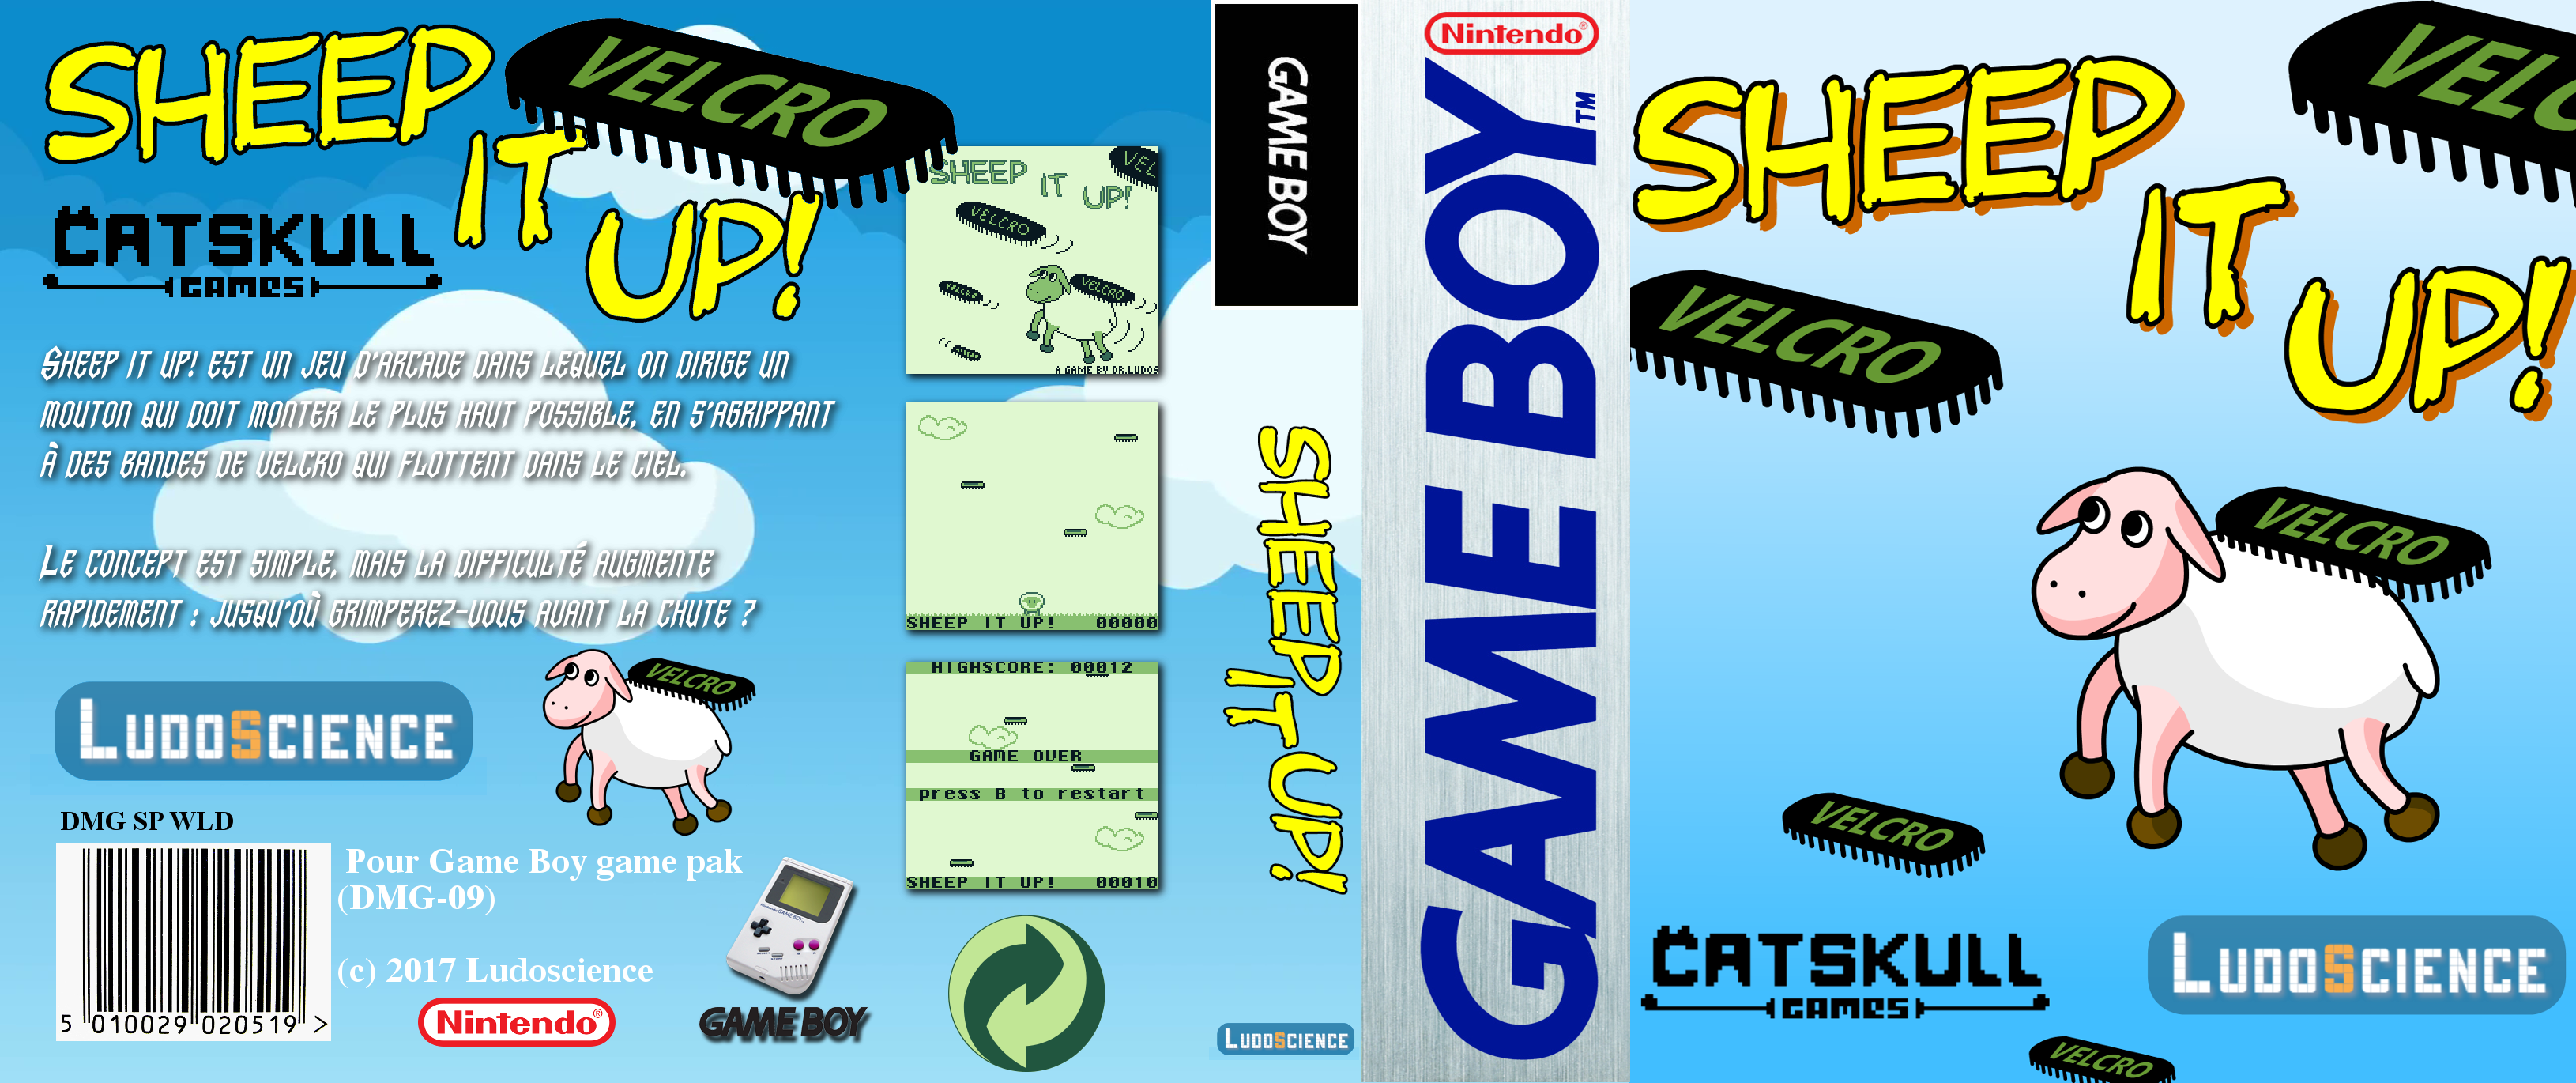
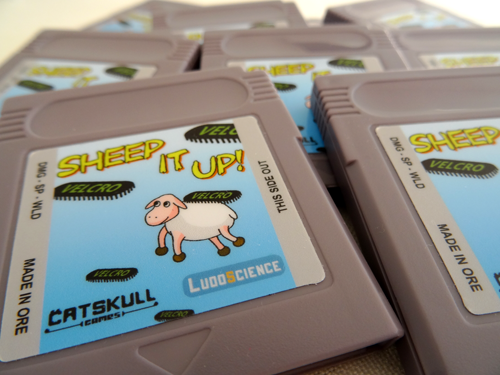
Everyone had a childhood dream. Personally, I dreamed of creating a game for my first console: the Nintendo Game Boy. Today my dream came true - I released the first game for the Game Boy on a real cartridge : Sheep It Up!
In this article I will talk about the tools I used and the obstacles that a newcomer had to overcome in order to create a project. The article is very long, therefore it is divided into two parts:
- Part 1: Used Tools / Technical Difficulties / Graphics Difficulties
- Part 2: sound limitations / creating cartridges / player reviews
A game
“Sheep It Up!” Is an arcade game in which a sheep must climb up, sticking to flying strips of velcro. The concept is simple, but the game quickly becomes quite complex: how far can you get without falling?

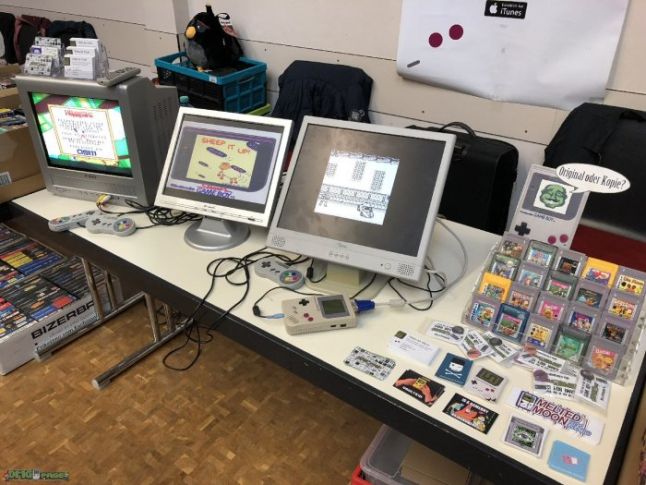
I myself am a collector of games, so I didn’t want any vintage games for the Game Boy to be damaged during the creation of my project. Therefore, everything was created specifically for the game: PCB, ROM, shell, protective case and even a sticker! We also sought to maintain a reasonable price so that everyone could enjoy the game: $ 15 (+ shipping) . It will run on any Game Boy model, from the very first to GBA SP, including the Super Game Boy.

If you still have a Game Boy, then you can buy the cartridge on the publisher’s website:
https://catskullgames.com/sheep-it-up
Sound limitations
As we understood from the first part of the article , Game Boy has obvious limitations in CPU power and graphics. But the same can be said about sound. In fact, unlike modern machines, the Game Boy cannot play MP3 music or read WAV audio files. To create sounds and music for the Game Boy, you need to dynamically generate them using four sound channels built into the console. Each channel has its own function:
- Channel 1 - Tone & Sweep: we can play a sound (tone) with increasing or decreasing pitch.
- Channel 2 - Tone: reproduces the tone without a special effect.
- Channel 3 - Waveform: can reproduce very simple wavelike signals (encoded in 4 bits).
- Channel 4 - Noise: can generate sounds of explosions or engines.
Let's repeat it again: to play a sound in the Game Boy, you must generate it manually, directly controlling these four sound channels . Fortunately, this is quite simple: just changing the values of several hardware registers is enough. Each audio channel is controlled by 4-5 hardware registers (8-bit variables) , which determine the volume, pitch, special effects, etc. By setting different values for the registers that control the channel, we can force the Game Boy to play a wide range of sounds. For example, here are three sounds from Sheep It Up! I created using audio channel 1, and the corresponding values of the hardware registers:
Bounce
NR10_REG = 0x15;
NR11_REG = 0x96;
NR12_REG = 0x73;
NR13_REG = 0xBB;
NR14_REG = 0x85;
Landing
NR10_REG = 0x79;
NR11_REG = 0x8D;
NR12_REG = 0x63;
NR13_REG = 0xC8;
NR14_REG = 0x80;
Drop (end of game)
NR10_REG = 0x4F;
NR11_REG = 0x96;
NR12_REG = 0xB7;
NR13_REG = 0xBB;
NR14_REG = 0x85;
As you can see, assigning different values to 5 variables allows us to create very different sound effects. You might think that to create sounds you have to go through trial and error: insert random values into registers until you get a pleasant sound. But it would be boring and pointless. Therefore, modern tools can make our lives easier . Let me introduce you to GB Sound Sample Generator .
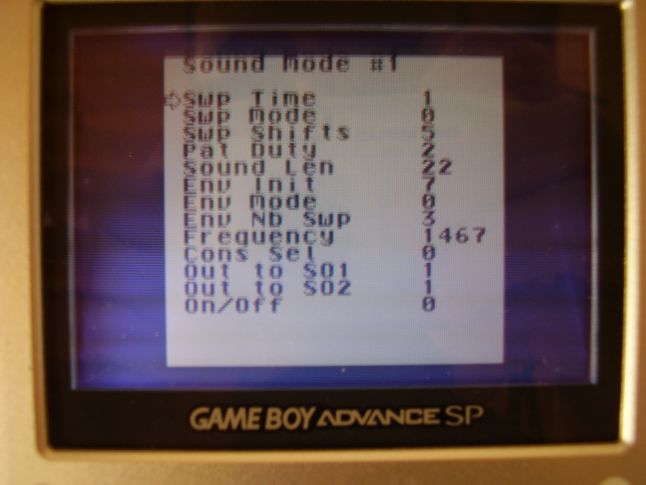
First, we set up convenient parameters to find the right sound (press START to check the current sound)
This is a Game Boy program that is fully compatible with real hardware. It allows changing the values of hardware sound registers in a user-friendly way. Instead of setting the raw values of NR10_REG, we can specify the frequency of the sound, the volume level, the duration of the sweep signal, etc. You can think of this tool as the SFXR for Game Boy. But for sound export instead of saving the WAV file, the GB Sound Sample generator displays the corresponding values of the hardware registers. That is, to reproduce the sound in your game, simply write these values into the source code.

Then you need to press and hold A + SELECT to display the corresponding raw values of the hardware registers.
To work on Sheep It Up! I used the GB Sound Sample generator on the Game Boy Advance SP (the backlit screen is more convenient) . ROM program was launched on Everdrive GB . I spent quite a lot of time setting up the parameters directly on the console, and when I finally found the right combination, I simply copied the values from the GB screen to the source code on the computer.
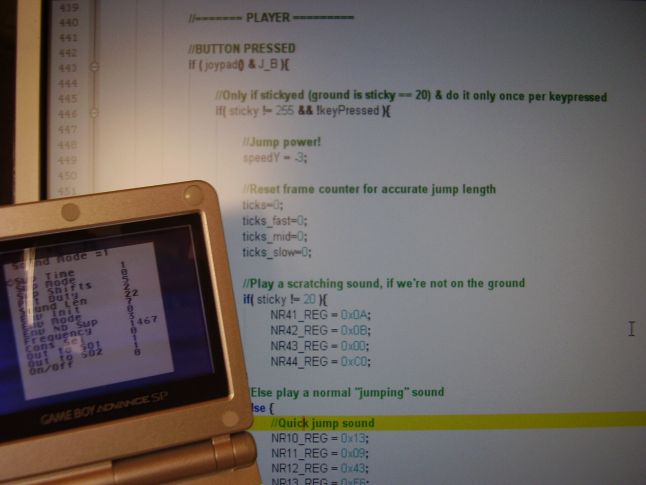
Copy the values of the hardware registers to the source code
Chiptune music!
Despite the limited sound capabilities, today Game Boy is used as a musical instrument. Many talented chiptune scene composers create energetic tracks on the Game Boy with programs like LSDJ or Nanoloop . For example, you might have heard about the Irish legend tyuna-chip Chipzel , who wrote the music for the Super Hexagon , and the French magician Sidabitball , to remix sets of hits of pop music 90's .

Chipzel and Sidabitball
Unfortunately for us, game developers, the LSDJ tool used to compose these amazing compositions consumes almost 100% of the Game Boy hardware resources. Therefore, it is possible to write wonderful music in it, but you will not be able to start the game while this music is playing on the console. Fortunately, there are less resource-demanding alternatives for creating and playing music on the Game Boy.
1) Own music player
The most minimalistic solution is to create your own “music player”.
Do not forget that the only way to play sounds on the Game Boy is to set the values of the hardware registers that control the four channels of sound generation. Therefore, simply create your own "music player", saving the "notes" in the array. Each “note” is a specific combination of values for each of the hardware registers. If we set the tempo with which we will go through this array to play "notes", then we will have a very simple way of playing music. That's what I did at Sheep It Up! Here is a short video gameplay with sound and music so you can hear the result:
In fact, my “notes” are played only on audio channel 2. Yes, four audio channels are common to sound effects and music. Therefore, if we play a note in a channel, then it cannot be used to simultaneously play a sound effect.. And since each channel is somewhat “special”, it is sometimes preferable to use some channels only for music, while others are left for sound effects. For example, a “creaking” sound that is heard when a sheep sticks to a flying velcro is played on channel 4 (noise). Since this is a very frequent sound in my game, I decided not to use this channel for music. The same applies to channel 1, which I used for all other sound effects. Since I am not a great specialist in music, I decided not to use the waves of channel 3, and instead work with the tones of channel 2.
2) GBT Player and Carillon Player
Many homebrew games use their own music player. However, this is not the only solution. There is a library called GBT Player that can convert music modules (in Impulse Tracker ".it" format) for playback on the Game Boy. Of course, there are many limitations on the size of the samples, the number of channels and the effects of notes. But nevertheless, the library allows you to compose real music on a real music tracker, for example, OpenMPTand then play it on the Game Boy. The most important thing is that the library consumes only 7-8% of Game Boy CPU resources, leaving a lot of processing power to execute the game. Moreover, it is very easy to integrate it into your code if you decide to write a game in C using GBDK or in assembler using RGBDS. A good alternative to GBT Player is Carillon Player , however in it you have to use Carillon Editor to compose music.
Geometrix is GBT Player AntonioND's homebrew game. For music this library is used.
We gain physical form: recording the game on the cartridges
After a long work on the code, graphics and sound, the game is finally ready. But at this stage we only have a ROM file. Of course, I can actively test on many different Gameboy models from my collection (I have them all, except for AGS-101) . But I did not feel that the project was ready: in my opinion, in order to be considered “completed”, the game must have its own cartridge .
As I said in the first part of the article , the entire ROM of the game Sheep It Up! weighs only 32KB, as with the early Game Boy games, such as Tetris and Alleyway . But in fact, most Game Boy games are much larger, from 128KB to 512KB, and the biggest game is Pokemon Blue and Redtakes a monstrous 1024KB (1MB). In the 90s, the more voluminous the game was, the more expensive the production turned out to be cartridges: you need more expensive chips to store large games. But today they all cost almost the same. So why did I limit myself to a 32 kilobyte game?
The answer is that I wanted to be able to release the game on the cartridges manufactured today. As you can guess, Nintendo has long ceased production of cartridges for the Game Boy (Game Pak) . Therefore, to create your own cartridge today there are two possible solutions:
1) Cartridge Modification (Cartmodding)
The first option, called "cartmodding", is to recycle the old Game Boy games. Games released during the Game Boy era of sales were stored on non-rewritable cartridges. Therefore, to replace the game stored on them, you need to open them, drop the memory chip and replace it with another memory chip into which the ROM of your game is loaded. This solution allows you to create games of any size. But, being a collector of games, I didn’t want to destroy existing Game Boy cartridges for the sake of producing my game.

An example of cardmodding. New homebrew-game memory chip soldered into old cartridge
2) Own cartridge
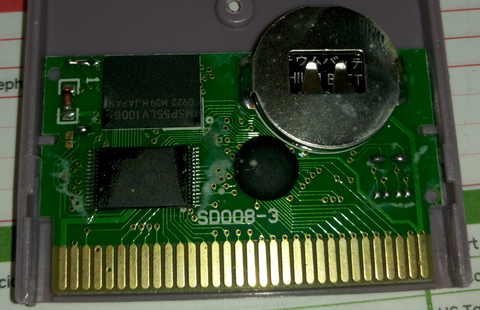
The second option is to create a new cartridge from scratch. Since I do not understand electronics, I began to search the Internet for people capable of collecting Game Boy cartridges. After several unsuccessful attempts, I was lucky to find Catskull. This is an amazing wizard of electronics, he creates and sells a variety of Game Boy-related equipment in his Catskull Electronics store . Among other things, he developed a device to connect the Gameboy to the MIDI interface, which allows musicians to use the Game Boy with real instruments and synthesizers. He also developed his Game Boy cartridge. For this cartridge everything was made anew: PCB, chips, shells, even stickers and new parts - nothing is taken from previous games. For me it was the perfect solution.
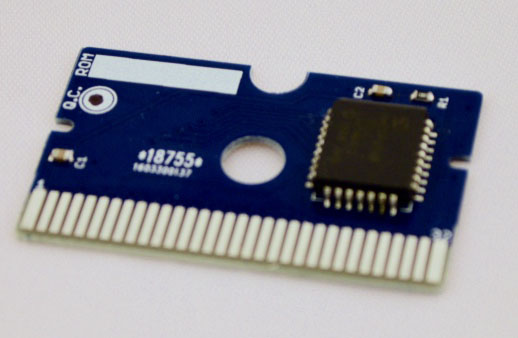
Catskull-designed original PCB I used for Sheep It Up!
But then it became even better: after a short correspondence, Catskull told me that he had long wanted to create a company for publishing homebrew games, and that my game would be a great opportunity for that! Therefore, we have combined our efforts: I make software, it is engaged in hardware . The only limitation in this solution is that only 32KB can be stored on a Catskull cartridge for a Game Boy . Why?
Initially it was assumed that the Game Boy console will only have access to 32KB of ROM data. To create games larger than 32KB, it is necessary to navigate through all the data on the cartridge, at the same time gaining access to only one subsection of all ROM data. This method is called bank switching : all ROM data is divided into banks of 16K each, and we can switch between them at any time (with certain restrictions). However, to perform bank switching on the cartridge, there must be an additional chip : a “memory bank controller” (Memory Bank Controller, MBC). There are several chips (MBC1, MBC5, etc.)ROMs that allow RAM to be used for saving games with battery power, etc. Unfortunately, at the moment there is no ready-made solution for creating new cartridges with such a chip from scratch.
Therefore, people who create homebrew games that are larger than 32KB are usually card-shedding in order to use the MBC chip of an old Game Boy cartridge, which they “process”. Another solution is to buy fake copies of real Game Boy games with subsequent flashing. Many years ago, Chinese manufacturers have learned to "clone" an MBC chip to create pirated copies of big games like Pokemon.. And since such pirated cartridges use EEPROM chips instead of ROM chips of old games, they can usually be “reflashed” to replace the game stored on the cartridge. To do this, use a cartridge flash recorder, for example BennVenn's Joey . In a few homebrew games larger than 32KB, this approach was used.
Made in China pirate cartridge. You can reflash it by writing your own game to it, but some others cannot be reflashed (more about this here )
For making Sheep It Up! I wanted to create completely new cartridges to avoid destroying the original Game Boy games. I was very lucky that I combined my efforts with Catskull, which produces its own cartridges, despite the fact that I had to limit myself to 32KB of total memory.
We bake cartridges!
So how are your own cartridges made? I asked Catskull to take photos of the individual stages of cartridge assembly. As you can see, each cartridge is assembled manually:
1) The printed circuit board is inserted into the hardware.

2) A stainless steel stencil is applied to the PCB to apply the solder paste. This paste will allow you to solder the memory chip to the board.
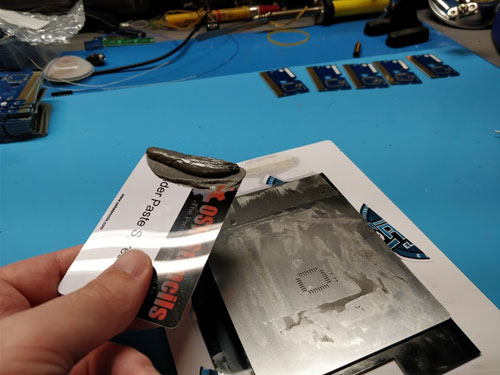
3) I usually make lots of 18-20 cartridges at a time. Solder paste has already been applied to this batch.
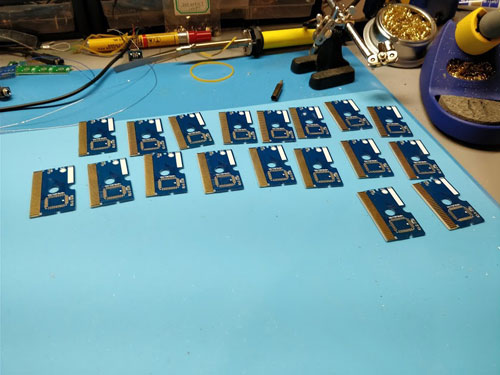
4) I know how to manually pick up capacitors and resistors, and locate them on boards. Then I put flash memory chips on each board.

5) Boards are laid out on the grate of the furnace for reflow. We literally “bake” every board in order to solder a chip on it. Now I can take each of the boards and write ROM games to the memory chip.

6) Then the board is inserted into the shell of the game cartridge with a beautiful sticker made on a professional printer.
7) After a thorough check of the cartridge on this equipment, the game is ready to be sent to the player who ordered it!
The fulfillment of a childhood dream
After all this technical information, I would like to share more personal feelings about what this project means to me. For the sake of understanding the context, I advise you to watch the most inspiring video I have seen on the video “Really achieving your childhood dreams” by Randy Posh. I highly recommend you to see it. This is a great lesson about how to take life with a sense of wonder, even on the most difficult days. To live a full life, Randy Posch invites us to try to fulfill children's dreams and help them fulfill the rest.
In the top lines of my personal list of children's dreams was the creation of a video game for the Nintendo Game Boy. Game Boy has become my first video game console, and it will always occupy an important place in my heart. For many years I told myself that I would someday create a game for her. But I have always had “more important things”, for example, working on a project that brought me money. Finally, one day I came across a BitBitJam game jam , dedicated to making games for retro-iron. Then I remembered the words of the wise Randy Posh: what if I try to complete the project at least once, expecting nothing more than the fulfillment of a childhood dream?
Therefore, about a month before the start of the jam, I began to learn various toolscreate games for the Game Boy. Then, already during the jam, I spent a whole week (I had a vacation) to create the prototype Sheep It Up! After the jam, I continued to work on the game, polishing, refining, optimizing and redrawing it ... until I became satisfied with the result. In the meantime, I was looking for ways to create real game cartridges. I was very lucky to meet Catskull, who was engaged in their manufacture, and who secretly dreamed of creating his own company for publishing homebrew-games. In the end, I created and released a real Game Boy game sold on physical cartridges. But why are cartridges so important? Could I not dwell on the distribution of the electronic version of the game online, as many other homebrew game developers do?
Do not forget - my real goal was not the release of the game, but the fulfillment of a childhood dream. And in my dream I could play with a cartridge that I made myself, on a real Game Boy , as it was with all the other games I bought as a child. Here is a video of how I test the game on the real Game Boy my parents bought for Christmas when I was nine years old:
As you can see, my children's console has seen a lot: many pixel columns are no longer displayed on the screen, the buttons are heavily worn, and there is a huge vertical scratch on the display. But it still works. I can not express in words the feelings that have arisen during the game on the console in the cartridge created by ME. All I can say is that at this very moment of the nine-year-old I was very proud of the adult he became. And this feeling alone was the best result I could get from such a project.

The console is still running 25 years later, and was able to run a game released on it in 2017!
I share a dream: player reviews
So, the creation of the game in the first place for the sake of their own joy - this is the best. But the joy can be even greater if other people can play it . At the end of the project, I knew that Sheep It Up! turned out to be a simple game, so the expectations were not very high. But the feedback from the players still surprised me!
Despite (or because of) the simplicity of the game, the players really liked it . The gameplay is simple enough to sort it out in seconds, but quickly draws you away - “one more, the last game to beat your record.” By the way, my current record is 147 points.! But in the retrogamer community, what I like most is that the key driving force for most players is love. And this can lead to curious surprises.
To begin with, some people complained that the game is not sold in the boxed version. Since I collect retro games just in cartridges (for the sake of saving money and shelf space)then at first did not think of creating a boxed version. But now I realize that it would be nice to offer such an option to people who needed it. But one of the fans of the game, Cyph, went even further, and created his own game box by remaking the Nintendo DS cartridge jewel box. I do not know about you, but the result seems amazing to me. If it interests you, you can also make your own box. Just take the Nintendo DS cartridge jewel box, cut off two small plastic parts inside and insert this beautiful cover created by Cyph .

Beautiful homemade box for Sheep It Up! created by Cyph player from the Nintendo DS cartridge box!
Another fun thing about the game is that it was shown at one of the largest video game shows in the world : Paris Game Week (300 thousand visitors - more than at E3 and Tokyo Game Show) . How did the amateur game released for Game Boy hit the show with the industry's latest AAA games? For this opportunity, I thank OrdiRetro . This is a French association dedicated to the history of video games, in particular, new games released for old consoles and computers. At this exhibition they had a booth with several games. Thanks to my friend Julian Alvarez they learned about the game and offered me to show it at the exhibition.

Sheep It Up !, launched on Super Game Boy during Paris Game Week 2017 - thanks, OrdiRetro !
But such a possibility may arise without links. Immediately after the release, the game was bought by two Game Boy fans from Germany who are involved in the DMGpage website . But they didn’t just buy the game, but also showed Retro-Börse retrogamers in Hesse at the conference. So thanks to the two Game Boy fans, the players managed to play my game on the Super Game Boy and at the German conference - I am very grateful to them too!
Sheep It Up! on display at the Super Game Boy during Retro-Börse in Hesse - thanks DMGpage !
Conclusion
Homebrew games for retro consoles are not made for money or popularity. Usually, very few copies are made. You can hope for an audience of several dozen people, at best, a couple of hundred, if your game is really good. But you can be sure that these people have a genuine interest in your game. They are led by the same love for the retro iron as you. Sometimes their love can be even stronger than yours. And if you liked these two parts of the article on creating a game for a Game Boy these days, why not try it yourself?
As stated in the first part of the article., there are many easy-to-use tools for creating games under the most popular portable console in history. Yes, it does not help you get rich, but you will get a lot of pleasure as a result. Or maybe you can also please other people playing your game!
So, I hope that you liked this post-mortem, and that it will push you to develop a retro game. In addition, if you have a Game Boy lying around somewhere, then do not forget that you can buy a wonderful Sheep It Up cartridge for only $ 15 from Catskull games. Each cartridge is assembled by hand!