Circuit board paintings
The concept of making a gift from a geek.
Socro is coming New Year, St. Valentine's Day, the eighth of March. Yes, a lot of things are coming, and now I want to prepare the sled in the summer, the cart in the winter, in general, thoroughly prepare for these festive events and please our other half with something unusual. In my opinion, the most invaluable gift is a handmade gift. From here we will dance.
I’m not sure that this idea didn’t occur to anyone, but a quick googling did not give me results in either English or Russian.
Most of my life I have been involved in electronics, programming and microcontrollers. I was not able to interest in this hobby any woman, even the most fierce engineers. According to this, they should at least have to make such a gift so that they understand that despite the love of electronics, we love them much more.
To do this, I thought of making some catchy electronic device that would remind her of the wonderful moments spent together. Usually a memorable moment is already captured in the photo ! It remains only to combine photography and electronics.
Imagine a picture: in a printed circuit board, a photo of you sitting in a cafe, and candles lit by LEDs. This craft is on her desk, and the craft is made with your own hands. High tech romance!
Also, this technology can be useful to printed circuit board breeders (I say hello to my colleagues from work) to place my picture on a printed circuit board (such as a signature).
In simpler terms, I decided to try to transfer any picture to textolite.
Below I will tell you how I did it and what I did.
As we all understand, even black and white photography has transitions from white to black, called gray. And in the printed circuit board we have only two colors: the color of copper and the color of the PCB. Conventionally, copper will be light, and textolite black. Although this is all a convention: if you take white textolite and oxidize copper, then everything will be the other way around. How do we make shades of gray in copper?
The idea is simple, like all ingenious - the technology of placing pictures in a newspaper. The bottom line is that the dimming or illuminance of the area is determined from the size of the point. Close it looks awful, but moving away it turns out a normal picture.
I first learned about this technology in my childhood by reading entertaining physics. A picture was given there, which at first glance seemed like a strange set of dots, but when removed, it turned into a woman's eye.

Illustration for “Entertaining Physics”
In order not to change the page size, I bring a small copy of this picture.

At a distance
I guess you already knew where I was leading. A photograph is taken, turned into such a sieve, then using LUT or photoresist it is applied to the board and etched.
For all this, you do not need much, according to the points:
1. Direct hands growing from the right place.
2. Preparation of the printed circuit board.
3. Laser printer.
4. Self-adhesive.
5. Hydrogen peroxide, citric acid, salt (table).
The hardest part for this article was to find a suitable photograph. I did not take photos of models because of copyright issues. Photos from the personal photo archive were either dull or not for a wide range. As a result, for the test I decided to just shoot one of my favorite instruments: mini-disks.
Vise
After which, they must be specially processed. Since I use only linux, I have at my disposal a warm tube gimp.
I deliberately did not do any processing of the photo (highlighting, stretching the contrast, etc.). Looking ahead, I’ll say that I paid for it and the resulting picture was not clear.
So, open the image in gimp, then bleach it.

Discoloration
Then that interesting magic begins, which turns an ordinary picture into something that will allow it to be reproduced, so to speak, in iron. Select “Distortion -> Newsprint”

Magic.
Then we start to play with the parameters. In the “Divide by:” section, check the box on CMYK. Empirically, you should choose the size of the cell. In the “Black” tab, I personally made the “Slot function” line. This is a matter of everyone’s taste, but I wanted to try like this.

Set the distortion parameters.
Click “OK”, and we get the following result:

Resulting picture
Low contrast is immediately visible. But I decided to try how to get such not-so-bright pictures in iron. See the worst option, so to speak, and continued his experiments. Now is the time to tell how to transfer the resulting drawing to the board.
To transfer the picture, I used the traditional, long-run Laser Ironing Technology (aka LUT). Rather, to remind how it is done, rather than teach it again, I will tell a few words about it.
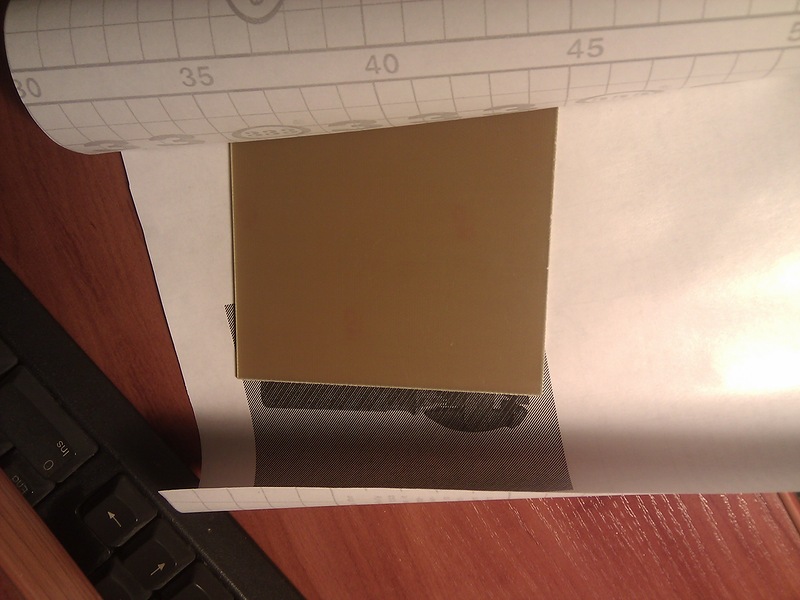
In order to know exactly the size of the future workpiece, I used one simple cheat, known from the school bench: placing the picture in the text editor, with the right size. Opening Writer (an analogue of MS Word in Linux), I set the size of the fields so that the horizontal length of the picture was exactly 10 cm. For this, there is a very convenient ruler at the top of the page. After inserting a picture, you can see that the vertical length is 8 cm. We
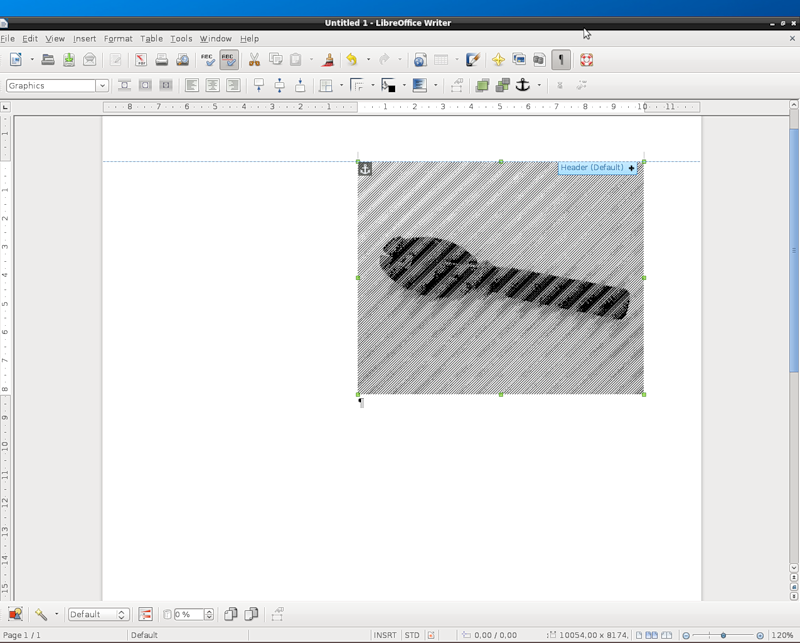
set clear borders of the picture
After that, we cut out a rectangle from the PCB with the same parameters, sand it and degrease it with isopropanol or any convenient solvent.

Skinning and degreasing.
You can pay attention to the picture at the top that I use a piece of paper with test print of the future pattern as a substrate. Looking at him, I decided to take exactly the lines, as well as increase their pitch and thickness.
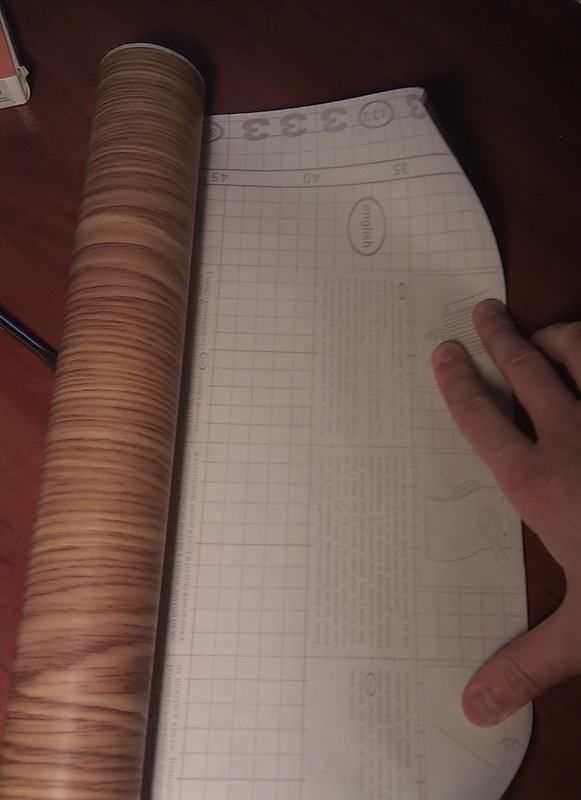
To transfer the image to textolite, I use a backing for self-adhesive wallpaper. Unlike magazine paper, there is a million times less hemorrhoid and there is no need to soak anything. A roll of 10 meters costs only 250 rubles, and it lasts for a very long time.
On the reverse side, cells are usually carefully drawn. We attach sheet A4, and note which cells it corresponds to.
Markup
Do not be lazy and do “long A4” (do not cut off the tail), my printer was offended by this and decided that he jammed the paper, that it did not come out for so long.
Cut, tear off the sticker and print on the side on which the sticker was.

Result (Half Life 2 is not recalled?) We
attach the blank to the drawing with copper, wrap the textolite in paper, and begin to iron the drawing from the back.
Wrap
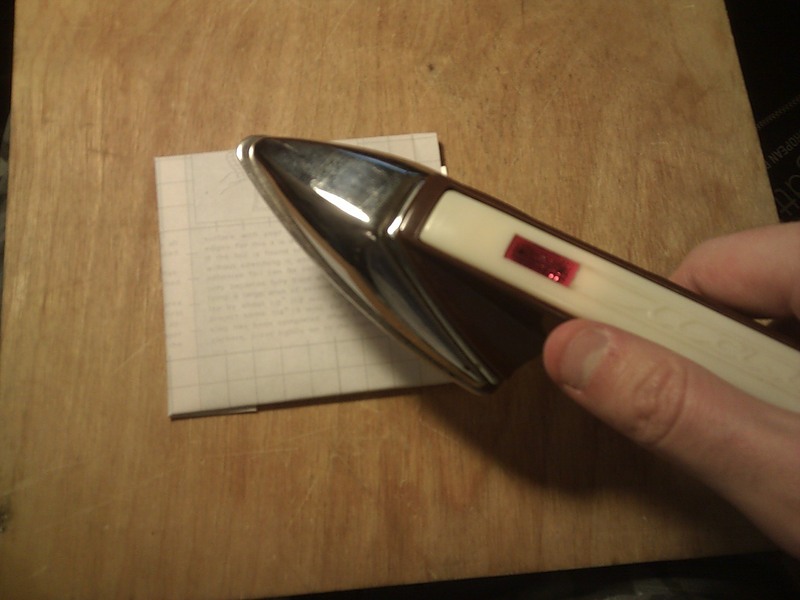
and iron
I usually iron through clean paper, but then I decided to iron the delivery paper on which it was printed. As a result, the paper stuck to the workpiece, torn paper with a pattern and everything was rejected. I had to start all over again.

Marriage
Marriage in such cases is a normal phenomenon, therefore we repeat all iterations first. After which we carefully remove the paper from the workpiece and we have the following picture:
Transferred drawing
In connection with the minuses of ferric chloride:
- incredibly dirty;
- it is very difficult to wash;
- stains clothes once and for all;
- it is difficult to wash the bath and toilet;
- you need to go to the other end of the city to buy it;
I decided to discover for myself a new method of etching printed circuit boards, described here radiokot.ru/lab/hardwork/62 as the most effective. For it, you need only three components that are in pharmacies and convenience stores:
- citric acid;
- hydrogen peroxide;
- ordinary table salt.
Proportions of etching taken from the site (quote):In 100 ml of the pharmacy 3% hydrogen peroxide, 30 g of citric acid and 5 g of sodium chloride are dissolved. This solution should be sufficient for etching 100 cm2 of copper, 35 microns thick.
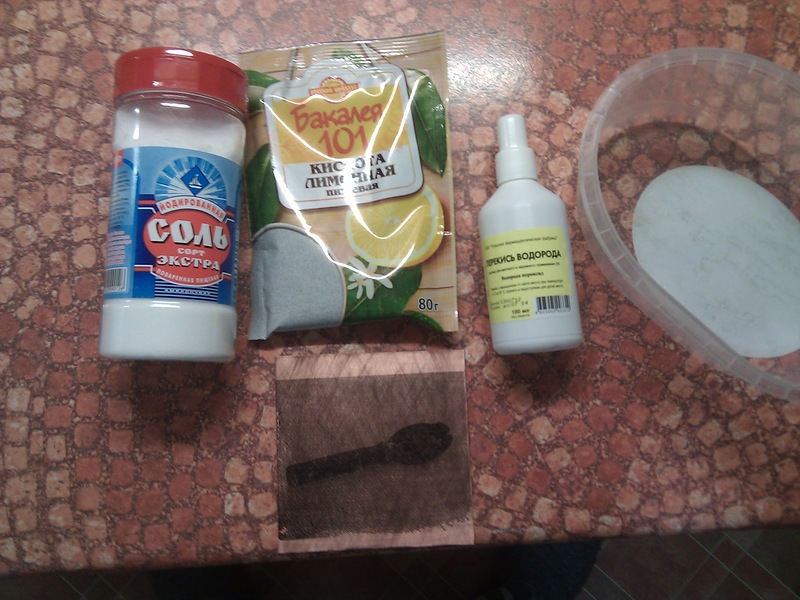
Everything is ready for etching.
Since I did not have measured weights, everything interfered by the eye, trying to at least somehow comply with the proportions. In the process of etching, hydroxide began to precipitate, and I added more citric acid. Then there were fewer bubbles, added peroxide. I also added salt. Everything is possible from impatience. It was poisoned for about two hours. I believe that this is due to cold peroxide, and not my desire to somehow warm it all up (they say that the solution boils, although I personally kept the solution cold). Plus, this time I was poisoning in a bowl, not using my wonderful bullet-lamp , about which I wrote here:habrahabr.ru/post/109869 . And all because he is busy with ferric chloride. It’s necessary to create a new bulbator specially for the new technology.
После травления получается прекрасный голубой раствор, который я, к сожалению догадался сфотографировать, уже после того, как слил в унитаз. По сему поверьте мне на слово, что он прекрасен :).
И вот, наконец, мы можем лицезреть результат. Скажу сразу, изначально он меня не впечатлил :(.
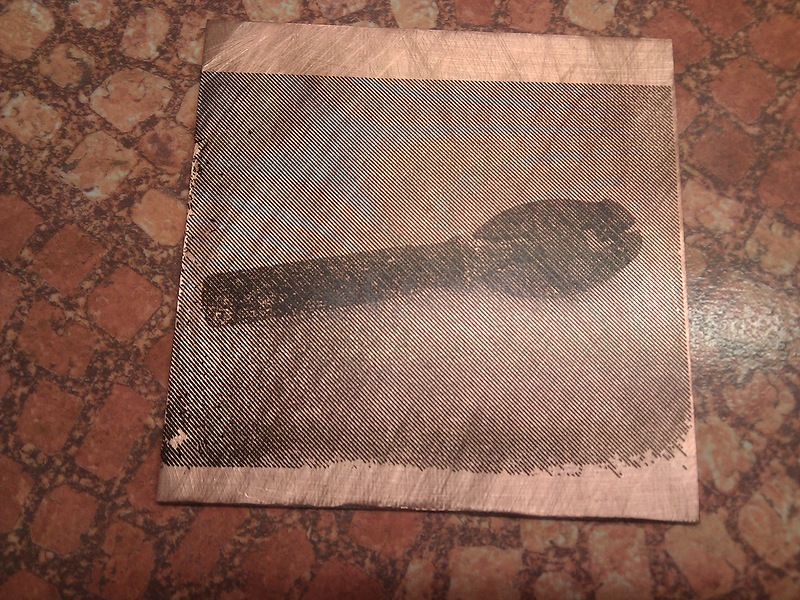
Протравленная плата
Может показаться, что на плате некоторая мешанина и клякса по форме минитисков. Но на самом деле это не так, всё становится понятно, глядя на просвет

На просвет
На просвет видны все детали минисков, и чтобы вам не листать в верх, приведу опять исходную фотографию для сравнения.

Исходная фотография (отражена по горизонтали)
Учитывая исходное качество фотографии, получилось просто апупительно, даже с низкой яркостью и контрастом! Видны все детали. Т.е. технология работает!
The technology turned out to be working, and not just working, but a bomb! Perhaps the result is not too impressive for you, but this is just a test of the pen, which can allow these experiments to develop further.
Even a completely terrible picture was etched and it turned out. For even greater results, use higher-contrast photographs. And also subject them to additional processing. It is better to make the background white, or uniform and light.
The disadvantage of the technology is the low contrast of copper relative to the PCB. It is solved in several ways. Firstly, you can take a darker textolite. Secondly, you can chemically stain copper. For example, copper darkens in the light, and this picture, if left in the sun for a week, will gain enough darkness. I believe there are simpler ways to oxidize copper, google to help. However, please note that in order to maintain the original shine, I recommend that the board be varnished to avoid oxidation.
For use in PCB layout, you must port the processed image to your CAD program in which you breed PCBs. For P-CAD, this is a very non-trivial and non-obvious way.
The next step will be the introduction of an electrical circuit in a printed circuit board. For example, in order to light and extinguish the stars or eyes of a loved one in the sky at the sight of you :).
I thank my HTC HD2 , upgraded to android for wonderful photos and conveniently downloading them to fotki.yandex.ru
Remember: the best thanks to the author for the post are the comments left.
Socro is coming New Year, St. Valentine's Day, the eighth of March. Yes, a lot of things are coming, and now I want to prepare the sled in the summer, the cart in the winter, in general, thoroughly prepare for these festive events and please our other half with something unusual. In my opinion, the most invaluable gift is a handmade gift. From here we will dance.
I’m not sure that this idea didn’t occur to anyone, but a quick googling did not give me results in either English or Russian.
Idea
Most of my life I have been involved in electronics, programming and microcontrollers. I was not able to interest in this hobby any woman, even the most fierce engineers. According to this, they should at least have to make such a gift so that they understand that despite the love of electronics, we love them much more.
To do this, I thought of making some catchy electronic device that would remind her of the wonderful moments spent together. Usually a memorable moment is already captured in the photo ! It remains only to combine photography and electronics.
Imagine a picture: in a printed circuit board, a photo of you sitting in a cafe, and candles lit by LEDs. This craft is on her desk, and the craft is made with your own hands. High tech romance!
Also, this technology can be useful to printed circuit board breeders (I say hello to my colleagues from work) to place my picture on a printed circuit board (such as a signature).
In simpler terms, I decided to try to transfer any picture to textolite.
Below I will tell you how I did it and what I did.
A few words about technology
As we all understand, even black and white photography has transitions from white to black, called gray. And in the printed circuit board we have only two colors: the color of copper and the color of the PCB. Conventionally, copper will be light, and textolite black. Although this is all a convention: if you take white textolite and oxidize copper, then everything will be the other way around. How do we make shades of gray in copper?
The idea is simple, like all ingenious - the technology of placing pictures in a newspaper. The bottom line is that the dimming or illuminance of the area is determined from the size of the point. Close it looks awful, but moving away it turns out a normal picture.
I first learned about this technology in my childhood by reading entertaining physics. A picture was given there, which at first glance seemed like a strange set of dots, but when removed, it turned into a woman's eye.
Illustration for “Entertaining Physics”
In order not to change the page size, I bring a small copy of this picture.
At a distance
I guess you already knew where I was leading. A photograph is taken, turned into such a sieve, then using LUT or photoresist it is applied to the board and etched.
What do we need?
For all this, you do not need much, according to the points:
1. Direct hands growing from the right place.
2. Preparation of the printed circuit board.
3. Laser printer.
4. Self-adhesive.
5. Hydrogen peroxide, citric acid, salt (table).
Image Preparation
The hardest part for this article was to find a suitable photograph. I did not take photos of models because of copyright issues. Photos from the personal photo archive were either dull or not for a wide range. As a result, for the test I decided to just shoot one of my favorite instruments: mini-disks.
Vise
After which, they must be specially processed. Since I use only linux, I have at my disposal a warm tube gimp.
I deliberately did not do any processing of the photo (highlighting, stretching the contrast, etc.). Looking ahead, I’ll say that I paid for it and the resulting picture was not clear.
So, open the image in gimp, then bleach it.
Discoloration
Then that interesting magic begins, which turns an ordinary picture into something that will allow it to be reproduced, so to speak, in iron. Select “Distortion -> Newsprint”
Magic.
Then we start to play with the parameters. In the “Divide by:” section, check the box on CMYK. Empirically, you should choose the size of the cell. In the “Black” tab, I personally made the “Slot function” line. This is a matter of everyone’s taste, but I wanted to try like this.
Set the distortion parameters.
Click “OK”, and we get the following result:
Resulting picture
Low contrast is immediately visible. But I decided to try how to get such not-so-bright pictures in iron. See the worst option, so to speak, and continued his experiments. Now is the time to tell how to transfer the resulting drawing to the board.
Transfer the image to the board
To transfer the picture, I used the traditional, long-run Laser Ironing Technology (aka LUT). Rather, to remind how it is done, rather than teach it again, I will tell a few words about it.
In order to know exactly the size of the future workpiece, I used one simple cheat, known from the school bench: placing the picture in the text editor, with the right size. Opening Writer (an analogue of MS Word in Linux), I set the size of the fields so that the horizontal length of the picture was exactly 10 cm. For this, there is a very convenient ruler at the top of the page. After inserting a picture, you can see that the vertical length is 8 cm. We
set clear borders of the picture
After that, we cut out a rectangle from the PCB with the same parameters, sand it and degrease it with isopropanol or any convenient solvent.
Skinning and degreasing.
You can pay attention to the picture at the top that I use a piece of paper with test print of the future pattern as a substrate. Looking at him, I decided to take exactly the lines, as well as increase their pitch and thickness.
To transfer the image to textolite, I use a backing for self-adhesive wallpaper. Unlike magazine paper, there is a million times less hemorrhoid and there is no need to soak anything. A roll of 10 meters costs only 250 rubles, and it lasts for a very long time.
On the reverse side, cells are usually carefully drawn. We attach sheet A4, and note which cells it corresponds to.
Markup
Do not be lazy and do “long A4” (do not cut off the tail), my printer was offended by this and decided that he jammed the paper, that it did not come out for so long.
Cut, tear off the sticker and print on the side on which the sticker was.
Result (Half Life 2 is not recalled?) We
attach the blank to the drawing with copper, wrap the textolite in paper, and begin to iron the drawing from the back.
Wrap
and iron
I usually iron through clean paper, but then I decided to iron the delivery paper on which it was printed. As a result, the paper stuck to the workpiece, torn paper with a pattern and everything was rejected. I had to start all over again.
Marriage
Marriage in such cases is a normal phenomenon, therefore we repeat all iterations first. After which we carefully remove the paper from the workpiece and we have the following picture:
Transferred drawing
Poison
In connection with the minuses of ferric chloride:
- incredibly dirty;
- it is very difficult to wash;
- stains clothes once and for all;
- it is difficult to wash the bath and toilet;
- you need to go to the other end of the city to buy it;
I decided to discover for myself a new method of etching printed circuit boards, described here radiokot.ru/lab/hardwork/62 as the most effective. For it, you need only three components that are in pharmacies and convenience stores:
- citric acid;
- hydrogen peroxide;
- ordinary table salt.
Proportions of etching taken from the site (quote):In 100 ml of the pharmacy 3% hydrogen peroxide, 30 g of citric acid and 5 g of sodium chloride are dissolved. This solution should be sufficient for etching 100 cm2 of copper, 35 microns thick.
Everything is ready for etching.
Since I did not have measured weights, everything interfered by the eye, trying to at least somehow comply with the proportions. In the process of etching, hydroxide began to precipitate, and I added more citric acid. Then there were fewer bubbles, added peroxide. I also added salt. Everything is possible from impatience. It was poisoned for about two hours. I believe that this is due to cold peroxide, and not my desire to somehow warm it all up (they say that the solution boils, although I personally kept the solution cold). Plus, this time I was poisoning in a bowl, not using my wonderful bullet-lamp , about which I wrote here:habrahabr.ru/post/109869 . And all because he is busy with ferric chloride. It’s necessary to create a new bulbator specially for the new technology.
Result
После травления получается прекрасный голубой раствор, который я, к сожалению догадался сфотографировать, уже после того, как слил в унитаз. По сему поверьте мне на слово, что он прекрасен :).
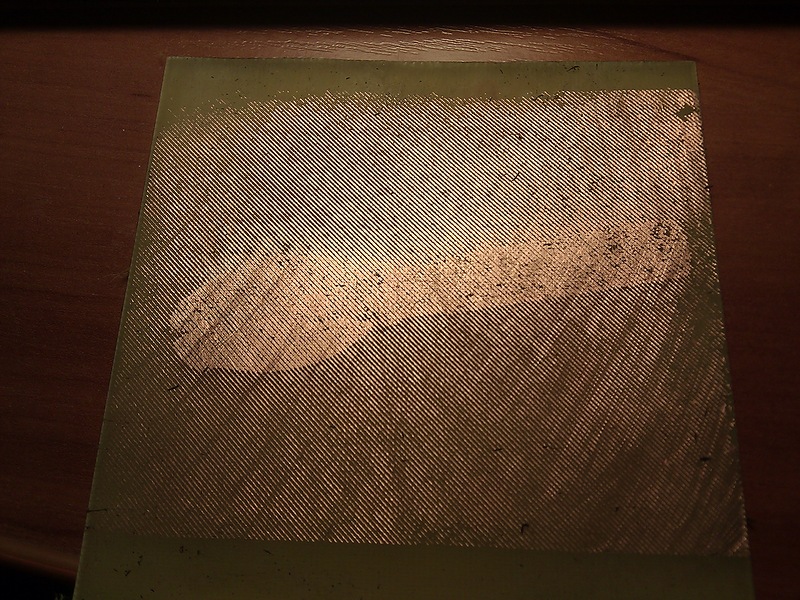
И вот, наконец, мы можем лицезреть результат. Скажу сразу, изначально он меня не впечатлил :(.
Протравленная плата
Может показаться, что на плате некоторая мешанина и клякса по форме минитисков. Но на самом деле это не так, всё становится понятно, глядя на просвет
На просвет
На просвет видны все детали минисков, и чтобы вам не листать в верх, приведу опять исходную фотографию для сравнения.
Исходная фотография (отражена по горизонтали)
Учитывая исходное качество фотографии, получилось просто апупительно, даже с низкой яркостью и контрастом! Видны все детали. Т.е. технология работает!
Summarizing
The technology turned out to be working, and not just working, but a bomb! Perhaps the result is not too impressive for you, but this is just a test of the pen, which can allow these experiments to develop further.
Even a completely terrible picture was etched and it turned out. For even greater results, use higher-contrast photographs. And also subject them to additional processing. It is better to make the background white, or uniform and light.
The disadvantage of the technology is the low contrast of copper relative to the PCB. It is solved in several ways. Firstly, you can take a darker textolite. Secondly, you can chemically stain copper. For example, copper darkens in the light, and this picture, if left in the sun for a week, will gain enough darkness. I believe there are simpler ways to oxidize copper, google to help. However, please note that in order to maintain the original shine, I recommend that the board be varnished to avoid oxidation.
For use in PCB layout, you must port the processed image to your CAD program in which you breed PCBs. For P-CAD, this is a very non-trivial and non-obvious way.
The next step will be the introduction of an electrical circuit in a printed circuit board. For example, in order to light and extinguish the stars or eyes of a loved one in the sky at the sight of you :).
I thank my HTC HD2 , upgraded to android for wonderful photos and conveniently downloading them to fotki.yandex.ru
Remember: the best thanks to the author for the post are the comments left.