Deploy Elasticsearch on AWS with Kubernetes in 10 Steps
- Transfer
Kubernetes aka k8sis an open source system for automating the deployment, scaling, and management of container applications. In this article, I’ll explain how to set up a Kubernetes cluster and deploy an Elasticsearch cluster in AWS on it. These settings also work on GCE and Azure .
Configuring Kubernetes on AWS
To get started, access the following AWS services with administrator rights: S3, EC2, Route53, IAM and VPC .
1. Installation: I will show the CLI installation for Linux. If you have another operating system, follow the links below for installation instructions for your operating system.
First, set AWS CLI to access AWS via CLI. If you already have Python and pip, run the command:
pip install awscli --upgrade --userThen we use Kops , a command line tool that guides us through setting up a production-level K8S cluster.
Install Kops binaries directly from github.
wget -O kops https://github.com/kubernetes/kops/releases/download/$(curl -s https://api.github.com/repos/kubernetes/kops/releases/latest | grep tag_name | cut -d '"' -f 4)/kops-linux-amd64
chmod +x ./kops
sudo mv ./kops /usr/local/bin/
Finally, use kubectl -CLI to manage the K8S cluster (if you used docker, this is similar to the docker CLI). The latest release is set by the command:
wget -O kubectl https://storage.googleapis.com/kubernetes-release/release/$(curl -s https://storage.googleapis.com/kubernetes-release/release/stable.txt)/bin/linux/amd64/kubectl
chmod +x ./kubectl
sudo mv ./kubectl /usr/local/bin/kubectl
Note: you can start a Kubernetes cluster and follow the instructions in this article on a minikube home machine .
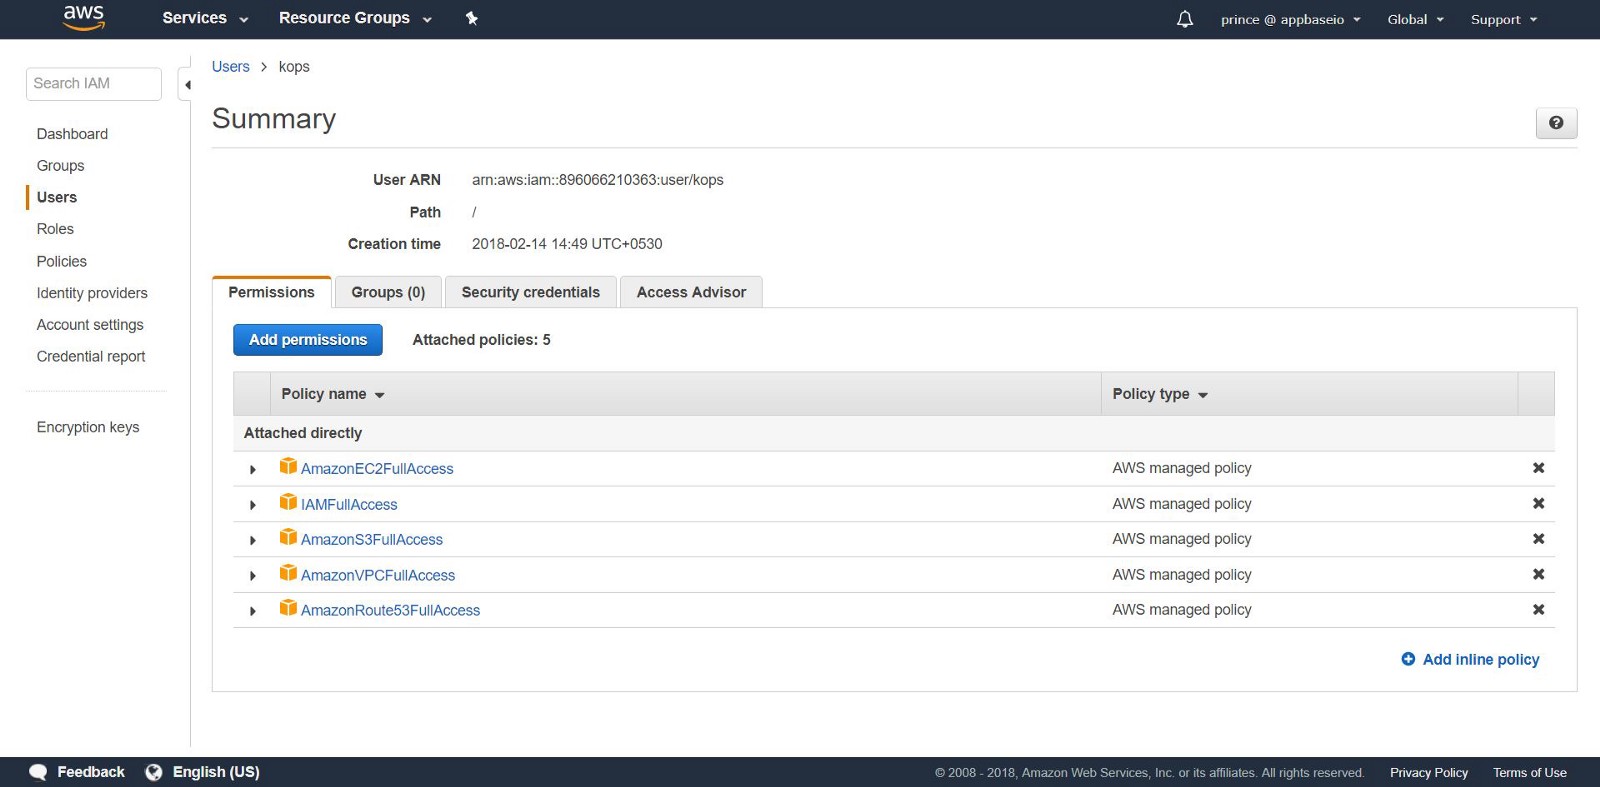
2. Creating IAM Users: To create clusters in AWS, we will create a separate IAM user for kops. For kopsneed an API account. Create a user and set up an account using the AWS console user interface . The user kopswill need the following IAM permission:
- AmazonEC2FullAccess
- AmazonRoute53FullAccess
- AmazonS3FullAccess
- IamFullAccess
- AmazonVPCFullAccess
Alternatively, you can do the same from the CLI using the following commands:
aws iam create-group --group-name kops
aws iam attach-group-policy --policy-arn arn:aws:iam::aws:policy/AmazonEC2FullAccess --group-name kops
aws iam attach-group-policy --policy-arn arn:aws:iam::aws:policy/AmazonRoute53FullAccess --group-name kops
aws iam attach-group-policy --policy-arn arn:aws:iam::aws:policy/AmazonS3FullAccess --group-name kops
aws iam attach-group-policy --policy-arn arn:aws:iam::aws:policy/IAMFullAccess --group-name kops
aws iam attach-group-policy --policy-arn arn:aws:iam::aws:policy/AmazonVPCFullAccess --group-name kops
aws iam create-user --user-name kops
aws iam add-user-to-group --user-name kops --group-name kops
aws iam create-access-key --user-name kops
Pay attention to the keys SecretAccessKeyand AccessKeyIDc kops.
Configure the AWS CLI to use the account with aws configure.
Make sure that the created user is in the list aws iam list-users.
We export the AWS account as the following environment variables so that the CLI kopscan use them.
export AWS_ACCESS_KEY_ID=$(aws configure get aws_access_key_id)
export AWS_SECRET_ACCESS_KEY=$(aws configure get aws_secret_access_key)
If you use Kops 1.6.2 or later, it is not necessary to configure DNS. You can create a gossip cluster. The only requirement: the name of the cluster must end with .k8s.local.DNS setup
If you have already placed your domain through AWS and plan to use it, you need not do anything. Another option: you want to use a subdomain of your domain, create a second public hosting zone for this subdomain. In this manual we will work with the private hosting zone. Set a zone under any name. Use this name to create Kubernetes clusters. Read more about configuring DNS here .
3. Creating an S3 bucket: to save the state and appearance of our K8S cluster, you need to create a separate S3 bucket for kops. This bucket will be a source of reliable data for the configuration cluster.
aws s3api create-bucket \
   --bucket <your-unique-bucket-name> \
   --region us-east-1
Note: if you commission your bucket in an area other than us-east-1, in addition to setting, - regionswitch to the desired area and add LocationConstraintto the same area. Below is the command to create a bucket in the region us-west-1.
aws s3api create-bucket \
   --bucket <your-unique-bucket-name> \
   --region us-west-1 \
   --create-bucket-configuration LocationConstraint=us-west-1
To set up storage of S3 versions for recovery, use the following command:
aws s3api put-bucket-versioning \
   --bucket <your-unique-bucket-name> \
   --versioning-configuration Status=Enabled
4. Creating the first cluster Kubernetes: So you are ready to create your first cluster! First, set up the environment variables to simplify the process. If you missed the DNS configuration (after step 2), add .k8s.localto the value NAME.
export NAME=myfirstcluster.example.com
export KOPS_STATE_STORE=s3://your-bucket-name
Do not forget to follow which regional areas are available to you. In this example, we will deploy a cluster in the us-east-2 region .
aws ec2 describe-availability-zones --region us-east-2If using a public hosting zone, create a cluster using the following command:
kops create cluster \
   --zones us-east-2c \
   --node-count 3 \
   ${NAME}
If you are using a private hosting zone, run:
kops create cluster \
   --zones us-east-2c \
   --node-count 3 \
   --dns private ${NAME}
This command will provide you with a K8S cluster configuration log. It takes time for the cluster to start up, as it creates new EC2 machines for master node minions.
[ec2-user@ip-172-31-35-145 test]$ kops create cluster \
>     --dns private \
>     --zones us-east-2c \
>     --node-count 3 \
>     ${NAME} --yes
I0306 09:45:29.636834   20628 create_cluster.go:439] Inferred --cloud=aws from zone "us-east-2c"
I0306 09:45:29.637030   20628 create_cluster.go:971] Using SSH public key: /home/ec2-user/.ssh/id_rsa.pub
I0306 09:45:29.850021   20628 subnets.go:184] Assigned CIDR 172.20.32.0/19 to subnet us-east-2c
I0306 09:45:31.118837   20628 dns.go:92] Private DNS: skipping DNS validation
I0306 09:45:46.986963   20628 executor.go:91] Tasks: 73 done / 73 total; 0 can run
I0306 09:45:46.987101   20628 dns.go:153] Pre-creating DNS records
I0306 09:45:47.668392   20628 update_cluster.go:248] Exporting kubecfg for cluster
kops has set your kubectl context to k8s.appbase
Cluster is starting.  It should be ready in a few minutes.
Voila! The K8s cluster should already be running.
5. Cluster check: all instances created kopsare in ASG (Auto Scaling Groups) . In case of failure, the ASG instances are checked and automatically rebuilt.
To change the cluster configuration, run the following command:
kops edit cluster ${NAME}Each time you change the cluster configuration, you will need to create a cluster by running the following command:
kops update cluster ${NAME} --yesYou will see something like this.
[ec2-user@ip-172-31-35-145 examples]$ kops update cluster --yes
Using cluster from kubectl context: k8s.appbase
I0216 05:09:06.074467    2158 dns.go:92] Private DNS: skipping DNS validation
I0216 05:09:07.699380    2158 executor.go:91] Tasks: 73 done / 73 total; 0 can run
I0216 05:09:07.699486    2158 dns.go:153] Pre-creating DNS records
I0216 05:09:07.961703    2158 update_cluster.go:248] Exporting kubecfg for cluster
kops has set your kubectl context to k8s.appbase
Cluster changes have been applied to the cloud.
Check the cluster.
kops validate clusterMake sure the cluster is up and ready.
Using cluster from kubectl context: k8s.appbase
Validating cluster k8s.appbase
INSTANCE GROUPS
NAME   ROLE MACHINETYPE MIN MAX SUBNETS
master-us-east-2c Master t2.large 1 1 us-east-2c
nodes   Node t2.medium 3 3 us-east-2c
NODE STATUS
NAME      ROLE READY
ip-172-20-44-33.us-east-2.compute.internal master True
ip-172-20-52-48.us-east-2.compute.internal node True
ip-172-20-62-30.us-east-2.compute.internal node True
ip-172-20-64-53.us-east-2.compute.internal node True
Your cluster k8s.appbase is ready
Check out your new k8s!
By simply calling the Kubernetes API, you can check if the API is online and listening. Use kubectlto check nodes.
kubectl get nodesThis will give information about your nodes and their current status.
[ec2-user@ip-172-31-35-145 elasticsearch]$ kubectl get nodes
NAME STATUS ROLES AGE VERSION
ip-172-20-44-33.us-east-2.compute.internal Ready master 1m v1.8.6
ip-172-20-52-48.us-east-2.compute.internal Ready node 3m v1.8.6
ip-172-20-62-30.us-east-2.compute.internal Ready node 2m v1.8.6
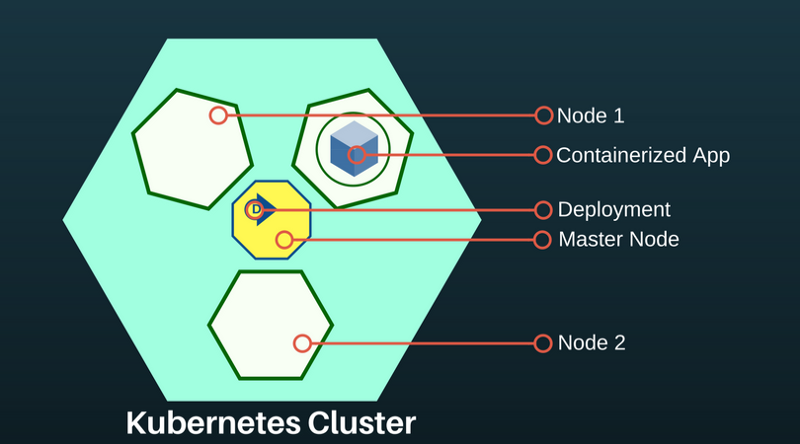
ip-172-20-64-53.us-east-2.compute.internal Ready node 4m v1.8.6A Kubernetes sub is an abstraction representing a group of one or more application containers (for example, Docker) and several shared resources for these containers. Under unfolds on the node. If you need to scale the application, add nodes to the deployed K8S.
To find out about the available feeds, run:
kubectl get podsThis command will list the available pods in the cluster.
[ec2-user@ip-172-31-35-145 ~]$ kubectl get pods
NAME                  READY     STATUS    RESTARTS   AGE
es-5967f5d99c-5vcpb   1/1       Running   0          3h
es-5967f5d99c-cqk88   1/1       Running   0          3h
es-5967f5d99c-lp789   1/1       Running   0          3h
Deploying Elasticsearch on a K8S cluster
If you are not familiar with Kubernetes, I recommend interactive training on k8s .
At the moment in the K8S cluster we have created: the main node and two node-agents. The role of the main node is to transfer deployment commands to applications running in the node node agents.
Application deployments in K8S are declarative and are configured via JSON / YAML files. Choose a controller depending on the type of application or system you are deploying. Since Elasticsearch is a stateful application, we will use a StatefulSet controller.
6. Deploy via StatefulSet. The StatefulSet manages the feeds based on the specification of identical containers. It manages the deployment and scaling of a set of pods and ensures the order and uniqueness of these pods. The StatefulSet controller also simplifies communication of the application with the persistent volume, which is important for Elasticsearch.
Create a file named es-stateful set.и yaml. It will contain the Elasticsearch specification. Feel free to change the configuration. For a list of environment variables that can be passed to your Elasticsearch image, see here .
7. Services:Service Kubernetes is an abstraction that defines a logical set подовand access to them. This helps the container application to identify another container application or its own instance in another poda.

LoadBalancer- a special type of service that provides sub-networks to external networks and distributes the load. We will use it to create an external IP address through which anyone can contact the Elasticsearch cluster. We will use this service for ES nodes as a way to discover each other.
Create a file named es-svc.yaml. Edit it and specify the load balancer service.
apiVersion: v1               #API Version of the resource
kind: Service                #Type of resource
metadata:                    #Contains metadata of this resource.
 name: elasticsearch        #Name of this resource
 labels:                    #Additional identifier to put on pods
   component: elasticsearch #puts component = elasticsearch
spec:                        #Specifications of this resource
 type: LoadBalancer         #type of service
 selector:                  #will distribute load on pods which
   component: elasticsearch #have label `component = elasticsearch`
 ports:                     #Port on which LoadBalancer will listen
 - name: http               #Name given to port
   port: 9200               #Port number
   protocol: TCP            #Protocol supported
 - name: transport          #Name given to port
   port: 9300               #Port number
   protocol: TCP            #Protocol supported
8. Creating an application: that's all we need. We deploy our Elasticsearch cluster on K8S using the following commands.
kubectl create -f es-statefulset.yaml
kubectl create -f es-svc.yaml
'Create' is a universal command for creating any resource in K8S.
Our 3-node (remember replicas = 3in the StatefulSet config?) Elasticsearch cluster will be launched instantly.
We can check Elasticsearch using this command:
kubectl get pods[ec2-user@ip-172-31-35-145 test]$ kubectl get pods,svc,deployment
NAME READY STATUS RESTARTS AGE
es-0 1/1 Running 0 23m
es-1 1/1 Running 0 17m
es-2 1/1 Running 0 23m9. Testing the cluster Elasticsearch: check whether the Elasticsearch is configured and working correctly. Get an external IP address to connect to Elasticsearch. It will be in the LoadBalancer service we created . Use the following command to describe LoadBalancer :
kubectl describe service elasticsearch[ec2-user@ip-172-31-35-145 examples]$ kubectl describe service elasticsearch
Name: elasticsearch
Namespace: default
Labels: component=elasticsearch
Annotations: <none>
Selector: component=elasticsearch
Type: LoadBalancer
IP: 100.70.114.146
LoadBalancer Ingress: http://a4d0c157d212811e898430af47d23da1-952261901.us-east-2.elb.amazonaws.com
Port: http 9200/TCP
TargetPort: 9200/TCP
NodePort: http 31358/TCP
Endpoints: 100.96.4.28:9200
Port: transport 9300/TCP
TargetPort: 9300/TCP
NodePort: transport 31767/TCP
Endpoints: 100.96.4.28:9300
Session Affinity: None
External Traffic Policy: Cluster
Events:
Type Reason Age From Message
---- ------ ---- ---- -------
Normal EnsuringLoadBalancer 1m service-controller Ensuring load balancer
Normal EnsuredLoadBalancer 1m service-controller Ensured load balancer
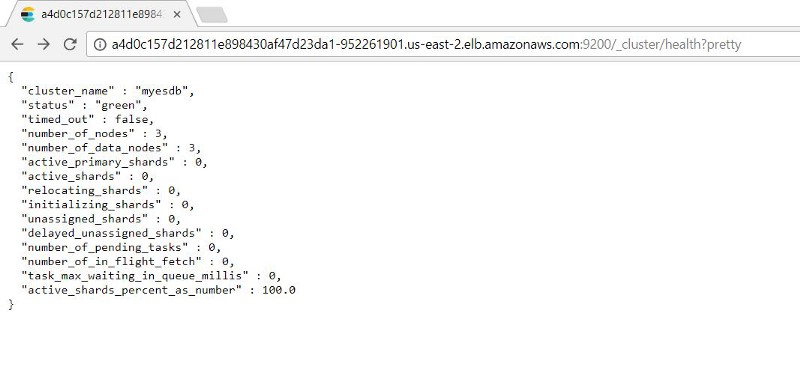
[ec2-user@ip-172-31-35-145 examples]$Pay attention to the value LoadBalancer Ingress. Open the browser and URI suffix number of the external port Elasticsearch: 9200. You will see this:
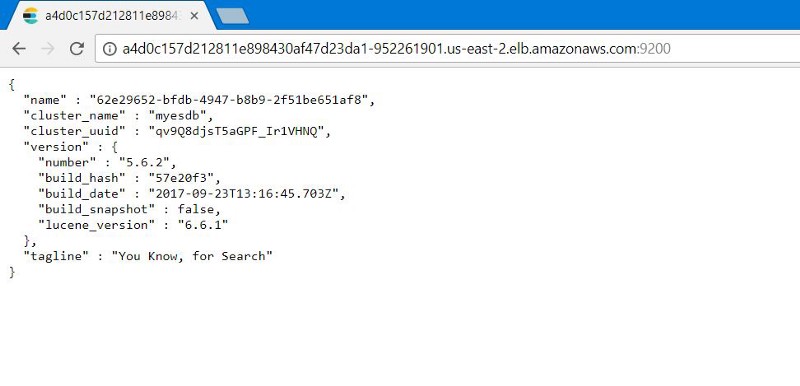
You can test the operation of the Elasticsearch nodes by adding: 9200/_cluster /health?prettyto the external IP address.
10. Testing Kubernetes Healing: StatefulSets has a function to save a specified number of replicas. Thus, if under falls, the StatefulSet will launch new pods.
We will check it by simulating a crash (removing all the scams that our ES instances run on) to see if our ES cluster can automatically back up data with intact data.
Since StatefulSet runs one at a time, it takes time to restore all containers.
We see that after the recovery of the pod, the indexed record is available to us in the state before the ES failure.
Recommend the following steps
Before using these settings in production, note:
- Backup setup. Helps to recover lost data. This process is best automated.
- Configure authorization. We want to protect the Elasticsearch cluster. Configuring basic authentication or authorization based on the token of the carrier will ensure security.
- TLS certificates. Configure LetsEncrypt / other TLS providers of personal domain mapping certificates for our ES cluster and protect all requests sent to it.
Although the article is not about that, but know: Kubernetes can do it all.
Original: Deploy Elasticsearch with Kubernetes on AWS in 10 steps