Custom Destination example in FreePBX
Hi Habr!
The purpose of this post is to use an example to show how to register custom contexts created by the user in FreePBX using Custom Destination (usually in the /etc/asterisk/extensions_custom.conf file).
Often, the standard features of FreePBX are enough to satisfy the needs of customers. But sometimes there are very specific requests, for the implementation of which you have to write different custom contexts. And everything seems to be fine until the task arises to direct calls to these contexts through the FreePBX admin panel. Here the Custom Destination function comes to the rescue!
For example:
Given:
Suppose our customer has 2 stores in the city. In one of them there is a server with AsteriskNow on board, which processes calls for both stores. The customer bought from a sip provider a beautiful number for 8 channels of the type 560560.
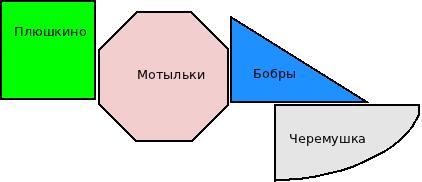
In the city there are 4 districts:
Plyushkino - phone numbers start at 33
Cheryomushka - phone numbers start at 45
Moths - phone numbers start at 77
Beavers - phone numbers start at 31
Geographically they are located as on the image.
One store is located in the Plyushkino area , where the number of the seller’s ring-group will be 600.
Another store in the Cheryomushka district, where the seller’s ring group number will be 601.
Challenge
We need all incoming calls from potential buyers to be processed by the store that is geographically closer to them. For example, if the call came from 312323, this means that the caller is in the area of Beaver , respectively, the nearest store is located in the area of Cheryomushka , i.e. the call should be directed to the number of the seller’s ring group 601.
That is, Depending on the first 2 digits of the customer’s Caller-ID, we must direct the call to the ring group we need.
Solution
To do this, add a new context called check-tel-location-mag to the /etc/asterisk/extensions_custom.conf file, which looks like this:
Now we can register the context we created in FreePBX.
To do this:
1. Go to the FreePBX admin panel -> Tools -> Custom Destination
in the Custom Destination field, enter the context - check-tel-location-mag, s, 1
fill in the remaining fields as convenient:
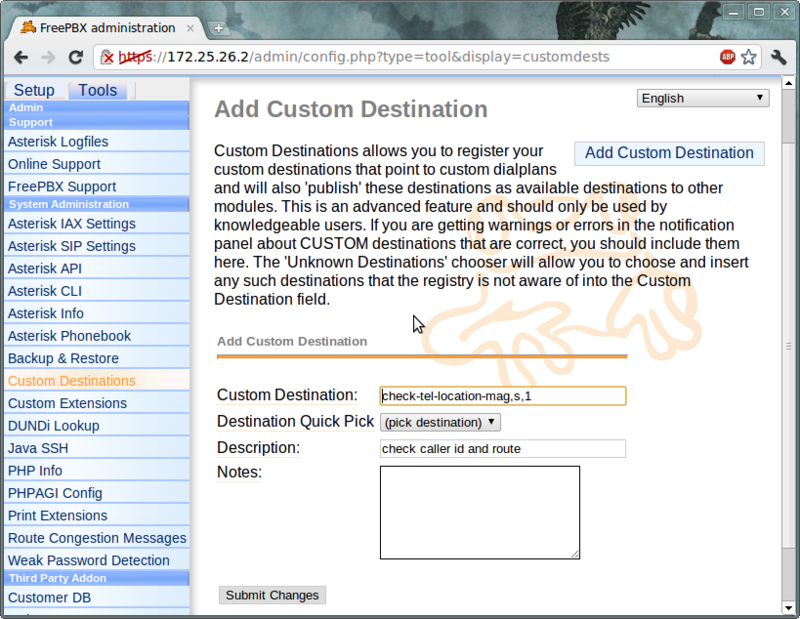
2. Click Submit Changes
Now you can create an incoming route to number 560560, in which you can select the Custom Destination created earlier:
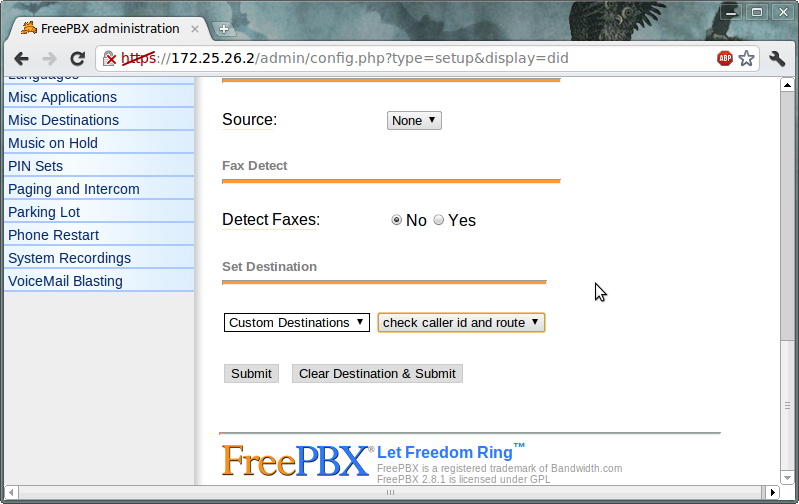
As a result, the customer is satisfied, he received the required functionality, and we learned how to create Custom Destination.
Links:
FreePBX Extension Registry HOW-TO
The purpose of this post is to use an example to show how to register custom contexts created by the user in FreePBX using Custom Destination (usually in the /etc/asterisk/extensions_custom.conf file).
Often, the standard features of FreePBX are enough to satisfy the needs of customers. But sometimes there are very specific requests, for the implementation of which you have to write different custom contexts. And everything seems to be fine until the task arises to direct calls to these contexts through the FreePBX admin panel. Here the Custom Destination function comes to the rescue!
For example:
Given:
Suppose our customer has 2 stores in the city. In one of them there is a server with AsteriskNow on board, which processes calls for both stores. The customer bought from a sip provider a beautiful number for 8 channels of the type 560560.
In the city there are 4 districts:
Plyushkino - phone numbers start at 33
Cheryomushka - phone numbers start at 45
Moths - phone numbers start at 77
Beavers - phone numbers start at 31
Geographically they are located as on the image.
One store is located in the Plyushkino area , where the number of the seller’s ring-group will be 600.
Another store in the Cheryomushka district, where the seller’s ring group number will be 601.
Challenge
We need all incoming calls from potential buyers to be processed by the store that is geographically closer to them. For example, if the call came from 312323, this means that the caller is in the area of Beaver , respectively, the nearest store is located in the area of Cheryomushka , i.e. the call should be directed to the number of the seller’s ring group 601.
That is, Depending on the first 2 digits of the customer’s Caller-ID, we must direct the call to the ring group we need.
Solution
To do this, add a new context called check-tel-location-mag to the /etc/asterisk/extensions_custom.conf file, which looks like this:
 [check-tel-location-mag]

 exten => s,1,Set(telnum=${CALLERID(num)})

 exten => s,n,GotoIf($[ $["${telnum:0:2}" = "33"] | $["${telnum:0:2}" = "77"] ]?pluwki)

 exten => s,n,GotoIf($[ $["${telnum:0:2}" = "31"] | $["${telnum:0:2}" = "45"] ]?ceremuska)

 exten => s,n(pluwki),Goto(ext-group,600,1)

 exten => s,n(ceremuska),Goto(ext-group,601,1)
Now we can register the context we created in FreePBX.
To do this:
1. Go to the FreePBX admin panel -> Tools -> Custom Destination
in the Custom Destination field, enter the context - check-tel-location-mag, s, 1
fill in the remaining fields as convenient:
2. Click Submit Changes
Now you can create an incoming route to number 560560, in which you can select the Custom Destination created earlier:
As a result, the customer is satisfied, he received the required functionality, and we learned how to create Custom Destination.
Links:
FreePBX Extension Registry HOW-TO