March 10, 2013 at 19:23
Exchange 1C with a client in C # using 1C web services
- Tutorial
For one project, it was necessary to use 1C web services, we built a warehouse automation system, and data collection terminals are directly connected to 1C, the clients themselves are developed on .NET. The result was a very interesting structure. Received information about 1C settings in the web service operation mode as well as writing a simple configuration and client in C # in the form of a tutorial laboratory work, which he then successfully presented at the institute.
The laboratory work received a slightly convoluted name:
Organization of information exchange between a client-server multi-platform solution using Web Services in the example of a source developed on the 1C: Enterprise 8.2 platform and a client on the .NET 4.0 platform in C #
Anyone who is interested, ask for cat.
To master the technology of building web services, the formation of a WSDL description of a web service. To learn the principles of serializing objects in XML schemas for the possibility of transferring through Web-services.
Increasingly, exchanges are found using Web Services technology. This is convenient, because for the host database, it’s enough to install the Web Service extension and data handler, and for the Clint solution, connect to the Web Service. The technology is multi-platform and at the moment its use is very relevant.
Examples of web services using the WSDL description include:
WSDL (Web Services Description Language) is an XML-based language for describing and accessing web services. (specification http://www.w3.org/TR/wsdl ).
SOAP (Simple Object Access Protocol) is a structured messaging protocol in a distributed computing environment. SOAP is used for the exchange of arbitrary messages in XML format and remote procedure call (RPC). (specification http://www.w3.org/TR/soap/ ).
XDTO (XML Data Transfer Objects) - a mechanism for object modeling of data described using the XML schema (more details http://v8.1c.ru/overview/xdto.htm ).
Most of the methods for serializing primitive types were developed by W3 and their description is located in the namespace “ http://www.w3.org/2001/XMLSchema ”.
Task 1: Install the 1C: Enterprise platform, install the IIS server components, connect the 1C Web Extensions to the IIS server.
When installing the 1C: Enterprise platform, you must install the Web Extension.
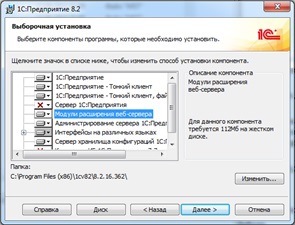
Fig. 1. Selected components at the time of 1C installation
In the menu “ Control Panel \ All elements of the control panel \ Programs and components ”, it is necessary to install additional Windows components “ Turn Windows components on or off.»Where to specify IIS components. In addition to the components selected by default, it is necessary to add more components related to ISAPI technology, it is thanks to this technology that the 1C web server extension has the ability to contact the IIS web server, and the authentication type is “by URL” to allow access to the web service using authentication 1C database users. After installation, it is recommended that you restart the operating system.
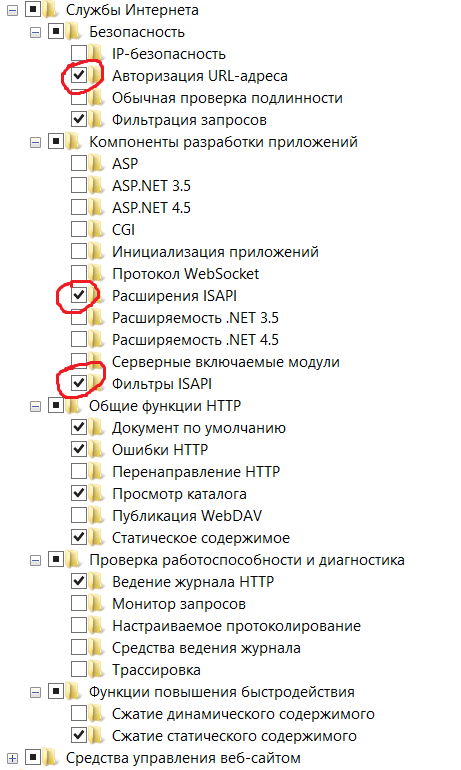
Fig. 2. Selected components at the time of IIS installation
In the menu " Control Panel \ All Control Panel Items \ Administrative Tools" , launch the " IIS Manager " console , where to open the " Application Pools " element , open the " DefaultAppPool " pool in the context menu, select "Additional parameters ... ”where the“ 32-bit applications are allowed ”element must be set to“ True ”. This is necessary for the operation of the Web-Extension 1C, because it is a 32-bit application. This is convenient for debugging (since when publishing from the configurator, “ DefaultAppPool ” will be substituted by default ), for the product I recommend creating separate pools for each service without a managed environment.
In the same IIS Manager console , select the Default Web Site item , select the Authentication action , where you need to enable the option: Anonymous authentication .
It is now possible to publish 1C Web Services on the IIS server. But in order to make this publication possible, it is necessary to run the 1C: Enterprise Configurator on behalf of the Administrator user .
Task 2: Creating a simple 1C configuration.
The first thing to start developing any configuration is: you need to create an Administrator role (In accordance with the configuration development methodology , it should be called Full Rights )
We believe that the database contains information on all orders containing the quantity and type of item that was ordered, in one order there may be a list containing the item and quantity, the order also has its own number and date of creation. Information about all orders must be transmitted through the Web service.
To describe this, you need to create database objects:

Fig. 3. The data structure in the created configuration 1C
Directory " Nomenclature ", without additional details. In the details "by default" contains information about the name and code of the item.
The document " Order of the buyer ", which will contain the tabular part " Products”, Each line of which will have information about the nomenclature (an element of the type“ DirectoryReference.Nomenclature ”) and the quantity (the element of the“ Number ”of the“ Number ”type is unsigned with 15 decimal places and 3 after).
Next, you can run 1C in enterprise mode and create several documents filled out by the nomenclatures we created and the corresponding number.
Task 3: Creation and publication of Web Service 1C.
In the “ General ” configuration grouping , create a new element of the “ XDTO-packages ” type, initially for transferring the item . It can be called, for example, " NomenclatureXDTO". The URL namespace, in accordance with the WSDL specification, must be assigned as the URL address of the specification for this package, for example,
" company.com/1C/Nomenclature ". In this package, you need to create an object type, for example, " Nomenclature ", in which there are details " Code " and " Name ", with the corresponding type " string (http://www.w3.org/2001/XMLSchema) ".
Now we need to create a second XDTO package that will contain information about customer orders, it can be called “ ClientOrderXDTO ” in the namespace “ company.com/1C/ClientOrder ”. First of all, you need to connect the import directive " company.com/1C/Nomenclature”, In order to be able to use the nomenclature serialization package that we created. This is necessary for the transfer of the items contained in the tabular part of the document “ Orders of customers ”.
Now we need to create an object type " ClientOrderRow " containing one row of the table part. This type will consist of a combination of the details “ Nomenclature ” and “ Count ”, respectively for the nomenclature it is necessary to indicate the type of the object “Nomenclature (http://company.com/1C/Nomenclature)”, and for the quantity, “ double (http: // www.w3.org/2001/XMLSchema) . "
The type of object containing the order itself can be called “ ClientOrder»Must contain the order number, creation date and an array of elements from the tabular part of the order. " Number " of type string, " Date " of type " dateTime (http://www.w3.org/2001/XMLSchema) " and " Products " of type " ClientOrderRow (http://company.com/1C/ClientOrder) ", it is necessary to indicate that the minimum number is “ 0 ”, and the maximum number is “ -1 ”, this indicates that this object will be an array.
But, since it is necessary to return the list of orders, it is necessary to create an object type containing this array, therefore it is necessary to create another element called “ ArrayOfClientOrders ”, which will have only one attribute, called “ClientOrder "type" ClientOrder (http://company.com/1C/ClientOrder) . "
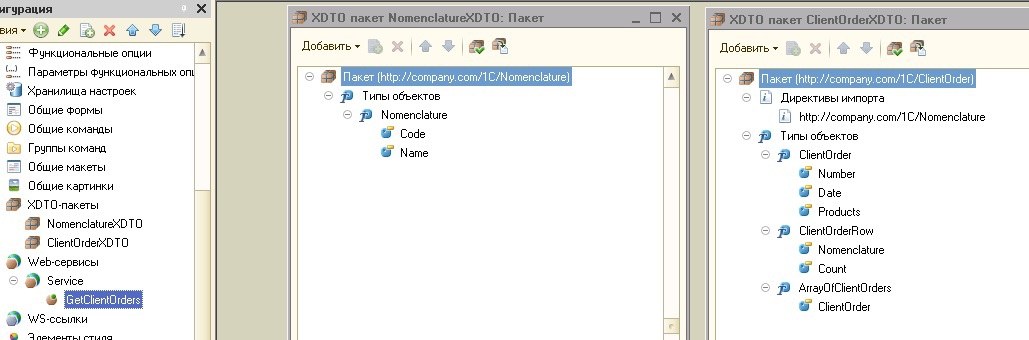
Figure 4. Structures of XDTO packets in 1C.
At this point, the creation of a description of the transmitted values can be considered complete. It is necessary to describe the web service itself and its methods.
In the “General” configuration grouping, you need to create an object, Web Service. It can be called " Service ." In the “Other” tab, you must specify the namespace to which the web service belongs, for example, “ company.com/1C ”, as well as the list of XDTO packages containing the newly created packages “ company.com/1C/Nomenclature , company.com/ 1C / ClientOrder . " In the "Operations" tab, create the " GetClientOrders " method”, Which will return the values“ ArrayOfClientOrders (http://company.com/1C/ClientOrder) ”, at the same time establish the ability to return empty values and click on the field with a magnifying glass called“ Method Name ”, thereby in the web service module a function will be created that will be called when accessing this web service method.
In order to correctly describe the function that receives from the database and returns a list of customer orders, it is necessary to know the internal language 1C, because the code for this function is in Appendix 1. What needs explanation is “ Factory XDTO", This is some manager that serializes objects, and this serialized object needs to be returned. In this case, all orders contained in the database are selected, serialization of the number, date, and rows of the tabular part occurs, while the nomenclature needs additional serialization, and the already-packed object is inserted into the general structure. An array of packed objects is assembled, serialized into an array package. And it is sent to the client as a result of the called function.
To publish a web service, in the 1C configurator menu, select " Administration \ Publish to web server ... ", and then specify the name of the web service publication, for example, " Company ", the name of the service, for example, " Service " and the address " service.1cws", As well as specify the path for publication, for example," C: \ inetpub \ wwwroot \ Company \ ".
After that, the WSDL Web Service structure will be available at the address " localhost / Company / ws / service.1cws? Wsdl "
Task 4: Creating a client on C # platform .NET 4.0.
In Visual Studio, create a new C # console application.
Next, call the context menu over the “ Reference ” project element and perform the “ Add service reference ... ” action , click the “ Advanced ... ” button in the menu that opens, a window opens where you need to click the “ Add Web Reference ... ” button .
A menu opens where you need to insert a link to the WSDL description of the web service.
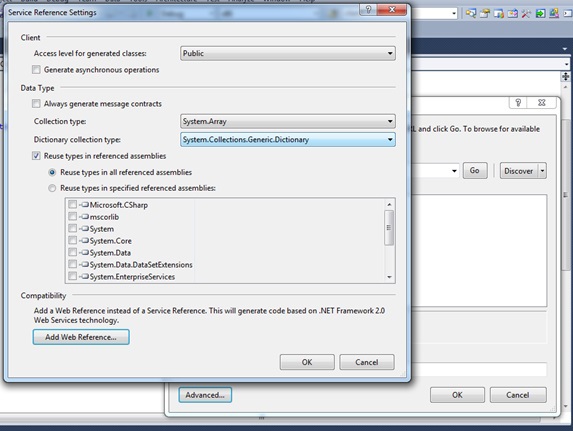
Fig. 5. Connecting the web service to the project in C #
For the web service created in 1C, this link will look like “ localhost / Company / ws / service.1cws? Wsdl ”, after correctly receiving the description of the web service, you must specify the name of the .NET namespace , from which access to a web service will be available, for example, “ CompanyService ”, then click on the “ Add Reference ... ” button , Visual Studio will automatically generate classes according to this description. In the project, it will be enough to call the methods of the generated class, while serialization and the call will be performed by the .NET platform.
Next, you need to write a program that will access the web service and display the received data to the user. To do this, you need to know the C # language, the program code is presented in Appendix 2. From this code it is necessary to clarify that the creation of the “ Service ” object is nothing more than the creation of a service access manager. On this behalf, web service methods will be called.
" _1CWebServiceClientConsole " is the common namespace of the project, it is selected at creation. The web service namespace obtained from the WSDL structure is fully included in the project namespace, which allows you to call remote methods “like your own”.
The construction of such an architecture is transparent for programmers, but it is necessary to understand at what points and what is being serialized for subsequent transmission. This client-server application architecture is currently the most popular.
The laboratory work received a slightly convoluted name:
Organization of information exchange between a client-server multi-platform solution using Web Services in the example of a source developed on the 1C: Enterprise 8.2 platform and a client on the .NET 4.0 platform in C #
Anyone who is interested, ask for cat.
purpose of work
To master the technology of building web services, the formation of a WSDL description of a web service. To learn the principles of serializing objects in XML schemas for the possibility of transferring through Web-services.
Hardware and software
- Microsoft Windows 7 x64
- Platform 1C: Enterprise 8.2
- Internet information server
- Visual Studio 10 Ultimate
Theoretical introduction
Increasingly, exchanges are found using Web Services technology. This is convenient, because for the host database, it’s enough to install the Web Service extension and data handler, and for the Clint solution, connect to the Web Service. The technology is multi-platform and at the moment its use is very relevant.
Examples of web services using the WSDL description include:
- http://www.cbr.ru/scripts/Root.asp?Prtid=DWS Web service of the Central Bank, for receiving daily data.
- http://api.yandex.ru/speller/doc/dg/concepts/api-overview.xml Yandex web service spellchecker.
- https://www.flightstats.com/developers/bin/view/Web+Services/WSDL a number of web-based statistics services for monitoring flights, weather information, etc.
WSDL (Web Services Description Language) is an XML-based language for describing and accessing web services. (specification http://www.w3.org/TR/wsdl ).
SOAP (Simple Object Access Protocol) is a structured messaging protocol in a distributed computing environment. SOAP is used for the exchange of arbitrary messages in XML format and remote procedure call (RPC). (specification http://www.w3.org/TR/soap/ ).
XDTO (XML Data Transfer Objects) - a mechanism for object modeling of data described using the XML schema (more details http://v8.1c.ru/overview/xdto.htm ).
Most of the methods for serializing primitive types were developed by W3 and their description is located in the namespace “ http://www.w3.org/2001/XMLSchema ”.
Work task
Task 1: Install the 1C: Enterprise platform, install the IIS server components, connect the 1C Web Extensions to the IIS server.
When installing the 1C: Enterprise platform, you must install the Web Extension.
Fig. 1. Selected components at the time of 1C installation
In the menu “ Control Panel \ All elements of the control panel \ Programs and components ”, it is necessary to install additional Windows components “ Turn Windows components on or off.»Where to specify IIS components. In addition to the components selected by default, it is necessary to add more components related to ISAPI technology, it is thanks to this technology that the 1C web server extension has the ability to contact the IIS web server, and the authentication type is “by URL” to allow access to the web service using authentication 1C database users. After installation, it is recommended that you restart the operating system.
Fig. 2. Selected components at the time of IIS installation
In the menu " Control Panel \ All Control Panel Items \ Administrative Tools" , launch the " IIS Manager " console , where to open the " Application Pools " element , open the " DefaultAppPool " pool in the context menu, select "Additional parameters ... ”where the“ 32-bit applications are allowed ”element must be set to“ True ”. This is necessary for the operation of the Web-Extension 1C, because it is a 32-bit application. This is convenient for debugging (since when publishing from the configurator, “ DefaultAppPool ” will be substituted by default ), for the product I recommend creating separate pools for each service without a managed environment.
In the same IIS Manager console , select the Default Web Site item , select the Authentication action , where you need to enable the option: Anonymous authentication .
It is now possible to publish 1C Web Services on the IIS server. But in order to make this publication possible, it is necessary to run the 1C: Enterprise Configurator on behalf of the Administrator user .
Task 2: Creating a simple 1C configuration.
The first thing to start developing any configuration is: you need to create an Administrator role (In accordance with the configuration development methodology , it should be called Full Rights )
We believe that the database contains information on all orders containing the quantity and type of item that was ordered, in one order there may be a list containing the item and quantity, the order also has its own number and date of creation. Information about all orders must be transmitted through the Web service.
To describe this, you need to create database objects:
Fig. 3. The data structure in the created configuration 1C
Directory " Nomenclature ", without additional details. In the details "by default" contains information about the name and code of the item.
The document " Order of the buyer ", which will contain the tabular part " Products”, Each line of which will have information about the nomenclature (an element of the type“ DirectoryReference.Nomenclature ”) and the quantity (the element of the“ Number ”of the“ Number ”type is unsigned with 15 decimal places and 3 after).
Next, you can run 1C in enterprise mode and create several documents filled out by the nomenclatures we created and the corresponding number.
Task 3: Creation and publication of Web Service 1C.
In the “ General ” configuration grouping , create a new element of the “ XDTO-packages ” type, initially for transferring the item . It can be called, for example, " NomenclatureXDTO". The URL namespace, in accordance with the WSDL specification, must be assigned as the URL address of the specification for this package, for example,
" company.com/1C/Nomenclature ". In this package, you need to create an object type, for example, " Nomenclature ", in which there are details " Code " and " Name ", with the corresponding type " string (http://www.w3.org/2001/XMLSchema) ".
Now we need to create a second XDTO package that will contain information about customer orders, it can be called “ ClientOrderXDTO ” in the namespace “ company.com/1C/ClientOrder ”. First of all, you need to connect the import directive " company.com/1C/Nomenclature”, In order to be able to use the nomenclature serialization package that we created. This is necessary for the transfer of the items contained in the tabular part of the document “ Orders of customers ”.
Now we need to create an object type " ClientOrderRow " containing one row of the table part. This type will consist of a combination of the details “ Nomenclature ” and “ Count ”, respectively for the nomenclature it is necessary to indicate the type of the object “Nomenclature (http://company.com/1C/Nomenclature)”, and for the quantity, “ double (http: // www.w3.org/2001/XMLSchema) . "
The type of object containing the order itself can be called “ ClientOrder»Must contain the order number, creation date and an array of elements from the tabular part of the order. " Number " of type string, " Date " of type " dateTime (http://www.w3.org/2001/XMLSchema) " and " Products " of type " ClientOrderRow (http://company.com/1C/ClientOrder) ", it is necessary to indicate that the minimum number is “ 0 ”, and the maximum number is “ -1 ”, this indicates that this object will be an array.
But, since it is necessary to return the list of orders, it is necessary to create an object type containing this array, therefore it is necessary to create another element called “ ArrayOfClientOrders ”, which will have only one attribute, called “ClientOrder "type" ClientOrder (http://company.com/1C/ClientOrder) . "
Figure 4. Structures of XDTO packets in 1C.
At this point, the creation of a description of the transmitted values can be considered complete. It is necessary to describe the web service itself and its methods.
In the “General” configuration grouping, you need to create an object, Web Service. It can be called " Service ." In the “Other” tab, you must specify the namespace to which the web service belongs, for example, “ company.com/1C ”, as well as the list of XDTO packages containing the newly created packages “ company.com/1C/Nomenclature , company.com/ 1C / ClientOrder . " In the "Operations" tab, create the " GetClientOrders " method”, Which will return the values“ ArrayOfClientOrders (http://company.com/1C/ClientOrder) ”, at the same time establish the ability to return empty values and click on the field with a magnifying glass called“ Method Name ”, thereby in the web service module a function will be created that will be called when accessing this web service method.
In order to correctly describe the function that receives from the database and returns a list of customer orders, it is necessary to know the internal language 1C, because the code for this function is in Appendix 1. What needs explanation is “ Factory XDTO", This is some manager that serializes objects, and this serialized object needs to be returned. In this case, all orders contained in the database are selected, serialization of the number, date, and rows of the tabular part occurs, while the nomenclature needs additional serialization, and the already-packed object is inserted into the general structure. An array of packed objects is assembled, serialized into an array package. And it is sent to the client as a result of the called function.
To publish a web service, in the 1C configurator menu, select " Administration \ Publish to web server ... ", and then specify the name of the web service publication, for example, " Company ", the name of the service, for example, " Service " and the address " service.1cws", As well as specify the path for publication, for example," C: \ inetpub \ wwwroot \ Company \ ".
After that, the WSDL Web Service structure will be available at the address " localhost / Company / ws / service.1cws? Wsdl "
Task 4: Creating a client on C # platform .NET 4.0.
In Visual Studio, create a new C # console application.
Next, call the context menu over the “ Reference ” project element and perform the “ Add service reference ... ” action , click the “ Advanced ... ” button in the menu that opens, a window opens where you need to click the “ Add Web Reference ... ” button .
A menu opens where you need to insert a link to the WSDL description of the web service.
Fig. 5. Connecting the web service to the project in C #
For the web service created in 1C, this link will look like “ localhost / Company / ws / service.1cws? Wsdl ”, after correctly receiving the description of the web service, you must specify the name of the .NET namespace , from which access to a web service will be available, for example, “ CompanyService ”, then click on the “ Add Reference ... ” button , Visual Studio will automatically generate classes according to this description. In the project, it will be enough to call the methods of the generated class, while serialization and the call will be performed by the .NET platform.
Next, you need to write a program that will access the web service and display the received data to the user. To do this, you need to know the C # language, the program code is presented in Appendix 2. From this code it is necessary to clarify that the creation of the “ Service ” object is nothing more than the creation of a service access manager. On this behalf, web service methods will be called.
" _1CWebServiceClientConsole " is the common namespace of the project, it is selected at creation. The web service namespace obtained from the WSDL structure is fully included in the project namespace, which allows you to call remote methods “like your own”.
The construction of such an architecture is transparent for programmers, but it is necessary to understand at what points and what is being serialized for subsequent transmission. This client-server application architecture is currently the most popular.
Lab report
A report is not required, a work stand is required, and a demonstration of its work is required.
Work protection procedure
It is necessary to show the work stand, explain the connection order and configuration features, as well as the features of serialization of objects. For successful protection, you must answer all questions.
Test questions and tasks
- What bit depth is 1C web extension?
- What 1C stores the structure of packages for data serialization?
- How to get a web service description structure?
- How to connect a web service to a project being developed in Visual Studio?
- Why create a client’s call manager and what is it like?
Appendix 1: GetClientOrders function code in 1C language
Функция GetClientOrders()
	МассивЗаказовПокупателейТип = ФабрикаXDTO.Тип("http://company.com/1C/ClientOrder", "ArrayOfClientOrders");
	ЗаказПокупателяТип = ФабрикаXDTO.Тип("http://company.com/1C/ClientOrder", "ClientOrder");
	ЗаказПокупателяСтрокаТип = ФабрикаXDTO.Тип("http://company.com/1C/ClientOrder", "ClientOrderRow");
	НоменклатураТип = ФабрикаXDTO.Тип("http://company.com/1C/Nomenclature", "Nomenclature");
	Запрос = Новый Запрос;
	Запрос.Текст =
		"ВЫБРАТЬ
		|	ЗаказПокупателя.Ссылка,
		|	ЗаказПокупателя.Номер,
		|	ЗаказПокупателя.Дата
		|ИЗ
		|	Документ.ЗаказПокупателя КАК ЗаказПокупателя";
	Результат = Запрос.Выполнить();
	Выборка = Результат.Выбрать();
	Если Выборка.Количество() = 0 Тогда
		Возврат Null;
	КонецЕсли;
	МассивЗаказовПокупателей = ФабрикаXDTO.Создать(МассивЗаказовПокупателейТип);
	Пока Выборка.Следующий() Цикл
		ЗаказПокупателя = ФабрикаXDTO.Создать(ЗаказПокупателяТип);
		ЗаказПокупателя.Number = Выборка.Номер;
		ЗаказПокупателя.Date = Выборка.Дата;
		Для каждого Строка Из Выборка.Ссылка.Товары Цикл // В промышленных условиях не вздумайте так писать!
			ЗаказПокупателяСтрока = ФабрикаXDTO.Создать(ЗаказПокупателяСтрокаТип);
			Номенклатура = ФабрикаXDTO.Создать(НоменклатураТип);
			Номенклатура.Code = Строка.Номенклатура.Код;
			Номенклатура.Name = Строка.Номенклатура.Наименование;
			ЗаказПокупателяСтрока.Nomenclature = Номенклатура;
			ЗаказПокупателяСтрока.Count = Строка.Количество;
			ЗаказПокупателя.Products.Добавить(ЗаказПокупателяСтрока);
		КонецЦикла;
		МассивЗаказовПокупателей.ClientOrder.Добавить(ЗаказПокупателя);
	КонецЦикла;
	Возврат МассивЗаказовПокупателей;
КонецФункции
Appendix 2: C # program code accessing a web service
using System;
using _1CWebServiceClientConsole.CompanyService;
namespace _1CWebServiceClientConsole
{
    class Program
    {
        static void Main(string[] args)
        {
            using (Service service = new Service())
            {
                service.SoapVersion = System.Web.Services.Protocols.SoapProtocolVersion.Soap12;
                service.Credentials = new System.Net.NetworkCredential("LOGIN", "PASS");
                var arrayOfClientOrders = service.GetClientOrders();
                if (arrayOfClientOrders == null)
                    Console.WriteLine("Не найдена");
                foreach (var clientOrder in arrayOfClientOrders)
                {
                    Console.WriteLine("Заказ покупателя №" + clientOrder.Number + " от " + clientOrder.Date);
                    Console.WriteLine("-----");
                    foreach (var clientOrderRow in clientOrder.Products)
                    {
                        Console.WriteLine(clientOrderRow.Nomenclature.Name + " " + clientOrderRow.Count);
                    }
                    Console.WriteLine("-----");
                }
            }
            Console.ReadKey();
        }
    }
}