We use a 433MHz wireless switch to control the PC
Hi, Geektimes Habr.
I’ve got a bunch of 433 MHz wireless switches in my home, and I wondered if they could be used for any tasks, such as controlling a computer or integrating into a smart home system.
These switches are convenient for their low cost and stable operation, they look like this:

How it works, and what can be done with them (hussars remain silent :), details under the cut.
I will say right away - how such a switch works, I do not know, although I guess about it. So you need to do a little reverse engineering.
First of all, the signal must be received, for which we use the already well-known RTL-SDR receiver to many, often called simply a “whistle” for radio amateurs. This device costing only $ 10 allows you to receive radio signals in the range from about 50 to 1250 MHz, for us what we need. The topic is old, but if someone has not read it, read it .
We make the first step of the analysis - carefully look at the switch. We find that the back of the case says “Made in China” (who would have thought?) And, more importantly, the frequency 433 MHz. Now you can connect the SDR receiver, run the SDR # and make sure that the data is actually transmitted.
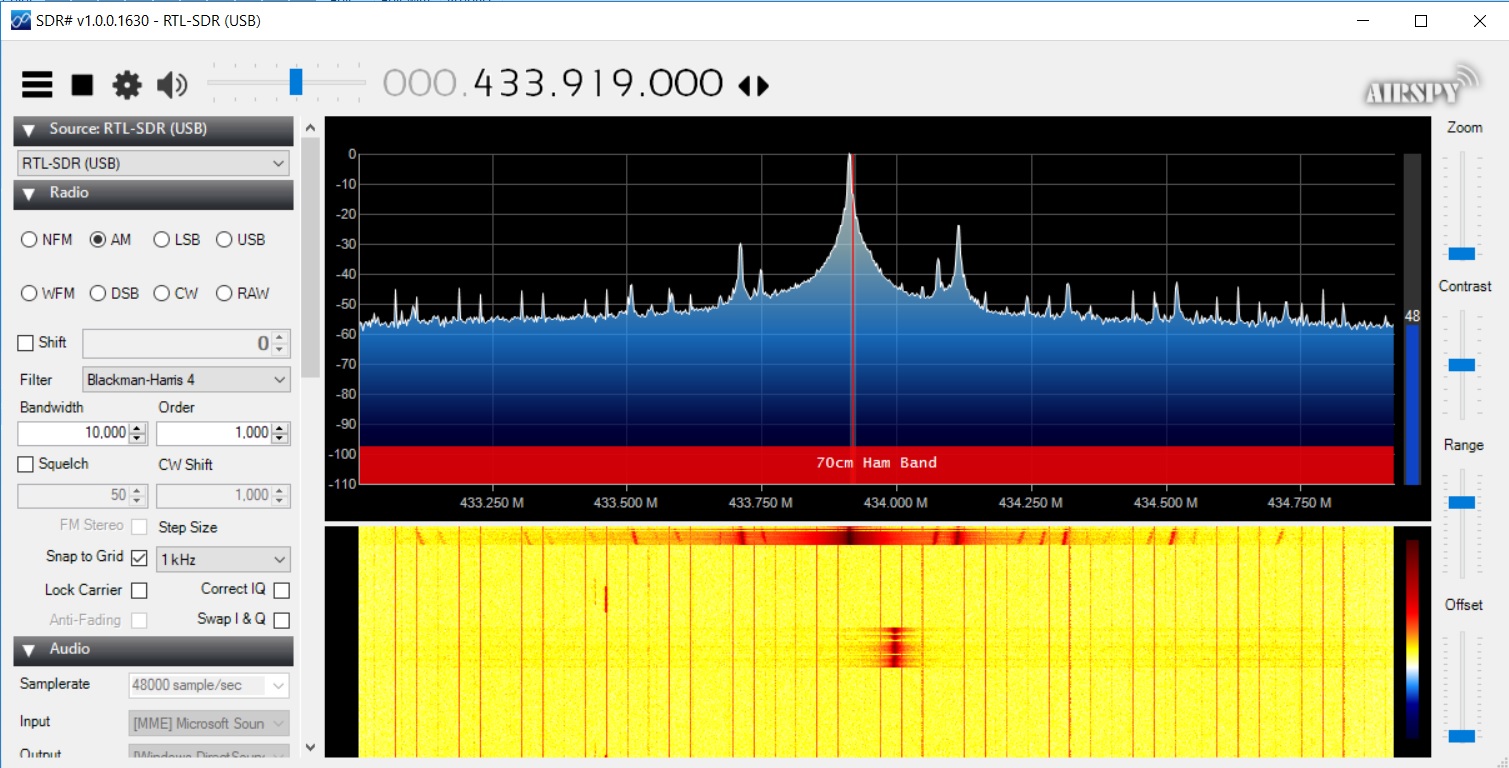
The symmetry of the signal on the spectrum suggests the presence of AM modulation. By the way, the weaker “alien” signal is visible on the right — they can also be received and decoded, and we’ll tell you more about them separately. But back to the signal. We write it in the usual WAV format and press the buttons on the remote control - for example, I pressed the ON and OFF buttons on channel “1”.
Open the sound file in any audio editor, and use the other professional analytics tool, Paint, to compare signals. We place 2 signals from different buttons one above the other to see the difference:
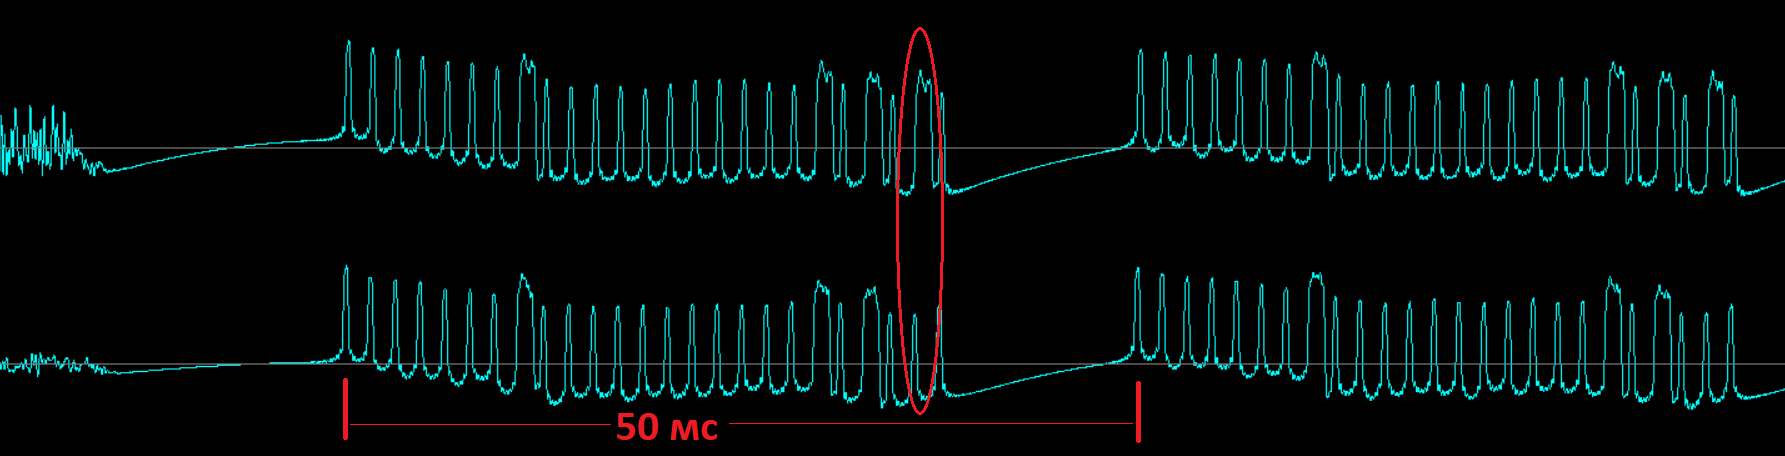
It is easy to see that we have the usual bit sequence, the difference in which is just one bit corresponding to the ON or OFF button. While the button is pressed, the switch simply cycles through this sequence at a rate of 20 times per second. Cheap and easy, even if one sequence is distorted during transmission, the other will be accepted.
From this, by the way, one important conclusion can be made: the signals of such switches (talking about cheap models) are transmitted on the air "as is", without any authentication, protection or encryption. Such a switch or a wireless socket with such a switch should not be used for some important functions, for example, to turn on powerful heaters or even more so to open the front door or garage. The point here is not even in hackers (the chance that someone will hack my house wirelessly, I estimate less than the chance of falling on my ISS house), but the fact that a neighbor may accidentally buy the same switch, and their codes may coincide ( however on the switch there is a choice between 4 channels). In my experience of use, 2-3 times a year, the switch did turn on "itself", or a disturbance,
Of course, this does not apply to more complex systems, such as Lora or Philips Hue, there is nothing wrong with encryption.
However, back to our problem. You can write a decoder of such signals yourself, but fortunately, this has already been done before us, in a project called “rtl_433”. Initially, the program was created for Linux, the Windows version can be downloaded at the Linux version; it can be downloaded from GitHub .
Run the program from the command line: “rtl_433.exe -F json”

We received the data, it remains to write a program to process it.
The first thing that is interesting to consider is the Raspberry Pi. To install rtl_433 on Raspbian, unpack the archive and execute the following commands.
The second step is to write a program that will receive this data and, depending on it, perform the necessary actions. The Python code is quite simple:
To run the code, you need to save it in a file (for example, rtl_listen.py) and run it with the command “python rtl_listen.py”.
As you can see, the program starts the process using subprocess.Popen and reads data from it. Then everything is simple, the code is quite readable, and it will not be difficult to make changes. In this example, when the “1” button is pressed, a print (“ON”) message is displayed, instead you can do something else, for example, activate the GPIO pin, turn on the relay, send data to the server, etc. Before use, you will need to change at the same time name transmitter_name for the name of the console model to be used.
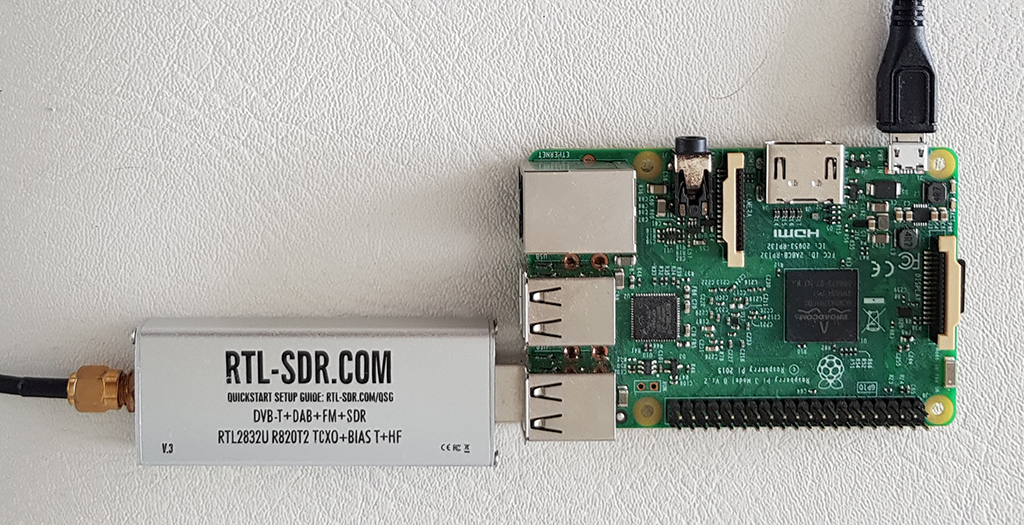
By the way, the RTL-SDR receiver itself, compared to the Raspberry Pi, looks like this:
Unfortunately, under Windows 10, the above code did not work. But as prompted by a search on github, asynchronous reading of data from a separate stream works. Why so, it was too lazy to find out, just give the working code under the spoiler.
With this code, we can use any actions in the handler, the logic is the same as in the code on Raspberry Pi.
Example : let's say we have a computer dedicated to home theater, and we want to turn it off by pressing a button from the remote. Replace the 'print ("OFF")' code with
After that, the computer will turn off by pressing the corresponding button. Of course, besides “shutdown -s” you can use any other Windows command, you just have to take into account that the commands will be sent repeatedly, while the remote control button is pressed, to avoid such duplication, you need to improve the code.
As you can see, everything is pretty simple, and there is a place for experimentation. Finally, a small bonus for those who read to here. At 433 MHz, a large number of different devices work that rtl_433 can decode, you can just leave the program running for several hours and see what it gets. Under the spoiler an example of such a log, recorded earlier:
There is some interesting data, such as tire pressure at a neighboring car (TPMS, tire-pressure monitoring monitoring system), or an external temperature of +6 from someone's sensor. This allows, for example, to output the outside temperature if the neighbors accidentally have a weather station compatible with this protocol.
All successful experiments.
Disclaimer : Obviously, using SDR and digital processing to read OOK-modulated signals is essentially gun shooting at sparrows. Perhaps there are ready $ 1-2 receivers on aliexpress that do the same thing, with a lower price and less power consumption. If anyone knows such models, write in the comments.
I’ve got a bunch of 433 MHz wireless switches in my home, and I wondered if they could be used for any tasks, such as controlling a computer or integrating into a smart home system.
These switches are convenient for their low cost and stable operation, they look like this:
How it works, and what can be done with them (hussars remain silent :), details under the cut.
Theory
I will say right away - how such a switch works, I do not know, although I guess about it. So you need to do a little reverse engineering.
First of all, the signal must be received, for which we use the already well-known RTL-SDR receiver to many, often called simply a “whistle” for radio amateurs. This device costing only $ 10 allows you to receive radio signals in the range from about 50 to 1250 MHz, for us what we need. The topic is old, but if someone has not read it, read it .
We make the first step of the analysis - carefully look at the switch. We find that the back of the case says “Made in China” (who would have thought?) And, more importantly, the frequency 433 MHz. Now you can connect the SDR receiver, run the SDR # and make sure that the data is actually transmitted.
The symmetry of the signal on the spectrum suggests the presence of AM modulation. By the way, the weaker “alien” signal is visible on the right — they can also be received and decoded, and we’ll tell you more about them separately. But back to the signal. We write it in the usual WAV format and press the buttons on the remote control - for example, I pressed the ON and OFF buttons on channel “1”.
Open the sound file in any audio editor, and use the other professional analytics tool, Paint, to compare signals. We place 2 signals from different buttons one above the other to see the difference:
It is easy to see that we have the usual bit sequence, the difference in which is just one bit corresponding to the ON or OFF button. While the button is pressed, the switch simply cycles through this sequence at a rate of 20 times per second. Cheap and easy, even if one sequence is distorted during transmission, the other will be accepted.
From this, by the way, one important conclusion can be made: the signals of such switches (talking about cheap models) are transmitted on the air "as is", without any authentication, protection or encryption. Such a switch or a wireless socket with such a switch should not be used for some important functions, for example, to turn on powerful heaters or even more so to open the front door or garage. The point here is not even in hackers (the chance that someone will hack my house wirelessly, I estimate less than the chance of falling on my ISS house), but the fact that a neighbor may accidentally buy the same switch, and their codes may coincide ( however on the switch there is a choice between 4 channels). In my experience of use, 2-3 times a year, the switch did turn on "itself", or a disturbance,
Of course, this does not apply to more complex systems, such as Lora or Philips Hue, there is nothing wrong with encryption.
However, back to our problem. You can write a decoder of such signals yourself, but fortunately, this has already been done before us, in a project called “rtl_433”. Initially, the program was created for Linux, the Windows version can be downloaded at the Linux version; it can be downloaded from GitHub .
Run the program from the command line: “rtl_433.exe -F json”
We received the data, it remains to write a program to process it.
Raspberry pi
The first thing that is interesting to consider is the Raspberry Pi. To install rtl_433 on Raspbian, unpack the archive and execute the following commands.
sudo apt-get install libtool libusb-1.0.0-dev librtlsdr-dev rtl-sdr build-essential autoconf cmake pkg-config
cd rtl_433/
autoreconf --install
./configure
make
make install
The second step is to write a program that will receive this data and, depending on it, perform the necessary actions. The Python code is quite simple:
from __future__ import print_function
import os, sys, io
import json
import subprocess
print("RTLSDR listening started")
transmitter_name = "Waveman Switch Transmitter"
transmitter_channel = 1
proc = subprocess.Popen(["rtl_433 -F json"], stdout=subprocess.PIPE, shell=True)
whileTrue:
    try:
        line = proc.stdout.readline().encode('ascii','ignore')
        proc.poll()
        data = json.loads(line)
        print(data)
        m,st,ch,btn= data['model'],data['state'],data['channel'],data['button']
        if m==transmitter_name and ch==transmitter_channel and btn==1and st=='on':
            print("ON")
        elif m==transmitter_name and ch==transmitter_channel and btn==1and st=='off':
            print("OFF")
    except KeyboardInterrupt:
        breakexcept:
        pass
print("RTLSDR listening done")
To run the code, you need to save it in a file (for example, rtl_listen.py) and run it with the command “python rtl_listen.py”.
As you can see, the program starts the process using subprocess.Popen and reads data from it. Then everything is simple, the code is quite readable, and it will not be difficult to make changes. In this example, when the “1” button is pressed, a print (“ON”) message is displayed, instead you can do something else, for example, activate the GPIO pin, turn on the relay, send data to the server, etc. Before use, you will need to change at the same time name transmitter_name for the name of the console model to be used.
By the way, the RTL-SDR receiver itself, compared to the Raspberry Pi, looks like this:
Windows
Unfortunately, under Windows 10, the above code did not work. But as prompted by a search on github, asynchronous reading of data from a separate stream works. Why so, it was too lazy to find out, just give the working code under the spoiler.
Source
from __future__ import print_function
import os, sys
import subprocess
import time
import threading
import Queue
import json
classAsynchronousFileReader(threading.Thread):# Helper class to implement asynchronous readingdef__init__(self, fd, queue):assert isinstance(queue, Queue.Queue)
        assert callable(fd.readline)
        threading.Thread.__init__(self)
        self._fd = fd
        self._queue = queue
    defrun(self):# The body of the tread: read lines and put them on the queue.for line in iter(self._fd.readline, ''):
            self._queue.put(line)
    defeof(self):# Check whether there is no more content to expectreturnnot self.is_alive() and self._queue.empty()
defreplace(string):while'  'in string:
        string = string.replace('  ', ' ')
    return string
defread_rtl_data():
    process = subprocess.Popen(["rtl_433.exe", "-F", "json"], stdout=subprocess.PIPE, stderr=subprocess.PIPE)
    # Launch the asynchronous readers of stdout and stderr.
    stdout_queue = Queue.Queue()
    stdout_reader = AsynchronousFileReader(process.stdout, stdout_queue)
    stdout_reader.start()
    stderr_queue = Queue.Queue()
    stderr_reader = AsynchronousFileReader(process.stderr, stderr_queue)
    stderr_reader.start()
    transmitter_name = "Waveman Switch Transmitter"
    transmitter_channel = 1# Check the queues if we received some outputwhilenot stdout_reader.eof() ornot stderr_reader.eof():
        # Show what we received from standard output.whilenot stdout_queue.empty():
           line = stdout_queue.get()
           print("Line1:", repr(line))
           data = json.loads(line)
           # print("Data:", repr(line))
           m,st,ch,btn= data['model'],data['state'],data['channel'],data['button']
           if m==transmitter_name and ch==transmitter_channel and btn==1and st=='on':
               print("ON")
           elif m==transmitter_name and ch==transmitter_channel and btn==1and st=='off':
               print("OFF")
        # Show what we received from standard error.whilenot stderr_queue.empty():
            line = replace(stderr_queue.get())
            print("Line2:", line)
        # Sleep a bit before asking the readers again.
        time.sleep(0.1)
    stdout_reader.join()
    stderr_reader.join()
    # Close subprocess' file descriptors.
    process.stdout.close()
    process.stderr.close()
if __name__ == '__main__':
    print("RTLSDR listening started")
    read_rtl_data()
    print("RTLSDR listening done")
With this code, we can use any actions in the handler, the logic is the same as in the code on Raspberry Pi.
Example : let's say we have a computer dedicated to home theater, and we want to turn it off by pressing a button from the remote. Replace the 'print ("OFF")' code with
               os.system('shutdown -s')
               sys.exit(0)
After that, the computer will turn off by pressing the corresponding button. Of course, besides “shutdown -s” you can use any other Windows command, you just have to take into account that the commands will be sent repeatedly, while the remote control button is pressed, to avoid such duplication, you need to improve the code.
Conclusion
As you can see, everything is pretty simple, and there is a place for experimentation. Finally, a small bonus for those who read to here. At 433 MHz, a large number of different devices work that rtl_433 can decode, you can just leave the program running for several hours and see what it gets. Under the spoiler an example of such a log, recorded earlier:
Log
2018-01-10 21:15:17 : Prologue sensor : 5 : 15

Channel: 1

Battery: OK

Button: 0

Temperature: 6.00 C

Humidity: 11 %


2018-01-10 21:15:28 : inFactory sensor

ID: 71

Temperature: 6.67 °C

Humidity: 99 %


2018-01-10 21:16:07 : Toyota : TPMS : 61511475 : 60e5006b : CRC


2018-01-10 21:20:33 : Prologue sensor : 5 : 15

Channel: 1

Battery: OK

Button: 0

Temperature: 6.00 C

Humidity: 11 %

: Waveman Switch Transmitter

id: A

channel: 2

button: 1

state: on

: Waveman Switch Transmitter

id: A

channel: 2

button: 1

state: on

: Waveman Switch Transmitter

id: A

channel: 2

button: 1

state: on


2018-01-10 21:21:21 : Akhan 100F14 remote keyless entry

ID (20bit): 0x41

Data (4bit): 0x4 (Mute)

: Waveman Switch Transmitter

id: A

channel: 2

button: 1

state: off


2018-01-10 21:32:31 : Ford : TPMS : 00268b1f : a34a0e : CHECKSUM

2018-01-10 21:32:32 : Ford : TPMS : 00268a5c : 9c440e : CHECKSUM

2018-01-10 21:32:37 : Ford : TPMS : 016dbfce : 99430e : CHECKSUM

2018-01-10 21:32:39 : Ford : TPMS : 002671a0 : 9c4a0e : CHECKSUM
There is some interesting data, such as tire pressure at a neighboring car (TPMS, tire-pressure monitoring monitoring system), or an external temperature of +6 from someone's sensor. This allows, for example, to output the outside temperature if the neighbors accidentally have a weather station compatible with this protocol.
All successful experiments.
Disclaimer : Obviously, using SDR and digital processing to read OOK-modulated signals is essentially gun shooting at sparrows. Perhaps there are ready $ 1-2 receivers on aliexpress that do the same thing, with a lower price and less power consumption. If anyone knows such models, write in the comments.