Filter Forge: Composing a Photo - Easy and Quick (lesson)
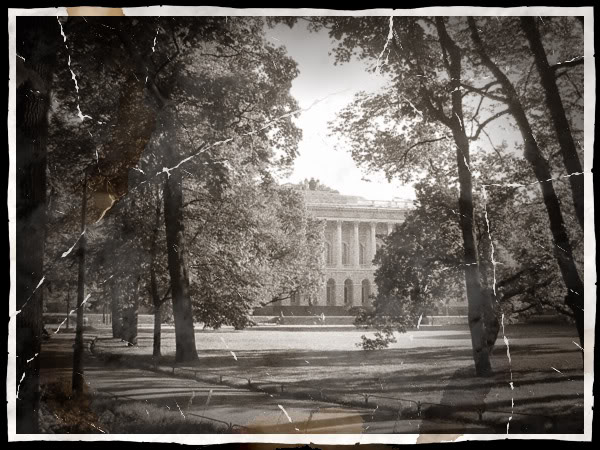
A huge number of tutorials have been published online that describe the most varied ways of aging photographs. I bring to your attention one more thing - with the help of Photoshop and the Filter Forge plugin, I intentionally will not use ready-made textures and brushes. The result is this picture:
If you do not have the Filter Forge plugin, download it on the official website of the developer http://www.filterforge.com/download/ . Run the Filter Forge Setup.exe (for Windows) or Filter Forge Setup.dmg (for Mac OS X) installer and install the program on your computer. In Photoshop, a new item will appear in the menu Filter> Filter Forge (you may have to restart Photoshop).
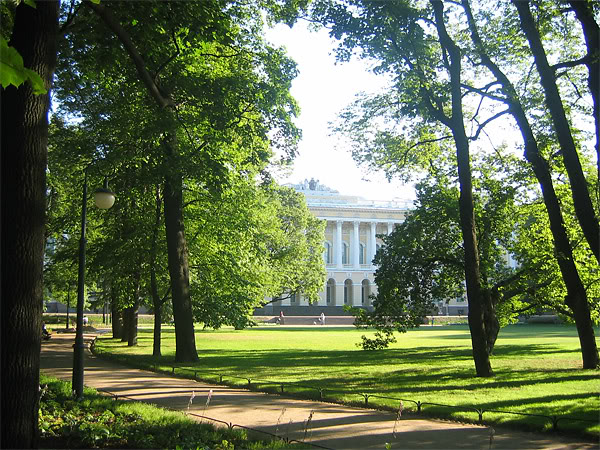
Launch Photoshop and open the original image Ctrl + O. I used a photo that was taken in St. Petersburg using a Canon A520 camera. In my photo there are no details that discord with the "antique" style, for example, antennas on buildings, cars or modernly dressed people. Take a close look at your original image for extra details. If there is, then you will have to spend some time removing them. I think the network has a ton of lessons on this subject.
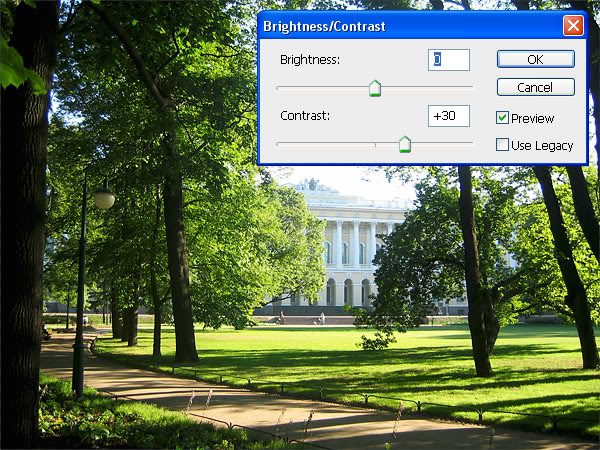
Add some contrast to the image: Image> Adjustment> Brightness / Contrast. I chose the value Contrast: +30.
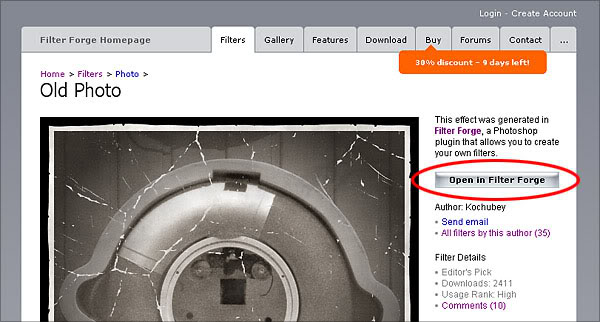
In Photoshop, run the Filter Forge plugin (Filter> Filter Forge). Then we go to the Old Photo filter page and click on the “Open in Filter Forge” button. The filter download starts (38.7 KB).
Similarly, download the Coffee Stain filter . It will be useful to us later - with it we will make spots.
And again, select Old Photo (the Photo category) in the filter list.
Now we select the most suitable parameters for our picture. To begin with, I’m trying to apply existing presets (the Presets tab) - double-clicking on the preview applies the effect to our image. I found something suitable, but I still want to twist the parameters. I go to the Settings tab and start moving the sliders.
There is another great thing - the random value generator (Randomizer) and the button “Next option” (Next Variant). By clicking on it, the program generates parameter values randomly. You can simply click on this button until you find the right combination.
The result is such a picture:

Now in Photoshop create a new layer; name it, for example, “Stain” and run Filter Forge (in the menu Filter> Filter Forge). Select the Coffee Stain filter - it is located in the Misc category in the texture section.
A small lyrical digression: You probably noticed that in the list of categories of the Filter Forge program there are items with the same name, for example, Misc, Frame, Patterns. This is due to the fact that in Filter Forge all filters in the library are divided into 2 types - textures (the top of the list of categories in the program) and effects. Details can be found here (in English). Thus, we will search for the “Coffee Stain” filter in the “Misc” category at the top of the list.
So, apply the “Coffee Stain” filter to our “Stain” layer.

Similarly, create a few more layers with different spots. Feel free to twist the filter settings :)
Now move the stained layers to the places you like (using the Move Tool). For each layer, we select the blending mode (Blending mode) and the degree of transparency (Opacity). And we erase excess segments of spots (Erase Tool).

Well, that's all. We look at the result:
If you do not have the Filter Forge plugin, download it on the official website of the developer http://www.filterforge.com/download/ . Run the Filter Forge Setup.exe (for Windows) or Filter Forge Setup.dmg (for Mac OS X) installer and install the program on your computer. In Photoshop, a new item will appear in the menu Filter> Filter Forge (you may have to restart Photoshop).
Step 1. Original Image
Launch Photoshop and open the original image Ctrl + O. I used a photo that was taken in St. Petersburg using a Canon A520 camera. In my photo there are no details that discord with the "antique" style, for example, antennas on buildings, cars or modernly dressed people. Take a close look at your original image for extra details. If there is, then you will have to spend some time removing them. I think the network has a ton of lessons on this subject.
Step 2. Add Contrast
Add some contrast to the image: Image> Adjustment> Brightness / Contrast. I chose the value Contrast: +30.
Step 3. Apply the “Old Photo” Filter
In Photoshop, run the Filter Forge plugin (Filter> Filter Forge). Then we go to the Old Photo filter page and click on the “Open in Filter Forge” button. The filter download starts (38.7 KB).
Similarly, download the Coffee Stain filter . It will be useful to us later - with it we will make spots.
And again, select Old Photo (the Photo category) in the filter list.
Step 4. Selection of filter parameters
Now we select the most suitable parameters for our picture. To begin with, I’m trying to apply existing presets (the Presets tab) - double-clicking on the preview applies the effect to our image. I found something suitable, but I still want to twist the parameters. I go to the Settings tab and start moving the sliders.
There is another great thing - the random value generator (Randomizer) and the button “Next option” (Next Variant). By clicking on it, the program generates parameter values randomly. You can simply click on this button until you find the right combination.
The result is such a picture:
Step 5. Make spots with the filter "Coffee Stain"
Now in Photoshop create a new layer; name it, for example, “Stain” and run Filter Forge (in the menu Filter> Filter Forge). Select the Coffee Stain filter - it is located in the Misc category in the texture section.
A small lyrical digression: You probably noticed that in the list of categories of the Filter Forge program there are items with the same name, for example, Misc, Frame, Patterns. This is due to the fact that in Filter Forge all filters in the library are divided into 2 types - textures (the top of the list of categories in the program) and effects. Details can be found here (in English). Thus, we will search for the “Coffee Stain” filter in the “Misc” category at the top of the list.
So, apply the “Coffee Stain” filter to our “Stain” layer.
Similarly, create a few more layers with different spots. Feel free to twist the filter settings :)
Step 6. Spread the spots
Now move the stained layers to the places you like (using the Move Tool). For each layer, we select the blending mode (Blending mode) and the degree of transparency (Opacity). And we erase excess segments of spots (Erase Tool).
Result
Well, that's all. We look at the result: