Trivia Guide in Ext JS
 Good afternoon, Habra users! Today I would like to share with the problems that usually repel respectable programmers from using the framework - Ext JS. I will describe the specific situation: one fine day, after some time spent looking at the features that Ext JS offers, there is an irresistible desire to try it “in practice”. The distribution is downloaded, put on the local server and beautiful examples of grids, forms and, even, the finished desktop are launched! The developer changes a couple of "chips", everything seems to be easy and simple. Reasonably, the idea of making a commercial project on Ext JS arises in the head of a boy scout (most often these are various kinds of CMS, admin pages, CRM). And then the fun begins ...
After a week of working with Ext JS, the Boy Scout head begins to semi-automatically generate thoughts of his own insignificance and unimaginable complexity of Ext JS. And, offended by Ext JS, the developer scatters the ashes of the desire to work on this framework. It's a pity ...
Therefore, in this article I want to describe the problems that I encountered when developing a content management system and solving these problems. All examples are tested on Ext JS version 3.4 .
1. Automatic sizing of the contents of the window.
Task: embed a form in Ext.Window (Ext.form.FormPanel). The first thing that comes to mind:
Ext.onReady(function(){
   var win = new Ext.Window({
		title: "title",
		border: false,
		width: 400,
		height: 400,
		items: [{
			width: 390,
			height: 380,
			items: [new Ext.form.FormPanel({
				 frame: true,
				 items: {xtype: 'textfield'}
			})]
		}]
   });
 win.show();
});
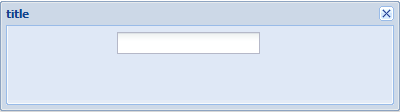
In this case, the developer needs to "fit" the size of the form to fit the window. If it is not fitted correctly, an annoying white bar appears below:

For this situation, Ext JS developers have provided the layout parameter in the Ext.Window configuration. Specifically, layout: 'fit' is used for this case:
Ext.onReady(function(){
   var win = new Ext.Window({
		title: "title",
		border: false,
		width: 400,
		height: 400,
		layout:'fit',
		items: [
			new Ext.form.FormPanel({
				frame: true,
				items: {xtype: 'textfield'}
			})
		]
 });
 win.show();
});
2. Separation of form fields into 2 or more columns (or placement of several form fields on one line).
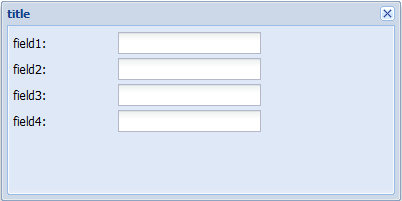
If you simply register several form fields in the form items, then they will line up exactly under each other, something like this:
Ext.onReady(function(){
   var win = new Ext.Window({
	title: "title",
	border: false,
	width: 400,
	height: 200,
	layout:'fit',
	items: [
		new Ext.form.FormPanel({
			frame: true,
			items: [{
				xtype: 'textfield',
				fieldLabel: 'field1'
			},{
				xtype: 'textfield',
				fieldLabel: 'field2'
			},{
				xtype: 'textfield',
				fieldLabel: 'field3'
			},{
				xtype: 'textfield',
				fieldLabel: 'field4'
			}]
		})
	]
 });
 win.show();
});
We need it to be something like this:
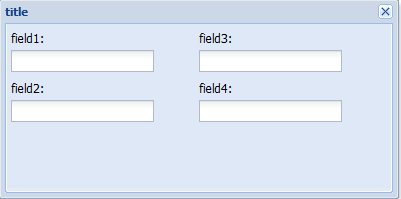
This is done like this:
(Warning! To understand the next piece of code, a little logical thinking is required)
Ext.onReady(function(){
   var win = new Ext.Window({
		title: "title",
		border: false,
		width: 400,
		height: 200,
		layout:'fit',
		items: [
			new Ext.form.FormPanel({
				frame: true,
				// Нас интересует код от этого места
				layout: 'column',
				defaults: {
					xtype: 'form',
					columnWidth:0.5,
					labelAlign: 'top',
					anchor: '100%'
				},
				// до этого
				// 1
				items: [{
					// 2, столбец 1
					items:[{
							xtype: 'textfield',
							fieldLabel: 'field1'
						},{
							xtype: 'textfield',
							fieldLabel: 'field2'
						}]
				},{
					// 3, столбец 2
					items:[{
							xtype: 'textfield',
							fieldLabel: 'field3'
						},{
							xtype: 'textfield',
							fieldLabel: 'field4'
						}]
				}]
			})
		]
 });
 win.show();
});
So. Let's get down to code parsing. The first thing you need to separate the form into columns is the layout parameter: 'column', which tells the form that the form should be divided into columns. Next, the defaults parameter comes in, which reports the default settings for child items. These settings are passed to each object in this array (objects items 2, items 3).
Why are there so many parameters in defaults and why are they needed to simply split the form into columns? I answer:
xtype: 'form' - without this parameter, fieldLabel for each field would not be displayed,
columnWidth - determines the default column width (in objects 2 and 3, you can override the column width),
labelAlign - determines the position of the fieldLabel (top - top),
anchor- width in percent of objects 2 and 3.
Also, pay attention to the fact that, unlike the previous example, another level of nesting is added to the items of object 1.
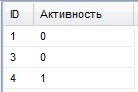
3. Managing the rendering of records in the grid.
It often happens that you want to somehow change the contents of the grid cell, depending on the future value of this content. The grid parameter - renderer comes to the rescue.
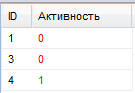
Let's say we have a grid at the start:
Source code:
var data = {
   totalCount : 3,
   banners: [{"is_active": 0,"ID": 1},{"is_active": 0,"ID" : 3},{"is_active": 1,"ID": 4}]
}
var view = new Ext.Viewport({
	layout: 'fit',
	items: [{
		xtype: 'grid',
		columns: [
			{header: "ID", align : 'left', width: 30, sortable: true, dataIndex: 'ID'},
			{
				header: "Активность", align : 'left', width: 100, sortable: true,
				dataIndex: 'is_active'
			}
		],
		store: new Ext.data.GroupingStore({
			data: data,
			fields: [{name: 'ID'},{name: 'is_active'}],
			reader: new Ext.data.JsonReader({
					root: 'banners',
					totalProperty: 'totalCount',
					id: 'ID'
				},
				Ext.data.Record.create([
					{name: 'ID'},
					{name: 'is_active'}
				])
			)
		}),
		view: new Ext.grid.GridView({
			forceFit: false,
		}),
		listeners: {}
	}]
});
view.render(Ext.getBody());
});
You can do this:
Source code:
var renderActivity = function(val) {
	if(val == 1)
		return ""+val+"";
	else
		return ""+val+"";
}
var data = {
   totalCount : 3,
   banners: [{"is_active": 0,"ID": 1},{"is_active": 0,"ID": 3},{"is_active": 1,"ID": 4}]
}
var view = new Ext.Viewport({
	layout: 'fit',
	items: [{
		xtype: 'grid',
		columns: [
			{header: "ID", align : 'left', width: 30, sortable: true, dataIndex: 'ID'},
			{
				header: "Активность", align : 'left', width: 100, sortable: true,
				dataIndex: 'is_active', renderer: renderActivity
			}
		],
		store: new Ext.data.GroupingStore({
			data: data,
			fields: [{name: 'ID'},{name: 'is_active'}],
			reader: new Ext.data.JsonReader({
					root: 'banners',
					totalProperty: 'totalCount',
					id: 'ID'
					}, Ext.data.Record.create([
						{name: 'ID'},
						{name: 'is_active'}
					])
			)
		}),
		view: new Ext.grid.GridView({
			forceFit: false,
		}),
		listeners: {}
	}]
});
view.render(Ext.getBody());
});
As you can see, the renderActivity function was first added, which paints the contents of the cell depending on the value in green or red. Next, this function is called in the description of the settings of the "Activity" column - renderer: renderActivity. Thus, the contents of the grid cells can be easily and simply changed for any,
If you devote more time to studying Ext JS, you are really amazed at the flexibility this framework provides. Many say Ext JS sites are hard to customize. Do not believe it. Personally, I think that the framework has a fairly high entry threshold.
Having been developing on Ext JS for about a year now, I "ate more than one dog." I have accumulated a great many such trifles. Therefore, if the habrasociety wishes to continue to read my articles on Ext JS, I will be happy to write them.
On this, if you please, finish my first article, I hope you enjoyed it.