How to import big data efficiently
Sometimes we need to import very large data into the database, which sometimes reaches several tens of gigabytes. We carry out regular backups, hot backups, in important services we use replication and High Availability. Most often, users rely on the built-in DBMS function, use it without any changes, wait until the import process is completed, and sometimes they do not wait at all.
In this blog I want to talk about different ways of importing data into the CUBRID DBMS , specifying which one is more effective and why. Some of these recommendations can also be applied to other database management systems.
So, in CUBRID you can import data using the following tools.
First, I will present the results of a short test so that you can see the big picture and understand why certain of the above solutions work faster than others. Then I will talk about recommendations that will help you significantly speed up the process of importing data.
For each of the methods, we will test on a small amount of data (100,000 records) to understand in which direction each of them moves. The test will be conducted on Windows 7 x86 with installed CUBRID 8.4.0. So we will use:
The following configurations will also be present.
CSQL is a tool for interpreting and running SQL queries on the command line. Compared to CUBRID Manager, CSQL is much easier and faster. It can work in two modes. The first is offline mode , and the second is Client-Server mode .
You can learn more about these modes in the manual .
It's time to create a base for our test. We can do this on the command line by running a command
Then we need to connect to this database using CSQL and create the necessary tables.
Since we prepared everything, it remains to import all the data that is in the dbtest.sql file . To start CSQL offline and read all the data from the file, enter the following command. To start CSQL in Client-Server mode and read all data from a file, enter the following command.
For this we will use the same information about the database and its schema. Then run the following script to enter 100,000 entries.
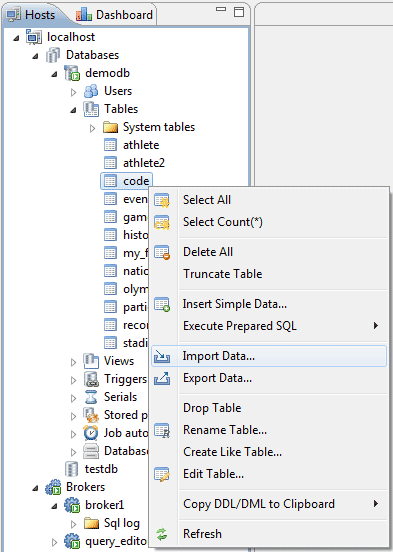
Here we will import data from the same file that we created in the CSQL test. Using the Import Data function (see the screenshot below), we import all the data.
The following test results are shown in seconds.
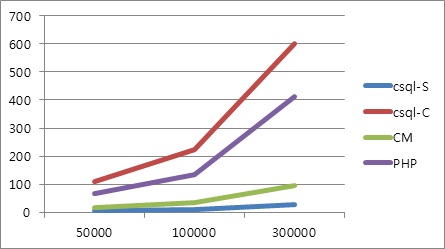
As you can see in the above graph, CSQL offline is the fastest way to import data into CUBRID. The reason for this is that it works directly with database files, bypassing server processes. In this mode, CSQL behaves as a server, and not as a client connected to the server. Therefore, this tool imports data the fastest.
However, there are times when we cannot use CSQL in offline mode, since in this mode more than one user is not allowed to connect. This means that CSQL should be the only application that works with the database at that time. And this in turn means that the database must be disconnected. If the database is running, it means that another user (host) is using it. In this case, an attempt to connect to the database using CSQL in standalone mode will produce the following error. In such cases, you must either make sure that no one else is connected to the database by completely disabling it, or use other methods of importing data. To disable the database on the command line, enter the command .
This is one of the most important recommendations for developers who plan to import large amounts of data.
Do not create any indexes before you finish importing all the data. This applies to indices such as:
Otherwise, each data entry (
There are two types of logging in CUBRID:
Client-side logging refers to a setting
When logging is enabled on the client side, each SQL statement processed by the CAS (CUBRID Application Server) will be stored in the DBMS logs. Accordingly, this will increase the total import time. Therefore, if you do not need the logs of the entire import process (as, for example, in the High Availability mode), disable it for a while until the import is complete.
There are several ways to turn off logging. Below I will show how to do this in CUBRID Manager and on the command line.
Example in CM
To disable logging (
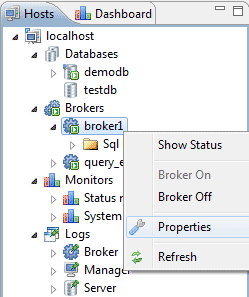
In the modal window, specify the parameter value
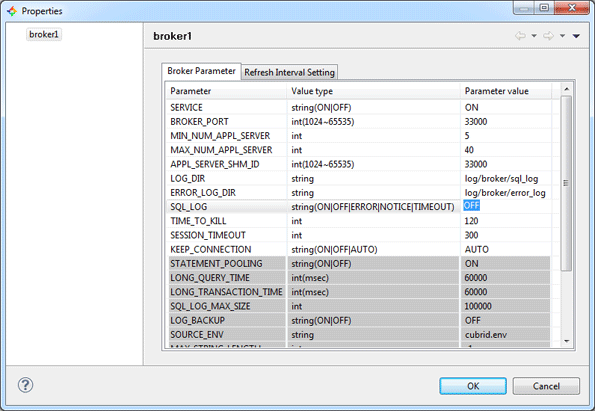
To apply the changes permanently, you need to restart the Broker. Also, right-click on the Broker and select Broker Off to disable, and then Broker On to start the Broker back. Now you can start importing.
Command line example
In a text editor, open cubrid_broker.conf , the broker configuration file, which is located in the conf directory where you installed CUBRID. In this file you can change the values of all broker parameters, including
Server-side logging refers to the media_failure_support parameter of the CUBRID Server itself, which determines the need to save archive logs in the event of storage device failure. If the value of this parameter is yes , which is the default value, then all active logs will be copied to the archive logs when the active logs are full, and the transaction is still active. If media_failure_support = no , then all archived logs created after active logs are full will be automatically deleted. It is necessary to replace that any archive logs will be immediately deleted if the value of this parameter changes to no .
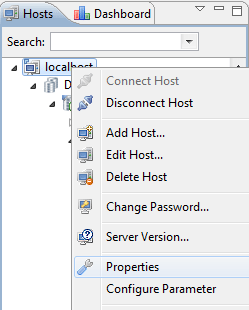
Thus setting the valuemedia_failure_support = no , you can reduce the overall time of importing data. To change this parameter, right-click on the host and select its properties.
In the modal window, specify the parameter value
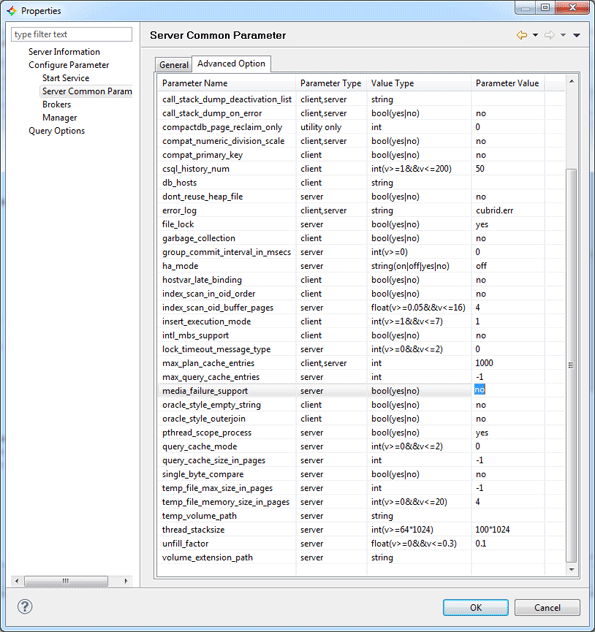
To apply all changes, restart the server.
If you decide to work with CUBRID Manager to import data, be sure to specify the number of threads, as well as the number of transactions in one commit.
Threads will allow CM to use multiple concurrent connections to perform INSERT requests. To determine the number of threads, specify their number in the Thread count . However, you must also remember that too much will not lead to anything good. It all depends on the ability of your iron. Usually we recommend 5 to 10 threads.

Also, the import time depends on the number of transactions in one commit ( commit cycle) This value determines how often the entered data should be captured. Frequent commit transactions will lead to poor performance. But on the other hand, a rare commit may require a lot of RAM. Therefore, again, it depends on the configurations of iron.
data_buffer_size is one of the important parameters in optimizing the operation of the entire CUBRID server. It determines the size of the pages of data that must be stored in the server’s CUBRID cache. The higher the value of data_buffer_size , the more data pages can be stored in the server buffer, which can significantly reduce the number of I / O operations, which means performance in general.
But if the value of this parameter is too large, a buffer pool can be swapped between the operating system and the server due to the lack of sufficient memory, and if the swap disk is not created, then the database (note, not the server, but the database itself) in general will not start, because there simply will not be enough memory. Therefore, based on the physical potential of iron, it is recommended to adjust the value of the data_buffer_size parameter to approximately two-thirds of the size of the system memory. By default, data_buffer_size = 512M (megabytes).
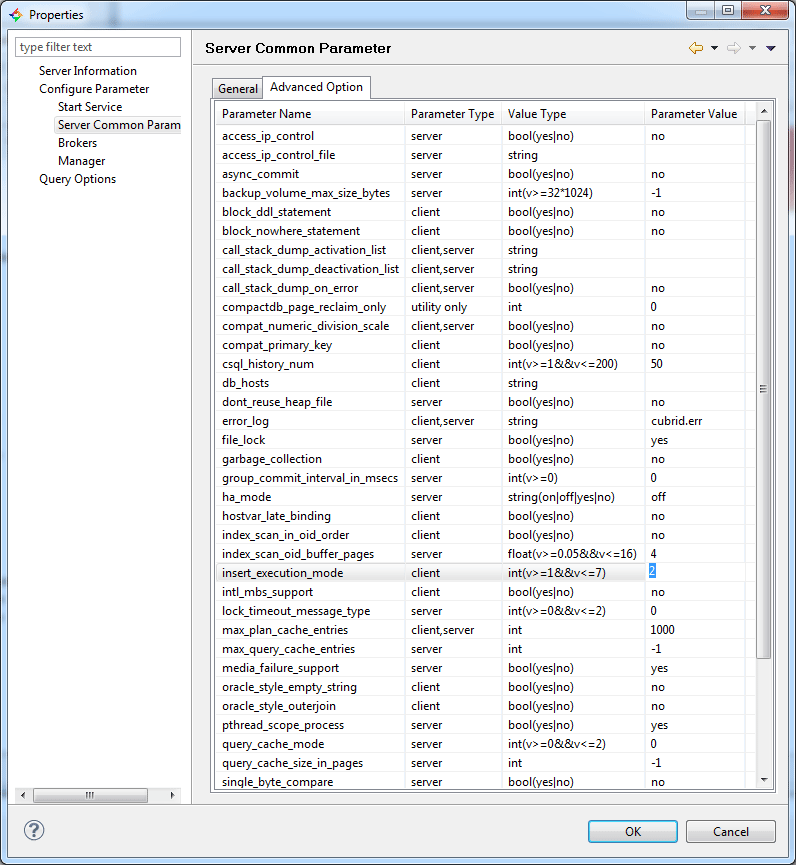
insert_execution_mode is a very useful parameter that allows you to run INSERT requests on the server side rather than on the client side . This is useful when there is very little available memory on the client side, or you need a dirty read before entering data for periodic backups.
The parameter can take 7 values (see Database Server Parameters for details ). The default value is insert_execution_mode = 1 , which means that all INSERT INTO ... SELECT ... queries of the form will be launched on the server side. Since when importing data we do not use this query structure, we need to change the value to 2, which allows us to run all queries in the form of INSERT INTO ... VALUES ... on the server side (see the figure below).
So, to reduce the overall import time and increase the performance of the CUBRID server, follow these tips:
Did I miss something? Write in the comments about your experiences and how often you import data.
In this blog I want to talk about different ways of importing data into the CUBRID DBMS , specifying which one is more effective and why. Some of these recommendations can also be applied to other database management systems.
So, in CUBRID you can import data using the following tools.
- The easiest way is to use CUBRID Manager
- You can also use PHP, Java and other drivers.
- Otherwise, you can use CSQL , CUBRID SQL interpreter on the command line.
- You can also configure replication or High Availability, but this is beyond the scope of this article.
First, I will present the results of a short test so that you can see the big picture and understand why certain of the above solutions work faster than others. Then I will talk about recommendations that will help you significantly speed up the process of importing data.
About the test
For each of the methods, we will test on a small amount of data (100,000 records) to understand in which direction each of them moves. The test will be conducted on Windows 7 x86 with installed CUBRID 8.4.0. So we will use:
- CSQL
-S stand-alone mode
-C client-server mode - CUBRID Manager
- PHP API
The following configurations will also be present.
- Commit transactions will be every 5000 times (Commit cycle)
- We will only measure the start time of INSERT queries, so the database and the necessary tables will be created in advance.
Test script
Running CSQL on the command line (-S and -C modes)
CSQL is a tool for interpreting and running SQL queries on the command line. Compared to CUBRID Manager, CSQL is much easier and faster. It can work in two modes. The first is offline mode , and the second is Client-Server mode .
- In standalone mode, CSQL works directly with database files and processes all queries and server commands. In other words, requests can be processed bypassing the server. However, due to the fact that only one active user is allowed in offline mode, you can only work in it to perform administrative tasks.
- In Client mode, the CSQL server works as a client, and as a regular client, it sends all requests for processing to the server.
You can learn more about these modes in the manual .
It's time to create a base for our test. We can do this on the command line by running a command
cubrid createdb dbtest. Then we need to connect to this database using CSQL and create the necessary tables.
$> csql demodb


CUBRID SQL Interpreter


Type `;help' for help messages.


csql> CREATE TABLE test1(a int, b TIMESTAMP, c int AUTO_INCREMENT)

csql> ;ru


Current transaction has been committed.


1 command(s) successfully processed.

csql> ;ex- In CSQL, the command ; ru means “run typed queries” (run).
- Command ; ex - exit (exit). You can find out about all possible commands here .
Since we prepared everything, it remains to import all the data that is in the dbtest.sql file . To start CSQL offline and read all the data from the file, enter the following command. To start CSQL in Client-Server mode and read all data from a file, enter the following command.
INSERT INTO test1 VALUES (0 , SYS_TIMESTAMP, NULL);

INSERT INTO test2 VALUES (1 , SYS_TIMESTAMP, NULL);

……………………

INSERT INTO test1 VALUES (99998 , SYS_TIMESTAMP, NULL);

INSERT INTO test1 VALUES (99999 , SYS_TIMESTAMP, NULL);
$> csql -u dba -p 1111 –S -i dbtest1.sql dbtest$> csql -u dba -p 1111 –C -i dbtest1.sql dbtestImport to PHP
For this we will use the same information about the database and its schema. Then run the following script to enter 100,000 entries.
$ host_ip = "localhost";
$ host_port = 33000;
$ db_name = "dbtest";
$ userId = "dba";
$ password = "1111";
$ cubrid_con = @cubrid_connect ($ host_ip, $ host_port, $ db_name, $ userId, $ password);
if ($ cubrid_con)
{
$ sql = "insert into". $ db_name. "(a, b) values (?, SYS_TIMESTAMP)";
$ reg = cubrid_prepare ($ cubrid_con, $ sql, CUBRID_INCLUDE_OID);
// Insert 100,000 records in the loop.
for ($ i = 0; $ i <100000; ++ $ i)
{
$ res = cubrid_bind ($ reg, 1, $ i);
$ res = cubrid_execute ($ reg);
// Commit once in 5,000 times (commit cycle).
if (($ i + 1)% 5000 == 0)
{
cubrid_commit ($ cubrid_con);
echo $ i, "
";
}
}
}Import data into CUBRID Manager
Here we will import data from the same file that we created in the CSQL test. Using the Import Data function (see the screenshot below), we import all the data.
Test results
The following test results are shown in seconds.
| 50,000 entries | 100,000 entries | 300,000 entries | |
|---|---|---|---|
| csql-s | 5 | 10 | 29th |
| csql-c | 111 | 224 | 599 |
| Php | 68 | 136 | 413 |
| CM | 17 | 33 | 96 |
Conclusion and recommendations
Use CSQL offline
As you can see in the above graph, CSQL offline is the fastest way to import data into CUBRID. The reason for this is that it works directly with database files, bypassing server processes. In this mode, CSQL behaves as a server, and not as a client connected to the server. Therefore, this tool imports data the fastest.
However, there are times when we cannot use CSQL in offline mode, since in this mode more than one user is not allowed to connect. This means that CSQL should be the only application that works with the database at that time. And this in turn means that the database must be disconnected. If the database is running, it means that another user (host) is using it. In this case, an attempt to connect to the database using CSQL in standalone mode will produce the following error. In such cases, you must either make sure that no one else is connected to the database by completely disabling it, or use other methods of importing data. To disable the database on the command line, enter the command .
$> csql -S demodb


ERROR: Unable to mount disk volume "C:CUBRIDdatabasesdemodbdemodb_lgat".

The database "C:CUBRIDDATABA~1demodbdemodb", to which the disk volume belongs,

is in use by user USER-PC$ on process 3096 of host user-PC since Thu Sep 22 11:04:01 2011.
cubrid server stop dbtest1Create any CONSTRAINT after importing data
This is one of the most important recommendations for developers who plan to import large amounts of data.
Do not create any indexes before you finish importing all the data. This applies to indices such as:
INDEX(regular index), UNIQUE(unique index), REVERSE INDEX(reverse index), REVERSE UNIQUE(reverse unique index) and even PRIMARY KEY(the primary key will automatically create a regular index). Otherwise, each data entry (
INSERT) during the import process will entail mandatory indexing, which will increase the total import time. Therefore, follow these instructions:- Create a table.
- Add all the necessary columns and indicate their data types, but do not specify any restrictions, even the primary key .
- Import all data.
- And only then create all the necessary indexes and primary keys.
Turn off logging during import
There are two types of logging in CUBRID:
- Client Side Logging
- Server side logging
Client Side Logging
Client-side logging refers to a setting
SQL_LOGin the CUBRID Broker . The default value SQL_LOG = ON. When logging is enabled on the client side, each SQL statement processed by the CAS (CUBRID Application Server) will be stored in the DBMS logs. Accordingly, this will increase the total import time. Therefore, if you do not need the logs of the entire import process (as, for example, in the High Availability mode), disable it for a while until the import is complete.
There are several ways to turn off logging. Below I will show how to do this in CUBRID Manager and on the command line.
Example in CM
To disable logging (
SQL_LOG = OFF), right-click on the Broker and select Properties(Properties). In the modal window, specify the parameter value
SQL_LOGas OFF . Then save the changes by clicking on OK . To apply the changes permanently, you need to restart the Broker. Also, right-click on the Broker and select Broker Off to disable, and then Broker On to start the Broker back. Now you can start importing.
Command line example
In a text editor, open cubrid_broker.conf , the broker configuration file, which is located in the conf directory where you installed CUBRID. In this file you can change the values of all broker parameters, including
SQL_LOG. See code snippet below.
Then restart the broker on the command line using the command .[broker]
...
SQL_LOG =OFF
...cubrid broker restartServer side logging
Server-side logging refers to the media_failure_support parameter of the CUBRID Server itself, which determines the need to save archive logs in the event of storage device failure. If the value of this parameter is yes , which is the default value, then all active logs will be copied to the archive logs when the active logs are full, and the transaction is still active. If media_failure_support = no , then all archived logs created after active logs are full will be automatically deleted. It is necessary to replace that any archive logs will be immediately deleted if the value of this parameter changes to no .
Thus setting the valuemedia_failure_support = no , you can reduce the overall time of importing data. To change this parameter, right-click on the host and select its properties.
In the modal window, specify the parameter value
media_failure_supportas no . Then save the changes by clicking on OK . To apply all changes, restart the server.
Specify the number of threads and transaction commits
If you decide to work with CUBRID Manager to import data, be sure to specify the number of threads, as well as the number of transactions in one commit.
Threads will allow CM to use multiple concurrent connections to perform INSERT requests. To determine the number of threads, specify their number in the Thread count . However, you must also remember that too much will not lead to anything good. It all depends on the ability of your iron. Usually we recommend 5 to 10 threads.
Also, the import time depends on the number of transactions in one commit ( commit cycle) This value determines how often the entered data should be captured. Frequent commit transactions will lead to poor performance. But on the other hand, a rare commit may require a lot of RAM. Therefore, again, it depends on the configurations of iron.
Use data_buffer_size
data_buffer_size is one of the important parameters in optimizing the operation of the entire CUBRID server. It determines the size of the pages of data that must be stored in the server’s CUBRID cache. The higher the value of data_buffer_size , the more data pages can be stored in the server buffer, which can significantly reduce the number of I / O operations, which means performance in general.
But if the value of this parameter is too large, a buffer pool can be swapped between the operating system and the server due to the lack of sufficient memory, and if the swap disk is not created, then the database (note, not the server, but the database itself) in general will not start, because there simply will not be enough memory. Therefore, based on the physical potential of iron, it is recommended to adjust the value of the data_buffer_size parameter to approximately two-thirds of the size of the system memory. By default, data_buffer_size = 512M (megabytes).
Use insert_execution_mode
insert_execution_mode is a very useful parameter that allows you to run INSERT requests on the server side rather than on the client side . This is useful when there is very little available memory on the client side, or you need a dirty read before entering data for periodic backups.
The parameter can take 7 values (see Database Server Parameters for details ). The default value is insert_execution_mode = 1 , which means that all INSERT INTO ... SELECT ... queries of the form will be launched on the server side. Since when importing data we do not use this query structure, we need to change the value to 2, which allows us to run all queries in the form of INSERT INTO ... VALUES ... on the server side (see the figure below).
So, to reduce the overall import time and increase the performance of the CUBRID server, follow these tips:
- Use CSQL offline
- Create any CONSTRAINT after importing data
- Turn off logging during import
- Specify the number of threads and transaction commits
- Use data_buffer_size
- Use insert_execution_mode
Did I miss something? Write in the comments about your experiences and how often you import data.