September 5, 2011 at 12:39
Network scanning is easy
This article is for dummies on how to set up image scanning over the network using an Asus WL-500gpv2 router, Samsung SCX-4220 MFP, and Windows. With pictures.
I will talk about the example of OpenWrt Backfire 10.03.1-rc5 firmware. It differs from Oleg’s famous firmware in the possibility of more detailed software configuration and the ability to manage packages from the web interface.
The list of equipment compatible with firmware is here .
This instruction is most likely suitable for any router from this table, which has at least 8mb of flash memory and at least 32mb of RAM.
You can download it here .
The firmware method may vary depending on the router model. This instruction is for routers, like mine.
Install the firmware using the utility for recovering firmware from asus .
First of all, change the password of the router:

Configure Internet access:
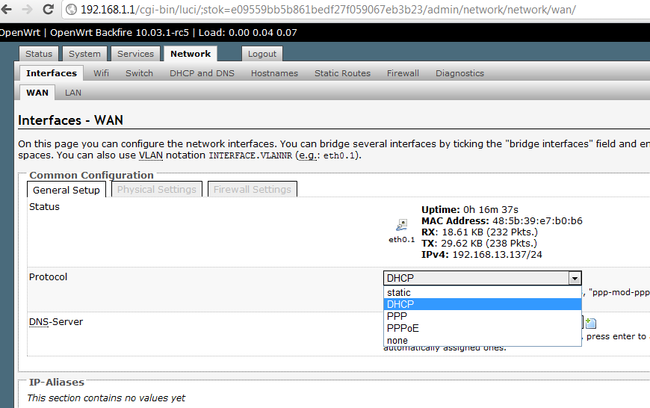
Configure the DHCP server, and change the address if it does not suit 192.168.1.1. I change it to 192.168.11.1, in the future the whole configuration will be to this address:

Next, let's move on to configuring packages.

Click Update package lists (if you want to install the package, this operation must be done each time the router is rebooted), look through the Filter field and put the packages:
Reboot the router.
We connect to the router via ssh .
The command
The version of backends in this firmware is 1.0.20, and, interestingly, when using the latest version (it seems to be 1.0.22, kernel version 2.6), which I installed on the firmware from Oleg, my scanner still could not be determined. I also met a description of this situation on the forums, so I chose the firmware with kernel version 2.4.
Save the file, check: The scanner is detected, everything is fine. Now configure the network access: Add a line to the file (you must specify the subnet of your router) Add the following lines to the file: Run xinetd in debug output mode: As you can see, the service is running. If the service does not start, check that the file / etc / services was the line
Now download and install SaneTwain.
In the archive there is an instruction and 2 files - sanetwain.ds and scanimage.exe,
run scanimage.exe , specify the router address in the settings:
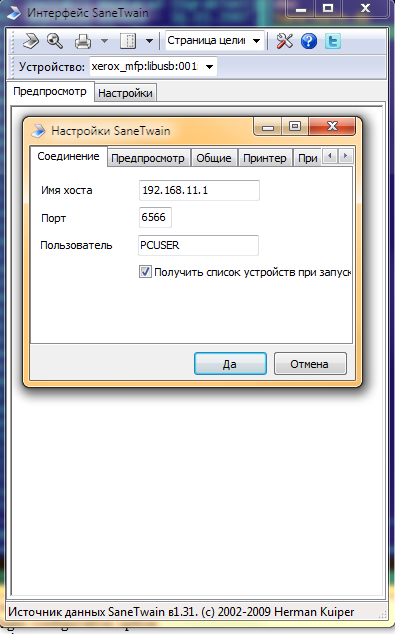
restart scanimage.exe :
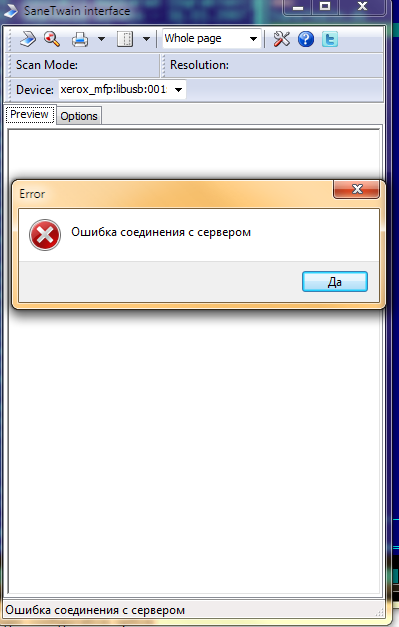
Why an error?
We look at the syslog entries in the web interface: By searching the forums, we find out that everything works in this situation, we need to add an entry to the hosts with a name for the router address: Add the line: Restart xinetd: Restart scanimage.exe (it is buggy, maybe only with the second time everything will be ok)
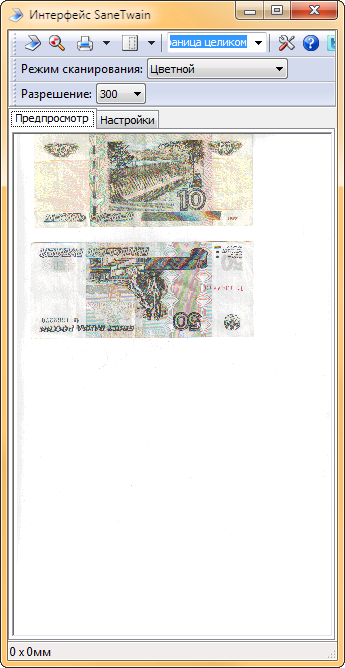
We see that everything works. Hurrah.
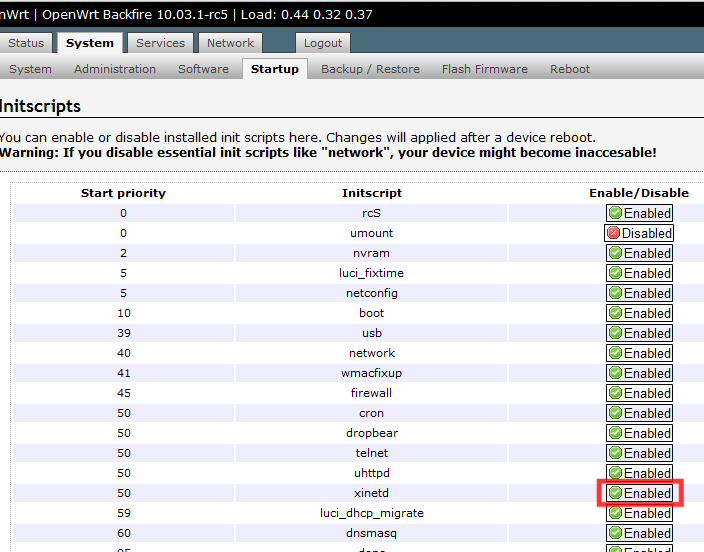
Now you need to enable xinetd autorun in the web interface of the router:
Restart the router, check the operation again.
Now copy the second file, sanetwain.ds , to the C: \ Windows \ twain_32 \ directory.
After that, you can use the scanner in programs with twain support, including the wonderful screenshot capture program Screenshot Captor :

Print
Now configure print over the network:
Install the luci-app-p910nd package.
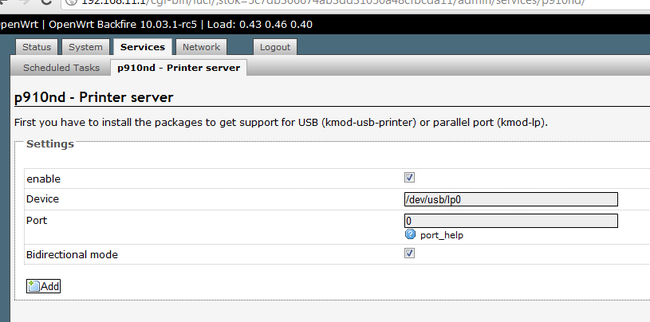
We make the following settings in the web interface of the router:
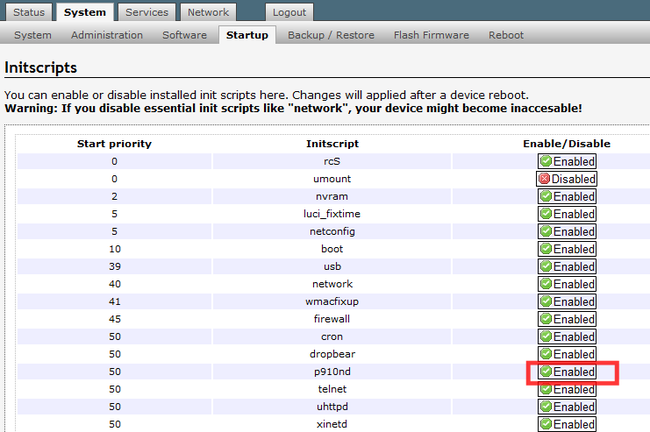
Make sure that the server starts when the router reboots:
and that it really started: Set up the printer: Click "Test Print", hurray! Printing over the network on all the firmware that I watched was configured without problems, so I'm sure that you will not have problems either.

We are connected via ssh.
The idea is to remove the backends we don’t need.
backends are located in the / usr / lib / sane / folder .
As you can see from man , the files of our backend are libsane-xerox_mfp.so.1 and libsane-xerox_mfp.so.1.0.20
Accordingly, if you do not plan to connect another scanner, all the rest can Unselected to delete what will free About 3.5 mb! Why 3.5 and not 7? Because in this directory exactly half of the files are symbolic links to libraries located in the same directory. The removal method is not the most elegant, but, nevertheless, effective (mc should not be offered, there is no place for it): The main thing is not to get carried away, and not to kill what you need to leave
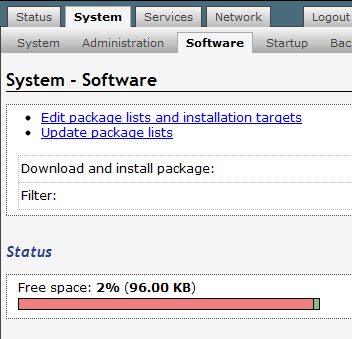
Now the result is clear - before:
and after: we

edit the file
comment # all lines not related to our backend (everything except
Now scanimage starts faster (it does not waste time initializing all backends), and there is enough space to install other necessary services .
PS
On the wl500g.info forum, I read comments that the scanner in this connection works more slowly than when connected directly to the computer.
Let's check ... Scan an A4 sheet in color at different resolutions.
600dpi through the router (wifi, while watching the video on youtube in 720p) 4min 16sec, directly 1min 47sec (through the router it’s actually 2.5 times slower);
300 dpi through a router 62sec, directly 31sec;
150dpi through a router 20sec, directly 15sec (here the difference is very small)
In principle, 150 dpi is enough to illustrate A4 documents or recognize text. In a situation where one scanner for several people and the scan volumes are small, it’s quite a solution.
In a situation where you need high resolutions with large volumes of scanning, this solution, of course, will not work ...
PPS
Note, we managed to do everything without connecting flash drives, mounting swap and other tricks like / opt, and the router left one unoccupied USB port.
I will talk about the example of OpenWrt Backfire 10.03.1-rc5 firmware. It differs from Oleg’s famous firmware in the possibility of more detailed software configuration and the ability to manage packages from the web interface.
The list of equipment compatible with firmware is here .
This instruction is most likely suitable for any router from this table, which has at least 8mb of flash memory and at least 32mb of RAM.
Firmware
You can download it here .
The firmware method may vary depending on the router model. This instruction is for routers, like mine.
Install the firmware using the utility for recovering firmware from asus .
- We connect the router to the computer via Ethernet (via any of the LAN ports)
- We put the router into recovery mode - turn off the power of the router, hold down the Reset / Restore button, turn on the power, hold the button down until the power indicator starts blinking
- No ip-address settings are needed, unless you assign the computer an address from 192.168.1.0/255.255.255.0 other than 192.168.1.1, and start ping at 192.168.1.1
- We launch the Firmware Restoration program, turn off the firewall (the program asks for it), select the firmware file with the extension .trx
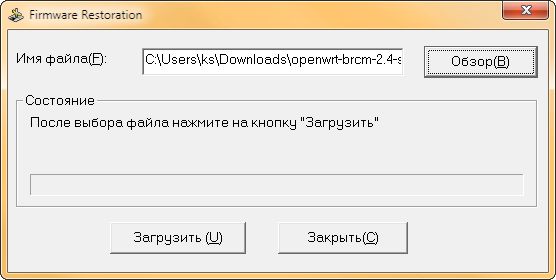
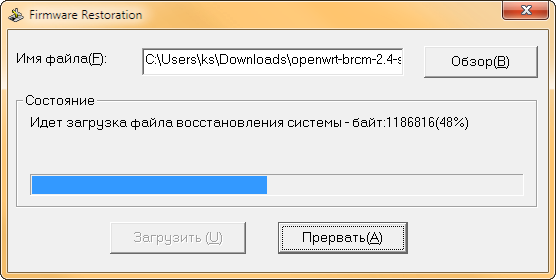
- We wait a couple of minutes until the router appears at 192.168.1.1
Scan and Print Settings
First of all, change the password of the router:
Configure Internet access:
Configure the DHCP server, and change the address if it does not suit 192.168.1.1. I change it to 192.168.11.1, in the future the whole configuration will be to this address:
Scanning
Next, let's move on to configuring packages.
Click Update package lists (if you want to install the package, this operation must be done each time the router is rebooted), look through the Filter field and put the packages:
- nano is friendlier than vi editor
- sane-backends, sane-frontends
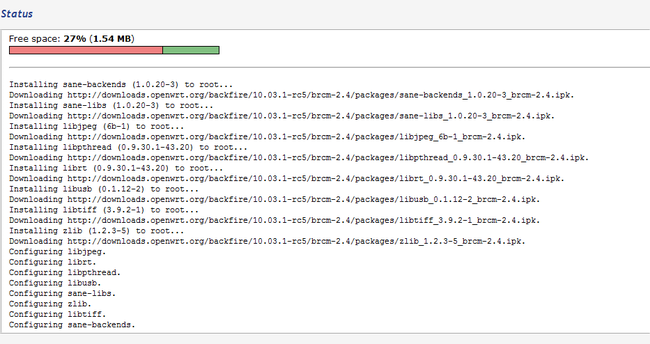
- xinetd - for network access
- kmod-usb-printer, kmod-usb-ohci, kmod-usb-uhci, kmod-usb2, kmod-usb-storage - support for various USB devices at the kernel level
Reboot the router.
We connect to the router via ssh .
The command
sane-find-scannershould give something like the following:
Note the values , we will need them.
Now, either you are lucky or have to make additional settings.
I was not lucky: Here you can find out which scanner model corresponds to which backend. Samsung SCX-4220 corresponds to backend sane-xerox_mfp . 5 . Here you can see the manual, which shows that the config is in the file /etc/sane.d/xerox_mfp.conf
Edit it:
Add a line to the file
and, just in case, this line, as advised on the forumsfound USB scanner (vendor=0x04e8 [Samsung], product=0x341b [SCX-4200 Series]) at libusb:001:004
# Your USB scanner was (probably) detected. It may or may not be supported by
# SANE. Try scanimage -L and read the backend's manpage.
# Not checking for parallel port scanners.
# Most Scanners connected to the parallel port or other proprietary ports
# can't be detected by this program.
vendor=0x04e8 , product=0x341b , libusb:001:004root@OpenWrt:~# scanimage -L
No scanners were identified. If you were expecting something different,
check that the scanner is plugged in, turned on and detected by the
sane-find-scanner tool (if appropriate). Please read the documentation
which came with this software (README, FAQ, manpages).
nano /etc/sane.d/xerox_mfp.confusb 0x04e8 0x341busb libusb:001:004The version of backends in this firmware is 1.0.20, and, interestingly, when using the latest version (it seems to be 1.0.22, kernel version 2.6), which I installed on the firmware from Oleg, my scanner still could not be determined. I also met a description of this situation on the forums, so I chose the firmware with kernel version 2.4.
Save the file, check: The scanner is detected, everything is fine. Now configure the network access: Add a line to the file (you must specify the subnet of your router) Add the following lines to the file: Run xinetd in debug output mode: As you can see, the service is running. If the service does not start, check that the file / etc / services was the line
root@OpenWrt:~# scanimage –L

device `xerox_mfp:libusb:001:004' is a SAMSUNG ORION multi-function peripheral
nano /etc/sane.d/saned.conf192.168.11.0/24nano /etc/xinetd.confservice saned
{
socket_type = stream
server = /usr/sbin/saned
protocol = tcp
user = root
group = root
wait = no
disable = no
}root@OpenWrt:~# xinetd -d
Service defaults
Bind = All addresses.
Only from: All sites
No access: No blocked sites
No logging
Service configuration: saned
id = saned
flags = IPv4
socket_type = stream
Protocol (name,number) = (tcp,6)
port = 6566
wait = no
user = 0
group = 0
Groups = no
PER_SOURCE = -1
Bind = All addresses.
Server = /usr/sbin/saned
Server argv = saned
Only from: All sites
No access: No blocked sites
No logging
11/9/2@07:43:31: DEBUG: 29656 {cnf_start_services} Started service: saned
11/9/2@07:43:31: DEBUG: 29656 {cnf_start_services} mask_max = 6, services_started = 1
11/9/2@07:43:31: NOTICE: 29656 {main} xinetd Version 2.3.14 started with loadavg options compiled in.
11/9/2@07:43:31: NOTICE: 29656 {main} Started working: 1 available service
11/9/2@07:43:31: DEBUG: 29656 {main_loop} active_services = 1saned 6566, and if it is missing, then add. Now download and install SaneTwain.
In the archive there is an instruction and 2 files - sanetwain.ds and scanimage.exe,
run scanimage.exe , specify the router address in the settings:
restart scanimage.exe :
Why an error?
We look at the syslog entries in the web interface: By searching the forums, we find out that everything works in this situation, we need to add an entry to the hosts with a name for the router address: Add the line: Restart xinetd: Restart scanimage.exe (it is buggy, maybe only with the second time everything will be ok)
Sep 2 07:59:19 OpenWrt daemon.debug saned[31278]: saned (AF-indep+IPv6) from sane-backends 1.0.20 starting up

Sep 2 07:59:19 OpenWrt daemon.debug saned[31278]: check_host: access by remote host: 192.168.11.139

Sep 2 07:59:19 OpenWrt daemon.debug saned[31278]: check_host: getaddrinfo for local hostname failed: Name or service not known

Sep 2 08:02:52 OpenWrt daemon.warn xinetd[29722]: Exiting...
root@OpenWrt:~# nano /etc/hosts192.168.11.1 OpenWrtkillall xinetd
xinetdWe see that everything works. Hurrah.
Now you need to enable xinetd autorun in the web interface of the router:
Restart the router, check the operation again.
Now copy the second file, sanetwain.ds , to the C: \ Windows \ twain_32 \ directory.
After that, you can use the scanner in programs with twain support, including the wonderful screenshot capture program Screenshot Captor :
Now configure print over the network:
Install the luci-app-p910nd package.
We make the following settings in the web interface of the router:
Make sure that the server starts when the router reboots:
and that it really started: Set up the printer: Click "Test Print", hurray! Printing over the network on all the firmware that I watched was configured without problems, so I'm sure that you will not have problems either.
root@OpenWrt:~# ps|grep p9100

32079 root 680 S /usr/sbin/p9100d -b -f /dev/usb/lp0 0
Free up space on the router for other programs
We are connected via ssh.
The idea is to remove the backends we don’t need.
backends are located in the / usr / lib / sane / folder .
As you can see from man , the files of our backend are libsane-xerox_mfp.so.1 and libsane-xerox_mfp.so.1.0.20
Accordingly, if you do not plan to connect another scanner, all the rest can Unselected to delete what will free About 3.5 mb! Why 3.5 and not 7? Because in this directory exactly half of the files are symbolic links to libraries located in the same directory. The removal method is not the most elegant, but, nevertheless, effective (mc should not be offered, there is no place for it): The main thing is not to get carried away, and not to kill what you need to leave
root@OpenWrt:/usr/lib/sane# cd /usr/lib/sane/

root@OpenWrt:/usr/lib/sane# du -m

7 .
root@OpenWrt:/usr/lib/sane# rm libsane-a*
root@OpenWrt:/usr/lib/sane# rm libsane-b*
root@OpenWrt:/usr/lib/sane# rm libsane-c*
root@OpenWrt:/usr/lib/sane# rm libsane-d*
root@OpenWrt:/usr/lib/sane# rm libsane-e*
root@OpenWrt:/usr/lib/sane# rm libsane-f*
root@OpenWrt:/usr/lib/sane# rm libsane-g*
root@OpenWrt:/usr/lib/sane# rm libsane-h*
root@OpenWrt:/usr/lib/sane# rm libsane-i*
root@OpenWrt:/usr/lib/sane# rm libsane-j*
rm: cannot remove 'libsane-j*': No such file or directory
root@OpenWrt:/usr/lib/sane# rm libsane-k*
rm: cannot remove 'libsane-k*': No such file or directory
root@OpenWrt:/usr/lib/sane# rm libsane-l*
root@OpenWrt:/usr/lib/sane# rm libsane-m*
root@OpenWrt:/usr/lib/sane# rm libsane-n*
root@OpenWrt:/usr/lib/sane# rm libsane-o*
rm: cannot remove 'libsane-o*': No such file or directory
root@OpenWrt:/usr/lib/sane# rm libsane-p*
root@OpenWrt:/usr/lib/sane# rm libsane-q*
root@OpenWrt:/usr/lib/sane# rm libsane-r*
root@OpenWrt:/usr/lib/sane# rm libsane-s*
root@OpenWrt:/usr/lib/sane# rm libsane-t*
root@OpenWrt:/usr/lib/sane# rm libsane-u*
root@OpenWrt:/usr/lib/sane# rm libsane-v*
rm: cannot remove 'libsane-v*': No such file or directory
root@OpenWrt:/usr/lib/sane# rm libsane-w*
rm: cannot remove 'libsane-w*': No such file or directoryNow the result is clear - before:
and after: we
edit the file
root@OpenWrt:/usr/lib/sane# nano /etc/sane.d/dll.confcomment # all lines not related to our backend (everything except
xerox_mfp) Now scanimage starts faster (it does not waste time initializing all backends), and there is enough space to install other necessary services .
PS
On the wl500g.info forum, I read comments that the scanner in this connection works more slowly than when connected directly to the computer.
Let's check ... Scan an A4 sheet in color at different resolutions.
600dpi through the router (wifi, while watching the video on youtube in 720p) 4min 16sec, directly 1min 47sec (through the router it’s actually 2.5 times slower);
300 dpi through a router 62sec, directly 31sec;
150dpi through a router 20sec, directly 15sec (here the difference is very small)
In principle, 150 dpi is enough to illustrate A4 documents or recognize text. In a situation where one scanner for several people and the scan volumes are small, it’s quite a solution.
In a situation where you need high resolutions with large volumes of scanning, this solution, of course, will not work ...
PPS
Note, we managed to do everything without connecting flash drives, mounting swap and other tricks like / opt, and the router left one unoccupied USB port.