ACLs: Access Control Lists in Cisco IOS
Today I will tell you about how to filter traffic on the network using access control lists. Consider how they work accordingly, what they are, what they are for. Later I will show how they are configured in Cisco IOS and lay out an archive with laboratory work to consolidate your knowledge.
Access Control List (ACL) is a set of text expressions that allow or forbid something. Typically, an ACL allows or denies IP packets, but, among other things, it can look inside the IP packet, view the packet type, TCP and UDP ports. ACLs also exist for various network protocols (IP, IPX, AppleTalk, and so on). Basically, the use of access lists is considered from the point of view of packet filtering, that is, packet filtering is necessary in those situations when you have equipment on the border of the Internet and your private network and you need to filter out unnecessary traffic.
You place ACLs in the inbound direction and block redundant traffic.
The functionality of the ACL is to classify traffic, you need to check it first, and then do something with it, depending on where the ACL is applied. ACLs apply everywhere, for example:
To use ACLs for all of these components, you need to understand how they work. And we will primarily deal with packet filtering. In relation to packet filtering, ACLs are placed on interfaces, they are created independently, and only then they are screwed to the interface. As soon as you fasten it to the interface, the router starts to view traffic. The router considers the traffic as incoming and outgoing. The traffic that enters the router is called inbound, the one that exits from it is outbound. Accordingly, ACLs are placed in the inbound or outbound direction.

A packet arrives from your private network to the fa0 / 1 router interface, the router checks if there are ACLs on the interface or not, if it is, then processing is carried out according to the access list rulesstrictly in the order in which the expressions are written , if the access list allows the packet to pass, then in this case the router sends the packet to the provider through the fa0 / 0 interface, if the access list does not allow the packet to pass, the packet is destroyed. If there is no access list, the packet flies without any restrictions. Before sending a packet to the provider, the router also checks the fa0 / 0 interface for an outgoing ACL. The fact is that an ACL can be attached on an interface as inbound or outbound. For example, we have an ACL with the rule to prohibit all nodes on the Internet from sending packets to our network.
So what interface to attach this ACL to? If we attach the ACL to the fa0 / 1 interface as an outbound, this will not be entirely true, although the ACL will work. An echo request comes to the router for some host on the private network, it checks if there is an ACL on the fa0 / 0 interface, it does not exist, then it checks the fa0 / 1 interface, there is an ACL on this interface, it is configured as outgoing, everything is correct the packet does not penetrate the network, but is destroyed by the router. But if we attach the ACL to the fa0 / 0 interface as an incoming one, the packet will be destroyed immediately as it arrives at the router. The last solution is the right one, since the router loads its computing resources less. Extended ACLs should be placed as close as possible to the source, standard ones as close as possible to the recipient. This is necessary in order not to drive packets across the network in vain.
The ACL itself is a set of text expressions in which permit ( deny ) or deny (deny) is written , and processing is carried out strictly in the order in which the expressions are specified. Accordingly, when a packet arrives at the interface, it is checked for the first condition, if the first condition matches the packet, its further processing is terminated. The package will either go on or be destroyed.
Once again, if the packet matches the condition, then it is not processed . If the first condition does not match, processing of the second condition is in progress, if it matches, processing stops, if not, processing of the third condition is in progress and so on until all conditions are checked,if none of the conditions matches, the packet is simply destroyed . Remember, at each end of the list is an implicit deny any (deny all traffic). Be very careful with these rules, which I have outlined, because configuration errors often occur.
ACLs are divided into two types:
Access lists are indicated by either numbers or symbolic names. ACLs are also used for different network protocols. We, in turn, will work with IP. They are designated as follows, numbered access lists:
Character ACLs are also divided into standard and extended. I’ll remind you that they can check much more than the standard ones, but they also work more slowly, since you have to look inside the package, unlike the standard ones, where we look only at the Source Address field. When creating an ACL, each access list entry is identified by a serial number, by default, within ten (10, 20, 30, etc.). Due to this, you can delete a specific record and insert another one in its place, but this feature appeared in Cisco IOS 12.3, you had to delete the ACL before 12.3, and then recreate it completely. You cannot place more than 1 access list per interface, per protocol, per direction. I explain: if we have a router and it has an interface, we can place only one access list for the IP protocol, for example, under number 10. Another rule regarding the routers themselves, the ACL does not affect the traffic generated by the router itself .
To filter addresses in the ACL, a WildCard mask is used. This is a reverse mask. Take the template expression: 255.255.255.255 and subtract the usual mask from the template.
255.255.255.255-255.255.255.0, we get the mask 0.0.0.255, which is the usual mask 255.255.255.0, only 0.0.0.255 is the WildCard mask.
It allows you to do the following, for example, you have a router that is connected to some server and we need to block access to it from the outside world, but at the same time there are several people who can connect to the server.
We set up a dynamic access list, attach it in the incoming direction, and then people who need to connect, connect via Telnet to this device, as a result, the dynamic ACL opens the passage to the server, and already a person can log in, say, through HTTP to get to the server. By default, after 10 minutes, this passage closes and the user is forced to perform Telnet again to connect to the device.
Here the situation is slightly different, when a node on the local network sends a TCP request to the Internet, we must have an open passage so that a TCP response arrives to establish a connection. If there is no passage, we will not be able to establish a connection, and attackers can take advantage of this passage, for example, to penetrate the network. Reflective ACLs work in this way, deny any access is blocked completely, but another special ACL is formed that can read the parameters of user sessions that are generated from the local network and open a passage to deny any for them, which means that they cannot install from the Internet compound. And the sessions generated from the local network will receive answers.
The usual ACL, but with a time limit, you can enter a special schedule that activates a particular entry in the access list. And to do such a trick, for example, we write an access list in which we prohibit HTTP access during the working day and hang it on the router interface, that is, the employees of the enterprise came to work, they closed HTTP access, the working day ended, HTTP access was opened ,
please, if you want to - sit on the Internet.
The ACLs themselves are created separately, that is, it's just a list that is created in the global config, then it is assigned to the interface and only then it starts working. It is necessary to remember some points in order to configure access lists correctly:


R # show access-lists {ACL number | name} - look at the access list information.
R # show access-lists - see all access lists on the router.
We see that we have two ACLs (standard and advanced) under the names nick and nick5. The first list allows the host 172.16.1.1 to access via IP (this means that all protocols running over IP are allowed) to the host 10.0.0.5. All other traffic is denied by the deny ip any any command. Next to this condition, in our example, it writes (16 match (es)). This shows that 16 packets fell under this condition.
The second ACL allows traffic from any source on the 172.16.0.0/16 network to pass through.
I have collected lab work for Packet Tracer from chapter 5 of the CCNA 4 ACL course. If you have a desire to consolidate knowledge in practice, please - link , mirror - FTP . Size - 865.14 KB.
CCNA Exploration: Accessing the WAN (5 chapter)
Introduction
Access Control List (ACL) is a set of text expressions that allow or forbid something. Typically, an ACL allows or denies IP packets, but, among other things, it can look inside the IP packet, view the packet type, TCP and UDP ports. ACLs also exist for various network protocols (IP, IPX, AppleTalk, and so on). Basically, the use of access lists is considered from the point of view of packet filtering, that is, packet filtering is necessary in those situations when you have equipment on the border of the Internet and your private network and you need to filter out unnecessary traffic.
You place ACLs in the inbound direction and block redundant traffic.
Theory
The functionality of the ACL is to classify traffic, you need to check it first, and then do something with it, depending on where the ACL is applied. ACLs apply everywhere, for example:
- On the interface: batch filtering
- On a Telnet Line: Router Access Restrictions
- VPN: what traffic needs to be encrypted
- QoS: which traffic to process more priority
- NAT: which addresses to translate
To use ACLs for all of these components, you need to understand how they work. And we will primarily deal with packet filtering. In relation to packet filtering, ACLs are placed on interfaces, they are created independently, and only then they are screwed to the interface. As soon as you fasten it to the interface, the router starts to view traffic. The router considers the traffic as incoming and outgoing. The traffic that enters the router is called inbound, the one that exits from it is outbound. Accordingly, ACLs are placed in the inbound or outbound direction.
A packet arrives from your private network to the fa0 / 1 router interface, the router checks if there are ACLs on the interface or not, if it is, then processing is carried out according to the access list rulesstrictly in the order in which the expressions are written , if the access list allows the packet to pass, then in this case the router sends the packet to the provider through the fa0 / 0 interface, if the access list does not allow the packet to pass, the packet is destroyed. If there is no access list, the packet flies without any restrictions. Before sending a packet to the provider, the router also checks the fa0 / 0 interface for an outgoing ACL. The fact is that an ACL can be attached on an interface as inbound or outbound. For example, we have an ACL with the rule to prohibit all nodes on the Internet from sending packets to our network.
So what interface to attach this ACL to? If we attach the ACL to the fa0 / 1 interface as an outbound, this will not be entirely true, although the ACL will work. An echo request comes to the router for some host on the private network, it checks if there is an ACL on the fa0 / 0 interface, it does not exist, then it checks the fa0 / 1 interface, there is an ACL on this interface, it is configured as outgoing, everything is correct the packet does not penetrate the network, but is destroyed by the router. But if we attach the ACL to the fa0 / 0 interface as an incoming one, the packet will be destroyed immediately as it arrives at the router. The last solution is the right one, since the router loads its computing resources less. Extended ACLs should be placed as close as possible to the source, standard ones as close as possible to the recipient. This is necessary in order not to drive packets across the network in vain.
The ACL itself is a set of text expressions in which permit ( deny ) or deny (deny) is written , and processing is carried out strictly in the order in which the expressions are specified. Accordingly, when a packet arrives at the interface, it is checked for the first condition, if the first condition matches the packet, its further processing is terminated. The package will either go on or be destroyed.
Once again, if the packet matches the condition, then it is not processed . If the first condition does not match, processing of the second condition is in progress, if it matches, processing stops, if not, processing of the third condition is in progress and so on until all conditions are checked,if none of the conditions matches, the packet is simply destroyed . Remember, at each end of the list is an implicit deny any (deny all traffic). Be very careful with these rules, which I have outlined, because configuration errors often occur.
ACLs are divided into two types:
- Standard: can only check source addresses
- Extended: can check source addresses as well as recipient addresses, in the case of IP the protocol type and TCP / UDP ports are also
Access lists are indicated by either numbers or symbolic names. ACLs are also used for different network protocols. We, in turn, will work with IP. They are designated as follows, numbered access lists:
- Standard: 1 to 99
- Extended: 100 to 199
Character ACLs are also divided into standard and extended. I’ll remind you that they can check much more than the standard ones, but they also work more slowly, since you have to look inside the package, unlike the standard ones, where we look only at the Source Address field. When creating an ACL, each access list entry is identified by a serial number, by default, within ten (10, 20, 30, etc.). Due to this, you can delete a specific record and insert another one in its place, but this feature appeared in Cisco IOS 12.3, you had to delete the ACL before 12.3, and then recreate it completely. You cannot place more than 1 access list per interface, per protocol, per direction. I explain: if we have a router and it has an interface, we can place only one access list for the IP protocol, for example, under number 10. Another rule regarding the routers themselves, the ACL does not affect the traffic generated by the router itself .
To filter addresses in the ACL, a WildCard mask is used. This is a reverse mask. Take the template expression: 255.255.255.255 and subtract the usual mask from the template.
255.255.255.255-255.255.255.0, we get the mask 0.0.0.255, which is the usual mask 255.255.255.0, only 0.0.0.255 is the WildCard mask.
Types of ACL
Dynamic (Dynamic ACL)
It allows you to do the following, for example, you have a router that is connected to some server and we need to block access to it from the outside world, but at the same time there are several people who can connect to the server.
We set up a dynamic access list, attach it in the incoming direction, and then people who need to connect, connect via Telnet to this device, as a result, the dynamic ACL opens the passage to the server, and already a person can log in, say, through HTTP to get to the server. By default, after 10 minutes, this passage closes and the user is forced to perform Telnet again to connect to the device.
Reflexive ACL
Here the situation is slightly different, when a node on the local network sends a TCP request to the Internet, we must have an open passage so that a TCP response arrives to establish a connection. If there is no passage, we will not be able to establish a connection, and attackers can take advantage of this passage, for example, to penetrate the network. Reflective ACLs work in this way, deny any access is blocked completely, but another special ACL is formed that can read the parameters of user sessions that are generated from the local network and open a passage to deny any for them, which means that they cannot install from the Internet compound. And the sessions generated from the local network will receive answers.
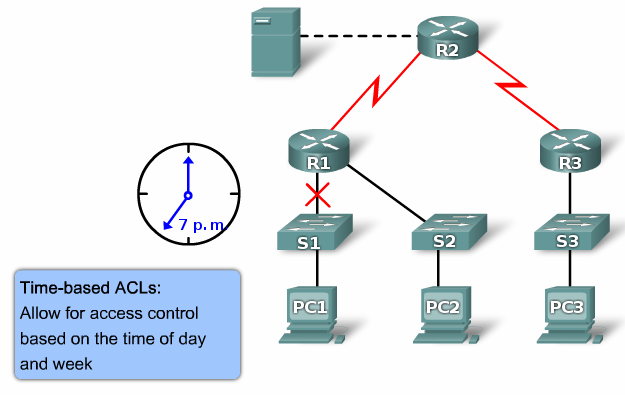
Time-based ACL
The usual ACL, but with a time limit, you can enter a special schedule that activates a particular entry in the access list. And to do such a trick, for example, we write an access list in which we prohibit HTTP access during the working day and hang it on the router interface, that is, the employees of the enterprise came to work, they closed HTTP access, the working day ended, HTTP access was opened ,
please, if you want to - sit on the Internet.
Customization
The ACLs themselves are created separately, that is, it's just a list that is created in the global config, then it is assigned to the interface and only then it starts working. It is necessary to remember some points in order to configure access lists correctly:
- Processing is carried out strictly in the order in which the conditions are recorded.
- If the packet matches the condition, then it is not processed
- At the end of each access list is an implicit deny any (deny everything)
- Extended ACLs should be placed as close as possible to the source, standard ones as close as possible to the recipient
- You cannot place more than 1 access list per interface, per protocol, per direction
- ACL does not affect traffic generated by the router itself
- WildCard mask is used to filter addresses.
Standard Access List
Router(config)#access-list <номер списка от 1 до 99> {permit | deny | remark}{address | any | host} [source-wildcard] [log]- permit: allow
- deny: prohibit
- remark: comment on access list
- address: disable or allow the network
- any: allow or deny everything
- host: allow or deny host
- source-wildcard: wildcard network mask
- log: enable logging packets passing through this ACL
Extended Access List
Router(config)#access-list <номер списка от 100 до 199> {permit | deny | remark} protocol source [source-wildcard] [operator operand] [port <порт или название протокола> [established]- protocol source: which protocol will we allow or close (ICMP, TCP, UDP, IP, OSPF, etc.)
- deny: prohibit
- operator:
ABCD - destination address
any - any destination host
eq - only packets on this port
gt - only packets with a large port number
host - only destination host
lt - only packets with a lower port number
neq - only packets not on a given port number
range - port range
- port: port number (TCP or UDP), you can specify a name
- established: allow the passage of TCP segments that are part of an already created TCP session
Attach to the interface
Router(config-if)#ip access-group <номер списка или имя ACL> {in | out}- in: incoming direction
- out: outgoing direction
Named Access Lists
Router(config)#ip access-list{standard | extended} {<номер ACL> | <имя ACL>}Router(config-ext-nacl)# {default | deny | exit | no | permit | remark}- standard: standard ACL
- extended: extended ACL
- default: set the command to default
Router Access Restriction
R(config)#line vty 0 4- go to the virtual lines configuration mode. - configure the username and password, and also fix the access list with the allowed IP addresses.R(config-line)#password <пароль>
R(config-line)#login
R(config-line)#access-class 21 inDynamic Access Lists
R3(config)#username Student password0 cisco- create users to connect via Telnet. - Allow all nodes to connect to the server via Telnet. - we fix 101 ACLs to the interface in the incoming direction. - as soon as the user authenticates, the network 192.168.30.0 will be available, after 5 minutes of inactivity the session will be closed.R3(config)#access-list 101 permit tcp any host 10.2.2.2 eq telnetR3(config)#access-list 101 dynamic testlist timeout 15 permit ip 192.168.10.0 0.0.0.255 192.168.30.0 0.0.0.255R3(config)#interface serial 0/0/1
R3(config-if)#ip access-group 101 inR3(config)#line vty 0 4
R3(config-line)#login local
R3(config-line)#autocommand access-enable host timeout 5Reflective Access Lists
R2(config)#ip access-list extended OUTBOUNDFILTERS

R2(config-ext-nacl)#permit tcp 192.168.0.0 0.0.255.255 any reflect TCPTRAFFIC

R2(config-ext-nacl)#permit icmp 192.168.0.0 0.0.255.255 any reflect ICMPTRAFFIC
- make the router monitor the traffic that was initiated from the inside. - create an inbound policy that requires the router to check incoming traffic to see if it was initiated from the inside and bind TCPTRAFFIC to INBOUNDFILTERS. - apply inbound and outbound ACLs to the interface.R2(config)#ip access-list extended INBOUNDFILTERS
R2(config-ext-nacl)#evaluate TCPTRAFFIC
R2(config-ext-nacl)#evaluate ICMPTRAFFICR2(config)#interface serial 0/1/0
R2(config-if)#ip access-group INBOUNDFILTERS in
R2(config-if)#ip access-group OUTBOUNDFILTERS outTime limit
R1(config)#time-range EVERYOTHERDAY

R1(config-time-range)#periodic Monday Wednesday Friday 8:00 to 17:00
- create a time list in which we add the days of the week and time. - apply time-range to the ACL. - we fix ACL to the interface.R1(config)#access-list 101 permit tcp 192.168.10.0 0.0.0.255 any eq telnet time-range EVERYOTHERDAYR1(config)#interface s0/0/0
R1(config-if)#ip access-group 101 outTroubleshooting
R # show access-lists {ACL number | name} - look at the access list information.
R # show access-lists - see all access lists on the router.
Example
Router#show access-lists

Extended IP access list nick
permit ip host 172.168.1.1 host 10.0.0.5
deny ip any any (16 match(es))

Standard IP access list nick5
permit 172.16.0.0 0.0.255.255
We see that we have two ACLs (standard and advanced) under the names nick and nick5. The first list allows the host 172.16.1.1 to access via IP (this means that all protocols running over IP are allowed) to the host 10.0.0.5. All other traffic is denied by the deny ip any any command. Next to this condition, in our example, it writes (16 match (es)). This shows that 16 packets fell under this condition.
The second ACL allows traffic from any source on the 172.16.0.0/16 network to pass through.
Practice
I have collected lab work for Packet Tracer from chapter 5 of the CCNA 4 ACL course. If you have a desire to consolidate knowledge in practice, please - link , mirror - FTP . Size - 865.14 KB.
Literature
CCNA Exploration: Accessing the WAN (5 chapter)