Playboy / Vogue VNC monitor for dummies
Good day, gentlemen.
My friends, after reading this article, asked me to write step-by-step instructions with “pictures” on installing a VNC client on a Playboy player with a machine on Ubuntu 11.04. Otherwise, many possessing players couldn’t use them normally, bumping into a lack of understanding of terms and a lack of skills in using Linux.
I hope with this material many questions will disappear.
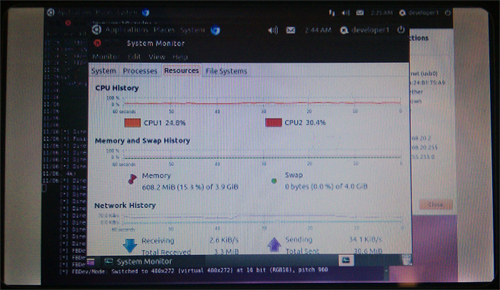
Photos of the results:
What we have:
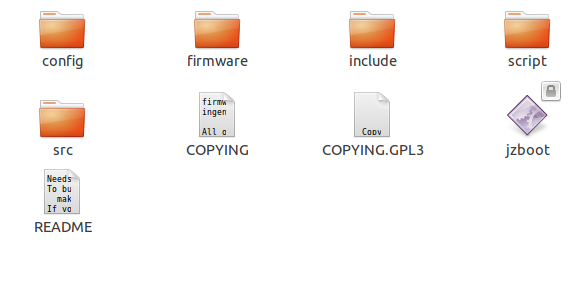
2. We go to the site ingenic.grindars.org in the middle of the page there are links to archives, I chose full . We read the page, then go to the directory where we downloaded the archive and unpack it.
3. We prepare the computer for copying with git, for this we go to the Console and write: The
computer will ask for a password before using sudo for the first time.
If there are questions during installation, we agree everywhere (write Y and press Enter).
4. Now we copy from git jzboot, for this we write in the console:
After that, the jzboot folder will appear in the user's home folder.
5. Now install the components for compiling jzboot, for this we write in the console one by one: We agree on all issues with the Y button in the same way. 6. Now we compile jzboot, for this we write in the console: After this, the compilation process should go and you will see a new file ( jzboot) as in the screenshot. 7. Now for simplicity of the process we transfer the unpacked folder from point 2 to the user's home folder (/ home / USERNAME /), and rename the folder to lin, it will lie next to the jzboot folder, as in the screenshot. USERNAME is your username. 8. We take the player, connect a mini-USB cable to it, I used the cable from the old HDD. The connector is under perforation.

9. In the closed state (the player is off), press the top button (the only one for vogue) and holding the button open the player.
10. Without closing the player, we connect it to the computer. Now our player is in “firmware mode”.
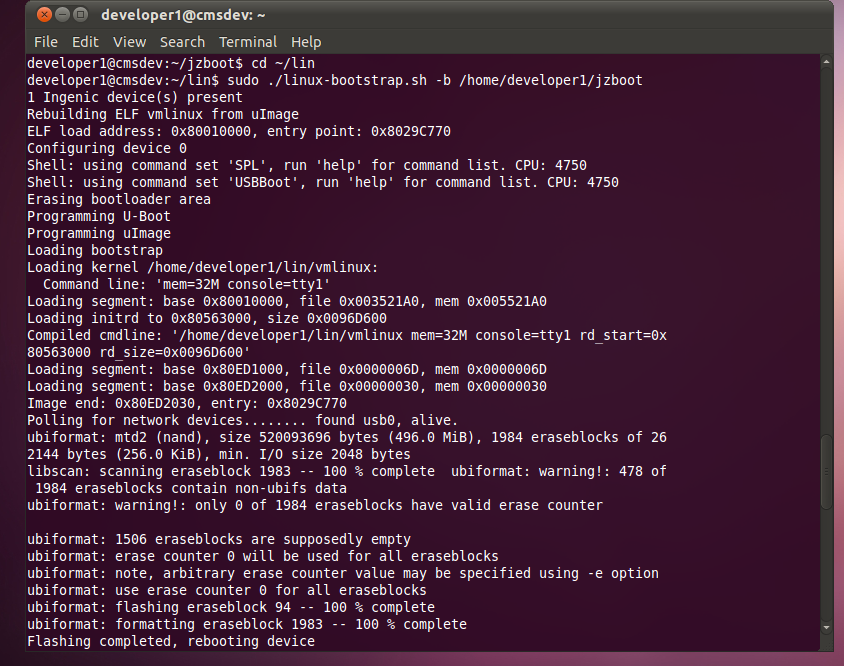
11. We begin the firmware process, for this we type in the console: If everything is ok, then we see about the same information in the console as in the screenshot. Accordingly, we are waiting for the completion of the process, do not touch anything until its completion. 12. The main part is finished, now on your player should be one of the latest versions of Linux. 13. Now we put the VNC client on the player. But first, let's share the Internet on the player from the computer with the following commands typed in the console:
14. Now we are connected to the player via SSH. If everything went ok - the player itself had to connect to the computer and use DHCP to assign an IP address. It will almost certainly be the address 192.168.20.1. So you need to write in the console:
Now we are connecting to the player from the console, the first time he connects, he asks whether to trust this device (whether to accept its key), again we agree (yes) and press Enter, when asked about the password, press Enter (password is empty).
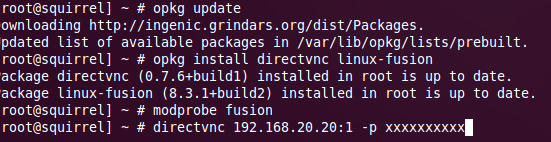
15. Now we put the VNC client on the player, we all write in the same place: 16. Now having the configured VNC server (we don’t consider this here), we write to the console in turn: Where 192.168.20.2 is the address of the VNC server,: 0 - the number of the monitor to connect to (I have 0, because this is a server without a monitor), and the VNC password is actually the password from VNC.
All. You are connected, but as already written it will be necessary to dig deeper into the settings of the running VNC session, I registered -scale 0.5 on x11vnc and got some permission less than necessary, but for now this is enough for me.
The instructions used materials from:
vogeeky.co.cc
ingenic.grindars.org
groups.google.com/group/vogeeky?hl=en
habrahabr.ru/tag/vogue Thank
you all of these resources and their participants.
Special thanks to: Grindars, whitequark , rzk333 , ValdikSS .
Now you can use the player as a monitor for a computer with a VNC server installed.
For now, I will use it to display information about loading the system.
Thanks to all.
UPD, at the request of friends who do not have a habra registration, I transfer to the open DIY blog.
My friends, after reading this article, asked me to write step-by-step instructions with “pictures” on installing a VNC client on a Playboy player with a machine on Ubuntu 11.04. Otherwise, many possessing players couldn’t use them normally, bumping into a lack of understanding of terms and a lack of skills in using Linux.
I hope with this material many questions will disappear.
Photos of the results:
What we have:
- Actually the player itself, I had from Playboy
- A computer with clean Ubuntu 11.04 (I had a server, it didn’t work out on the vmware virtual machine)
- A machine with a working VNC server (you can put it on the local one from which we install Linux on the player)
- Basic console skills
2. We go to the site ingenic.grindars.org in the middle of the page there are links to archives, I chose full . We read the page, then go to the directory where we downloaded the archive and unpack it.
3. We prepare the computer for copying with git, for this we go to the Console and write: The
sudo apt-get install gitcomputer will ask for a password before using sudo for the first time.
If there are questions during installation, we agree everywhere (write Y and press Enter).
4. Now we copy from git jzboot, for this we write in the console:
git clone git://git.whitequark.org/jzboot.gitAfter that, the jzboot folder will appear in the user's home folder.
5. Now install the components for compiling jzboot, for this we write in the console one by one: We agree on all issues with the Y button in the same way. 6. Now we compile jzboot, for this we write in the console: After this, the compilation process should go and you will see a new file ( jzboot) as in the screenshot. 7. Now for simplicity of the process we transfer the unpacked folder from point 2 to the user's home folder (/ home / USERNAME /), and rename the folder to lin, it will lie next to the jzboot folder, as in the screenshot. USERNAME is your username. 8. We take the player, connect a mini-USB cable to it, I used the cable from the old HDD. The connector is under perforation.
sudo apt-get install libusb-1.0-0-dev

sudo apt-get install libreadline6 libreadline6-dev
cd ~/jzboot
make -C src READLINE=19. In the closed state (the player is off), press the top button (the only one for vogue) and holding the button open the player.
10. Without closing the player, we connect it to the computer. Now our player is in “firmware mode”.
11. We begin the firmware process, for this we type in the console: If everything is ok, then we see about the same information in the console as in the screenshot. Accordingly, we are waiting for the completion of the process, do not touch anything until its completion. 12. The main part is finished, now on your player should be one of the latest versions of Linux. 13. Now we put the VNC client on the player. But first, let's share the Internet on the player from the computer with the following commands typed in the console:
cd ~/lin/

sudo ./linux-bootstrap.sh -b /home/USERNAME/jzboot/
sysctl net.ipv4.ip_forward=1
iptables -t nat -A POSTROUTING -o eth0 -j MASQUERADE14. Now we are connected to the player via SSH. If everything went ok - the player itself had to connect to the computer and use DHCP to assign an IP address. It will almost certainly be the address 192.168.20.1. So you need to write in the console:
ssh root@192.168.20.1Now we are connecting to the player from the console, the first time he connects, he asks whether to trust this device (whether to accept its key), again we agree (yes) and press Enter, when asked about the password, press Enter (password is empty).
15. Now we put the VNC client on the player, we all write in the same place: 16. Now having the configured VNC server (we don’t consider this here), we write to the console in turn: Where 192.168.20.2 is the address of the VNC server,: 0 - the number of the monitor to connect to (I have 0, because this is a server without a monitor), and the VNC password is actually the password from VNC.
opkg update

opkg install directvnc linux-fusion
modprobe fusion
directvnc 192.168.20.2:0 -p парольVNCAll. You are connected, but as already written it will be necessary to dig deeper into the settings of the running VNC session, I registered -scale 0.5 on x11vnc and got some permission less than necessary, but for now this is enough for me.
The instructions used materials from:
vogeeky.co.cc
ingenic.grindars.org
groups.google.com/group/vogeeky?hl=en
habrahabr.ru/tag/vogue Thank
you all of these resources and their participants.
Special thanks to: Grindars, whitequark , rzk333 , ValdikSS .
Now you can use the player as a monitor for a computer with a VNC server installed.
For now, I will use it to display information about loading the system.
Thanks to all.
UPD, at the request of friends who do not have a habra registration, I transfer to the open DIY blog.